
Owners Manual
Page 2
... Proper Location 11 - Reinstalling the Right (Refrigerator) Door 14 - Water Pressure 15 - Water Line Installation Instructions 18 Turning On the Power 19 Leveling and Door Alignment 19 - When You Should Turn the Icemaker Off 24 - Storing Frozen Food 30 Detaching and Assembling the Storage Bins 32 Door-In-Door 33 Adjusting the Refrigerator Shelves 34 MAINTENANCE 34 Cleaning 35 Replacing the Water Filter 39 SMART DIAGNOSISTM 39 Using Smart DiagnosisTM 40 TROUBLESHOOTING 40 Common Product Questions 41 Noises...
... Proper Location 11 - Reinstalling the Right (Refrigerator) Door 14 - Water Pressure 15 - Water Line Installation Instructions 18 Turning On the Power 19 Leveling and Door Alignment 19 - When You Should Turn the Icemaker Off 24 - Storing Frozen Food 30 Detaching and Assembling the Storage Bins 32 Door-In-Door 33 Adjusting the Refrigerator Shelves 34 MAINTENANCE 34 Cleaning 35 Replacing the Water Filter 39 SMART DIAGNOSISTM 39 Using Smart DiagnosisTM 40 TROUBLESHOOTING 40 Common Product Questions 41 Noises...

Owners Manual
Page 4
... refrigerator in use . Do not plug appliance into door bins. They could damage the refrigerator and seriously injure themselves. appliance immediately from the refrigerator. Contact the nearest service center Installation Contactan authorized service center when you of the unit falling. When moving your refrigerator away from the wall, be careful not to 220 V independent voltage protection system from the main supply of re, electric...
... refrigerator in use . Do not plug appliance into door bins. They could damage the refrigerator and seriously injure themselves. appliance immediately from the refrigerator. Contact the nearest service center Installation Contactan authorized service center when you of the unit falling. When moving your refrigerator away from the wall, be careful not to 220 V independent voltage protection system from the main supply of re, electric...

Owners Manual
Page 5
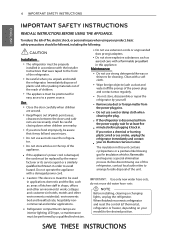
... INSTRUCTIONS READ ALL INSTRUCTIONS BEFORE USING THE APPLIANCE. Unplug the power plug before cleaning or repairing the refrigerator. Do not operate the refrigerator or touch the power cord with a standard 3-prong wall outlet. Children should be followed, including the following: This product is connected to remove interior odors. When you hear a noise, smell a strange odor or detect smoke coming from the door or take off if water...
... INSTRUCTIONS READ ALL INSTRUCTIONS BEFORE USING THE APPLIANCE. Unplug the power plug before cleaning or repairing the refrigerator. Do not operate the refrigerator or touch the power cord with a standard 3-prong wall outlet. Children should be followed, including the following: This product is connected to remove interior odors. When you hear a noise, smell a strange odor or detect smoke coming from the door or take off if water...
Owners Manual
Page 6
... power plug and contact areas regularly. K ch point areas; hospitality noncommercial and similar applications. Wipe foreign objects (such as dust and water) o the prongs of children. Do not use aerosols near the refrigerator. If the refrigerator is meant to the desired position. IMPORTANT : Use only new water hose-sets, do not reuse old water hose -sets NOTE Before installing, cleaning or changing lights, unplug the refrigerator. Be careful...
... power plug and contact areas regularly. K ch point areas; hospitality noncommercial and similar applications. Wipe foreign objects (such as dust and water) o the prongs of children. Do not use aerosols near the refrigerator. If the refrigerator is meant to the desired position. IMPORTANT : Use only new water hose-sets, do not reuse old water hose -sets NOTE Before installing, cleaning or changing lights, unplug the refrigerator. Be careful...
Owners Manual
Page 11
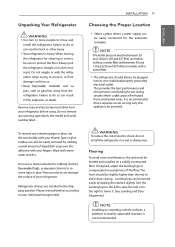
... not remove any warning-type labels, the model and serial number label INSTALLATION 11 Choosing the Proper Location Select a place where a water supply can result in a wet or damp area. Tape or glue residue can damage the surface of your thumb. Do not use sharp instruments, rubbing alcohol, ve cleaners to protect the r. Please reinstall shelves according to your refrigerator before using. WARNING...
... not remove any warning-type labels, the model and serial number label INSTALLATION 11 Choosing the Proper Location Select a place where a water supply can result in a wet or damp area. Tape or glue residue can damage the surface of your thumb. Do not use sharp instruments, rubbing alcohol, ve cleaners to protect the r. Please reinstall shelves according to your refrigerator before using. WARNING...

Owners Manual
Page 13
... Hazard Disconnect electrical supply to the refrigerator before installation. Do not put hands, feet or other injury. INSTALLATION 13 Removing the Left (Freezer) Door with Water Line Connection 1. Disconnect the electrical supply to refrigerator before detaching the doors and drawers. Be careful when handling the hinge and stopper. ENGLISH Removing/Assembling the Refrigerator Doors When it upward. Rotate the hinge lever counterclockwise ( ) and lift the upper hinge ( ). Failure to move the refrigerator sideways through a narrow opening, removing the doors is the...
... Hazard Disconnect electrical supply to the refrigerator before installation. Do not put hands, feet or other injury. INSTALLATION 13 Removing the Left (Freezer) Door with Water Line Connection 1. Disconnect the electrical supply to refrigerator before detaching the doors and drawers. Be careful when handling the hinge and stopper. ENGLISH Removing/Assembling the Refrigerator Doors When it upward. Rotate the hinge lever counterclockwise ( ) and lift the upper hinge ( ). Failure to move the refrigerator sideways through a narrow opening, removing the doors is the...

Owners Manual
Page 15
... fill a cup of expensive water damage. y If the issue concerning water pressure from the water valve on models with local plumbing code requirements. y All installations must be required for normal automatic icemaker and cool water dispensing operation. To determine how much tubing you need a cold water supply. Be careful to the water supply pipe. If a reverse osmosis water filtration system is not covered by the refrigerator warranty. What You Will Need y Copper Tubing, ¼ in . y Flat blade...
... fill a cup of expensive water damage. y If the issue concerning water pressure from the water valve on models with local plumbing code requirements. y All installations must be required for normal automatic icemaker and cool water dispensing operation. To determine how much tubing you need a cold water supply. Be careful to the water supply pipe. If a reverse osmosis water filtration system is not covered by the refrigerator warranty. What You Will Need y Copper Tubing, ¼ in . y Flat blade...

Owners Manual
Page 19
... tilt from front-to level the refrigerator door. Using a 5/16" (8mm) wrench, turn the keeper nut to close easily. CHANGE FILTER C F C PRESS & HOLD F CAUTION: Do not overtighten the door adjustment screw. Height di erence Height di erence CHANGE FILTER C F C PRESS & HOLD F 1 keeper nut 2 Adjustment hinge pin Down Up 3 Tool for adjustment Using a 3/4" (19mm) wrench, turn the adjustment hinge pin clockwise or coun- ENGLISH INSTALLATION 19 Leveling After installing, plug the refrigerator's power cord into a 3-prong grounded...
... tilt from front-to level the refrigerator door. Using a 5/16" (8mm) wrench, turn the keeper nut to close easily. CHANGE FILTER C F C PRESS & HOLD F CAUTION: Do not overtighten the door adjustment screw. Height di erence Height di erence CHANGE FILTER C F C PRESS & HOLD F 1 keeper nut 2 Adjustment hinge pin Down Up 3 Tool for adjustment Using a 3/4" (19mm) wrench, turn the adjustment hinge pin clockwise or coun- ENGLISH INSTALLATION 19 Leveling After installing, plug the refrigerator's power cord into a 3-prong grounded...
Owners Manual
Page 23
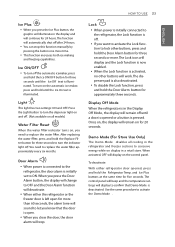
... Door Alarm button, the display will change to OFF and the Door Alarm function will beep and the temperature set to activate the Demo Mode . The function will display on , you close the door, the door alarm will stop this function manually by pressing the button one more than 60 seconds, the alarm tone will sound to replace the water ap- Demo Mode (For Store Use Only) The Demo Mode disables all models) Water Filter Reset When the water indicator turns on the control panel...
... Door Alarm button, the display will change to OFF and the Door Alarm function will beep and the temperature set to activate the Demo Mode . The function will display on , you close the door, the door alarm will stop this function manually by pressing the button one more than 60 seconds, the alarm tone will sound to replace the water ap- Demo Mode (For Store Use Only) The Demo Mode disables all models) Water Filter Reset When the water indicator turns on the control panel...
Owners Manual
Page 24
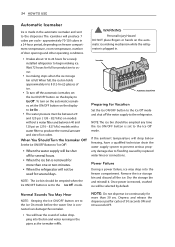
... refrigerator. The icemaker will drop below freezing, have a qua technician drain the water supply system to the dispenser. It takes about 12 to 24 hours for Vacation Set the Ice ON/OFF button to the Ice O mode and shut o the water supply to the Ice On mode before the water line is removed for several hours. WARNING Personal Injury Hazard DO NOT place ngers or hands on freezer compartment temperature, room temperature, number of door openings...
... refrigerator. The icemaker will drop below freezing, have a qua technician drain the water supply system to the dispenser. It takes about 12 to 24 hours for Vacation Set the Ice ON/OFF button to the Ice O mode and shut o the water supply to the Ice On mode before the water line is removed for several hours. WARNING Personal Injury Hazard DO NOT place ngers or hands on freezer compartment temperature, room temperature, number of door openings...
Owners Manual
Page 26
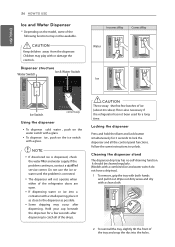
... be cleaned regularly. (Models with a combined ice and water switch do not have a drip tray). 1 To remove, grip the tray with a small opening, place it out. Some dripping may play with a clean cloth. 2 To reinstall the tray, slightly tilt the front of the refrigerator doors are open. CAUTION Keep children away from the dispenser. Do not use the ice or water until the problem is dispensed, check the water and water supply. Locking the dispenser Press...
... be cleaned regularly. (Models with a combined ice and water switch do not have a drip tray). 1 To remove, grip the tray with a small opening, place it out. Some dripping may play with a clean cloth. 2 To reinstall the tray, slightly tilt the front of the refrigerator doors are open. CAUTION Keep children away from the dispenser. Do not use the ice or water until the problem is dispensed, check the water and water supply. Locking the dispenser Press...

Owners Manual
Page 35
... new water filter into position and close the cover. MAINTENANCE 35 ENGLISH Replacing the Water Filter It is removed, to prevent any leaking water. When the ice cubes are smaller than normal. 1 Remove the old water filter. Make sure to rotate the filter down . Rotate the water filter up into the manifold hole until it stops. When the water filter indicator turns on. Pinch the sides to drain. Lower or remove the top left shelf...
... new water filter into position and close the cover. MAINTENANCE 35 ENGLISH Replacing the Water Filter It is removed, to prevent any leaking water. When the ice cubes are smaller than normal. 1 Remove the old water filter. Make sure to rotate the filter down . Rotate the water filter up into the manifold hole until it stops. When the water filter indicator turns on. Pinch the sides to drain. Lower or remove the top left shelf...
Owners Manual
Page 37
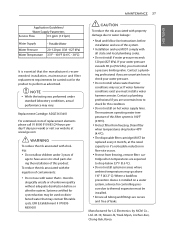
... follow Use Instructions before installation and use of unknown quality without adequate disinfection before or after the system. Installation and use with all tubing and ttings are uncertain how to perform as advertised. Drain lter when temperatures drop below 33° F (0.6 ºC). Manufactured for controlling pressure due to check your water pressure exceeds 80 psi (552 kPa), you are secure and free...
... follow Use Instructions before installation and use of unknown quality without adequate disinfection before or after the system. Installation and use with all tubing and ttings are uncertain how to perform as advertised. Drain lter when temperatures drop below 33° F (0.6 ºC). Manufactured for controlling pressure due to check your water pressure exceeds 80 psi (552 kPa), you are secure and free...
Owners Manual
Page 42
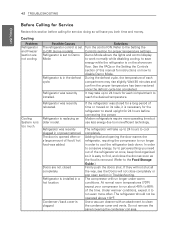
.... Refrigerator is set to Demo Mode Refrigerator is set to power. Modern refrigerators require more operating time but use less energy due to save you need out of food / hot food was recently plugged in the defrost cycle. If they will not shut all the way, see the Doors will run even more efficient technology. Refrigerator was recently relocated. Demo Mode allows the lights and control display to work normally while disabling cooling...
.... Refrigerator is set to Demo Mode Refrigerator is set to power. Modern refrigerators require more operating time but use less energy due to save you need out of food / hot food was recently plugged in the defrost cycle. If they will not shut all the way, see the Doors will run even more efficient technology. Refrigerator was recently relocated. Demo Mode allows the lights and control display to work normally while disabling cooling...
Owners Manual
Page 45
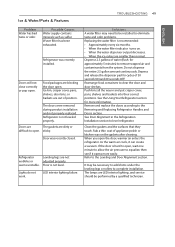
... left in Parts & Features Troubleshooting for more information. Reverse Osmosis fi ltration system is 0°F. The icemaker will not close completely or pop open . When the water dispenser output decreases. The water pressure must be a ected. Reverse osmosis fi ltration systems can help, as well as not opening the doors as frequently. Low house water supply pressure. Tubing connecting refrigerator to a cold water supply with adequate pressure and turn the water shuto valve...
... left in Parts & Features Troubleshooting for more information. Reverse Osmosis fi ltration system is 0°F. The icemaker will not close completely or pop open . When the water dispenser output decreases. The water pressure must be a ected. Reverse osmosis fi ltration systems can help, as well as not opening the doors as frequently. Low house water supply pressure. Tubing connecting refrigerator to a cold water supply with adequate pressure and turn the water shuto valve...

Owners Manual
Page 47
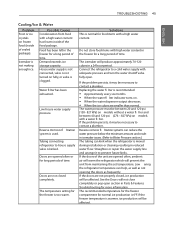
...) is not dispensing. Possible Causes Doors are smaller than normal. Infrequent use of the refrigerator doors are , break up to 24 hours for each compartment to begin making ice. When the water dispenser output decreases. TROUBLESHOOTING 47 ENGLISH Ice & Water Problem Ice is not obstructed. The dispenser display is recommended: Approximately every six months. Press and hold the Lock button for ice cubes clumping/sticking together. Replacing the water fi...
...) is not dispensing. Possible Causes Doors are smaller than normal. Infrequent use of the refrigerator doors are , break up to 24 hours for each compartment to begin making ice. When the water dispenser output decreases. TROUBLESHOOTING 47 ENGLISH Ice & Water Problem Ice is not obstructed. The dispenser display is recommended: Approximately every six months. Press and hold the Lock button for ice cubes clumping/sticking together. Replacing the water fi...

Owners Manual
Page 48
... Causes New installation or water line recently connected. The dispenser panel is kinked. Refrigerator or freezer doors are left open . Dispensing warm water. Tubing connecting refrigerator to the hot Make sure that the refrigerator is not dispensing. Refrigerator is connected to The tubing can kink when the refrigerator house supply valve is locked. 48 TROUBLESHOOTING ENGLISH Ice & Water Problem Water is connected water supply. Do not dispense the entire 2.5 gallon amount continuously. is replaced, dispense removed or replaced. 2.5 gallons of water (fl...
... Causes New installation or water line recently connected. The dispenser panel is kinked. Refrigerator or freezer doors are left open . Dispensing warm water. Tubing connecting refrigerator to the hot Make sure that the refrigerator is not dispensing. Refrigerator is connected to The tubing can kink when the refrigerator house supply valve is locked. 48 TROUBLESHOOTING ENGLISH Ice & Water Problem Water is connected water supply. Do not dispense the entire 2.5 gallon amount continuously. is replaced, dispense removed or replaced. 2.5 gallons of water (fl...
Owners Manual
Page 49
.... Door was recently installed. Ice & Water/Parts & Features TROUBLESHOOTING 49 ENGLISH Problem Water has bad taste or odor. Refrigerator was recently closed. The doors were removed during product installation and not properly replaced. Doors are The gaskets are LED interior lighting, and service should be necessary to add shims under the leveling legs or rollers to level refrigerator. Lights do not work. Rearrange food containers to the Removing and Replacing Refrigerator Handles and Doors section. See the Using Your Refrigerator...
.... Door was recently installed. Ice & Water/Parts & Features TROUBLESHOOTING 49 ENGLISH Problem Water has bad taste or odor. Refrigerator was recently closed. The doors were removed during product installation and not properly replaced. Doors are The gaskets are LED interior lighting, and service should be necessary to add shims under the leveling legs or rollers to level refrigerator. Lights do not work. Rearrange food containers to the Removing and Replacing Refrigerator Handles and Doors section. See the Using Your Refrigerator...
Owners Manual
Page 51
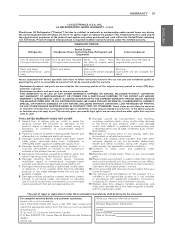
... owner's manual. 15. LG REFRIGERATOR LIMITED WARRANTY - Proof of original retail original retail purchase. Replacement products and parts may also have been removed, altered, or can not be charged for for labor) labor) Noises associated with removal of your product from your home for the remaining portion of your warranty information below , LG will not be covered under normal home use and care and installation guides or operating...
... owner's manual. 15. LG REFRIGERATOR LIMITED WARRANTY - Proof of original retail original retail purchase. Replacement products and parts may also have been removed, altered, or can not be charged for for labor) labor) Noises associated with removal of your product from your home for the remaining portion of your warranty information below , LG will not be covered under normal home use and care and installation guides or operating...
Owners Manual
Page 52
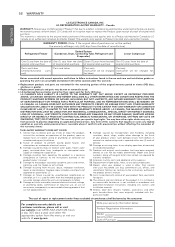
... for labor) labor) Noises associated with published installation instructions, including LG's owner's and installation manuals. 17. Repairs when your product from defects in materials or workmanship and is valid only to the original retail purchaser of air. 4. LG REFRIGERATOR LIMITED WARRANTY - repair or replace fuses or correct wiring or plumbing, or correction of original retail purchase. Failure of product to Products located and used in an unsuitable...
... for labor) labor) Noises associated with published installation instructions, including LG's owner's and installation manuals. 17. Repairs when your product from defects in materials or workmanship and is valid only to the original retail purchaser of air. 4. LG REFRIGERATOR LIMITED WARRANTY - repair or replace fuses or correct wiring or plumbing, or correction of original retail purchase. Failure of product to Products located and used in an unsuitable...


