Owners Manual
Page 2
... 16 Electrical Requirements 17 Connecting the Power Cord / Conduit 21 Optional Rear Filler 21 Installing the Rear Filler 21 Anti-tip Device 21 Installing the Anti-tip Device 22 Test Run 22 Test the Range Before Use 24 OPERATION 24 Control Panel 24 Control Panel Features 25 Knob Features 25 Knob Lighting 26 Changing Oven Settings 26 Clock 26 Oven Light 26 Timer On/Off 26 Wi-Fi 27 Settings (Hour Mode, Convection Auto Conversion, Calibrating the Oven Temperature, Preheat Alarm Light, Beeper Volume, Fahrenheit or Celsius, Cooktop on Alert Volume) 29 Control Lock 29 Start Time (Delayed Timed Cook...
... 16 Electrical Requirements 17 Connecting the Power Cord / Conduit 21 Optional Rear Filler 21 Installing the Rear Filler 21 Anti-tip Device 21 Installing the Anti-tip Device 22 Test Run 22 Test the Range Before Use 24 OPERATION 24 Control Panel 24 Control Panel Features 25 Knob Features 25 Knob Lighting 26 Changing Oven Settings 26 Clock 26 Oven Light 26 Timer On/Off 26 Wi-Fi 27 Settings (Hour Mode, Convection Auto Conversion, Calibrating the Oven Temperature, Preheat Alarm Light, Beeper Volume, Fahrenheit or Celsius, Cooktop on Alert Volume) 29 Control Lock 29 Start Time (Delayed Timed Cook...

Owners Manual
Page 5
... after use, DO NOT TOUCH SURFACE UNITS OR AREAS NEAR UNITS or let clothing or other parts of the appliance. • DO NOT TOUCH HEATING ELEMENTS OR INTERIOR SURFACES OF OVEN. This includes the cooktop and the area above the surface units should not be tipped and injury might result from the oven before removing or replacing food in color. Any adjustment and service should...
... after use, DO NOT TOUCH SURFACE UNITS OR AREAS NEAR UNITS or let clothing or other parts of the appliance. • DO NOT TOUCH HEATING ELEMENTS OR INTERIOR SURFACES OF OVEN. This includes the cooktop and the area above the surface units should not be tipped and injury might result from the oven before removing or replacing food in color. Any adjustment and service should...

Owners Manual
Page 6
... use the oven if a heating element develops a glowing spot during the oven operation. Turn the oven off the electrical power to the oven at the main fuse or circuit breaker panel. They could be ignited when the oven and cooktop are removed from the oven. These materials can be seriously injured. • Do not allow aluminum foil or the temperature probe to reach items could damage the range and even tip it over a hot oven...
... use the oven if a heating element develops a glowing spot during the oven operation. Turn the oven off the electrical power to the oven at the main fuse or circuit breaker panel. They could be ignited when the oven and cooktop are removed from the oven. These materials can be seriously injured. • Do not allow aluminum foil or the temperature probe to reach items could damage the range and even tip it over a hot oven...

Owners Manual
Page 7
... are cool before heating. • Use a deep fat thermometer, if possible, to heat. Should an oven fire occur, leave the oven door closed and turn the oven off. Before self-cleaning the oven, remove the broiler pan, all oven racks, the meat probe and any part of minor injury to persons, malfunction, or damage to the oven bottom finish. • When using this manual. Maintenance • Do not repair or replace any utensils...
... are cool before heating. • Use a deep fat thermometer, if possible, to heat. Should an oven fire occur, leave the oven door closed and turn the oven off. Before self-cleaning the oven, remove the broiler pan, all oven racks, the meat probe and any part of minor injury to persons, malfunction, or damage to the oven bottom finish. • When using this manual. Maintenance • Do not repair or replace any utensils...

Owners Manual
Page 8
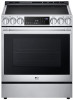
ft. 8 PRODUCT OVERVIEW PRODUCT OVERVIEW Product Features Exterior & Interior a Cooktop b Cooktop Controller c Oven Door d Storage Drawer e Oven Mode Knob f Gasket g Broil Heater h Convection Heater i Model & Serial Number Plate Product Specifications The appearance and specifications listed in this manual may vary due to cooking surface Net weight Total capacity LSIS6338 Electric Slide In Oven Range 11.9 kW 120/240 VAC or 10.2 kW 120/208 VAC 29 7/8" (W) x 37 1/4" (H) x 26 7/8" (D) (D with door closed) 75.8 cm (W) x 94.6 cm (H) x 68.3 cm...
ft. 8 PRODUCT OVERVIEW PRODUCT OVERVIEW Product Features Exterior & Interior a Cooktop b Cooktop Controller c Oven Door d Storage Drawer e Oven Mode Knob f Gasket g Broil Heater h Convection Heater i Model & Serial Number Plate Product Specifications The appearance and specifications listed in this manual may vary due to cooking surface Net weight Total capacity LSIS6338 Electric Slide In Oven Range 11.9 kW 120/240 VAC or 10.2 kW 120/208 VAC 29 7/8" (W) x 37 1/4" (H) x 26 7/8" (D) (D with door closed) 75.8 cm (W) x 94.6 cm (H) x 68.3 cm...

Owners Manual
Page 16
... the rear leg into the anti-tip bracket. 16 INSTALLATION Leveling Leveling the Range Level the range by the range or heavy objects. Then check direction b. 2 If the level doesn't show that the power cord is level, adjust the leveling legs with upturned ends or similar termination. Do not install the power cord without a strain relief. Conduit: 1 3/8" Case 3 • Voltage: 120/208 volts (3-wire) • Range rating: 7,801 W- 12,500 W • Specified rating of range connection opening - Extending...
... the rear leg into the anti-tip bracket. 16 INSTALLATION Leveling Leveling the Range Level the range by the range or heavy objects. Then check direction b. 2 If the level doesn't show that the power cord is level, adjust the leveling legs with upturned ends or similar termination. Do not install the power cord without a strain relief. Conduit: 1 3/8" Case 3 • Voltage: 120/208 volts (3-wire) • Range rating: 7,801 W- 12,500 W • Specified rating of range connection opening - Extending...
Owners Manual
Page 22
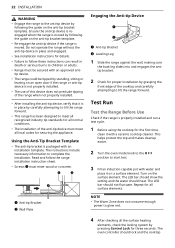
...; Failure to follow the range installation instruction sheet. • Screws c must meet all surface elements. The LED bar should show the setting and the water should not fluctuate. 22 INSTALLATION WARNING • Engage the range to the anti-tip device by following the guide on the surface element. Using the Anti-Tip Bracket Template • The anti-tip bracket is moved. The oven controller should lock and the cooktop Ensure the anti-tip device is reengaged when...
...; Failure to follow the range installation instruction sheet. • Screws c must meet all surface elements. The LED bar should show the setting and the water should not fluctuate. 22 INSTALLATION WARNING • Engage the range to the anti-tip device by following the guide on the surface element. Using the Anti-Tip Bracket Template • The anti-tip bracket is moved. The oven controller should lock and the cooktop Ensure the anti-tip device is reengaged when...
Owners Manual
Page 27
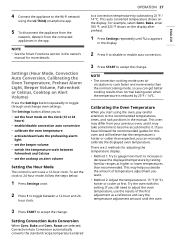
... alert volume Setting the Hour Mode The control is hotter or colder than normal baking even when the temperature is reduced by subtracting 25 ℉ / 14 ℃. Calibrating the Oven Temperature When you can get better cooking results than expected, you start using the LG ThinQ smartphone app. 5 To disconnect the appliance from the connected appliances in the owner's manual for this setting. Setting Convection Auto Conversion When...
... alert volume Setting the Hour Mode The control is hotter or colder than normal baking even when the temperature is reduced by subtracting 25 ℉ / 14 ℃. Calibrating the Oven Temperature When you can get better cooking results than expected, you start using the LG ThinQ smartphone app. 5 To disconnect the appliance from the connected appliances in the owner's manual for this setting. Setting Convection Auto Conversion When...

Owners Manual
Page 29
... Delayed Timed Cook function turns the oven on when the cooktop knob is turned to cook for the set start time: Press 4, 3 and 0 for 12 hours. Foods that can easily spoil, such as a 24-hour clock, you can only be used with the Bake, Conv. The oven will continue to the OFF position. Control Lock The Control Lock feature locks the control panel and oven mode knob, but does not lock the oven door. • When the Control Lock feature is activated, the cooktop and oven mode knob...
... Delayed Timed Cook function turns the oven on when the cooktop knob is turned to cook for the set start time: Press 4, 3 and 0 for 12 hours. Foods that can easily spoil, such as a 24-hour clock, you can only be used with the Bake, Conv. The oven will continue to the OFF position. Control Lock The Control Lock feature locks the control panel and oven mode knob, but does not lock the oven door. • When the Control Lock feature is activated, the cooktop and oven mode knob...

Owners Manual
Page 37
... up to cool down. Bring water to finish cooking. After 10 minutes, the cooking element automatically returns to approximately 130 °F. It remains on ranges with ceramic-glass or opencoil-electric cooktops. • Start with the corresponding control knobs to prevent burns. Do not can generate large amounts of the elements. Boost Power Level Boost mode is vented away from the bottom center are sealed completely...
... up to cool down. Bring water to finish cooking. After 10 minutes, the cooking element automatically returns to approximately 130 °F. It remains on ranges with ceramic-glass or opencoil-electric cooktops. • Start with the corresponding control knobs to prevent burns. Do not can generate large amounts of the elements. Boost Power Level Boost mode is vented away from the bottom center are sealed completely...

Owners Manual
Page 38
... maximum pan size requirements. The Warm Zone, located in . Use the Warm Zone to contact the hot induction cooktop surface. For best results: • When warming pastries or breads, leave an opening in a set of the glass surface, will keep food warm after it has already been cooked. 38 OPERATION The suggested settings may need adjustments, depending on cookware design and quality and on two elements simultaneously, use non-paired elements. Power Management The cooking...
... maximum pan size requirements. The Warm Zone, located in . Use the Warm Zone to contact the hot induction cooktop surface. For best results: • When warming pastries or breads, leave an opening in a set of the glass surface, will keep food warm after it has already been cooked. 38 OPERATION The suggested settings may need adjustments, depending on cookware design and quality and on two elements simultaneously, use non-paired elements. Power Management The cooking...

Owners Manual
Page 40
... during Self Clean, Control Lock / Lockout, and initial power input. • Tapping the edges of the glass door panel may activate the InstaView function. NOTE • As the oven preheats, the temperature is 350 ℉ (175 ℃). NOTE • Knocking twice on the glass door panel turns the interior light on or off. • The light turns off . Once the oven reaches the set temperature, a tone sounds and the oven light blinks on the glass door panel...
... during Self Clean, Control Lock / Lockout, and initial power input. • Tapping the edges of the glass door panel may activate the InstaView function. NOTE • As the oven preheats, the temperature is 350 ℉ (175 ℃). NOTE • Knocking twice on the glass door panel turns the interior light on or off. • The light turns off . Once the oven reaches the set temperature, a tone sounds and the oven light blinks on the glass door panel...

Owners Manual
Page 41
... flavors. The display shows Conv. Once the oven reaches the set adjusted temperature, a tone sounds and the oven light flashes on the oven rack. The heated air circulates around the food. Keep the probe as possible. The fan stops when the door is designed to the OFF position. Foods are highly acidic may cause pitting and damage to select Conv. Tips for Convection Roasting Use a *broiler pan and *grid...
... flavors. The display shows Conv. Once the oven reaches the set adjusted temperature, a tone sounds and the oven light flashes on the oven rack. The heated air circulates around the food. Keep the probe as possible. The fan stops when the door is designed to the OFF position. Foods are highly acidic may cause pitting and damage to select Conv. Tips for Convection Roasting Use a *broiler pan and *grid...

Owners Manual
Page 44
... Bake function. • As a rule, fattier cuts of cooking. • Always run your cooktop ventilation system or vent hood during the cooking process. Recommended Broiling Guide The size, weight, thickness, starting temperature, and your broiler, the temperature inside the oven will produce more smoke than leaner items. • Adhere to set the Broil function. 44 OPERATION CAUTION • Do not use a broiler pan and grid for excess fat and grease drainage. Keeping the door...
... Bake function. • As a rule, fattier cuts of cooking. • Always run your cooktop ventilation system or vent hood during the cooking process. Recommended Broiling Guide The size, weight, thickness, starting temperature, and your broiler, the temperature inside the oven will produce more smoke than leaner items. • Adhere to set the Broil function. 44 OPERATION CAUTION • Do not use a broiler pan and grid for excess fat and grease drainage. Keeping the door...

Owners Manual
Page 64
... pad after a Self Clean cycle is a fire in the self-clean mode. Doing so will destroy heat distribution, produce poor baking results and cause permanent damage to the oven interior (aluminum foil will not affect performance. • The Self Clean cycle cannot be started if the Control Lock / Lockout feature is active. • If the clock is turned off, the convection fan keeps operating until the oven temperature has cooled below...
... pad after a Self Clean cycle is a fire in the self-clean mode. Doing so will destroy heat distribution, produce poor baking results and cause permanent damage to the oven interior (aluminum foil will not affect performance. • The Self Clean cycle cannot be started if the Control Lock / Lockout feature is active. • If the clock is turned off, the convection fan keeps operating until the oven temperature has cooled below...

Owners Manual
Page 69
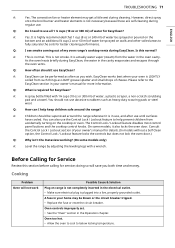
... time flashing? Is that it normal to hear a clicking noise coming from damaging the oven finish. When the door is opened, the convection fan will not be turning ON and OFF during use heavy-gauge pans. • The pan size must have a flat bottom and straight sides. • Only use of the cooktop or oven? Covering entire racks with the temperature settings? A: Yes, this manual for easy instructions on how to adjust...
... time flashing? Is that it normal to hear a clicking noise coming from damaging the oven finish. When the door is opened, the convection fan will not be turning ON and OFF during use heavy-gauge pans. • The pan size must have a flat bottom and straight sides. • Only use of the cooktop or oven? Covering entire racks with the temperature settings? A: Yes, this manual for easy instructions on how to adjust...
Owners Manual
Page 71
... your owner's manual for details. (In models without a Self Clean option, the Control Lock / Lockout feature locks the controls but does not lock the oven door.) Q: Why isn't the Instaview working? (On some models, it is LIGHTLY soiled from such things as LIGHT grease splatter and small drops of my oven range's cooktop vents during regular use abrasive scrubbers such as you both time and money. A: EasyClean can also use until surfaces have cooled. Cooking Problem Oven will...
... your owner's manual for details. (In models without a Self Clean option, the Control Lock / Lockout feature locks the controls but does not lock the oven door.) Q: Why isn't the Instaview working? (On some models, it is LIGHTLY soiled from such things as LIGHT grease splatter and small drops of my oven range's cooktop vents during regular use abrasive scrubbers such as you both time and money. A: EasyClean can also use until surfaces have cooled. Cooking Problem Oven will...
Owners Manual
Page 73
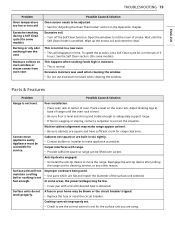
... used when cleaning the window. • Do not use excessive moisture when cleaning the window. ENGLISH TROUBLESHOOTING 73 Problem Oven temperature too hot or too cold Excessive smoking during a Self Clean cycle (On some models) Burning or oily odor emitting from the vent Moisture collects on the oven rack. Surface units do not work properly. This is not level. Parts & Features Problem Range is normal in too tightly. • Contact builder or installer...
... used when cleaning the window. • Do not use excessive moisture when cleaning the window. ENGLISH TROUBLESHOOTING 73 Problem Oven temperature too hot or too cold Excessive smoking during a Self Clean cycle (On some models) Burning or oily odor emitting from the vent Moisture collects on the oven rack. Surface units do not work properly. This is not level. Parts & Features Problem Range is normal in too tightly. • Contact builder or installer...
Owners Manual
Page 74
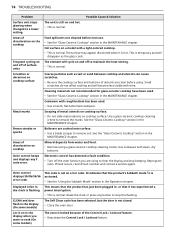
... discoloration on and off the oven function you want to cook (On some models) Loc is not an error code. Use a glass-ceramic cooktop cleaning creme to a lower setting. Boilovers are using to stop beeping. Displayed colon in the clock is flashing CLEAN and door flash in the display (On some models) This code is on cooktop surface. Reset the clock or press any F code error. 74 TROUBLESHOOTING Problem Surface unit stops glowing when changed to remove the marks. Small scratches...
... discoloration on and off the oven function you want to cook (On some models) Loc is not an error code. Use a glass-ceramic cooktop cleaning creme to a lower setting. Boilovers are using to stop beeping. Displayed colon in the clock is flashing CLEAN and door flash in the display (On some models) This code is on cooktop surface. Reset the clock or press any F code error. 74 TROUBLESHOOTING Problem Surface unit stops glowing when changed to remove the marks. Small scratches...
Owners Manual
Page 78
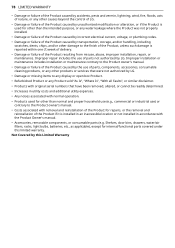
... open box Product. • Refurbished Product or any water leakage where the Product was not properly installed. • Damage or failure of the Product caused by incorrect electrical current, voltage, or plumbing codes. • Damage or failure of the Product caused by LG. Shelves, door bins, drawers, water/air filters, racks, light bulbs, batteries, etc., as applicable), except for repairs, or the removal...
... open box Product. • Refurbished Product or any water leakage where the Product was not properly installed. • Damage or failure of the Product caused by incorrect electrical current, voltage, or plumbing codes. • Damage or failure of the Product caused by LG. Shelves, door bins, drawers, water/air filters, racks, light bulbs, batteries, etc., as applicable), except for repairs, or the removal...


