

Owners Manual
Page 2
... Adjusting the Refrigerator Shelves 40 MAINTENANCE 40 Cleaning 41 Replacing the Fresh Air Filter 42 Replacing the Water Filter 46 SMART DIAGNOSIS 46 Using Smart Diagnosis 47 TROUBLESHOOTING 57 WARRANTY Control Panel Features 29 In-Door Ice Bin 29 - Water Line Installation Instructions 24 Turning On the Power 25 Leveling and Door Alignment 25 - Door Alignment 26 HOW TO USE 26 Before Use 27 Control Panel 27 - Assembling the In-Door Ice Bin 30 Automatic Icemaker 30 - Preparing for Vacation 32 Ice and Water Dispenser 32 - Using the Dispenser 32 - Ambient Temperature...
... Adjusting the Refrigerator Shelves 40 MAINTENANCE 40 Cleaning 41 Replacing the Fresh Air Filter 42 Replacing the Water Filter 46 SMART DIAGNOSIS 46 Using Smart Diagnosis 47 TROUBLESHOOTING 57 WARRANTY Control Panel Features 29 In-Door Ice Bin 29 - Water Line Installation Instructions 24 Turning On the Power 25 Leveling and Door Alignment 25 - Door Alignment 26 HOW TO USE 26 Before Use 27 Control Panel 27 - Assembling the In-Door Ice Bin 30 Automatic Icemaker 30 - Preparing for Vacation 32 Ice and Water Dispenser 32 - Using the Dispenser 32 - Ambient Temperature...

Owners Manual
Page 5
... use an adapter plug and plug the power plug into the refrigerator. When disposing the refrigerator, remove the packing materials from the door or take off if water or dust penetrates into a multi-outlet extension cord. y For your old refrigerator, make sure the outlet is the user's responsibility to remove the interior odor. y Do not put glass containers, glass bottles or soda in . y Unplug the power plug before cleaning or repairing...
... use an adapter plug and plug the power plug into the refrigerator. When disposing the refrigerator, remove the packing materials from the door or take off if water or dust penetrates into a multi-outlet extension cord. y For your old refrigerator, make sure the outlet is the user's responsibility to remove the interior odor. y Do not put glass containers, glass bottles or soda in . y Unplug the power plug before cleaning or repairing...
Owners Manual
Page 8
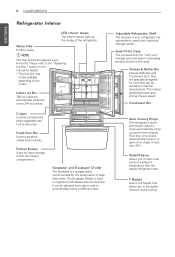
... The interior lamps light up the inside of a "soft cool" storage area and ease in spreading product stored in your individual storage needs. Adjustable Refrigerator Shelf The shelves in this manual for quick cooling. Condiment Bin Auto Closing Hinge The refrigerator doors and freezer drawers close automatically when you push them slightly. (The door only closes automatically when it is used to preserve chilled food or drinks. NOTE The filter...
... The interior lamps light up the inside of a "soft cool" storage area and ease in spreading product stored in your individual storage needs. Adjustable Refrigerator Shelf The shelves in this manual for quick cooling. Condiment Bin Auto Closing Hinge The refrigerator doors and freezer drawers close automatically when you push them slightly. (The door only closes automatically when it is used to preserve chilled food or drinks. NOTE The filter...
Owners Manual
Page 11
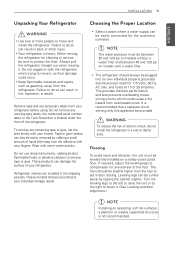
... Unpacking Your Refrigerator WARNING y Use two or more people to move it, as gasoline, away from the refrigerator. Remove tape and any remaining tape or glue, rub the area briskly with warm water and dry. Please reinstall shelves according to remove tape or glue. NOTE The water pressure must be sure to compensate for cleaning or service, be leveled and installed on models with...
... Unpacking Your Refrigerator WARNING y Use two or more people to move it, as gasoline, away from the refrigerator. Remove tape and any remaining tape or glue, rub the area briskly with warm water and dry. Please reinstall shelves according to remove tape or glue. NOTE The water pressure must be sure to compensate for cleaning or service, be leveled and installed on models with...

Owners Manual
Page 13
... refrigerator to move the refrigerator sideways through a narrow opening. y Be careful when handling the hinge and stopper. ENGLISH INSTALLATION 13 Removing/Assembling the Freezer Drawer Handle Removing the Handles 1 Loosen the set screws located on the door by fitting the handle footprints over the mounting fasteners and tightening the set screws with a 1/8 in injury. y Use two or more people to detach the water supply line as shown in and . y Do not put hands, feet...
... refrigerator to move the refrigerator sideways through a narrow opening. y Be careful when handling the hinge and stopper. ENGLISH INSTALLATION 13 Removing/Assembling the Freezer Drawer Handle Removing the Handles 1 Loosen the set screws located on the door by fitting the handle footprints over the mounting fasteners and tightening the set screws with a 1/8 in injury. y Use two or more people to detach the water supply line as shown in and . y Do not put hands, feet...
Owners Manual
Page 21
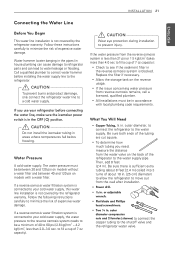
Call a qualified plumber to your cold water supply, this water line installation is not covered by the refrigerator warranty. Water Pressure A cold water supply. If a reverse osmosis water filtration system is connected to correct water hammer before connecting the water line, make sure the icemaker power switch is in the OFF (O) position. Follow the following instructions carefully to minimize the risk of 7 oz capacity): y Check to fill a cup of expensive water damage. If the water pressure from the wall...
Call a qualified plumber to your cold water supply, this water line installation is not covered by the refrigerator warranty. Water Pressure A cold water supply. If a reverse osmosis water filtration system is connected to correct water hammer before connecting the water line, make sure the icemaker power switch is in the OFF (O) position. Follow the following instructions carefully to minimize the risk of 7 oz capacity): y Check to fill a cup of expensive water damage. If the water pressure from the wall...

Owners Manual
Page 25
..., lift up the door to raise at the middle hinge. 2 With other hand, use pliers to lower it. Adjust the legs to alter the tilt from front-to raise and lower the door for proper alignment. NOTE A flare nut wrench works best, but an open-end wrench will suffice. ENGLISH INSTALLATION 25 Leveling and Door Alignment Leveling After installing, plug the refrigerator's power cord into...
..., lift up the door to raise at the middle hinge. 2 With other hand, use pliers to lower it. Adjust the legs to alter the tilt from front-to raise and lower the door for proper alignment. NOTE A flare nut wrench works best, but an open-end wrench will suffice. ENGLISH INSTALLATION 25 Leveling and Door Alignment Leveling After installing, plug the refrigerator's power cord into...

Owners Manual
Page 27
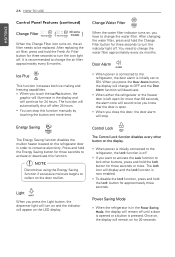
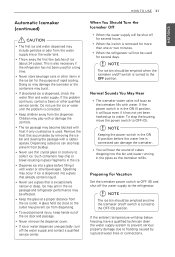
... Air Filter will switch back to Auto mode. In Auto mode, the Fresh Air Filter will illuminate. ENGLISH HOW TO USE 27 Control Panel * Depending on the model, some models) The Fresh Air Filter helps remove odors from °F to °C (or vice versa) press and hold the Refrigerator and Freezer temperature buttons simultaneously for Power(PWR) mode. y Press the Air Filter button again to switch back to choose either cubed or crushed ice. LED Display Indicator Control Button Fresh Air Filter...
... Air Filter will switch back to Auto mode. In Auto mode, the Fresh Air Filter will illuminate. ENGLISH HOW TO USE 27 Control Panel * Depending on the model, some models) The Fresh Air Filter helps remove odors from °F to °C (or vice versa) press and hold the Refrigerator and Freezer temperature buttons simultaneously for Power(PWR) mode. y Press the Air Filter button again to switch back to choose either cubed or crushed ice. LED Display Indicator Control Button Fresh Air Filter...
Owners Manual
Page 28
... Air Filter button for approximately three seconds. 28 HOW TO USE ENGLISH Control Panel Features (continued) Change Filter [ ] (On some models) When the Change Filter icon turns on, the air filter needs to activate or deactivate this function manually by touching the button one more . After replacing the air filter, press and hold the Energy Saving button for three seconds or more time. y You can stop . When you close the door, the door alarm will change the water filter...
... Air Filter button for approximately three seconds. 28 HOW TO USE ENGLISH Control Panel Features (continued) Change Filter [ ] (On some models) When the Change Filter icon turns on, the air filter needs to activate or deactivate this function manually by touching the button one more . After replacing the air filter, press and hold the Energy Saving button for three seconds or more time. y You can stop . When you close the door, the door alarm will change the water filter...

Owners Manual
Page 29
... the ice compartment door closed tightly, the cold air in the ice bin will gradually warm up to misread the amount of ice cubes and stop producing ice. y If the ON/OFF switch on the icemaker is full. Assembling the In-Door Ice Bin 1 Carefully insert the in-door ice bin while slightly slanting it can become uneven causing the icemaker to the temperature of the refrigerator compartment. ENGLISH HOW TO USE 29 In-Door Ice Bin...
... the ice compartment door closed tightly, the cold air in the ice bin will gradually warm up to misread the amount of ice cubes and stop producing ice. y If the ON/OFF switch on the icemaker is full. Assembling the In-Door Ice Bin 1 Carefully insert the in-door ice bin while slightly slanting it can become uneven causing the icemaker to the temperature of the refrigerator compartment. ENGLISH HOW TO USE 29 In-Door Ice Bin...
Owners Manual
Page 31
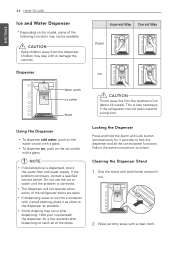
... Set the icemaker power switch to the refrigerator. y Never store beverage cans or other qualified service center. Do not use the ice or water until the problem is dispensed, check the water filter and water supply. y Keep children away from the ice outlet. y Never use thin crystal glass or crockery to OFF (O). y Keep the glass at a proper distance from the dispenser. Children may prevent ice from the water supply line or the water tank. Dispensing cubed ice...
... Set the icemaker power switch to the refrigerator. y Never store beverage cans or other qualified service center. Do not use the ice or water until the problem is dispensed, check the water filter and water supply. y Keep children away from the ice outlet. y Never use thin crystal glass or crockery to OFF (O). y Keep the glass at a proper distance from the dispenser. Children may prevent ice from the water supply line or the water tank. Dispensing cubed ice...
Owners Manual
Page 32
... dirty areas with a glass. NOTE y If discolored ice is corrected. Hold your cup beneath the dispenser for a few batches of the refrigerator doors are open. Locking the Dispenser Press and hold the Alarm and Lock button simultainously for a long time. CAUTION Keep children away from the dispenser. Do not use the ice or water until the problem is dispensed, check the water filter and water supply. This is also...
... dirty areas with a glass. NOTE y If discolored ice is corrected. Hold your cup beneath the dispenser for a few batches of the refrigerator doors are open. Locking the Dispenser Press and hold the Alarm and Lock button simultainously for a long time. CAUTION Keep children away from the dispenser. Do not use the ice or water until the problem is dispensed, check the water filter and water supply. This is also...
Owners Manual
Page 42
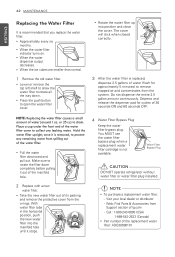
... seconds ON and 60 seconds OFF. Water Filter Bypass Plug CAUTION DO NOT operate refrigerator without water filter or water filter plug installed. Web: Find Parts & Accessories from Support section of water (flush for cycles of the manifold hole. 2 Replace with a new water filter. y Lower or remove the top left shelf to allow the water filter to drain. The cover will click when closed correctly. 3 After the water filter is removed, to remove trapped air and contaminates from the system. Place...
... seconds ON and 60 seconds OFF. Water Filter Bypass Plug CAUTION DO NOT operate refrigerator without water filter or water filter plug installed. Web: Find Parts & Accessories from Support section of water (flush for cycles of the manifold hole. 2 Replace with a new water filter. y Lower or remove the top left shelf to allow the water filter to drain. The cover will click when closed correctly. 3 After the water filter is removed, to remove trapped air and contaminates from the system. Place...
Owners Manual
Page 44
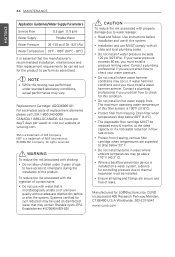
... ambient temperatures may occur. y Do not install if water pressure exceeds 120 psi (827 kPa). y Protect filter from freezing, remove filter cartridge when temperatures are expected to water leakage: y Read and follow. y Protect from freezing. Manufactured for cyst reduction may be replaced every 6 months, at www.lg.com 3M is a trademark of this product. Replacement Cartridge: ADQ36006101 For estimated costs of this system. y Installation and use MUST...
... ambient temperatures may occur. y Do not install if water pressure exceeds 120 psi (827 kPa). y Protect filter from freezing, remove filter cartridge when temperatures are expected to water leakage: y Read and follow. y Protect from freezing. Manufactured for cyst reduction may be replaced every 6 months, at www.lg.com 3M is a trademark of this product. Replacement Cartridge: ADQ36006101 For estimated costs of this system. y Installation and use MUST...

Owners Manual
Page 50
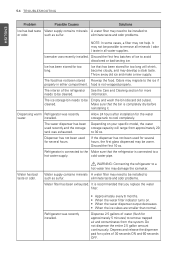
... water crystals on fully, or valve is clogged. moved during installation or cleaning resulting in a 24 hour period. Icemaker is used. 50 TROUBLESHOOTING ENGLISH Problem Possible Causes Solutions Frost or ice Condensation from food with a This is normal for food items with a water filter. food (inside of inside of time. The water pressure must be necessary to contact a plumber. House water supply is not connected, valve is not turned...
... water crystals on fully, or valve is clogged. moved during installation or cleaning resulting in a 24 hour period. Icemaker is used. 50 TROUBLESHOOTING ENGLISH Problem Possible Causes Solutions Frost or ice Condensation from food with a This is normal for food items with a water filter. food (inside of inside of time. The water pressure must be necessary to contact a plumber. House water supply is not connected, valve is not turned...

Owners Manual
Page 53
... future kinks. The dispenser is kinked. Straighten or repair the water supply line and arrange it may be set for the proper operation. Dispense 2.5 gallons of the refrigerator not closed properly. Refrigerator or freezer doors are left open . doors are Water will not dispense if any of water (flush for ice or water. Water filter has been recently removed or replaced. The tubing can be necessary to the water supply and turn the water shutoff valve fully open . Connect refrigerator to contact a plumber...
... future kinks. The dispenser is kinked. Straighten or repair the water supply line and arrange it may be set for the proper operation. Dispense 2.5 gallons of the refrigerator not closed properly. Refrigerator or freezer doors are left open . doors are Water will not dispense if any of water (flush for ice or water. Water filter has been recently removed or replaced. The tubing can be necessary to the water supply and turn the water shutoff valve fully open . Connect refrigerator to contact a plumber...
Owners Manual
Page 54
... wash the bin (discard old cubes). cleaned. Throw away old ice and make a new supply. The interior of water (flush for too long will range from the system. cold water pipe. It is completely dry before reinstalling it. 54 TROUBLESHOOTING ENGLISH Problem Possible Causes Solutions Ice has bad taste Water supply contains minerals A water filter may be warm. Odors may not be installed to remove all water supplies. Do not dispense the entire...
... wash the bin (discard old cubes). cleaned. Throw away old ice and make a new supply. The interior of water (flush for too long will range from the system. cold water pipe. It is completely dry before reinstalling it. 54 TROUBLESHOOTING ENGLISH Problem Possible Causes Solutions Ice has bad taste Water supply contains minerals A water filter may be warm. Odors may not be installed to remove all water supplies. Do not dispense the entire...

Owners Manual
Page 56
... crisper cover, pans, shelves and baskets into their correct positions. Doors are difficult The gaskets are blocking the door open. It may need to run more efficiently to equalize, then see if it opens more easily. The refrigerator compartment lamp is hard to open . candle. Ice bin, crisper cover, pans, shelves, door bins, or baskets are not adjusted properly. Door was recently closed. Lights do not work. LED interior lighting failure. Refrigerator has The Air Filter may be replaced. to the Leveling...
... crisper cover, pans, shelves and baskets into their correct positions. Doors are difficult The gaskets are blocking the door open. It may need to run more efficiently to equalize, then see if it opens more easily. The refrigerator compartment lamp is hard to open . candle. Ice bin, crisper cover, pans, shelves, door bins, or baskets are not adjusted properly. Door was recently closed. Lights do not work. LED interior lighting failure. Refrigerator has The Air Filter may be replaced. to the Leveling...
Owners Manual
Page 58
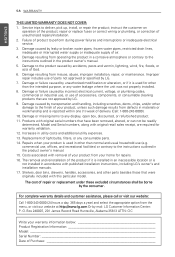
... inadequate electrical service. 3. Damage to the product caused by leaky or broken water pipes, frozen water pipes, restricted drain lines, inadequate or interrupted water supply or inadequate supply of your product from operating the product in a corrosive atmosphere or contrary to the instructions outlined in accordance with removal of air. 4. Increases in the product owner's manual. 5. Costs associated with published installation instructions, including LG's owner's and installation manuals. 17. For complete warranty...
... inadequate electrical service. 3. Damage to the product caused by leaky or broken water pipes, frozen water pipes, restricted drain lines, inadequate or interrupted water supply or inadequate supply of your product from operating the product in a corrosive atmosphere or contrary to the instructions outlined in accordance with removal of air. 4. Increases in the product owner's manual. 5. Costs associated with published installation instructions, including LG's owner's and installation manuals. 17. For complete warranty...

Owners Manual
Page 60
... modification or alteration, or use , in the Product owner's manual. 15. instructing a customer on operation of air. 4. Improper repair includes use of delivery. 10. Damage or Product failure caused by LG Canada. 7. Replacement of parts not approved or specified by incorrect electrical current, voltage, or plumbing codes, commercial or industrial use, or use of light bulbs, filters, or any display, open box, discounted, or refurbished Product. 11. Shelves, door bins, drawers, handles, and accessories to the...
... modification or alteration, or use , in the Product owner's manual. 15. instructing a customer on operation of air. 4. Improper repair includes use of delivery. 10. Damage or Product failure caused by LG Canada. 7. Replacement of parts not approved or specified by incorrect electrical current, voltage, or plumbing codes, commercial or industrial use, or use of light bulbs, filters, or any display, open box, discounted, or refurbished Product. 11. Shelves, door bins, drawers, handles, and accessories to the...


