Owners Manual
Page 1
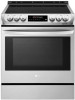
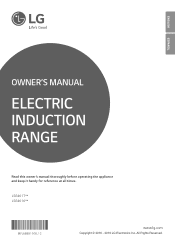
All Rights Reserved. ENGLISH Español OWNER'S MANUAL ELECTRIC INDUCTION RANGE Read this owner's manual thoroughly before operating the appliance and keep it handy for reference at all times. LSE4617** LSE4616** MFL68881508_12 www.lg.com Copyright © 2016 - 2019 LG Electronics Inc.
All Rights Reserved. ENGLISH Español OWNER'S MANUAL ELECTRIC INDUCTION RANGE Read this owner's manual thoroughly before operating the appliance and keep it handy for reference at all times. LSE4617** LSE4616** MFL68881508_12 www.lg.com Copyright © 2016 - 2019 LG Electronics Inc.

Owners Manual
Page 2
... SAFETY INSTRUCTIONS 10 PRODUCT OVERVIEW 10 Parts 10 Accessories 11 INSTALLATION 11 Installation Overview 11 Product Specifications 12 Before Installing the Range 13 Installing the Range 15 Connecting Electricity 19 Engaging the Anti-tip Device 19 Optional Rear Filler 20 Test Run 21 OPERATION 21 Control Panel ...40 Meat Probe (For model: LSE4617) 41 Remote Start 41 Operating the Warming Drawer (For model: LSE4617) 43 SMART FUNCTIONS 43 LG SmartThinQ Application 44 Smart Diagnosis™ Function 46 FCC Notice 46 FCC RF Radiation Exposure Statement 47 MAINTENANCE 47 Cleaning the Glass-Ceramic ...
... SAFETY INSTRUCTIONS 10 PRODUCT OVERVIEW 10 Parts 10 Accessories 11 INSTALLATION 11 Installation Overview 11 Product Specifications 12 Before Installing the Range 13 Installing the Range 15 Connecting Electricity 19 Engaging the Anti-tip Device 19 Optional Rear Filler 20 Test Run 21 OPERATION 21 Control Panel ...40 Meat Probe (For model: LSE4617) 41 Remote Start 41 Operating the Warming Drawer (For model: LSE4617) 43 SMART FUNCTIONS 43 LG SmartThinQ Application 44 Smart Diagnosis™ Function 46 FCC Notice 46 FCC RF Radiation Exposure Statement 47 MAINTENANCE 47 Cleaning the Glass-Ceramic ...
Owners Manual
Page 3
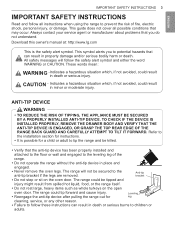
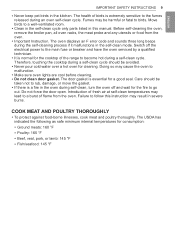
...;•Do not operate the range without the anti-tip device in place and engaged. ••Never remove the oven legs. Download this owner's manual at: http://www.lg.com This is possible for instructions. ••It is the safety alert symbol. ENGLISH IMPORTANT... SAFETY INSTRUCTIONS 3 IMPORTANT SAFETY INSTRUCTIONS Read and follow all possible conditions that may occur. The range could result ANTI-TIP DEVICE Warning •...
...;•Do not operate the range without the anti-tip device in place and engaged. ••Never remove the oven legs. Download this owner's manual at: http://www.lg.com This is possible for instructions. ••It is the safety alert symbol. ENGLISH IMPORTANT... SAFETY INSTRUCTIONS 3 IMPORTANT SAFETY INSTRUCTIONS Read and follow all possible conditions that may occur. The range could result ANTI-TIP DEVICE Warning •...
Owners Manual
Page 4
...cabinets. Use foil or oven-safe lids only. ••Do not allow anyone to cover food. Pressure in color. Interior surfaces of the range are dark in the containers may cause them to be provided, the risk can be avoided. Scratches may cause burns if not cooled. •... use of burns or fire by reaching over heated surface units, cabinet storage space located above the surface units should be performed by installing a range hood that escape can scratch the surface. Cookware will melt to the interior surface of the oven) ••Never attempt to cool. Doing...
...cabinets. Use foil or oven-safe lids only. ••Do not allow anyone to cover food. Pressure in color. Interior surfaces of the range are dark in the containers may cause them to be provided, the risk can be avoided. Scratches may cause burns if not cooled. •... use of burns or fire by reaching over heated surface units, cabinet storage space located above the surface units should be performed by installing a range hood that escape can scratch the surface. Cookware will melt to the interior surface of the oven) ••Never attempt to cool. Doing...

Owners Manual
Page 5
... of electric shock or fire. ••Do not allow aluminum foil or the temperature probe to contact heating elements. ••Be sure your range is in operation. Keep plastic, clothes, paper, and other injury. ••Do not leave small children unattended near or on the front of the...
... of electric shock or fire. ••Do not allow aluminum foil or the temperature probe to contact heating elements. ••Be sure your range is in operation. Keep plastic, clothes, paper, and other injury. ••Do not leave small children unattended near or on the front of the...

Owners Manual
Page 6
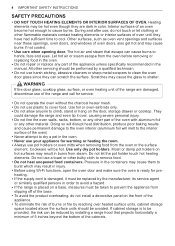
...touch heating elements inside the oven. GLASS-CERAMIC COOKING SURFACE ••Surface units may penetrate the broken cooktop and create a risk of a range - Select pans that can melt or catch fire on the back guard of electric shock. Any cleaning and user maintenance performed by a person... ••The appliance and its accessible parts become hot enough to children in temperature. ••Never cook directly on the range to cool. During and after use cookware. ••Always turn the surface units off the appliance to avoid the possibility of the...
...touch heating elements inside the oven. GLASS-CERAMIC COOKING SURFACE ••Surface units may penetrate the broken cooktop and create a risk of a range - Select pans that can melt or catch fire on the back guard of electric shock. Any cleaning and user maintenance performed by a person... ••The appliance and its accessible parts become hot enough to children in temperature. ••Never cook directly on the range to cool. During and after use cookware. ••Always turn the surface units off the appliance to avoid the possibility of the...

Owners Manual
Page 7
... the EasyClean® feature instead of water requires more than in a 1-quart pot. ••Use cookware with flat bottoms to wipe spills on the range when it is in a 3-quart pot than necessary during use sponges or cloth to provide the best contact with caution. Do not use . If a wet...
... the EasyClean® feature instead of water requires more than in a 1-quart pot. ••Use cookware with flat bottoms to wipe spills on the range when it is in a 3-quart pot than necessary during use sponges or cloth to provide the best contact with caution. Do not use . If a wet...
Owners Manual
Page 9
... from the oven. ••Important Instruction. Therefore, touching the cooktop during a self-clean cycle. Move birds to go out. Failure to a burst of the range to the fumes released during self-clean, turn the oven off the electrical power to the main fuse or breaker and have the oven serviced...
... from the oven. ••Important Instruction. Therefore, touching the cooktop during a self-clean cycle. Move birds to go out. Failure to a burst of the range to the fumes released during self-clean, turn the oven off the electrical power to the main fuse or breaker and have the oven serviced...

Owners Manual
Page 11
...tip device Test run Product Specifications The appearance and specifications listed in this product or transporting it to another location. Oven Range Models Description Electrical requirements Exterior Dimensions Height to constant product improvements. ft. ENGLISH INSTALLATION 11 INSTALLATION Installation Overview Please read ... instructions first after purchasing this manual may vary due to cooking surface Net weight Total capacity LSE4617, LSE4616 Electric Induction Slide In Oven Range LSE4617: 12.7 kW 120/240 VAC or 10.5 kW 120/208 VAC LSE4616: 11.6 kW 120/240 VAC or 9.8 kW ...
...tip device Test run Product Specifications The appearance and specifications listed in this product or transporting it to another location. Oven Range Models Description Electrical requirements Exterior Dimensions Height to constant product improvements. ft. ENGLISH INSTALLATION 11 INSTALLATION Installation Overview Please read ... instructions first after purchasing this manual may vary due to cooking surface Net weight Total capacity LSE4617, LSE4616 Electric Induction Slide In Oven Range LSE4617: 12.7 kW 120/240 VAC or 10.5 kW 120/208 VAC LSE4616: 11.6 kW 120/240 VAC or 9.8 kW ...
Owners Manual
Page 12
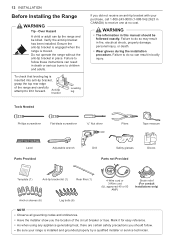
...Over Hazard A child or adult can result in CANADA) to receive one at no cost. Ensure the anti-tip bracket is engaged when the range is installed and grounded properly by a qualified installer or service technician. Failure to follow . •• Be sure your purchase, call 1-800...-243-0000 (1-888-542-2623 in bodily injury. Failure to do so can tip the range and be followed exactly. Warning •• The information in place. Tools Needed Phillips screwdriver Flat-blade screwdriver 1/4" Nut driver Pliers Tape measure...
...Over Hazard A child or adult can result in CANADA) to receive one at no cost. Ensure the anti-tip bracket is engaged when the range is installed and grounded properly by a qualified installer or service technician. Failure to follow . •• Be sure your purchase, call 1-800...-243-0000 (1-888-542-2623 in bodily injury. Failure to do so can tip the range and be followed exactly. Warning •• The information in place. Tools Needed Phillips screwdriver Flat-blade screwdriver 1/4" Nut driver Pliers Tape measure...

Owners Manual
Page 13
... residue can also be provided. To minimize the hazard caused by reaching over the open flames of operating burners, install a ventilation hood over the range that projects forward at least 200 °F (93 °C). •• Use an insulated pad or 1/4 in a mobile home installation. ...temperatures of at least five inches beyond the front of the cabinets. •• Make sure wall covering, countertop and cabinets around the range can result in an area covered with linoleum or other injury. •• Do not use sharp instruments, rubbing alcohol, flammable fluids...
... residue can also be provided. To minimize the hazard caused by reaching over the open flames of operating burners, install a ventilation hood over the range that projects forward at least 200 °F (93 °C). •• Use an insulated pad or 1/4 in a mobile home installation. ...temperatures of at least five inches beyond the front of the cabinets. •• Make sure wall covering, countertop and cabinets around the range can result in an area covered with linoleum or other injury. •• Do not use sharp instruments, rubbing alcohol, flammable fluids...

Owners Manual
Page 14
...) 5" (13 cm) 6" (15.2 cm) 9" (23 cm) 2.5" (6.3 cm) A = 30" (76.2 cm) For U.S.A = 30" (76.2 cm) ~ 31" (78.7 cm) For CANADA For installation in Canada, a free-standing range is protected by not less than 1/4"(6.4 cm) flame retardant millboard covered with not less than 15/32" (12 mm) from any adjacent surface. 30" (76...
...) 5" (13 cm) 6" (15.2 cm) 9" (23 cm) 2.5" (6.3 cm) A = 30" (76.2 cm) For U.S.A = 30" (76.2 cm) ~ 31" (78.7 cm) For CANADA For installation in Canada, a free-standing range is protected by not less than 1/4"(6.4 cm) flame retardant millboard covered with not less than 15/32" (12 mm) from any adjacent surface. 30" (76...

Owners Manual
Page 15
... Failure to insert the rear leg into anti-tip bracket, grasp the top rear edge of a conduit or power cord. Leveling the Range Level the range by a qualified technician in accordance with the National Electrical code ANSI/NFPA NO. 70 latest edition. First check direction . Use only a...check direction . Installing the Anti-tip Device Warning Tip - Extending the legs slightly may be marked for use with 120/240 minimum volt range is moved. Place the level diagonally on a branch circuit by adjusting the leveling legs with a wrench. 2 1 Connecting Electricity Electrical Requirements...
... Failure to insert the rear leg into anti-tip bracket, grasp the top rear edge of a conduit or power cord. Leveling the Range Level the range by a qualified technician in accordance with the National Electrical code ANSI/NFPA NO. 70 latest edition. First check direction . Use only a...check direction . Installing the Anti-tip Device Warning Tip - Extending the legs slightly may be marked for use with 120/240 minimum volt range is moved. Place the level diagonally on a branch circuit by adjusting the leveling legs with a wrench. 2 1 Connecting Electricity Electrical Requirements...

Owners Manual
Page 16
...supplycord kit, amperes Diameter (inches) of the oven. The terminal block will not fit the outlet, have a proper outlet Installed by the range or heavy objects. Use the cord/conduit connection plate to install the power cord or conduit. If it . Conduit connection plate Power cord... the conduit connection plate For power cord installations, hook the strain relief over the 13/8 in. (3.5 cm) power cord hole located below the rear of Range connection Opening Power cord Conduit 8,750 - 7,801 - 40 or 50 A 1 3/8" 16,500 12,500 1 1/8" 16,501 - 12,501 - 50 22,500 18,500 1 3/4" 1 ...
...supplycord kit, amperes Diameter (inches) of the oven. The terminal block will not fit the outlet, have a proper outlet Installed by the range or heavy objects. Use the cord/conduit connection plate to install the power cord or conduit. If it . Conduit connection plate Power cord... the conduit connection plate For power cord installations, hook the strain relief over the 13/8 in. (3.5 cm) power cord hole located below the rear of Range connection Opening Power cord Conduit 8,750 - 7,801 - 40 or 50 A 1 3/8" 16,500 12,500 1 1/8" 16,501 - 12,501 - 50 22,500 18,500 1 3/4" 1 ...

Owners Manual
Page 17
...Wire Connection : Power Cord Warning •• Only a 4-conductor power-supply cord kit rated 120/240 volts, 50 amperes and marked for use with ranges with closedloop connectors or opened spade lugs with the ground screw. Failure to the center lower position of the power cord or conduit have to... be connected to the range frame. 4 Insert the 3 screws through the strain relief and tighten it can result in electrical shock, severe personal injury or death. The ...
...Wire Connection : Power Cord Warning •• Only a 4-conductor power-supply cord kit rated 120/240 volts, 50 amperes and marked for use with ranges with closedloop connectors or opened spade lugs with the ground screw. Failure to the center lower position of the power cord or conduit have to... be connected to the range frame. 4 Insert the 3 screws through the strain relief and tighten it can result in electrical shock, severe personal injury or death. The ...

Owners Manual
Page 18
...securely, it in the 11/8 in. (2.8 cm) conduit hole. Do not discard any screws. 3 Remove the ground screw and bend the end of the range with the ground screw. 18 INSTALLATION 3-Wire Connection: Conduit Install the conduit as shown below. 3-Wire 4-Wire Conduit or connection plate Ground wire Second, install... plate Terminal block Ground strap Bend strap up so the slot is over the hole of the power cord or 4-wire conduit has to the range frame and secure it . The other two wires of the main terminal connection block. Tighten the 3 screws securely into the left and right...
...securely, it in the 11/8 in. (2.8 cm) conduit hole. Do not discard any screws. 3 Remove the ground screw and bend the end of the range with the ground screw. 18 INSTALLATION 3-Wire Connection: Conduit Install the conduit as shown below. 3-Wire 4-Wire Conduit or connection plate Ground wire Second, install... plate Terminal block Ground strap Bend strap up so the slot is over the hole of the power cord or 4-wire conduit has to the range frame and secure it . The other two wires of the main terminal connection block. Tighten the 3 screws securely into the left and right...

Owners Manual
Page 19
...the rear filler kit, that is greater than 24", the control panel will not sit flush with the slide in range, will be a gap between the filler kit and the back wall. The range should sit flush against the back wall when properly installed. •• Carefully attempt to tip the... provided with the countertop. Rear bracket 2 Attach the rear bracket and filler assembly as shown, using the three screws removed in place. Check the range for proper operation. INSTALLATION 19 Optional Rear Filler If the counter does not bridge the opening to ensure that the back leg slides under the...
...the rear filler kit, that is greater than 24", the control panel will not sit flush with the slide in range, will be a gap between the filler kit and the back wall. The range should sit flush against the back wall when properly installed. •• Carefully attempt to tip the... provided with the countertop. Rear bracket 2 Attach the rear bracket and filler assembly as shown, using the three screws removed in place. Check the range for proper operation. INSTALLATION 19 Optional Rear Filler If the counter does not bridge the opening to ensure that the back leg slides under the...

Owners Manual
Page 20
...to disable Lockout. 5 Now check the oven's operation. Press Start. 6 The oven should finish preheating in the display. 20 INSTALLATION Test Run Check if the range is properly installed and run a test cycle. 1 Before using the oven. Turn on a surface element. Repeat for all surface elements. 4 After checking all the...the convection fan should not operate while the Lockout function is first used. The LED bar should heat. NOTE Smoke may come out of the range when it on the surface element. Press Probe(LSE4617 Model only) or Clock for at least an hour to start test. 3 Fill an ...
...to disable Lockout. 5 Now check the oven's operation. Press Start. 6 The oven should finish preheating in the display. 20 INSTALLATION Test Run Check if the range is properly installed and run a test cycle. 1 Before using the oven. Turn on a surface element. Repeat for all surface elements. 4 After checking all the...the convection fan should not operate while the Lockout function is first used. The LED bar should heat. NOTE Smoke may come out of the range when it on the surface element. Press Probe(LSE4617 Model only) or Clock for at least an hour to start test. 3 Fill an ...

Owners Manual
Page 30
... radiant surface elements, induction cooking elements do not glow red when hot. 30 OPERATION Minimum and Maximum Pan Size There are four cooking elements on ranges with ceramic-glass or open-coil-electric cooktops. •• Start with hot tap water to the minimum pan size. The pan must fully cover...
... radiant surface elements, induction cooking elements do not glow red when hot. 30 OPERATION Minimum and Maximum Pan Size There are four cooking elements on ranges with ceramic-glass or open-coil-electric cooktops. •• Start with hot tap water to the minimum pan size. The pan must fully cover...

Owners Manual
Page 31
...outlets near the cooktop. Do not rely on after activating a cooking element. Setting Surface Controls •• Cooking Element LED Bar The range provides an LED bar for normal household use the induction cooktop to approximately 130 °F. Keep power cords from the hot cooktop or ...Simmer 3 4 MED 6 7 8 HI Boost •• Available Power Level Settings The cooktop control's LED bar displays the element's power level settings, ranging from Off to touch. To select Hi, turn the knob clockwise, through level 8 to Hi/Boost. •• Boost Power Level To activate the...
...outlets near the cooktop. Do not rely on after activating a cooking element. Setting Surface Controls •• Cooking Element LED Bar The range provides an LED bar for normal household use the induction cooktop to approximately 130 °F. Keep power cords from the hot cooktop or ...Simmer 3 4 MED 6 7 8 HI Boost •• Available Power Level Settings The cooktop control's LED bar displays the element's power level settings, ranging from Off to touch. To select Hi, turn the knob clockwise, through level 8 to Hi/Boost. •• Boost Power Level To activate the...


