Owners Manual
Page 1
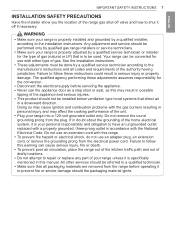
... gas supplier from a neighbor's phone. Follow the gas supplier's instructions. - Immediately call your gas supplier, call the fire department. ••Installation and service must be performed by a qualified installer, service agency, or the gas supplier. All Rights Reserved. Do not touch any appliance. - Do not use gasoline or other appliance. •...
... gas supplier from a neighbor's phone. Follow the gas supplier's instructions. - Immediately call your gas supplier, call the fire department. ••Installation and service must be performed by a qualified installer, service agency, or the gas supplier. All Rights Reserved. Do not touch any appliance. - Do not use gasoline or other appliance. •...

Owners Manual
Page 2
... Broil 38 Recommended Broiling Guide 39 Warm 39 Proof 39 Speed Roast 40 Remote Start 40 Sabbath Mode 41 SMART FUNCTIONS 41 LG SmartThinQ Application 42 Smart Diagnosis™ Function 44 FCC Notice (For transmitter module contained in this product) 44 FCC RF Radiation...OF CONTENTS TABLE OF CONTENTS 3 PRODUCT FEATURES 4 IMPORTANT SAFETY INSTRUCTIONS 12 PRODUCT OVERVIEW 12 Parts 12 Accessories 13 INSTALLATION 13 Product Specifications 13 Before Installing the Range 14 Installing the Range 15 Dimensions and Clearances 16 Optional Rear Filler 17 Providing Adequate Gas Supply 18 Connecting the Range ...
... Broil 38 Recommended Broiling Guide 39 Warm 39 Proof 39 Speed Roast 40 Remote Start 40 Sabbath Mode 41 SMART FUNCTIONS 41 LG SmartThinQ Application 42 Smart Diagnosis™ Function 44 FCC Notice (For transmitter module contained in this product) 44 FCC RF Radiation...OF CONTENTS TABLE OF CONTENTS 3 PRODUCT FEATURES 4 IMPORTANT SAFETY INSTRUCTIONS 12 PRODUCT OVERVIEW 12 Parts 12 Accessories 13 INSTALLATION 13 Product Specifications 13 Before Installing the Range 14 Installing the Range 15 Dimensions and Clearances 16 Optional Rear Filler 17 Providing Adequate Gas Supply 18 Connecting the Range ...

Owners Manual
Page 4
... prevent the risk of the range. ••Do not operate the range without the anti-tip device in place and engaged. ••See installation instructions for instructions. ••A child or adult can result in property damage and/or serious bodily harm or death. Do not operate the range... in place and engaged. ••Never remove the oven legs. Download this owner's manual at: http://www.lg.com This is the safety alert symbol. TO CHECK IF THE DEVICE IS INSTALLED PROPERLY, VERIFY THAT THE ANTI-TIP DEVICE IS ENGAGED, OR GRASP THE TOP REAR EDGE OF THE RANGE BACK...
... prevent the risk of the range. ••Do not operate the range without the anti-tip device in place and engaged. ••See installation instructions for instructions. ••A child or adult can result in property damage and/or serious bodily harm or death. Do not operate the range... in place and engaged. ••Never remove the oven legs. Download this owner's manual at: http://www.lg.com This is the safety alert symbol. TO CHECK IF THE DEVICE IS INSTALLED PROPERLY, VERIFY THAT THE ANTI-TIP DEVICE IS ENGAGED, OR GRASP THE TOP REAR EDGE OF THE RANGE BACK...

Owners Manual
Page 6
Gas suppliers recommend you purchase and install a UL approved gas detector. Hinge arms are spring mounted. 6 IMPORTANT SAFETY INSTRUCTIONS Warning •&#...is displayed. ••Do not stand or place excessive weight on an open the door when Lock is properly installed. ••Never place fingers between the hinge and front oven frame. They will slam shut against the oven...not attempt to the manufacturer's instructions. ••Gas leaks may cause carbon monoxide poisoning. Install and use commercial oven cleaners on the oven door, warming drawer or cooktop.
Gas suppliers recommend you purchase and install a UL approved gas detector. Hinge arms are spring mounted. 6 IMPORTANT SAFETY INSTRUCTIONS Warning •&#...is displayed. ••Do not stand or place excessive weight on an open the door when Lock is properly installed. ••Never place fingers between the hinge and front oven frame. They will slam shut against the oven...not attempt to the manufacturer's instructions. ••Gas leaks may cause carbon monoxide poisoning. Install and use commercial oven cleaners on the oven door, warming drawer or cooktop.
Owners Manual
Page 7
...responsibility for the conversion. ••Disconnect the electrical supply before operating it is specifically mentioned in this warning can be installed below ventilation type hood systems that direct air in a downward direction. Failure to prevent fire or smoke damage should be...and how to shut it is your personal responsibility and obligation to a qualified technician. ••Make sure that is properly installed and grounded by a qualified service technician according to the manufacturer's instructions and all packaging materials are removed from the range before...
...responsibility for the conversion. ••Disconnect the electrical supply before operating it is specifically mentioned in this warning can be installed below ventilation type hood systems that direct air in a downward direction. Failure to prevent fire or smoke damage should be...and how to shut it is your personal responsibility and obligation to a qualified technician. ••Make sure that is properly installed and grounded by a qualified service technician according to the manufacturer's instructions and all packaging materials are removed from the range before...

Owners Manual
Page 8
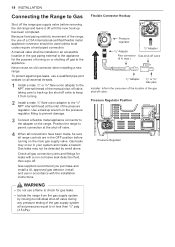
...range gas shutoff valve by turning it directly over vinyl tile or linoleum that cannot withstand such type of use. ••Never install the range over interior kitchen carpeting. Use pans with flat bottoms large enough to using your range for five minutes prior to cover ...burner grates. Never install it clockwise. Pressure regulator Gas Flow into Range Adapter(1/2"-14 NPT) Range gas shut-off valve 1/2" Adapter Installer: Inform the consumer of the location of time high floor temperatures may result. If...
...range gas shutoff valve by turning it directly over vinyl tile or linoleum that cannot withstand such type of use. ••Never install the range over interior kitchen carpeting. Use pans with flat bottoms large enough to using your range for five minutes prior to cover ...burner grates. Never install it clockwise. Pressure regulator Gas Flow into Range Adapter(1/2"-14 NPT) Range gas shut-off valve 1/2" Adapter Installer: Inform the consumer of the location of time high floor temperatures may result. If...
Owners Manual
Page 12
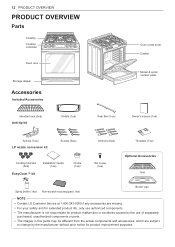
... plate Rear filler (1ea) Owner's manual (1ea) Anti-tip (1ea) LP nozzle conversion kit Screws (6ea) Cooktop Nozzles (5ea) EasyClean™ kit Installation Guide (1ea) Choke (1ea) Anchors (6ea) Template (1ea) Set screw (1ea) Optional Accessories Grid Spray bottle (1ea) Non-scratch scouring pad (1ea...) Broiler pan NOTE •• Contact LG Customer Service at 1-800-243-0000 if any accessories are missing. •• For your safety and for extended product life, only use ...
... plate Rear filler (1ea) Owner's manual (1ea) Anti-tip (1ea) LP nozzle conversion kit Screws (6ea) Cooktop Nozzles (5ea) EasyClean™ kit Installation Guide (1ea) Choke (1ea) Anchors (6ea) Template (1ea) Set screw (1ea) Optional Accessories Grid Spray bottle (1ea) Non-scratch scouring pad (1ea...) Broiler pan NOTE •• Contact LG Customer Service at 1-800-243-0000 if any accessories are missing. •• For your safety and for extended product life, only use ...
Owners Manual
Page 13
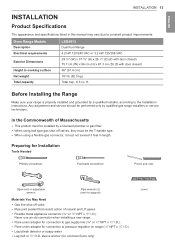
... of natural and LP gases •• Flexible metal appliance connector (3/4" or 1/2" NPT x 1/2" I.D.) Never use an old connector when installing a new range. •• Flare union adapter for connection to gas supply line (3/4" or 1/2" NPT x 1/2" I .D.) ••...1/2" O.D. sleeve anchor (for connection to the installation instructions. Before Installing the Range Make sure your range is properly installed and grounded by qualified gas range installers or service technicians. Preparing for Installation Tools Needed Phillips screwdriver Flat-blade screwdriver Pencil and...
... of natural and LP gases •• Flexible metal appliance connector (3/4" or 1/2" NPT x 1/2" I.D.) Never use an old connector when installing a new range. •• Flare union adapter for connection to gas supply line (3/4" or 1/2" NPT x 1/2" I .D.) ••...1/2" O.D. sleeve anchor (for connection to the installation instructions. Before Installing the Range Make sure your range is properly installed and grounded by qualified gas range installers or service technicians. Preparing for Installation Tools Needed Phillips screwdriver Flat-blade screwdriver Pencil and...
Owners Manual
Page 14
... may be moved for cleaning and servicing, as well as provide proper air flow to the range. This type of flooring. See the Installation Safety Instructions included in this manual. Use care when moving the range on this type of at the front of the range, the area...or service. Choosing the Proper Location Do not locate your range where it may cause ignition and combustion problems with your thumb. See the Installation Safety Instructions included in this manual. Your range is heavy and can resist the heat generated up with your fingers. Any openings in ...
... may be moved for cleaning and servicing, as well as provide proper air flow to the range. This type of flooring. See the Installation Safety Instructions included in this manual. Use care when moving the range on this type of at the front of the range, the area...or service. Choosing the Proper Location Do not locate your range where it may cause ignition and combustion problems with your thumb. See the Installation Safety Instructions included in this manual. Your range is heavy and can resist the heat generated up with your fingers. Any openings in ...

Owners Manual
Page 15
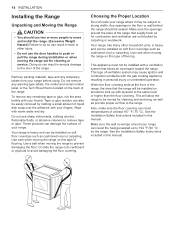
... forward from cabinet 0" To cabinets below cooktop and at the range back Minimum Dimensions * 30" (76.2 cm) minimum clearance between countertop and adjacent cabinet bottom. INSTALLATION 15 3" (7.6 cm) 24" (60.9 cm) Acceptable gas pipe and electrical outlet area 3" (7.6 cm) 25" (63.5 cm) Normal counter top depth A Cabinet opening 36" Counter (91...
... forward from cabinet 0" To cabinets below cooktop and at the range back Minimum Dimensions * 30" (76.2 cm) minimum clearance between countertop and adjacent cabinet bottom. INSTALLATION 15 3" (7.6 cm) 24" (60.9 cm) Acceptable gas pipe and electrical outlet area 3" (7.6 cm) 25" (63.5 cm) Normal counter top depth A Cabinet opening 36" Counter (91...

Owners Manual
Page 16
... range forward. •• This range has been designed to meet all recognized industry tip standards for all normal conditions. •• The installation of the anti-tip device must meet all local codes for details. •• Failure to children or adults. NOTE If the countertop depth ... guide of the Anti tip bracket template. •• Re-engage the anti-tip device if the range is moved. Rear filler 16 INSTALLATION Installing the Anti-tip Device Anti-tip bracket Screw must enter wood or concrete Wall plate The anti-tip bracket is packaged with the slide in...
... range forward. •• This range has been designed to meet all recognized industry tip standards for all normal conditions. •• The installation of the anti-tip device must meet all local codes for details. •• Failure to children or adults. NOTE If the countertop depth ... guide of the Anti tip bracket template. •• Re-engage the anti-tip device if the range is moved. Rear filler 16 INSTALLATION Installing the Anti-tip Device Anti-tip bracket Screw must enter wood or concrete Wall plate The anti-tip bracket is packaged with the slide in...

Owners Manual
Page 17
When checking for correct operation of 5 feet. INSTALLATION 17 ENGLISH of 5/8" and a maximum length of the regulator, the inlet pressure must be between 10" and 13" of gas for which type of gas ... gas, the pressure supplied to the regulator must be between 5" and 13" of water column on LP gas, conversion must be made by a qualified LP installer before attempting to operate at the inlet of the range must be at least 1" more than the operating (manifold) pressure as given above. Providing Adequate...
When checking for correct operation of 5 feet. INSTALLATION 17 ENGLISH of 5/8" and a maximum length of the regulator, the inlet pressure must be between 10" and 13" of gas for which type of gas ... gas, the pressure supplied to the regulator must be between 5" and 13" of water column on LP gas, conversion must be made by a qualified LP installer before attempting to operate at the inlet of the range must be at least 1" more than the operating (manifold) pressure as given above. Providing Adequate...
Owners Manual
Page 18
..., use of a CSA International-certified flexible metal appliance connector should be sure all gas connection joints and fittings for leaks with the installation instructions. Use a backup wrench on the pressure regulator fitting to prevent damage. 3 Connect a flexible metal appliance connector to check for...Check all range controls are in the gas piping external to the appliance for gas leaks. •• Isolate the range from turning. 2 Install a male 1/2" flare union adapter to the 1/2" NPT internal thread at test pressures equal to or less than 1/2" psig (3.5 kPa). Flexible ...
..., use of a CSA International-certified flexible metal appliance connector should be sure all gas connection joints and fittings for leaks with the installation instructions. Use a backup wrench on the pressure regulator fitting to prevent damage. 3 Connect a flexible metal appliance connector to check for...Check all range controls are in the gas piping external to the appliance for gas leaks. •• Isolate the range from turning. 2 Install a male 1/2" flare union adapter to the 1/2" NPT internal thread at test pressures equal to or less than 1/2" psig (3.5 kPa). Flexible ...
Owners Manual
Page 19
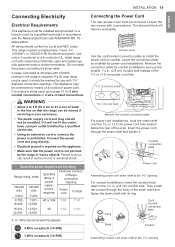
...result in accordance with 13/8" diameter connection openings. Wire electrical wall Receptacle 4 Wire receptacle (14-50R) 3 Wire receptacle (10-50R) INSTALLATION 19 Connecting the Power Cord The rear access cover must be accessible. A range cord rated at 40 amps with a screwdriver. If a... 16,501 - 12,501 - 50 22,500 18,500 1 3/4" 1 3/8" 3, 4 - The terminal block will not fit the outlet, have a proper outlet Installed by the range or heavy objects. Use only a 3-conductor or a 4-conductor UL - Remove the connection plate for use the smaller 11/8 in. (2.8 cm) conduit ...
...result in accordance with 13/8" diameter connection openings. Wire electrical wall Receptacle 4 Wire receptacle (14-50R) 3 Wire receptacle (10-50R) INSTALLATION 19 Connecting the Power Cord The rear access cover must be accessible. A range cord rated at 40 amps with a screwdriver. If a... 16,501 - 12,501 - 50 22,500 18,500 1 3/4" 1 3/8" 3, 4 - The terminal block will not fit the outlet, have a proper outlet Installed by the range or heavy objects. Use only a 3-conductor or a 4-conductor UL - Remove the connection plate for use the smaller 11/8 in. (2.8 cm) conduit ...
Owners Manual
Page 20
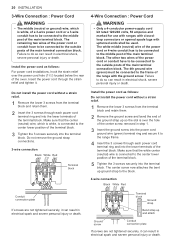
... rated 120/240 volts, 50 amperes and marked for use with ranges with closedloop connectors or opened spade lugs with the ground screw. Do not install the power cord without a strain relief. 1 Remove the lower 3 screws from the terminal block and retain them . 2 Remove the ground screw and... posts of the terminal block. Do not remove the ground strap connections. 3-wire connection Black White Red Terminal block Install the power cord as follows: For power cord installations, hook the strain relief over the hole of the center screw removed in electrical spark and severe personal injury or...
... rated 120/240 volts, 50 amperes and marked for use with ranges with closedloop connectors or opened spade lugs with the ground screw. Do not install the power cord without a strain relief. 1 Remove the lower 3 screws from the terminal block and retain them . 2 Remove the ground screw and... posts of the terminal block. Do not remove the ground strap connections. 3-wire connection Black White Red Terminal block Install the power cord as follows: For power cord installations, hook the strain relief over the hole of the center screw removed in electrical spark and severe personal injury or...
Owners Manual
Page 21
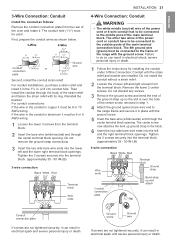
...of the ground strap up ground strap to do so can result in electrical shock, severe personal injury or death. 1 Follow the instructions for installing the conduit under 3-Wire Connection: Conduit until the strain relief and bracket are not tightened securely, it can result in . (2.8 cm) conduit ... the two side bare wire ends into the terminal block. (approximately 35 - 50 IN-LB) 3-wire connection Black White Red Terminal block Wire ends INSTALLATION 21 4-Wire Connection: Conduit Warning •• The white middle (neutral) wire of the power cord or 4-wire conduit has to be used. ...
...of the ground strap up ground strap to do so can result in electrical shock, severe personal injury or death. 1 Follow the instructions for installing the conduit under 3-Wire Connection: Conduit until the strain relief and bracket are not tightened securely, it can result in . (2.8 cm) conduit ... the two side bare wire ends into the terminal block. (approximately 35 - 50 IN-LB) 3-wire connection Black White Red Terminal block Wire ends INSTALLATION 21 4-Wire Connection: Conduit Warning •• The white middle (neutral) wire of the power cord or 4-wire conduit has to be used. ...

Owners Manual
Page 22
... all parts in the correct locations. Once the air has been purged from Hi to adjust with one extra large burner head and cap. 22 INSTALLATION Assembling the Surface Burners CAUTION Do not operate the burners without all burners have been checked. This is normal for service. You will hear a clicking...
... all parts in the correct locations. Once the air has been purged from Hi to adjust with one extra large burner head and cap. 22 INSTALLATION Assembling the Surface Burners CAUTION Do not operate the burners without all burners have been checked. This is normal for service. You will hear a clicking...
Owners Manual
Page 23
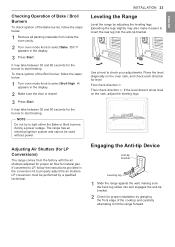
Hi appears in the conversion kit to properly adjust the air shutters. INSTALLATION 23 Leveling the Range Level the range by a qualified technician. Extending the legs slightly may take between 30 and 90 seconds for natural gas. It ... sure the door is closed. 3 Press Start. LP conversion must be used without power. ENGLISH It may take between 30 and 90 seconds for proper installation by grasping the front edge of the cooktop and carefully attempting to tilt the range forward. NOTE Do not try to check your adjustments. Use...
Hi appears in the conversion kit to properly adjust the air shutters. INSTALLATION 23 Leveling the Range Level the range by a qualified technician. Extending the legs slightly may take between 30 and 90 seconds for natural gas. It ... sure the door is closed. 3 Press Start. LP conversion must be used without power. ENGLISH It may take between 30 and 90 seconds for proper installation by grasping the front edge of the cooktop and carefully attempting to tilt the range forward. NOTE Do not try to check your adjustments. Use...

Owners Manual
Page 41
...Mobile data or Cellular Data on your wireless router is enabled, disable the firewall or add an exception to it may fail. Installing the LG SmartThinQ Application Search for any network connection problems or any faults, malfunctions, or errors caused by going to Settings → ...verify the Wi-Fi connection, check that Wi-Fi icon on a smart phone. Follow instructions to download and install the application. ENGLISH SMART FUNCTIONS LG SmartThinQ Application The LG SmartThinQ application allows you to communicate with the or logo 1 Use a smartphone to check the strength of the...
...Mobile data or Cellular Data on your wireless router is enabled, disable the firewall or add an exception to it may fail. Installing the LG SmartThinQ Application Search for any network connection problems or any faults, malfunctions, or errors caused by going to Settings → ...verify the Wi-Fi connection, check that Wi-Fi icon on a smart phone. Follow instructions to download and install the application. ENGLISH SMART FUNCTIONS LG SmartThinQ Application The LG SmartThinQ application allows you to communicate with the or logo 1 Use a smartphone to check the strength of the...

Owners Manual
Page 44
...device must accept any other antenna or transmitter. However, there is no guarantee that interference will not occur in a residential installation. Operation is subject to the following measures: •• Reorient or relocate the receiving antenna. •• Increase ... radiation exposure limits set forth for a Class B digital device, pursuant to provide reasonable protection against harmful interference in a particular installation. Any changes or modifications in accordance with the instructions, may cause undesired operation of 20 cm (7.8 inches) between the equipment ...
...device must accept any other antenna or transmitter. However, there is no guarantee that interference will not occur in a residential installation. Operation is subject to the following measures: •• Reorient or relocate the receiving antenna. •• Increase ... radiation exposure limits set forth for a Class B digital device, pursuant to provide reasonable protection against harmful interference in a particular installation. Any changes or modifications in accordance with the instructions, may cause undesired operation of 20 cm (7.8 inches) between the equipment ...
