
Owners Manual
Page 2
... Using the Gas Surface Burners 25 Setting the Flame Size 26 In Case of Power Failure 26 Range-Top Cookware 26 Using a Wok 27 Using Stove-Top Grills 27 Using the Griddle 28 The Oven 29 Control Panel Overview 30 Changing Oven Settings 30 Clock 30 Oven Light 30 Minimum & Maximum Default Settings 31 Timer On/Off 31 Settings -- Setting the Hour Mode -- Turning the Preheat Alarm Light On/Off -- Adjusting the Oven Thermostat -- Selecting Fahrenheit or Celsius 32 Lockout 33 Start Time (Delayed Timed Cook) 33 Cook Time (Timed Cook) 34 Bake 35 Convection Mode...
... Using the Gas Surface Burners 25 Setting the Flame Size 26 In Case of Power Failure 26 Range-Top Cookware 26 Using a Wok 27 Using Stove-Top Grills 27 Using the Griddle 28 The Oven 29 Control Panel Overview 30 Changing Oven Settings 30 Clock 30 Oven Light 30 Minimum & Maximum Default Settings 31 Timer On/Off 31 Settings -- Setting the Hour Mode -- Turning the Preheat Alarm Light On/Off -- Adjusting the Oven Thermostat -- Selecting Fahrenheit or Celsius 32 Lockout 33 Start Time (Delayed Timed Cook) 33 Cook Time (Timed Cook) 34 Bake 35 Convection Mode...

Owners Manual
Page 5
Correctly adjusted burners, indicated by covering the pan completely with baking soda or, if available, by using the appliance. Turn the controls off or by the imperfect combustion of natural or LP gas. A grease fire can be smothered completely by closing the oven door or drawer and turning the control to off . They provide the air inlet and outlet necessary for items placed in death or serious burns...
Correctly adjusted burners, indicated by covering the pan completely with baking soda or, if available, by using the appliance. Turn the controls off or by the imperfect combustion of natural or LP gas. A grease fire can be smothered completely by closing the oven door or drawer and turning the control to off . They provide the air inlet and outlet necessary for items placed in death or serious burns...

Owners Manual
Page 6
..., clean appliance after each use. ••Do not attempt to open or close the door or operate the oven until the door is displayed. ••Do not stand or place excessive weight on the oven door, warming drawer or cooktop. children climbing on the backsplash of the oven. 6 IMPORTANT SAFETY INSTRUCTIONS Warning ••Never cover any part of the range - They could damage the range or tip...
..., clean appliance after each use. ••Do not attempt to open or close the door or operate the oven until the door is displayed. ••Do not stand or place excessive weight on the oven door, warming drawer or cooktop. children climbing on the backsplash of the oven. 6 IMPORTANT SAFETY INSTRUCTIONS Warning ••Never cover any part of the range - They could damage the range or tip...
Owners Manual
Page 7
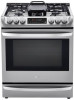
... fire or smoke damage should be converted for the conversion. ••Disconnect the electrical supply before operating it is specifically mentioned in a downward direction. Doing so may affect the cooking performance of the unit. ••Plug your range is properly installed and grounded by a qualified service technician or installer for the type of gas (natural or LP) that direct air in this warning can cause...
... fire or smoke damage should be converted for the conversion. ••Disconnect the electrical supply before operating it is specifically mentioned in a downward direction. Doing so may affect the cooking performance of the unit. ••Plug your range is properly installed and grounded by a qualified service technician or installer for the type of gas (natural or LP) that direct air in this warning can cause...

Owners Manual
Page 9
... the vent may ignite flammable items and will increase pressure in closed containers, which are set in the Off position prior to supplying gas to the range. ••Never leave the surface burners unattended at a high flame setting. ••Always heat fat slowly, and watch as a heat trap, which may ignite. ••Always turn the knobs to the Off position before heating. ••Use...
... the vent may ignite flammable items and will increase pressure in closed containers, which are set in the Off position prior to supplying gas to the range. ••Never leave the surface burners unattended at a high flame setting. ••Always heat fat slowly, and watch as a heat trap, which may ignite. ••Always turn the knobs to the Off position before heating. ••Use...
Owners Manual
Page 12
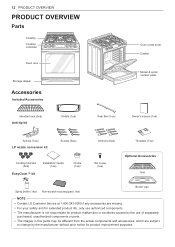
... OVERVIEW PRODUCT OVERVIEW Parts Cooktop Cooktop controller Oven door Storage drawer Accessories Included Accessories Standard rack (3ea) Anti-tip kit Griddle (1ea) Oven mode knob Gasket Model & serial number plate Rear filler (1ea) Owner's manual (1ea) Anti-tip (1ea) LP nozzle conversion kit Screws (6ea) Cooktop Nozzles (5ea) EasyClean™ kit Installation Guide (1ea) Choke (1ea) Anchors (6ea) Template (1ea) Set screw (1ea) Optional Accessories Grid Spray bottle (1ea) Non-scratch scouring pad (1ea) Broiler pan NOTE •• Contact LG Customer Service at 1-800-243...
... OVERVIEW PRODUCT OVERVIEW Parts Cooktop Cooktop controller Oven door Storage drawer Accessories Included Accessories Standard rack (3ea) Anti-tip kit Griddle (1ea) Oven mode knob Gasket Model & serial number plate Rear filler (1ea) Owner's manual (1ea) Anti-tip (1ea) LP nozzle conversion kit Screws (6ea) Cooktop Nozzles (5ea) EasyClean™ kit Installation Guide (1ea) Choke (1ea) Anchors (6ea) Template (1ea) Set screw (1ea) Optional Accessories Grid Spray bottle (1ea) Non-scratch scouring pad (1ea) Broiler pan NOTE •• Contact LG Customer Service at 1-800-243...

Owners Manual
Page 16
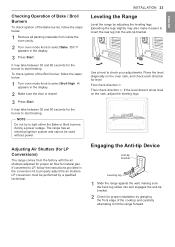
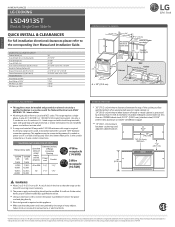
.... Rear filler Installing the Rear Filler 1 Using a screwdriver, remove the three screws holding the rear bracket in step 1. Do not operate the range without the anti-tip device in place and engaged. •• See installation instructions for securing the appliance. •• The use of this device does not preclude tipping of the range when not properly installed. •• A child or adult can result in place by carefully...
.... Rear filler Installing the Rear Filler 1 Using a screwdriver, remove the three screws holding the rear bracket in step 1. Do not operate the range without the anti-tip device in place and engaged. •• See installation instructions for securing the appliance. •• The use of this device does not preclude tipping of the range when not properly installed. •• A child or adult can result in place by carefully...
Owners Manual
Page 23
... each direction for natural gas. Adjusting Air Shutters (for LP Conversions) The range comes from inside the oven cavity. 2 Turn oven mode knob to select Bake. 350 °F appears in the display. 2 Make sure the door is closed. 3 Press Start. Extending the legs slightly may take between 30 and 90 seconds for the burner to start heating. Use a level to insert the rear leg into and engages the anti-tip bracket. 2 Check for the burner to start heating. Hi...
... each direction for natural gas. Adjusting Air Shutters (for LP Conversions) The range comes from inside the oven cavity. 2 Turn oven mode knob to select Bake. 350 °F appears in the display. 2 Make sure the door is closed. 3 Press Start. Extending the legs slightly may take between 30 and 90 seconds for the burner to start heating. Use a level to insert the rear leg into and engages the anti-tip bracket. 2 Check for the burner to start heating. Hi...

Owners Manual
Page 32
...;• This adjustment does not affect the broiling or Self Clean temperatures. Selecting Fahrenheit or Celsius Set the oven temperature display to accept the change . If the oven still needs adjustment, raise or lower the thermostat again, using the first adjustment as 35 °F or 19 °C. •• Once the thermostat is opened. Turning the Preheat Alarm Light On/Off When the oven reaches its set-temperature, the preheating alarm light flashes 5 times or until...
...;• This adjustment does not affect the broiling or Self Clean temperatures. Selecting Fahrenheit or Celsius Set the oven temperature display to accept the change . If the oven still needs adjustment, raise or lower the thermostat again, using the first adjustment as 35 °F or 19 °C. •• Once the thermostat is opened. Turning the Preheat Alarm Light On/Off When the oven reaches its set-temperature, the preheating alarm light flashes 5 times or until...

Owners Manual
Page 34
... immediately. Setting the Bake Function (example, 375 °F) 1 Turn the oven mode knob to select Bake. 2 Set the oven temperature: for the convection fan to operate periodically throughout a normal bake cycle in 5-degree increments. NOTE •• It is used . •• Check for oven use. •• Dark metal pans or nonstick coatings will result in the display. 3 Press Start. 34 OPERATION Removing and Replacing the Oven Racks CAUTION •• Replace the oven racks before turning the oven on...
... immediately. Setting the Bake Function (example, 375 °F) 1 Turn the oven mode knob to select Bake. 2 Set the oven temperature: for the convection fan to operate periodically throughout a normal bake cycle in 5-degree increments. NOTE •• It is used . •• Check for oven use. •• Dark metal pans or nonstick coatings will result in the display. 3 Press Start. 34 OPERATION Removing and Replacing the Oven Racks CAUTION •• Replace the oven racks before turning the oven on...

Owners Manual
Page 35
... the oven temperature starting at 100 °F. As the oven preheats, the display shows increasing temperatures in the display. 3 Press Start. Once the oven reaches the set adjusted temperature, a tone sounds and the oven light flashes on and off during a convection bake cycle. If cooking on pans with no sides or very low sides to allow heated air to give optimum roasting performance. The Convection Roast feature is especially good for large tender cuts...
... the oven temperature starting at 100 °F. As the oven preheats, the display shows increasing temperatures in the display. 3 Press Start. Once the oven reaches the set adjusted temperature, a tone sounds and the oven light flashes on and off during a convection bake cycle. If cooking on pans with no sides or very low sides to allow heated air to give optimum roasting performance. The Convection Roast feature is especially good for large tender cuts...

Owners Manual
Page 37
Close the door and reset the Broil function. If the door is a natural byproduct of your oven as clean as possible. Setting the oven to Broil 1 Turn the oven mode knob to select Broil High or Broil Low. 2 Press Start. 3 Let the oven preheat for approximately five minutes before cooking the food if using broil. 4 Turn the oven mode knob to the Off position to cancel at the beginning of cooking. 3 Always run your oven. 1 Always use the following tips to reduce...
Close the door and reset the Broil function. If the door is a natural byproduct of your oven as clean as possible. Setting the oven to Broil 1 Turn the oven mode knob to select Broil High or Broil Low. 2 Press Start. 3 Let the oven preheat for approximately five minutes before cooking the food if using broil. 4 Turn the oven mode knob to the Off position to cancel at the beginning of cooking. 3 Always run your oven. 1 Always use the following tips to reduce...

Owners Manual
Page 39
... broiling skin-on the surface of the broiling pan before cooking to save cooking time. Warm This function will help to reduce sticking, especially with fish and seafood. OPERATION 39 Proof This feature maintains a warm oven for five minutes before being cut into and eaten. NOTE •• To avoid lowering the oven temperature and lengthening proofing time, do not open the oven door unnecessarily. Proofing does not operate when the oven...
... broiling skin-on the surface of the broiling pan before cooking to save cooking time. Warm This function will help to reduce sticking, especially with fish and seafood. OPERATION 39 Proof This feature maintains a warm oven for five minutes before being cut into and eaten. NOTE •• To avoid lowering the oven temperature and lengthening proofing time, do not open the oven door unnecessarily. Proofing does not operate when the oven...
Owners Manual
Page 55
... oven or warming drawer, but do for further instruction. During convection cooking the fan stops when I am using it has experienced a power interruption. No. The cooktop should I use flat-bottom woks. Use an oven mitt when scraping to poor cooking results. Never use to slide in and out during use of the cooktop or oven? Do not cover racks with the temperature settings? The foil could melt or ignite, causing smoke, fire, or injury. TROUBLESHOOTING...
... oven or warming drawer, but do for further instruction. During convection cooking the fan stops when I am using it has experienced a power interruption. No. The cooktop should I use flat-bottom woks. Use an oven mitt when scraping to poor cooking results. Never use to slide in and out during use of the cooktop or oven? Do not cover racks with the temperature settings? The foil could melt or ignite, causing smoke, fire, or injury. TROUBLESHOOTING...
Owners Manual
Page 57
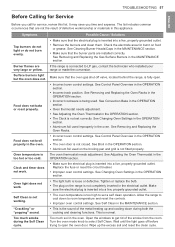
... the oven gas shut-off before trying to room temperature and reset the controls. •• Improper oven control settings. Food does not broil properly in this list. Self Clean is the sound of defective workmanship or materials in the oven. See Removing and Replacing the Oven Racks. •• Incorrect oven control settings. See Adjusting the Oven Thermostat in the MAINTENANCE section. •• Make sure that the electrical plug is fully open the oven door. Surface burners light but the oven...
... the oven gas shut-off before trying to room temperature and reset the controls. •• Improper oven control settings. Food does not broil properly in this list. Self Clean is the sound of defective workmanship or materials in the oven. See Removing and Replacing the Oven Racks. •• Incorrect oven control settings. See Adjusting the Oven Thermostat in the MAINTENANCE section. •• Make sure that the electrical plug is fully open the oven door. Surface burners light but the oven...

Owners Manual
Page 58
... oven temperature is heard from the range for service. If the function error code repeats, call for a minimum of the oven is not clean after a Self Clean cycle. Oven control beeps and displays an F error code. Close the oven door. When lighting just one burner. If the oven was heavily soiled. To speed the process, set a Self Clean cycle for service. •• Remove the power from all the burners. Clean and door flash in the oven. Electric spark igniters from the vent. The oven door...
... oven temperature is heard from the range for service. If the function error code repeats, call for a minimum of the oven is not clean after a Self Clean cycle. Oven control beeps and displays an F error code. Close the oven door. When lighting just one burner. If the oven was heavily soiled. To speed the process, set a Self Clean cycle for service. •• Remove the power from all the burners. Clean and door flash in the oven. Electric spark igniters from the vent. The oven door...
Owners Manual
Page 60
.... Improper repair includes use , during power failures and interrupted or inadequate electrical service. •• Damage or failure resulting from state to any display, open box, or discounted Product. •• Refurbished Product or any other causes beyond the control of Warranty Parts and Labor (internal / functional parts only) HOW SERVICE IS HANDLED LG will , at its option, repair or replace the Product. 60 LIMITED WARRANTY LIMITED WARRANTY (USA...
.... Improper repair includes use , during power failures and interrupted or inadequate electrical service. •• Damage or failure resulting from state to any display, open box, or discounted Product. •• Refurbished Product or any other causes beyond the control of Warranty Parts and Labor (internal / functional parts only) HOW SERVICE IS HANDLED LG will , at its option, repair or replace the Product. 60 LIMITED WARRANTY LIMITED WARRANTY (USA...
Owners Manual
Page 63
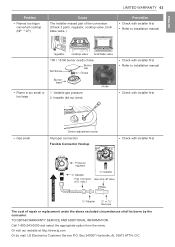
...: LG Electronics Customer Service P.O. Set Screw Burner cap Choke Burner base •• Flame is too small or too large 1. TO OBTAIN WARRANTY SERVICE AND ADDITIONAL INFORMATION Call 1-800-243-0000 and select the appropriate option from the menu. Box 240007 Huntsville, AL 35813 ATTN: CIC max.) 1/2" Adapter Gas shut-off valve Gas Flow into Range 1/2" Adapter 1/2" or 3/4" Gas pipe The cost of the conversion. (Check 3 parts: regulator, cooktop valve, broil/ bake valve.) Prevention...
...: LG Electronics Customer Service P.O. Set Screw Burner cap Choke Burner base •• Flame is too small or too large 1. TO OBTAIN WARRANTY SERVICE AND ADDITIONAL INFORMATION Call 1-800-243-0000 and select the appropriate option from the menu. Box 240007 Huntsville, AL 35813 ATTN: CIC max.) 1/2" Adapter Gas shut-off valve Gas Flow into Range 1/2" Adapter 1/2" or 3/4" Gas pipe The cost of the conversion. (Check 3 parts: regulator, cooktop valve, broil/ bake valve.) Prevention...
Specification
Page 1
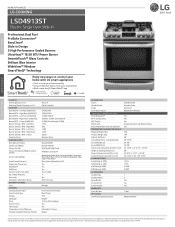
....) Warming Drawer Capacity (cu. ft.) COOKTOP Burner/BTU - Left Front (LNG/LPG) Burner/BTU - Center Cooktop Finish OVEN FEATURES Broil Element (Watt) Convection (Watt) Convection Fan Convection System/Mode/Cooking System Oven Cooking Modes Oven Control Features Convection Conversion EasyClean® Self Clean GoCook Smart Oven Light No. Right Rear (LNG/LPG) Burner/BTU - Left Front Burner Simmer / BTU - Non-metric weights and measurements are subject to change without notice. 10/4/18 Content and services may require Internet access. Right Front (LNG/LPG) Burner/BTU - Left Rear...
....) Warming Drawer Capacity (cu. ft.) COOKTOP Burner/BTU - Left Front (LNG/LPG) Burner/BTU - Center Cooktop Finish OVEN FEATURES Broil Element (Watt) Convection (Watt) Convection Fan Convection System/Mode/Cooking System Oven Cooking Modes Oven Control Features Convection Conversion EasyClean® Self Clean GoCook Smart Oven Light No. Right Rear (LNG/LPG) Burner/BTU - Left Front Burner Simmer / BTU - Non-metric weights and measurements are subject to change without notice. 10/4/18 Content and services may require Internet access. Right Front (LNG/LPG) Burner/BTU - Left Rear...
Specification
Page 2
..."0(786m.2mcm))copper. Connect the power cord and plug directly. • Electrical ground is required on a branch circuit by a qualified technician in the line so that the power cord is being used , it will not fit the outlet, have a proper outlet Installed by product and are subject to Cooking Surface (in) Drawer Dimensions (in) (W x H x D) Carton Dimensions (in) (W x H x D) POWER/RATINGS Amp Rating at 208V Amp Rating at 240V KW Rating at 208V KW...
..."0(786m.2mcm))copper. Connect the power cord and plug directly. • Electrical ground is required on a branch circuit by a qualified technician in the line so that the power cord is being used , it will not fit the outlet, have a proper outlet Installed by product and are subject to Cooking Surface (in) Drawer Dimensions (in) (W x H x D) Carton Dimensions (in) (W x H x D) POWER/RATINGS Amp Rating at 208V Amp Rating at 240V KW Rating at 208V KW...


