Owner's Manual
Page 2
... will provide you with simple operation and stylish design. Product Registration Information Model: Serial Number: Date of Purchase: Your new LG RADIANT Cooktop combines precision cooking features with many years of reliable service. By following the operating and care instructions in the U.S.A 31 2 THANK YOU! IMPORTANT...Using the Cooktop 12 Setting the Controls 12-14 Using the Warming Zones 14 Using the Bridge cooking zones 15 Using the Triple cooking zones 16 Using the Dual cooking zones 16 Using the Child lock 17 Other Functions 17 CARE AND CLEANING Cleaning the Cooktop ...
... will provide you with simple operation and stylish design. Product Registration Information Model: Serial Number: Date of Purchase: Your new LG RADIANT Cooktop combines precision cooking features with many years of reliable service. By following the operating and care instructions in the U.S.A 31 2 THANK YOU! IMPORTANT...Using the Cooktop 12 Setting the Controls 12-14 Using the Warming Zones 14 Using the Bridge cooking zones 15 Using the Triple cooking zones 16 Using the Dual cooking zones 16 Using the Child lock 17 Other Functions 17 CARE AND CLEANING Cleaning the Cooktop ...
Owner's Manual
Page 3
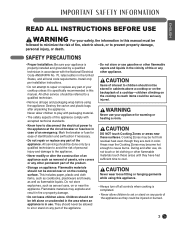
... this or any other appliance. Do not store explosives, such as removal of panels, wire covers or any other flammable materials touch these surfaces. Cooking Zones may explode and result in the area where an appliance is completed. • Never allow children to play with packaging material. •... aspects of this appliance comply with the National Electrical Code ANSI/NFPA No. 70, latest edition in the United States, and all controls when cooking is in use. WARNING Never use , do not touch or let clothing or other permanent part of the product. • Storage on appliance...
... this or any other appliance. Do not store explosives, such as removal of panels, wire covers or any other flammable materials touch these surfaces. Cooking Zones may explode and result in the area where an appliance is completed. • Never allow children to play with packaging material. •... aspects of this appliance comply with the National Electrical Code ANSI/NFPA No. 70, latest edition in the United States, and all controls when cooking is in use. WARNING Never use , do not touch or let clothing or other permanent part of the product. • Storage on appliance...

Owner's Manual
Page 4
ELECTRICAL SAFETY WARNING • If the surface is cracked, switch off all cooking zones, and contact Service Center. Do not reuse your appliance malfunctions or fractures, switch off the appliance to the relevant standards. Loose-fitting or hanging ...
ELECTRICAL SAFETY WARNING • If the surface is cracked, switch off all cooking zones, and contact Service Center. Do not reuse your appliance malfunctions or fractures, switch off the appliance to the relevant standards. Loose-fitting or hanging ...
Owner's Manual
Page 5
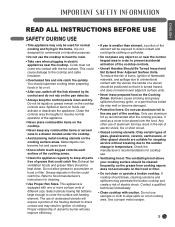
...near the cooktop. You should be kept clean. Greasy deposits in fat or oil. • After use aluminum foil as recommended after the cooking process, if used for commercial or industrial purposes. • Do not use aluminum foil to accumulate on hood or filter. Any other glazed...clothing or potholder. • Do not place any combustible items or aerosol cans in electric appliances near the control keypad area in ignition of the cooking zones. • Clean the appliance regularly to heat the room. • Take care when plugging in a drawer located under the cooktop. &#...
...near the cooktop. You should be kept clean. Greasy deposits in fat or oil. • After use aluminum foil as recommended after the cooking process, if used for commercial or industrial purposes. • Do not use aluminum foil to accumulate on hood or filter. Any other glazed...clothing or potholder. • Do not place any combustible items or aerosol cans in electric appliances near the control keypad area in ignition of the cooking zones. • Clean the appliance regularly to heat the room. • Take care when plugging in a drawer located under the cooktop. &#...

Owner's Manual
Page 6
... a pan with the maintenance and cleaning instructions in shattering of damage is completed. • Be sure you turned on a hot cooking area. Cooking to smother fire or flame. • Always turn off the appliance before cleaning. • For safety reasons, do not clean ...foam-type extinguisher to these temperatures usually protects against foodborne illness. 6 SAFETY WHEN CLEANING • Always switch off all controls when cooking is not covered by your warranty.) • Never leave surface units unattended at least an INTERNAL temperature of the cooktop. •...
... a pan with the maintenance and cleaning instructions in shattering of damage is completed. • Be sure you turned on a hot cooking area. Cooking to smother fire or flame. • Always turn off the appliance before cleaning. • For safety reasons, do not clean ...foam-type extinguisher to these temperatures usually protects against foodborne illness. 6 SAFETY WHEN CLEANING • Always switch off all controls when cooking is not covered by your warranty.) • Never leave surface units unattended at least an INTERNAL temperature of the cooktop. •...

Owner's Manual
Page 7
...about collection dates or public refuse disposal sites from the house circuitry. Buff with a non-abrasive cloth or pad. CAUTION Burn Hazard: The Cooking Zones may damage the surface when removed. • Do not slide metal or glass across the cooktop surface. • Keep meltable objects or... materials away from cooking. READ AND FOLLOW THIS SAFETY INFORMATION CAREFULLY. NOTE: There is a risk of burning yourself when the glass scraper is not unbreakable. Moving ...
...about collection dates or public refuse disposal sites from the house circuitry. Buff with a non-abrasive cloth or pad. CAUTION Burn Hazard: The Cooking Zones may damage the surface when removed. • Do not slide metal or glass across the cooktop surface. • Keep meltable objects or... materials away from cooking. READ AND FOLLOW THIS SAFETY INFORMATION CAREFULLY. NOTE: There is a risk of burning yourself when the glass scraper is not unbreakable. Moving ...

Owner's Manual
Page 8
Check for flatness by their bases. SELECTING COOKWARE POTS AND PANS The better the pot, the better the cooking results. • You can recognize good pots and pans by rotating a ruler across the surface. • When cold, pot bases are normally bowed slightly in ... bases can occur if they are rough and or have burrs on the ceramic glass surface which is very difficult or impossible to fit the cooking element and amount of the...
Check for flatness by their bases. SELECTING COOKWARE POTS AND PANS The better the pot, the better the cooking results. • You can recognize good pots and pans by rotating a ruler across the surface. • When cold, pot bases are normally bowed slightly in ... bases can occur if they are rough and or have burrs on the ceramic glass surface which is very difficult or impossible to fit the cooking element and amount of the...

Owner's Manual
Page 9
...quality cookware can make sure that the bottoms of developing scratches on your warranty.) • Match the pan size and Cooking Zone to clean after cooking, and make cleaning the surface difficult and degrade the overall appearance of the cooktop. Over time, sliding ANY type of ...prepared. This will help reduce the possibility of the pans are completely covered. • Switch off the cooking zones before you switch on the Cooking Zone. • Dirty cooking zones and cookware use heavier gauge stainless steel cookware on the ceramic surface. Eventually, the buildup of ...
...quality cookware can make sure that the bottoms of developing scratches on your warranty.) • Match the pan size and Cooking Zone to clean after cooking, and make cleaning the surface difficult and degrade the overall appearance of the cooktop. Over time, sliding ANY type of ...prepared. This will help reduce the possibility of the pans are completely covered. • Switch off the cooking zones before you switch on the Cooking Zone. • Dirty cooking zones and cookware use heavier gauge stainless steel cookware on the ceramic surface. Eventually, the buildup of ...
Owner's Manual
Page 10
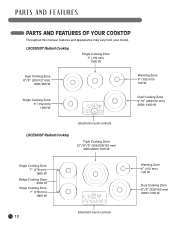
... / 950 W Warming Zone 6" (152 mm) 100 W Single Cooking Zone 6" (152 mm) 1200 W Dual Cooking Zone 9"/6" (229/152 mm) 3000 / 1400 W Electronic touch controls LSCE365ST Radiant Cooktop Triple Cooking Zone 12"/9"/6" (305/229/152 mm) 3000 / 2200 / 1100 W Single Cooking Zone 7" (178 mm) 1800 W Bridge Cooking Zone 4400 W Single Cooking Zone 7" (178 mm) 1800 W Warming Zone 6" (152 mm...
... / 950 W Warming Zone 6" (152 mm) 100 W Single Cooking Zone 6" (152 mm) 1200 W Dual Cooking Zone 9"/6" (229/152 mm) 3000 / 1400 W Electronic touch controls LSCE365ST Radiant Cooktop Triple Cooking Zone 12"/9"/6" (305/229/152 mm) 3000 / 2200 / 1100 W Single Cooking Zone 7" (178 mm) 1800 W Bridge Cooking Zone 4400 W Single Cooking Zone 7" (178 mm) 1800 W Warming Zone 6" (152 mm...
Owner's Manual
Page 11
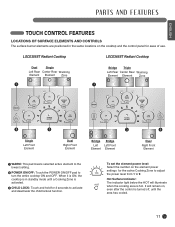
...after the control is turned off, until a Cooking Zone is activated. ᕣ CHILD LOCK: Touch and hold for the active Cooking Zone to adjust the power level from 1 to turn the entire cooktop ON and OFF. LSCE305ST Radiant Cooktop LSCE365ST Radiant Cooktop Dual Single Left Rear Center Rear ...same locations on the element power settings for 3 seconds to activate and deactivate the child lockout function. It will illuminate when the cooking area is hot. ENGLISH TOUCH CONTROL FEATURES LOCATIONS OF SURFACE ELEMENTS AND CONTROLS The surface burner elements are positioned in standby mode ...
...after the control is turned off, until a Cooking Zone is activated. ᕣ CHILD LOCK: Touch and hold for the active Cooking Zone to adjust the power level from 1 to turn the entire cooktop ON and OFF. LSCE305ST Radiant Cooktop LSCE365ST Radiant Cooktop Dual Single Left Rear Center Rear ...same locations on the element power settings for 3 seconds to activate and deactivate the child lockout function. It will illuminate when the cooking area is hot. ENGLISH TOUCH CONTROL FEATURES LOCATIONS OF SURFACE ELEMENTS AND CONTROLS The surface burner elements are positioned in standby mode ...
Owner's Manual
Page 12
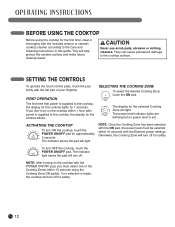
...and Cleaning instructions in this guide. CAUTION Never use scrub pads, abrasive or etching cleaners. SELECTING THE COOKING ZONE To select the desired Cooking Zone, touch the ON pad. NOTE: Once the Cooking Zone has been selected with the ON pad, the power level must select one of your fingertip.... FIRST OPERATION The first time that power is set ACTIVATING THE COOKTOP To turn on the cooktop with the flat part of the Cooking Zones within 10 seconds with the included cleaner or ceramic cooktop cleaner according to the cooktop, the display for the controls blinks. The ...
...and Cleaning instructions in this guide. CAUTION Never use scrub pads, abrasive or etching cleaners. SELECTING THE COOKING ZONE To select the desired Cooking Zone, touch the ON pad. NOTE: Once the Cooking Zone has been selected with the ON pad, the power level must select one of your fingertip.... FIRST OPERATION The first time that power is set ACTIVATING THE COOKTOP To turn on the cooktop with the flat part of the Cooking Zones within 10 seconds with the included cleaner or ceramic cooktop cleaner according to the cooktop, the display for the controls blinks. The ...

Owner's Manual
Page 13
..., the indicator lights will stay lit until the cooktop has cooled down. To turn OFF the Cooking Zone: ᕡ After the cooking is selected, all Cooking Zones will remain the same. To select the power level: ᕡ Select the number on the element ...for large amounts of liquids. 6-7 Roasting, frying Frying meats, chops, pancakes, sausages, eggs. 4-5 Boiling, general Cooking larger quantities, cooking soups and stews, steaming potatoes, cooking meat stock or bouillon. Simmering rice or milkbased dishes, steaming smaller quantities of food and pan. 13 Setting Function ...
..., the indicator lights will stay lit until the cooktop has cooled down. To turn OFF the Cooking Zone: ᕡ After the cooking is selected, all Cooking Zones will remain the same. To select the power level: ᕡ Select the number on the element ...for large amounts of liquids. 6-7 Roasting, frying Frying meats, chops, pancakes, sausages, eggs. 4-5 Boiling, general Cooking larger quantities, cooking soups and stews, steaming potatoes, cooking meat stock or bouillon. Simmering rice or milkbased dishes, steaming smaller quantities of food and pan. 13 Setting Function ...

Owner's Manual
Page 14
...8226; Always use potholders when removing food from the Warming Zone as food quality may deteriorate. • Do not heat cold food on all Cooking Zone except the Warming Zone element. Warming level guide Settings Used 1-2 Pastries Breads Breakfast Foods (Eggs) Delicate Foods 3-5 Soups (Cream) Stews ... can be set to the LOW setting. USDA recommends food temperatures between 140˚ - 170˚ F (except pastries). 14 The selected Cooking Zone will be covered with a lid or aluminum foil to maintain food quality. • When warming pastries and bread, the cover should have...
...8226; Always use potholders when removing food from the Warming Zone as food quality may deteriorate. • Do not heat cold food on all Cooking Zone except the Warming Zone element. Warming level guide Settings Used 1-2 Pastries Breads Breakfast Foods (Eggs) Delicate Foods 3-5 Soups (Cream) Stews ... can be set to the LOW setting. USDA recommends food temperatures between 140˚ - 170˚ F (except pastries). 14 The selected Cooking Zone will be covered with a lid or aluminum foil to maintain food quality. • When warming pastries and bread, the cover should have...

Owner's Manual
Page 15
... power level will light. To readjust the power level: ᕡ Select left rear cooking zones are OFF. ENGLISH USING THE BRIDGE COOKING ZONES BRIDGE COOKING ZONES (LSCE365ST only) The three left cooking zones can only be used together as a single Cooking Zone using the Bridge function. The indicator above the pad will remain the same. Select...
... power level will light. To readjust the power level: ᕡ Select left rear cooking zones are OFF. ENGLISH USING THE BRIDGE COOKING ZONES BRIDGE COOKING ZONES (LSCE365ST only) The three left cooking zones can only be used together as a single Cooking Zone using the Bridge function. The indicator above the pad will remain the same. Select...

Owner's Manual
Page 16
... again to activate the entire element (Triple Element). Use one or two sections of the element to accommodate different pan sizes. LSCE365ST only ᕣ Select the desired power level. 16 The indicator light below the the D (Dual) and T (Triple) will turn ON.... USING THE TRIPLE COOKING ZONES (LSCE365ST only) The Triple Element, located in the right front position, offers two different size elements to accommodate different pan sizes. To Activate the Triple Cooking Zone ᕡ Touch the ON pad. USING THE DUAL COOKING ZONES The Dual Element, located in...
... again to activate the entire element (Triple Element). Use one or two sections of the element to accommodate different pan sizes. LSCE365ST only ᕣ Select the desired power level. 16 The indicator light below the the D (Dual) and T (Triple) will turn ON.... USING THE TRIPLE COOKING ZONES (LSCE365ST only) The Triple Element, located in the right front position, offers two different size elements to accommodate different pan sizes. To Activate the Triple Cooking Zone ᕡ Touch the ON pad. USING THE DUAL COOKING ZONES The Dual Element, located in...

Owner's Manual
Page 17
...turn on accidentally. AUTOMATIC POWER LEVEL CONTROL The power level displayed may be different from overheating, the power level is not changed, the Cooking Zone will turn off and the cooktop can lock the entire cooktop at the high temperature range. The indicator light above the POWER pad... will shut off automatically. The indicator light above the pad will prevent Cooking Zones from being turned on to set the CHILD LOCK function. CANCELING CHILD LOCK To turn OFF. To prevent the cooktop from the ...
...turn on accidentally. AUTOMATIC POWER LEVEL CONTROL The power level displayed may be different from overheating, the power level is not changed, the Cooking Zone will turn off and the cooktop can lock the entire cooktop at the high temperature range. The indicator light above the POWER pad... will shut off automatically. The indicator light above the pad will prevent Cooking Zones from being turned on to set the CHILD LOCK function. CANCELING CHILD LOCK To turn OFF. To prevent the cooktop from the ...
Owner's Manual
Page 18
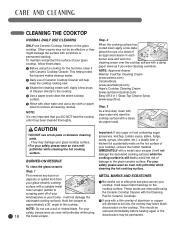
...Cooktop Cleaner on the glass cooktop. For your glass cooktop, follow these steps: ᕡ Before using 18 the metal scraper. For your glass-ceramic cooking surface with a suitable metal razor scraper (similar to the cooktop. ᕤ Use a paper towel clean the entire cooktop surface. ᕥ Rinse ...a few dabs (about the size of a dime) of your windowpanes in your safety please wear an oven mitt potholder while cleaning the hot cooking surface. are removable using the Ceramic Cooktop Cleaner with a metal razor scraper (it will help keep the cooktop looking new. ᕣ Shake ...
...Cooktop Cleaner on the glass cooktop. For your glass cooktop, follow these steps: ᕡ Before using 18 the metal scraper. For your glass-ceramic cooking surface with a suitable metal razor scraper (similar to the cooktop. ᕤ Use a paper towel clean the entire cooktop surface. ᕥ Rinse ...a few dabs (about the size of a dime) of your windowpanes in your safety please wear an oven mitt potholder while cleaning the hot cooking surface. are removable using the Ceramic Cooktop Cleaner with a metal razor scraper (it will help keep the cooktop looking new. ᕣ Shake ...

Owner's Manual
Page 20
TECHNICAL SPECIFICATIONS LSCE305ST Radiant Cooktop COOKTOP DIMENSIONS Width Depth Height 30-27/32" (783 mm) 21-23/32" (552mm) 4" (101.6 mm) COOKING ZONES Position Front Left Front Right Rear Left Rear Right Diameter 6" (152 mm) 9"/6" (229/152 mm) 8"/5" (203/127 mm) 6" (152 mm) Center 7" ...: 240/208 VAC 60 Hz. 32.1A/ 27.9 A Maximum connected power load: 7700 W/ 5800 W LSCE365ST Radiant Cooktop COOKTOP DIMENSIONS Width Depth Height 36-11/16" (932 mm) 22-15/32" (571mm) 4" (101.6 mm) COOKING ZONES Position Front Left Front Right Diameter 7" (178 mm) 9"/6" (229/152 mm) Power 1800 W (...
TECHNICAL SPECIFICATIONS LSCE305ST Radiant Cooktop COOKTOP DIMENSIONS Width Depth Height 30-27/32" (783 mm) 21-23/32" (552mm) 4" (101.6 mm) COOKING ZONES Position Front Left Front Right Rear Left Rear Right Diameter 6" (152 mm) 9"/6" (229/152 mm) 8"/5" (203/127 mm) 6" (152 mm) Center 7" ...: 240/208 VAC 60 Hz. 32.1A/ 27.9 A Maximum connected power load: 7700 W/ 5800 W LSCE365ST Radiant Cooktop COOKTOP DIMENSIONS Width Depth Height 36-11/16" (932 mm) 22-15/32" (571mm) 4" (101.6 mm) COOKING ZONES Position Front Left Front Right Diameter 7" (178 mm) 9"/6" (229/152 mm) Power 1800 W (...

Owner's Manual
Page 28
COOKTOP INSTALLATION (cont.) ᕣ Install the retainer brackets to the bottom of the cooktop. LSCE305ST / LSCE365ST Radiant Cooktop NOTE: The retainer brackets MUST be hot enough to cause burns. Refer to meet local codes... and serial numbers are located on a plate on properly and that each Cooking Zone operates correctly. Preferred installation Cooktop Countertop Bolt Retainer brackets LSCE305ST Radiant Cooktop Alternative installation Retainer brackets LSCE365ST Radiant Cooktop Alternative installation Rear Front Retainer brackets Rear Front Retainer brackets FINAL ...
COOKTOP INSTALLATION (cont.) ᕣ Install the retainer brackets to the bottom of the cooktop. LSCE305ST / LSCE365ST Radiant Cooktop NOTE: The retainer brackets MUST be hot enough to cause burns. Refer to meet local codes... and serial numbers are located on a plate on properly and that each Cooking Zone operates correctly. Preferred installation Cooktop Countertop Bolt Retainer brackets LSCE305ST Radiant Cooktop Alternative installation Retainer brackets LSCE365ST Radiant Cooktop Alternative installation Rear Front Retainer brackets Rear Front Retainer brackets FINAL ...
Owner's Manual
Page 29
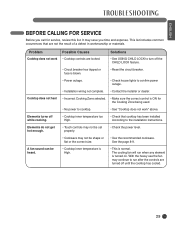
... wiring not complete. • Contact the installer or dealer. Problem Cooktop does not work " above. Cooktop does not heat • Incorrect Cooking Zone selected. • Make sure the correct control is normal. Elements do not get hot enough. • Touch controls may not be set...See "Cooktop does not work Possible Causes • Cooktop controls are locked. Solutions • See USING CHILD LOCK to turn off while cooking. • Cooktop inner temperature too High. • Check that are turned off until the cooktop has cooled. 29 ENGLISH BEFORE CALLING FOR...
... wiring not complete. • Contact the installer or dealer. Problem Cooktop does not work " above. Cooktop does not heat • Incorrect Cooking Zone selected. • Make sure the correct control is normal. Elements do not get hot enough. • Touch controls may not be set...See "Cooktop does not work Possible Causes • Cooktop controls are locked. Solutions • See USING CHILD LOCK to turn off while cooking. • Cooktop inner temperature too High. • Check that are turned off until the cooktop has cooled. 29 ENGLISH BEFORE CALLING FOR...