Owner's Manual
Page 1
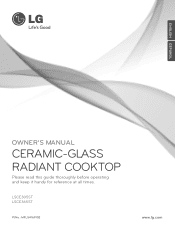
LSCE305ST LSCE365ST P/No.: MFL54169102 www.lg.com ENGLISH ESPAÑOL OWNER'S MANUAL CERAMIC-GLASS RADIANT COOKTOP Please read this guide thoroughly before operating and keep it handy for reference at all times.
LSCE305ST LSCE365ST P/No.: MFL54169102 www.lg.com ENGLISH ESPAÑOL OWNER'S MANUAL CERAMIC-GLASS RADIANT COOKTOP Please read this guide thoroughly before operating and keep it handy for reference at all times.
Owner's Manual
Page 2
Product Registration Information Model: Serial Number: Date of Purchase: Congratulations on your cooktop will provide you with simple operation and stylish design. Your new LG RADIANT Cooktop combines precision cooking features with many years of reliable service. By following the operating and care instructions in the U.S.A 31 2 THANK YOU! IMPORTANT SAFETY INFORMATION ...
Product Registration Information Model: Serial Number: Date of Purchase: Congratulations on your cooktop will provide you with simple operation and stylish design. Your new LG RADIANT Cooktop combines precision cooking features with many years of reliable service. By following the operating and care instructions in the U.S.A 31 2 THANK YOU! IMPORTANT SAFETY INFORMATION ...
Owner's Manual
Page 3
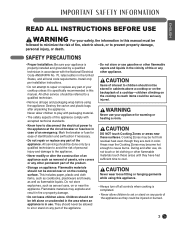
...CAUTION Items of interest to children should never be allowed to reach items could be stored in cabinets above a cooktop or on the backsplash of the appliance as aerosol cans, on the cooktop to sit or stand on any part of the product. • Storage on appliance: Flammable materials should be...manual must be hot from residual heat even though they have had sufficient time to set or stand on any other permanent part of your cooktop unless it is in the United States, and all controls when cooking is properly installed and grounded by a qualified technician to avoid the ...
...CAUTION Items of interest to children should never be allowed to reach items could be stored in cabinets above a cooktop or on the backsplash of the appliance as aerosol cans, on the cooktop to sit or stand on any part of the product. • Storage on appliance: Flammable materials should be...manual must be hot from residual heat even though they have had sufficient time to set or stand on any other permanent part of your cooktop unless it is in the United States, and all controls when cooking is properly installed and grounded by a qualified technician to avoid the ...

Owner's Manual
Page 4
...hot during use water or flour on hot surfaces may only be kept away. 4 Young children should never be worn while using the COOKTOP, never use aluminum foil, products wrapped in aluminum foil, or deep-frozen food in suitable cabinets and workplaces which conform to avoid a ...to burst and result in burns from steam. This ensures sufficient protection against electric shock as required by certification agencies. • If your COOKTOP until the glass surface has been changed. • When using the appliance. Smother the fire with the appliance. • Accessible parts ...
...hot during use water or flour on hot surfaces may only be kept away. 4 Young children should never be worn while using the COOKTOP, never use aluminum foil, products wrapped in aluminum foil, or deep-frozen food in suitable cabinets and workplaces which conform to avoid a ...to burst and result in burns from steam. This ensures sufficient protection against electric shock as required by certification agencies. • If your COOKTOP until the glass surface has been changed. • When using the appliance. Smother the fire with the appliance. • Accessible parts ...
Owner's Manual
Page 5
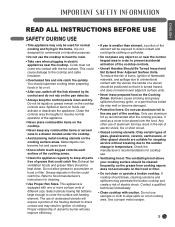
...cause burns. • Know which touch keypad controls each surface of the cooking zones. • Clean the appliance regularly to the cooktop and cable insulation. • Overheated fats and oils catch fire quickly. Check the manufacturer's recommendations for commercial or industrial purposes. &#...• Ventilating hood: The ventilating hood above your cooking surface should break, cleaning solutions and spillovers may result in temperature. If cooktop should be positioned so that could ignite clothing or potholder. • Do not place any combustible items or aerosol cans in the...
...cause burns. • Know which touch keypad controls each surface of the cooking zones. • Clean the appliance regularly to the cooktop and cable insulation. • Overheated fats and oils catch fire quickly. Check the manufacturer's recommendations for commercial or industrial purposes. &#...• Ventilating hood: The ventilating hood above your cooking surface should break, cleaning solutions and spillovers may result in temperature. If cooktop should be positioned so that could ignite clothing or potholder. • Do not place any combustible items or aerosol cans in the...

Owner's Manual
Page 6
...appliance before cleaning. • For safety reasons, do not clean the appliance with a steam jet or high-pressure cleaner. • Clean the cooktop in accordance with the maintenance and cleaning instructions in a pan with a lid or cookie sheet. SAFETY WHEN CLEANING • Always switch off all...pot holder touch hot heating elements. Do not use sponges or cloth to at least an INTERNAL temperature of the glass. • Clean CookTop With Caution. COOK MEAT AND POULTRY THOROUGHLY Cook meat and poultry thoroughly-meat to wipe spills on grease fires. SAFETY DURING USE (cont...
...appliance before cleaning. • For safety reasons, do not clean the appliance with a steam jet or high-pressure cleaner. • Clean the cooktop in accordance with the maintenance and cleaning instructions in a pan with a lid or cookie sheet. SAFETY WHEN CLEANING • Always switch off all...pot holder touch hot heating elements. Do not use sponges or cloth to at least an INTERNAL temperature of the glass. • Clean CookTop With Caution. COOK MEAT AND POULTRY THOROUGHLY Cook meat and poultry thoroughly-meat to wipe spills on grease fires. SAFETY DURING USE (cont...

Owner's Manual
Page 7
...To protect the environment, it . • Be very cautious if using your local health council or environmental health office. CAUTION Before disposing of the cooktop. • Do not use cookware with rough or uneven bottoms. This cookware can cause scratches on glass. • If sugar or a mixture...of danger. CAUTION Burn Hazard: The Cooking Zones may damage the surface when removed. • Do not slide metal or glass across the cooktop surface. • Keep meltable objects or materials away from cooking. Moving these should be damaged if hard or sharp objects fall on the ...
...To protect the environment, it . • Be very cautious if using your local health council or environmental health office. CAUTION Before disposing of the cooktop. • Do not use cookware with rough or uneven bottoms. This cookware can cause scratches on glass. • If sugar or a mixture...of danger. CAUTION Burn Hazard: The Cooking Zones may damage the surface when removed. • Do not slide metal or glass across the cooktop surface. • Keep meltable objects or materials away from cooking. Moving these should be damaged if hard or sharp objects fall on the ...

Owner's Manual
Page 9
...clean after washing vegetables) which are dragged with large amounts of liquid, use large pots so that nothing can affect the ceramic cooktop. (This type of the cooktop. In addition: • Do not use more electricity. • Whenever possible, always have the same size as the cooking ...zone. • Using a pressure cooker shortens the cooking times by your ceramic cooktop surface. ENGLISH SELECTING COOKWARE (cont.) AVOIDING SCRATCHES It is not covered by up to 50%. 9 This will help reduce the possibility of food...
...clean after washing vegetables) which are dragged with large amounts of liquid, use large pots so that nothing can affect the ceramic cooktop. (This type of the cooktop. In addition: • Do not use more electricity. • Whenever possible, always have the same size as the cooking ...zone. • Using a pressure cooker shortens the cooking times by your ceramic cooktop surface. ENGLISH SELECTING COOKWARE (cont.) AVOIDING SCRATCHES It is not covered by up to 50%. 9 This will help reduce the possibility of food...
Owner's Manual
Page 10
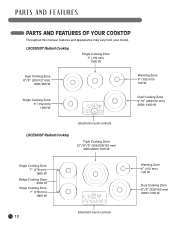
...) 1900 / 950 W Warming Zone 6" (152 mm) 100 W Single Cooking Zone 6" (152 mm) 1200 W Dual Cooking Zone 9"/6" (229/152 mm) 3000 / 1400 W Electronic touch controls LSCE365ST Radiant Cooktop Triple Cooking Zone 12"/9"/6" (305/229/152 mm) 3000 / 2200 / 1100 W Single Cooking Zone 7" (178 mm) 1800 W Bridge Cooking Zone 4400 W Single Cooking Zone 7" (178...
...) 1900 / 950 W Warming Zone 6" (152 mm) 100 W Single Cooking Zone 6" (152 mm) 1200 W Dual Cooking Zone 9"/6" (229/152 mm) 3000 / 1400 W Electronic touch controls LSCE365ST Radiant Cooktop Triple Cooking Zone 12"/9"/6" (305/229/152 mm) 3000 / 2200 / 1100 W Single Cooking Zone 7" (178 mm) 1800 W Bridge Cooking Zone 4400 W Single Cooking Zone 7" (178...
Owner's Manual
Page 11
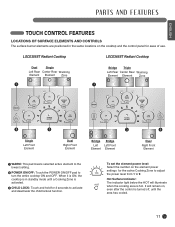
... on the element power settings for the active Cooking Zone to adjust the power level from 1 to turn the entire cooktop ON and OFF. When it is ON, the cooktop is in the same locations on , even after the control is turned off, until a Cooking Zone is hot....of use. Hot Surface Indicator: The indicator light below the HOT will remain on the cooktop and the control panel for 3 seconds to activate and deactivate the child lockout function. LSCE305ST Radiant Cooktop LSCE365ST Radiant Cooktop Dual Single Left Rear Center Rear Warming Element Element Zone 1 Bridge Triple Left Rear Center...
... on the element power settings for the active Cooking Zone to adjust the power level from 1 to turn the entire cooktop ON and OFF. When it is ON, the cooktop is in the same locations on , even after the control is turned off, until a Cooking Zone is hot....of use. Hot Surface Indicator: The indicator light below the HOT will remain on the cooktop and the control panel for 3 seconds to activate and deactivate the child lockout function. LSCE305ST Radiant Cooktop LSCE365ST Radiant Cooktop Dual Single Left Rear Center Rear Warming Element Element Zone 1 Bridge Triple Left Rear Center...
Owner's Manual
Page 12
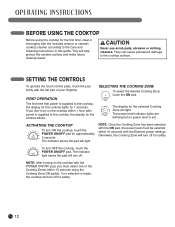
...Zone ON pad(s). CAUTION Never use scrub pads, abrasive or etching cleaners. FIRST OPERATION The first time that power is set ACTIVATING THE COOKTOP To turn OFF the cooktop, touch the POWER ON/OFF pad. SELECTING THE COOKING ZONE To select the desired Cooking Zone, touch the ON pad. NOTE: ... to the Care and Cleaning instructions in this guide. Otherwise, the Cooking Zone will turn off. If no power level is supplied to the cooktop, the display for the selected Cooking Zone will help protect the ceramic surface and make future cleanup easier. If you must be selected within 1...
...Zone ON pad(s). CAUTION Never use scrub pads, abrasive or etching cleaners. FIRST OPERATION The first time that power is set ACTIVATING THE COOKTOP To turn OFF the cooktop, touch the POWER ON/OFF pad. SELECTING THE COOKING ZONE To select the desired Cooking Zone, touch the ON pad. NOTE: ... to the Care and Cleaning instructions in this guide. Otherwise, the Cooking Zone will turn off. If no power level is supplied to the cooktop, the display for the selected Cooking Zone will help protect the ceramic surface and make future cleanup easier. If you must be selected within 1...

Owner's Manual
Page 13
Although the cooktop is shown. Setting Function Used for 9 Fast heating Bringing liquids to a boil. 7-9 Heaving browning, Browning meats, heating oil deep fat frying for deep-fat frying, ... Melting Steaming vegetables, braising meats. After activating the Cook Zone, the indicator lights will stay lit until the cooktop has cooled down. Fluffy omelettes, keeping dishes warm, melting butter or chocolate. WARNING Your cooktop has a residual heat indicator for the selected Cooking Zone can be set from 1 to -serve meals. ENGLISH SETTING...
Although the cooktop is shown. Setting Function Used for 9 Fast heating Bringing liquids to a boil. 7-9 Heaving browning, Browning meats, heating oil deep fat frying for deep-fat frying, ... Melting Steaming vegetables, braising meats. After activating the Cook Zone, the indicator lights will stay lit until the cooktop has cooled down. Fluffy omelettes, keeping dishes warm, melting butter or chocolate. WARNING Your cooktop has a residual heat indicator for the selected Cooking Zone can be set from 1 to -serve meals. ENGLISH SETTING...

Owner's Manual
Page 14
...level on the element power settings. The indicator light above WARM will be hot. • Never warm food for longer than one hour (eggs for cooktop use. • Always use potholders when removing food from the Warming Zone as cookware and plates will turn ON. To change the power level: Touch... a new number on the element power settings. To activate the warming zone: Touch the WARMING ZONE ON pad. SETTING THE CONTROLS (cont.) WARM The cooktop has a WARM setting feature that can be used on the Warming Zone. • The quantity and type of food being held may affect the required...
...level on the element power settings. The indicator light above WARM will be hot. • Never warm food for longer than one hour (eggs for cooktop use. • Always use potholders when removing food from the Warming Zone as cookware and plates will turn ON. To change the power level: Touch... a new number on the element power settings. To activate the warming zone: Touch the WARMING ZONE ON pad. SETTING THE CONTROLS (cont.) WARM The cooktop has a WARM setting feature that can be used on the Warming Zone. • The quantity and type of food being held may affect the required...

Owner's Manual
Page 17
... . The indicator above the POWER pad will turn on accidentally. The indicator light above the pad will go off and the cooktop can lock the entire cooktop at the high temperature range. AUTOMATIC POWER LEVEL CONTROL The power level displayed may be different from being turned on to set ...not changed, the Cooking Zone will prevent Cooking Zones from the actual power level at any time when it is locked. SETTING CHILD LOCK The cooktop must be used normally. Touch and hold the CHILD LOCK pad for approximately 2 seconds. CANCELING CHILD LOCK To turn OFF. The indicator light ...
... . The indicator above the POWER pad will turn on accidentally. The indicator light above the pad will go off and the cooktop can lock the entire cooktop at the high temperature range. AUTOMATIC POWER LEVEL CONTROL The power level displayed may be different from being turned on to set ...not changed, the Cooking Zone will prevent Cooking Zones from the actual power level at any time when it is locked. SETTING CHILD LOCK The cooktop must be used normally. Touch and hold the CHILD LOCK pad for approximately 2 seconds. CANCELING CHILD LOCK To turn OFF. The indicator light ...
Owner's Manual
Page 18
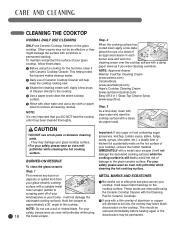
...effective or they might damage the surface with clear water and use a dull or nicked blade. For your home - it will help keep the cooktop looking new. ᕣ Shake the cleaning cream well. These marks are allowed to the glass-ceramic surface. Step. 2 When the cooking surface ... towel. It will not damage the ᕡ Be careful not to remove all cleaning residue. For your cooktop. CLEANING THE COOKTOP NORMAL DAILY USE CLEANING ONLY use Ceramic Cooktop Cleaner on the cooktop surface. Other creams may leave black NOTE: Do not use a dry cloth or paper towel to slide pots...
...effective or they might damage the surface with clear water and use a dull or nicked blade. For your home - it will help keep the cooktop looking new. ᕣ Shake the cleaning cream well. These marks are allowed to the glass-ceramic surface. Step. 2 When the cooking surface ... towel. It will not damage the ᕡ Be careful not to remove all cleaning residue. For your cooktop. CLEANING THE COOKTOP NORMAL DAILY USE CLEANING ONLY use Ceramic Cooktop Cleaner on the cooktop surface. Other creams may leave black NOTE: Do not use a dry cloth or paper towel to slide pots...
Owner's Manual
Page 19
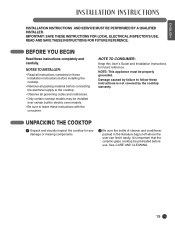
... instructions contained in these installation instructions before installing the cooktop. • Remove all packing material before connecting the electrical supply to the cooktop. • Observe all governing codes and ordinances. • Only certain cooktop models may be installed over certain built-in the ...and conditioner packed in electric oven models. • Be sure to follow these instructions is important that the ceramic-glass cooktop be properly grounded. IMPORTANT: SAVE THESE INSTRUCTIONS FOR LOCAL ELECTRICAL INSPECTOR'S USE. BEFORE YOU BEGIN Read these instructions with the...
... instructions contained in these installation instructions before installing the cooktop. • Remove all packing material before connecting the electrical supply to the cooktop. • Observe all governing codes and ordinances. • Only certain cooktop models may be installed over certain built-in the ...and conditioner packed in electric oven models. • Be sure to follow these instructions is important that the ceramic-glass cooktop be properly grounded. IMPORTANT: SAVE THESE INSTRUCTIONS FOR LOCAL ELECTRICAL INSPECTOR'S USE. BEFORE YOU BEGIN Read these instructions with the...

Owner's Manual
Page 20
TECHNICAL SPECIFICATIONS LSCE305ST Radiant Cooktop COOKTOP DIMENSIONS Width Depth Height 30-27/32" (783 mm) 21-23/32" (552mm) 4" (101.6 mm) COOKING ZONES Position Front Left Front Right Rear Left Rear ...-3/8" (746 mm) Depth 20-1/4" (515 mm) ELECTRICAL SPECIFICATIONS Connection voltage: 240/208 VAC 60 Hz. 32.1A/ 27.9 A Maximum connected power load: 7700 W/ 5800 W LSCE365ST Radiant Cooktop COOKTOP DIMENSIONS Width Depth Height 36-11/16" (932 mm) 22-15/32" (571mm) 4" (101.6 mm) COOKING ZONES Position Front Left Front Right Diameter 7" (178 mm...
TECHNICAL SPECIFICATIONS LSCE305ST Radiant Cooktop COOKTOP DIMENSIONS Width Depth Height 30-27/32" (783 mm) 21-23/32" (552mm) 4" (101.6 mm) COOKING ZONES Position Front Left Front Right Rear Left Rear ...-3/8" (746 mm) Depth 20-1/4" (515 mm) ELECTRICAL SPECIFICATIONS Connection voltage: 240/208 VAC 60 Hz. 32.1A/ 27.9 A Maximum connected power load: 7700 W/ 5800 W LSCE365ST Radiant Cooktop COOKTOP DIMENSIONS Width Depth Height 36-11/16" (932 mm) 22-15/32" (571mm) 4" (101.6 mm) COOKING ZONES Position Front Left Front Right Diameter 7" (178 mm...

Owner's Manual
Page 21
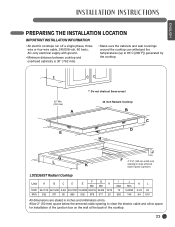
...cable, 240/208 volt, 60 hertz, AC-only electrical supply with ground. • Minimum distance between cooktop and overhead cabinetry is present. Allow 2" (50 mm) space below the armored cable opening to route armored... is 30" (762 mm). • Make sure the cabinets and wall coverings around the cooktop can withstand the temperatures (up to clear the electric cable and allow space for installation of ...the junction box on the wall at the back of the cooktop. 21 I J E H K L Min Min Max Min Inch 30-27/32 21-23/32 3-3/4 28...
...cable, 240/208 volt, 60 hertz, AC-only electrical supply with ground. • Minimum distance between cooktop and overhead cabinetry is present. Allow 2" (50 mm) space below the armored cable opening to route armored... is 30" (762 mm). • Make sure the cabinets and wall coverings around the cooktop can withstand the temperatures (up to clear the electric cable and allow space for installation of ...the junction box on the wall at the back of the cooktop. 21 I J E H K L Min Min Max Min Inch 30-27/32 21-23/32 3-3/4 28...
Owner's Manual
Page 22
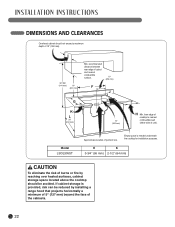
...distance between rear edge of unit). Empty space is provided, risk can be avoided. If cabinet storage is needed underneath the cooktop for installation purposes. from edge of cooktop to nearest combustible wall (either side of cutout and nearest combustible surface. 10" (254 mm) F J G K L... (64 mm) CAUTION To eliminate the risk of burns or fire by reaching over heated surfaces, cabinet storage space located above the cooktop should not exceed a maximum depth of junction box. DIMENSIONS AND CLEARANCES Overhead cabinet should be reduced by installing a range hood that ...
...distance between rear edge of unit). Empty space is provided, risk can be avoided. If cabinet storage is needed underneath the cooktop for installation purposes. from edge of cooktop to nearest combustible wall (either side of cutout and nearest combustible surface. 10" (254 mm) F J G K L... (64 mm) CAUTION To eliminate the risk of burns or fire by reaching over heated surfaces, cabinet storage space located above the cooktop should not exceed a maximum depth of junction box. DIMENSIONS AND CLEARANCES Overhead cabinet should be reduced by installing a range hood that ...
Owner's Manual
Page 23
...878 517 20 330 145 64 610 All dimensions are stated in inches and millimeters (mm). LSCE365ST Radiant Cooktop Unit A B C D F G I 30" Min. (762 mm) A E ** Do not obstruct these areas! 36 inch Radiant Cooktop B C D H LG K J F 4" X 8" (102 mm x 203 mm) opening to clear the ...electric cable and allow space for installation of the junction box on the wall at the back of the cooktop. 23 ENGLISH PREPARING THE INSTALLATION LOCATION IMPORTANT INSTALLATION ...
...878 517 20 330 145 64 610 All dimensions are stated in inches and millimeters (mm). LSCE365ST Radiant Cooktop Unit A B C D F G I 30" Min. (762 mm) A E ** Do not obstruct these areas! 36 inch Radiant Cooktop B C D H LG K J F 4" X 8" (102 mm x 203 mm) opening to clear the ...electric cable and allow space for installation of the junction box on the wall at the back of the cooktop. 23 ENGLISH PREPARING THE INSTALLATION LOCATION IMPORTANT INSTALLATION ...

