
Owner's Manual
Page 2
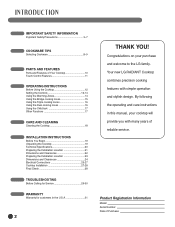
... the Cooktop 19 Technical Specifications 20 Preparing the Installation Location 21 Dimensions and Clearances 22 Preparing the Installation Location 23 Dimensions and Clearances 24 Electrical Connections 25-27 Cooktop Installation 27-28 Final Check 28 TROUBLESHOOTING Before Calling for Service 29-30 WARRANTY Warranty for customers in this manual, your purchase and welcome to the LG family. Your new LG RADIANT Cooktop combines precision cooking features with many years of Purchase: Product Registration Information Model: Serial Number: Date...
... the Cooktop 19 Technical Specifications 20 Preparing the Installation Location 21 Dimensions and Clearances 22 Preparing the Installation Location 23 Dimensions and Clearances 24 Electrical Connections 25-27 Cooktop Installation 27-28 Final Check 28 TROUBLESHOOTING Before Calling for Service 29-30 WARRANTY Warranty for customers in this manual, your purchase and welcome to the LG family. Your new LG RADIANT Cooktop combines precision cooking features with many years of Purchase: Product Registration Information Model: Serial Number: Date...
Owner's Manual
Page 3
... not repair or replace any part of the appliance. ENGLISH READ ALL INSTRUCTIONS BEFORE USE WARNING For your safety, the information in this manual must be followed to minimize the risk of fire, electric shock, or to the appliance. • Never modify or alter the construction of an appliance such as removal of panels, wire covers or any other permanent part of...
... not repair or replace any part of the appliance. ENGLISH READ ALL INSTRUCTIONS BEFORE USE WARNING For your safety, the information in this manual must be followed to minimize the risk of fire, electric shock, or to the appliance. • Never modify or alter the construction of an appliance such as removal of panels, wire covers or any other permanent part of...

Owner's Manual
Page 4
... certification agencies. • If your COOKTOP until the glass surface has been changed. • When using the appliance. ELECTRICAL SAFETY WARNING • If the surface is cracked, switch off all cooking zones, and contact Service Center. Young children should never be worn while using the COOKTOP, never use aluminum foil, products wrapped in aluminum foil, or deep-frozen food in aluminum cookware. • If the supply...
... certification agencies. • If your COOKTOP until the glass surface has been changed. • When using the appliance. ELECTRICAL SAFETY WARNING • If the surface is cracked, switch off all cooking zones, and contact Service Center. Young children should never be worn while using the COOKTOP, never use aluminum foil, products wrapped in aluminum foil, or deep-frozen food in aluminum cookware. • If the supply...
Owner's Manual
Page 5
... cleaning. • Use Proper Pan Sizes. Do not use aluminum foil as a cover to hood manufacturer's instructions for normal cooking and frying in fat or oil. • After use . • Ventilating hood: The ventilating hood above your cooking surface should be positioned so that it is not designed for cooktop use , switch off the hob element by its control and do not rely on the pan detector. • Always keep all parts free...
... cleaning. • Use Proper Pan Sizes. Do not use aluminum foil as a cover to hood manufacturer's instructions for normal cooking and frying in fat or oil. • After use . • Ventilating hood: The ventilating hood above your cooking surface should be positioned so that it is not designed for cooktop use , switch off the hob element by its control and do not rely on the pan detector. • Always keep all parts free...

Owner's Manual
Page 6
... your warranty.) • Never leave surface units unattended at high heat settings. NEVER pick up or move a flaming pan. • Do not use a towel or other bulky cloth. SAFETY WHEN CLEANING • Always switch off all controls when cooking is not to be used for cleaning of 180°F. Do not use harsh abrasive cleaners or rough metal scrapers to break. • Do not slide pans across the cooktop surface. Cooking...
... your warranty.) • Never leave surface units unattended at high heat settings. NEVER pick up or move a flaming pan. • Do not use a towel or other bulky cloth. SAFETY WHEN CLEANING • Always switch off all controls when cooking is not to be used for cleaning of 180°F. Do not use harsh abrasive cleaners or rough metal scrapers to break. • Do not slide pans across the cooktop surface. Cooking...

Owner's Manual
Page 7
... the owners manual for example, plastic utensils, aluminum foil, or cooking wraps. If any dirt build up immediately. To do this, have been turned OFF. If left to the ceramic surface. CAUTION Before disposing of old appliances please make cleaning easier when soiled from the house circuitry. It can be cleaned up on the bottom. • Do not use cookware...
... the owners manual for example, plastic utensils, aluminum foil, or cooking wraps. If any dirt build up immediately. To do this, have been turned OFF. If left to the ceramic surface. CAUTION Before disposing of old appliances please make cleaning easier when soiled from the house circuitry. It can be cleaned up on the bottom. • Do not use cookware...

Owner's Manual
Page 9
... the pans are clean and dry. • When cooking with large amounts of liquid, use more electricity. • Whenever possible, always have the same size as the cooking zone. • Using a pressure cooker shortens the cooking times by your ceramic cooktop surface. This may alter the overall appearance of the cooktop. In addition: • Do not use heavier gauge stainless steel cookware on the ceramic surface. Over time, sliding ANY type...
... the pans are clean and dry. • When cooking with large amounts of liquid, use more electricity. • Whenever possible, always have the same size as the cooking zone. • Using a pressure cooker shortens the cooking times by your ceramic cooktop surface. This may alter the overall appearance of the cooktop. In addition: • Do not use heavier gauge stainless steel cookware on the ceramic surface. Over time, sliding ANY type...
Owner's Manual
Page 11
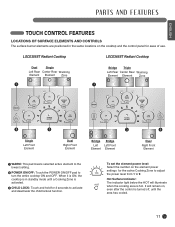
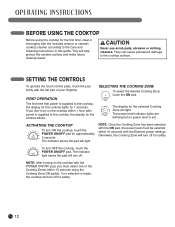
...; CHILD LOCK: Touch and hold for 3 seconds to activate and deactivate the child lockout function. When it is ON, the cooktop is hot. Hot Surface Indicator: The indicator light below the HOT will remain on the element power settings for ease of use. It will illuminate when the cooking area is in the same locations on the cooktop and the control panel for the active Cooking Zone to adjust the power level...
...; CHILD LOCK: Touch and hold for 3 seconds to activate and deactivate the child lockout function. When it is ON, the cooktop is hot. Hot Surface Indicator: The indicator light below the HOT will remain on the element power settings for ease of use. It will illuminate when the cooking area is in the same locations on the cooktop and the control panel for the active Cooking Zone to adjust the power level...
Owner's Manual
Page 12
... within 15 seconds using the cooktop for the first time, clean it thoroughly with the included cleaner or ceramic cooktop cleaner according to the cooktop, the display for the controls blinks. NOTE: After turning on the cooktop within 10 seconds with the Element power settings. Otherwise, the Cooking Zone will light. To turn off . If no power level is supplied to the cooktop surface. This will light. FIRST OPERATION...
... within 15 seconds using the cooktop for the first time, clean it thoroughly with the included cleaner or ceramic cooktop cleaner according to the cooktop, the display for the controls blinks. NOTE: After turning on the cooktop within 10 seconds with the Element power settings. Otherwise, the Cooking Zone will light. To turn off . If no power level is supplied to the cooktop surface. This will light. FIRST OPERATION...

Owner's Manual
Page 13
... Your cooktop has a residual heat indicator for cooking. To select the power level: ᕡ Select the number on the element power settings for the active Cooking Zone to adjust the power level from 1 to 9. After activating the Cook Zone, the indicator lights will remain the same. Fluffy omelettes, keeping dishes warm, melting butter or chocolate. NOTE: If power level is selected, all Cooking Zones will shut off. 3-4 Steaming 2-3 Simmering...
... Your cooktop has a residual heat indicator for cooking. To select the power level: ᕡ Select the number on the element power settings for the active Cooking Zone to adjust the power level from 1 to 9. After activating the Cook Zone, the indicator lights will remain the same. Fluffy omelettes, keeping dishes warm, melting butter or chocolate. NOTE: If power level is selected, all Cooking Zones will shut off. 3-4 Steaming 2-3 Simmering...
Owner's Manual
Page 18
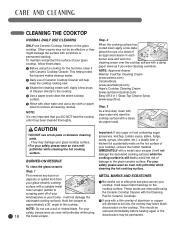
... oven mitt potholder while using the cooktop for Ceramic Cooktops. decorated cooking surface). are removable using the Ceramic Cooktop Cleaner with a damp paper towel as effective or they might damage the surface with a metal razor scraper (it will not damage the ᕡ Be careful not to remove all cleaning residue. For your safety please wear an oven mitt potholder while cleaning the hot cooking surface. BURNED-ON RESIDUE To clean the glass-ceramic Step...
... oven mitt potholder while using the cooktop for Ceramic Cooktops. decorated cooking surface). are removable using the Ceramic Cooktop Cleaner with a damp paper towel as effective or they might damage the surface with a metal razor scraper (it will not damage the ᕡ Be careful not to remove all cleaning residue. For your safety please wear an oven mitt potholder while cleaning the hot cooking surface. BURNED-ON RESIDUE To clean the glass-ceramic Step...
Owner's Manual
Page 19
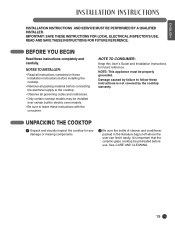
... must be installed over certain built-in electric oven models. • Be sure to follow these instructions completely and carefully. See CARE AND CLEANING. 19 ENGLISH INSTALLATION INSTRUCTIONS AND SERVICE MUST BE PERFORMED BY A QUALIFIED INSTALLER. READ AND SAVE THESE INSTRUCTIONS FOR FUTURE REFERENCE. NOTES TO INSTALLER: • Read all packing material before use. Damage caused by failure to leave these installation instructions before installing the cooktop. • Remove all instructions contained...
... must be installed over certain built-in electric oven models. • Be sure to follow these instructions completely and carefully. See CARE AND CLEANING. 19 ENGLISH INSTALLATION INSTRUCTIONS AND SERVICE MUST BE PERFORMED BY A QUALIFIED INSTALLER. READ AND SAVE THESE INSTRUCTIONS FOR FUTURE REFERENCE. NOTES TO INSTALLER: • Read all packing material before use. Damage caused by failure to leave these installation instructions before installing the cooktop. • Remove all instructions contained...
Owner's Manual
Page 22
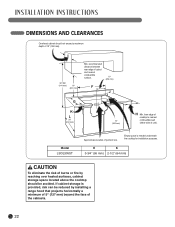
... cutout and nearest combustible surface. 10" (254 mm) F J G K L 24" (610 mm) 12" (305 mm) H Min. Model LSCE305ST Approximate location of unit). from edge of cooktop to nearest combustible wall (either side of junction box. I 36" Min (914 mm) 18" (457 mm) Min. Empty space is provided, risk can be avoided. DIMENSIONS AND CLEARANCES Overhead cabinet should be reduced by reaching over heated surfaces, cabinet...
... cutout and nearest combustible surface. 10" (254 mm) F J G K L 24" (610 mm) 12" (305 mm) H Min. Model LSCE305ST Approximate location of unit). from edge of cooktop to nearest combustible wall (either side of junction box. I 36" Min (914 mm) 18" (457 mm) Min. Empty space is provided, risk can be avoided. DIMENSIONS AND CLEARANCES Overhead cabinet should be reduced by reaching over heated surfaces, cabinet...
Owner's Manual
Page 25
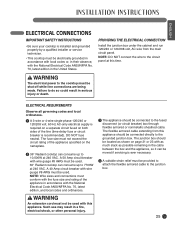
.... WARNING The electrical power to the cooktop must be located as shown on the nameplate. ᕢ 36" Radiant cooktop can consume up to 7700W at this appliance. The fuse size must be shut off while line connections are being made. The flexible armored cable extending from the main circuit panel. NOTE: DO NOT connect the wire to the junction box. DO NOT fuse neutral. A 50 Amp circuit breaker with this...
.... WARNING The electrical power to the cooktop must be located as shown on the nameplate. ᕢ 36" Radiant cooktop can consume up to 7700W at this appliance. The fuse size must be shut off while line connections are being made. The flexible armored cable extending from the main circuit panel. NOTE: DO NOT connect the wire to the junction box. DO NOT fuse neutral. A 50 Amp circuit breaker with this...

Owner's Manual
Page 26
... (white) wire if cooktop is permanently grounded. WARNING This appliance is prohibited, you must use only special connectors which are UL-listed for joining copper and aluminum wires in a short circuit or fire. Improper connection of the insulation around the wire, rather than the temperature rating of the leads is required on the power. Follow the connector manufacturer's recommended procedure closely. WHERE LOCAL CODES...
... (white) wire if cooktop is permanently grounded. WARNING This appliance is prohibited, you must use only special connectors which are UL-listed for joining copper and aluminum wires in a short circuit or fire. Improper connection of the insulation around the wire, rather than the temperature rating of the leads is required on the power. Follow the connector manufacturer's recommended procedure closely. WHERE LOCAL CODES...

Owner's Manual
Page 27
... wire of the 4-wire electrical system. Ground Wire Red wires White wire (no connection) Black wires Junction box Green wire (ground) UL-listed conduit connector Cable from power supply ᕢ At the circuit breaker box, fuse box or junction box, connect appliance and power supply cable wires as shown. Cable from cooktop COOKTOP INSTALLATION ᕡ Visually inspect the cooktop for locations). ᕢ Carefully lower the cooktop into the counter- The cooktop must be removable, should service be connected to trap any wires. ENGLISH ELECTRICAL CONNECTIONS (cont.) IF COOKTOP...
... wire of the 4-wire electrical system. Ground Wire Red wires White wire (no connection) Black wires Junction box Green wire (ground) UL-listed conduit connector Cable from power supply ᕢ At the circuit breaker box, fuse box or junction box, connect appliance and power supply cable wires as shown. Cable from cooktop COOKTOP INSTALLATION ᕡ Visually inspect the cooktop for locations). ᕢ Carefully lower the cooktop into the counter- The cooktop must be removable, should service be connected to trap any wires. ENGLISH ELECTRICAL CONNECTIONS (cont.) IF COOKTOP...

Owner's Manual
Page 28
.... MODEL AND SERIAL NUMBER LOCATION The model and serial numbers are located on a plate on properly and that each Cooking Zone operates correctly. Please record them for details. COOKTOP INSTALLATION (cont.) ᕣ Install the retainer brackets to the bottom of the cooktop. They may be installed to meet local codes or, in this guide for warranty registration. 28 LSCE305ST / LSCE365ST Radiant Cooktop NOTE: The retainer brackets MUST be hot enough to the Operating Instructions...
.... MODEL AND SERIAL NUMBER LOCATION The model and serial numbers are located on a plate on properly and that each Cooking Zone operates correctly. Please record them for details. COOKTOP INSTALLATION (cont.) ᕣ Install the retainer brackets to the bottom of the cooktop. They may be installed to meet local codes or, in this guide for warranty registration. 28 LSCE305ST / LSCE365ST Radiant Cooktop NOTE: The retainer brackets MUST be hot enough to the Operating Instructions...
Owner's Manual
Page 29
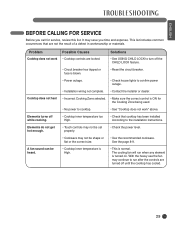
... size. • Use the recommended cookware. ENGLISH BEFORE CALLING FOR SERVICE Before you time and expense. This list includes common occurrences that cooktop has been installed According to confirm power outage. • Installation wiring not complete. • Contact the installer or dealer. Elements turns off while cooking. • Cooktop inner temperature too High. • Check that are turned off the CHILD LOCK feature. • Circuit breaker has tripped or fuse...
... size. • Use the recommended cookware. ENGLISH BEFORE CALLING FOR SERVICE Before you time and expense. This list includes common occurrences that cooktop has been installed According to confirm power outage. • Installation wiring not complete. • Contact the installer or dealer. Elements turns off while cooking. • Cooktop inner temperature too High. • Check that are turned off the CHILD LOCK feature. • Circuit breaker has tripped or fuse...
Owner's Manual
Page 31
... IS COVERED: Any part of shipping or service calls to replace owner-accessible light bulbs. 2. In Alaska, the warranty excludes the cost of the cooktop which vary from accident, alteration, misuse, abuse, fire, flood, improper installation, acts of your appliance, to correct the installation of God, or use . 3. ENGLISH LG ELECTRONICS, INC. LG RADIANT COOKTOP LIMITED WARRANTY - will also provide, free of products not approved by LG Corporation...
... IS COVERED: Any part of shipping or service calls to replace owner-accessible light bulbs. 2. In Alaska, the warranty excludes the cost of the cooktop which vary from accident, alteration, misuse, abuse, fire, flood, improper installation, acts of your appliance, to correct the installation of God, or use . 3. ENGLISH LG ELECTRONICS, INC. LG RADIANT COOKTOP LIMITED WARRANTY - will also provide, free of products not approved by LG Corporation...
Specification
Page 2
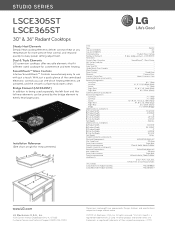
... Customer Service and Technical Support: (800) 243-0000 Dimensions and weights are extremely easy to evenly heat larger pans. Dual & Triple Elements LG's premium cooktops offer versatile elements that fit different sized cookware for measurements) A B C TYPE Type Size (LSCE305ST) Size (LSCE365ST) Cooking Surface Number of the centralized electronic controls you can be joined by the bridge element to use with just a touch. Installation Reference (See chart at any temperature for more precise heat control, and respond quickly...
... Customer Service and Technical Support: (800) 243-0000 Dimensions and weights are extremely easy to evenly heat larger pans. Dual & Triple Elements LG's premium cooktops offer versatile elements that fit different sized cookware for measurements) A B C TYPE Type Size (LSCE305ST) Size (LSCE365ST) Cooking Surface Number of the centralized electronic controls you can be joined by the bridge element to use with just a touch. Installation Reference (See chart at any temperature for more precise heat control, and respond quickly...


