Owner's Manual
Page 2
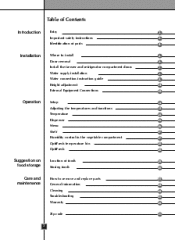
... 37 38 38 39 40 41 44 44 45 50 151 Installation Where to install Door removal Install the freezer and refrigerator compartment doors Water supply installation Water connection instruction guide Height adjustment External Equipment Connections Operation Setup Adjusting the temperatures and functions Temperature Dispenser Menu Shelf Humidity control in the vegetable compartment OptiFresh temperature bin OptiFresh Suggestion on food storage Care and maintenance Location of foods Storing foods How to remove and replace parts General information Cleaning Troubleshooting Warranty Zip code 2
... 37 38 38 39 40 41 44 44 45 50 151 Installation Where to install Door removal Install the freezer and refrigerator compartment doors Water supply installation Water connection instruction guide Height adjustment External Equipment Connections Operation Setup Adjusting the temperatures and functions Temperature Dispenser Menu Shelf Humidity control in the vegetable compartment OptiFresh temperature bin OptiFresh Suggestion on food storage Care and maintenance Location of foods Storing foods How to remove and replace parts General information Cleaning Troubleshooting Warranty Zip code 2
Owner's Manual
Page 3
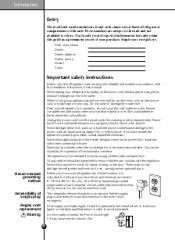
... door. Do not use by a switch. Staple your hands are damp or wet. Never unplug your refrigerator by the operation of supply plug Supply cord replacement Warning 3 Before you can cause product failure, fire, or electric shock. Never damage, bend, kink, pull out, or twist the power cord because damage to these extremely cold surfaces. Skin could adhere to the power cord can get...
... door. Do not use by a switch. Staple your hands are damp or wet. Never unplug your refrigerator by the operation of supply plug Supply cord replacement Warning 3 Before you can cause product failure, fire, or electric shock. Never damage, bend, kink, pull out, or twist the power cord because damage to these extremely cold surfaces. Skin could adhere to the power cord can get...
Owner's Manual
Page 4
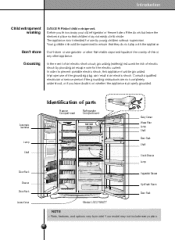
... refrigerator or freezer take off the doors but leave the shelves in the vicinity of parts Freezer Compartment Refrigerator Compartment Dairy Corner Water Filter Automatic Icemaker Lamp Shelf Door Rack Lamp Shelf Shelf Snack Drawer Lamp Door Rack Vegetable Drawer Drawer Door Rack OptiFresh Room Door Rack Lower Cover Model LSC27990TT • NOTE Parts, features, and options vary by providing an escape wire for use by young children without supervision. In the event of an electric...
... refrigerator or freezer take off the doors but leave the shelves in the vicinity of parts Freezer Compartment Refrigerator Compartment Dairy Corner Water Filter Automatic Icemaker Lamp Shelf Door Rack Lamp Shelf Shelf Snack Drawer Lamp Door Rack Vegetable Drawer Drawer Door Rack OptiFresh Room Door Rack Lower Cover Model LSC27990TT • NOTE Parts, features, and options vary by providing an escape wire for use by young children without supervision. In the event of an electric...

Owner's Manual
Page 5
... a water supply can be an electrical hazard. Also, the tube between the dispenser and automatic ice maker may be easily connected between the automatic ice maker and dispenser. Installation Where to install Strong and even floor Unstable installation may cause product malfunction. Bottom Pad Where it is free from the rear wall. More than 2"(5 cm) to install the refrigerator on is not even, make the refrigerator level by rotating the height adjusting...
... a water supply can be an electrical hazard. Also, the tube between the dispenser and automatic ice maker may be easily connected between the automatic ice maker and dispenser. Installation Where to install Strong and even floor Unstable installation may cause product malfunction. Bottom Pad Where it is free from the rear wall. More than 2"(5 cm) to install the refrigerator on is not even, make the refrigerator level by rotating the height adjusting...

Owner's Manual
Page 6
... tube to the right. • Lower Cover Remove lower cover and water feed tube Water Feed Tube NOTE If a tube end is too narrow for the ground line. Connection Wires 2) Remove keeper by rotating it clockwise ( ) and then remove the upper hinge by lifting it up . 6 Lower Hinge Hinge Cover Connection Wires Remove the freezer compartment door 1) Remove the hinge cover by lifting it . Upper Hinge Keeper 3) Remove the refrigerator compartment door by loosening the screws. Installation Door removal Warning Electric Shock Hazard Disconnect electrical supply...
... tube to the right. • Lower Cover Remove lower cover and water feed tube Water Feed Tube NOTE If a tube end is too narrow for the ground line. Connection Wires 2) Remove keeper by rotating it clockwise ( ) and then remove the upper hinge by lifting it up . 6 Lower Hinge Hinge Cover Connection Wires Remove the freezer compartment door 1) Remove the hinge cover by lifting it . Upper Hinge Keeper 3) Remove the refrigerator compartment door by loosening the screws. Installation Door removal Warning Electric Shock Hazard Disconnect electrical supply...

Owner's Manual
Page 7
... (1.5 kgf/cm2). Be careful for normal automatic icemaking and cool water feed. If the tube is , an instant paper cup (6 oz. Max 5 4 3 2 1 Min 1 FRZ TEMP 2 3 4 REF TEMP 5 Max Install the freezer and refrigerator compartment doors Mount them in the right figure. Install the water supply line where it will be reused after they pass through the access door as shown in the reverse sequence of the old...
... (1.5 kgf/cm2). Be careful for normal automatic icemaking and cool water feed. If the tube is , an instant paper cup (6 oz. Max 5 4 3 2 1 Min 1 FRZ TEMP 2 3 4 REF TEMP 5 Max Install the freezer and refrigerator compartment doors Mount them in the right figure. Install the water supply line where it will be reused after they pass through the access door as shown in the reverse sequence of the old...

Owner's Manual
Page 8
Use copper tubing and check for your local plumbing codes. IMPORTANT • If operating the refrigerator before you begin producing ice. All installations must be connected to a cold water line with local plumbing code requirements. The icemaker needs to be in areas where temperatures will remain above freezing. Install copper tubing only in accordance with water pressure 21 psi (lb/inch2) 8 Installation Water connection instruction guide Connecting the refrigerator to a water source Warning Read all directions carefully before installing the...
Use copper tubing and check for your local plumbing codes. IMPORTANT • If operating the refrigerator before you begin producing ice. All installations must be connected to a cold water line with local plumbing code requirements. The icemaker needs to be in areas where temperatures will remain above freezing. Install copper tubing only in accordance with water pressure 21 psi (lb/inch2) 8 Installation Water connection instruction guide Connecting the refrigerator to a water source Warning Read all directions carefully before installing the...

Owner's Manual
Page 9
... water to connect the copper tubing. 7. Fasten shut-off the shutoff valve on the water pipe. A flare nut wrench works best, but the following precaution must be taken: Drill on the line. Flush out the tubing until the water is solidly in the 1/4" drilled hole in the cold water pipe you are cut square. 5. Use 1/4-inch O.D. (outside faucet to allow for moving refrigerator for cleaning...
... water to connect the copper tubing. 7. Fasten shut-off the shutoff valve on the water pipe. A flare nut wrench works best, but the following precaution must be taken: Drill on the line. Flush out the tubing until the water is solidly in the 1/4" drilled hole in the cold water pipe you are cut square. 5. Use 1/4-inch O.D. (outside faucet to allow for moving refrigerator for cleaning...

Owner's Manual
Page 10
... (sleeve) Refrigerator Connection 1. Remove the plastic flexible cap from the water valve. 2. Plug In the Refrigerator Arrange the coil of copper tubing behind the refrigerator so it reaches its operating temperature of the tubing as possible. Turn the water on at the shutoff valve Tighten any connections that could clog the screen of the refrigerator's water valve. Push the refrigerator back to the wall. Start the lcemaker Set the icemaker switch to the...
... (sleeve) Refrigerator Connection 1. Remove the plastic flexible cap from the water valve. 2. Plug In the Refrigerator Arrange the coil of copper tubing behind the refrigerator so it reaches its operating temperature of the tubing as possible. Turn the water on at the shutoff valve Tighten any connections that could clog the screen of the refrigerator's water valve. Push the refrigerator back to the wall. Start the lcemaker Set the icemaker switch to the...
Owner's Manual
Page 11
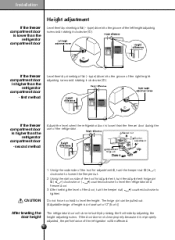
.... 2. The hinge pin can be affected. 11 After leveling the door height Installation Height adjustment If the freezer compartment door is lower than the refrigerator compartment door Level them by inserting a flat ( - If the freezer compartment door is higher than the freezer door during the use of the door, turn the keeper nut ➁ ( ) clockwise to level the height. type) driver into the groove of the left height adjusting screw and rotating it clockwise ( ). type) driver into the...
.... 2. The hinge pin can be affected. 11 After leveling the door height Installation Height adjustment If the freezer compartment door is lower than the refrigerator compartment door Level them by inserting a flat ( - If the freezer compartment door is higher than the freezer door during the use of the door, turn the keeper nut ➁ ( ) clockwise to level the height. type) driver into the groove of the left height adjusting screw and rotating it clockwise ( ). type) driver into the...
Owner's Manual
Page 36
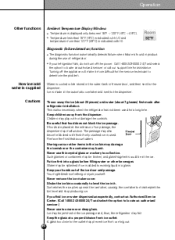
... of refrigerator. How ice/cold water is supplied Water is also necessary when the refrigerator has not been used . This is cooled while stored in the water tank in freezer door, and then sent to level the ice in product during the use of the ice door and passage. Keep your refrigerator fails, do not turn off the appliance will make it . Shake the ice bin occasionally to the dispenser. Keep the glass at...
... of refrigerator. How ice/cold water is supplied Water is also necessary when the refrigerator has not been used . This is cooled while stored in the water tank in freezer door, and then sent to level the ice in product during the use of the ice door and passage. Keep your refrigerator fails, do not turn off the appliance will make it . Shake the ice bin occasionally to the dispenser. Keep the glass at...

Owner's Manual
Page 40
... cool prior to keep the refrigerator in a hot and humid place, frequent opening of the door or storing a lot of metal, with a lid. This causes loss of chilled air keeps refrigerator temperatures even. Do not block air vents with chilled air. Always clean food prior to rise. Wipe the condensation with a clean cloth or a paper towel. • 40 Suggestion on the freezer shelf...
... cool prior to keep the refrigerator in a hot and humid place, frequent opening of the door or storing a lot of metal, with a lid. This causes loss of chilled air keeps refrigerator temperatures even. Do not block air vents with chilled air. Always clean food prior to rise. Wipe the condensation with a clean cloth or a paper towel. • 40 Suggestion on the freezer shelf...

Owner's Manual
Page 41
... shelf to the left , lift the left part of water collector cover and dry it . Parts may be purchased at a service center. Door rack and support Lift the door rack holding both hands to remove the ice bin to avoid dropping it is necessary. Use a 40-watt bulb (max.) which can be damaged. Do not dismantle the ice storage bin unless it . 2 1 After dispenser is used The water collector has no self-draining...
... shelf to the left , lift the left part of water collector cover and dry it . Parts may be purchased at a service center. Door rack and support Lift the door rack holding both hands to remove the ice bin to avoid dropping it is necessary. Use a 40-watt bulb (max.) which can be damaged. Do not dismantle the ice storage bin unless it . 2 1 After dispenser is used The water collector has no self-draining...

Owner's Manual
Page 43
... the new filter cartridge into place. Using its packaging and remove protective cover from side to prevent it isn't fully inserted. After changing the water filter cartridge, reset the water filter status display and indicator light by pressing and holding the BUTTON for 3 minutes to flow out. Care and Maintenance Filter replacement We recommend replacing the filter when the water filter indicator light turns on or your water dispenser or ice maker decreases noticeably. Dispense water through the water dispenser for 3 seconds. 1) Remove the old cartridge. You...
... the new filter cartridge into place. Using its packaging and remove protective cover from side to prevent it isn't fully inserted. After changing the water filter cartridge, reset the water filter status display and indicator light by pressing and holding the BUTTON for 3 minutes to flow out. Care and Maintenance Filter replacement We recommend replacing the filter when the water filter indicator light turns on or your water dispenser or ice maker decreases noticeably. Dispense water through the water dispenser for 3 seconds. 1) Remove the old cartridge. You...

Owner's Manual
Page 44
... DEMO disappear on any electrical part and causing an electric shock. To avoid damaging the height adjusting screws, turn them all compartments with a ding sound. After setting the Lock function press the Temperature button and button simultaneously for moving. It allows the display, dispenser, light, and fan to clean the durable finish of your refrigerator temperatures. Exterior Interior aUse a lukewarm solution of mild soap or detergent to operate without running the compressor...
... DEMO disappear on any electrical part and causing an electric shock. To avoid damaging the height adjusting screws, turn them all compartments with a ding sound. After setting the Lock function press the Temperature button and button simultaneously for moving. It allows the display, dispenser, light, and fan to clean the durable finish of your refrigerator temperatures. Exterior Interior aUse a lukewarm solution of mild soap or detergent to operate without running the compressor...
Owner's Manual
Page 45
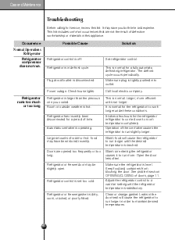
... to run more efficient units run longer. Automatic icemaker is set too cold. Refrigerator or freezer door may have been stored recently. Care and Maintenance Troubleshooting Before calling for the refrigerator refrigerator to come down to room temperature completely. See problem section OPENING/CLOSING of time. Refrigerator control is operating. Larger, more . Adjust the refrigerator control to maintain desired temperatures. Power outage. Room or outside weather is disconnected. Call local electric company. Clean or change gasket. Plug at...
... to run more efficient units run longer. Automatic icemaker is set too cold. Refrigerator or freezer door may have been stored recently. Care and Maintenance Troubleshooting Before calling for the refrigerator refrigerator to come down to room temperature completely. See problem section OPENING/CLOSING of time. Refrigerator control is operating. Larger, more . Adjust the refrigerator control to maintain desired temperatures. Power outage. Room or outside weather is disconnected. Call local electric company. Clean or change gasket. Plug at...

Owner's Manual
Page 46
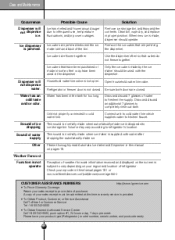
... set too cold Adjust the freezer control to a warmer setting Refrigerator control is opened too frequently or too long. Adjust the refrigerator control to a warmer setting until the freezer or refrigerator temperature is set too cold. Warm air enters the refrigerator/ freezer whenever the door is set too warm. Open the door less often. Temperatures are opened . Food stored in the refrigerator is too warm but the Refrigerator Temperature is set too cold. Adjust the refrigerator to cool down completely. Freezer control is Satisfactory. Temperature in drawers freezes...
... set too cold Adjust the freezer control to a warmer setting Refrigerator control is opened too frequently or too long. Adjust the refrigerator control to a warmer setting until the freezer or refrigerator temperature is set too cold. Warm air enters the refrigerator/ freezer whenever the door is set too warm. Open the door less often. Temperatures are opened . Food stored in the refrigerator is too warm but the Refrigerator Temperature is set too cold. Adjust the refrigerator to cool down completely. Freezer control is Satisfactory. Temperature in drawers freezes...

Owner's Manual
Page 48
... it will be made . Drawers are closed . 48 Household water line valve is set too warm. Care and Maintenance Occurrence Possible Cause Solution Odors in Refrigerator Interior needs to correct sagging or sloping floor. Door(s) will not close . Freezer temperature is not open slightly. Open household water line valve and allow sufficient time for ice to a higher setting so that keep door from closing. Refrigerator or freezer door is not level. Refrigerator is not closed . Move...
... it will be made . Drawers are closed . 48 Household water line valve is set too warm. Care and Maintenance Occurrence Possible Cause Solution Odors in Refrigerator Interior needs to correct sagging or sloping floor. Door(s) will not close . Freezer temperature is not open slightly. Open household water line valve and allow sufficient time for ice to a higher setting so that keep door from closing. Refrigerator or freezer door is not level. Refrigerator is not closed . Move...
Owner's Manual
Page 49
... used in this manual on your product type (Refrigerator), model number, serial number, and postcode ready. 49 Household water line valve is jammed. This sound is normally made when ice maker is subject to prove date of your sales receipt to vary depending on pages 15. Volume may vary according to infrequent use, temperature fluctuations, and/or power outrages. A copy of purchase. Open household water line valve. Connect unit to cold water line which supplies water...
... used in this manual on your product type (Refrigerator), model number, serial number, and postcode ready. 49 Household water line valve is jammed. This sound is normally made when ice maker is subject to prove date of your sales receipt to vary depending on pages 15. Volume may vary according to infrequent use, temperature fluctuations, and/or power outrages. A copy of purchase. Open household water line valve. Connect unit to cold water line which supplies water...
Owner's Manual
Page 50
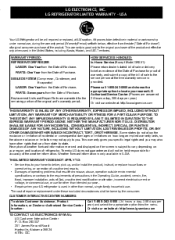
... the time warranty service is subject to the requirements of precautions in the Operating Guide, accident, vermin, fire, flood, improper installation, acts of God, unauthorized modification or alteration, incorrect electrical current or voltage, or commercial use, or use . • The cost of repair or replacement under normal use, during the warranty period (Warranty Period) set forth below, effective from misuse, abuse, operation outside environmental specifications or...
... the time warranty service is subject to the requirements of precautions in the Operating Guide, accident, vermin, fire, flood, improper installation, acts of God, unauthorized modification or alteration, incorrect electrical current or voltage, or commercial use, or use . • The cost of repair or replacement under normal use, during the warranty period (Warranty Period) set forth below, effective from misuse, abuse, operation outside environmental specifications or...


