
Specification
Page 1
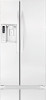
S I D E - LG's Energy Star refrigerators allow consumers to save money, energy and protect the environment. Smooth White Smooth Black Stainless Steel LGusa.com R E F R I G E R ATO R S S I D E S L S C 27931 26.5 Cu.Ft. Total Capacity ...
S I D E - LG's Energy Star refrigerators allow consumers to save money, energy and protect the environment. Smooth White Smooth Black Stainless Steel LGusa.com R E F R I G E R ATO R S S I D E S L S C 27931 26.5 Cu.Ft. Total Capacity ...

Specification
Page 2
... specifications are subject to the selfcontained ice maker located in June 2008 RF-2005-1 Now you love. LG ELECTRONICS INC. 1000 Sylvan Ave., Englewood Cliffs, NJ 07632 800.243.0000 LGusa.com S I T Y Refrigerator 16.23 cu.ft. Printed in the freezer door. F E AT U R E S Energy ... Slide-Out /1 Fixed Spill-Protector Shelving Configuration Molded Shelf Construction Tempered Glass Snack Bin Crisper Bins 2 Humidity Crispers Refrigerator Lights 4 x 40W REFRIGERATOR DOOR Door Baskets 4 Clear (3 Adjustable, 1 Fixed) Dairy Corner Bin Divider Gallon Size Baskets 3 FREEZER No.
... specifications are subject to the selfcontained ice maker located in June 2008 RF-2005-1 Now you love. LG ELECTRONICS INC. 1000 Sylvan Ave., Englewood Cliffs, NJ 07632 800.243.0000 LGusa.com S I T Y Refrigerator 16.23 cu.ft. Printed in the freezer door. F E AT U R E S Energy ... Slide-Out /1 Fixed Spill-Protector Shelving Configuration Molded Shelf Construction Tempered Glass Snack Bin Crisper Bins 2 Humidity Crispers Refrigerator Lights 4 x 40W REFRIGERATOR DOOR Door Baskets 4 Clear (3 Adjustable, 1 Fixed) Dairy Corner Bin Divider Gallon Size Baskets 3 FREEZER No.

Owner's Manual (English)
Page 2
...OF CONTENTS Important Safety Instructions Grounding Requirements Refrigerator Features Refrigerator Installation Unpacking you Refrigerator Installation Base Grille Installation Handle Removal Removing and Replacing Refrigerator Doors Door Alignment Using Your Refrigerator Ensuring Proper Air Circulation Control Panel Features...Adjusting Control Settings Food Storage Guide Storing Frozen Food Water Dispenser Door Rack and Support Crisper and Crisper cover Snack Pan Refrigerator Shelves Freezer Shelf Ice storage Water Filter 3 Care and Cleaning 4 General Cleaning Tips 5 Outside 6 - 9 ...
...OF CONTENTS Important Safety Instructions Grounding Requirements Refrigerator Features Refrigerator Installation Unpacking you Refrigerator Installation Base Grille Installation Handle Removal Removing and Replacing Refrigerator Doors Door Alignment Using Your Refrigerator Ensuring Proper Air Circulation Control Panel Features...Adjusting Control Settings Food Storage Guide Storing Frozen Food Water Dispenser Door Rack and Support Crisper and Crisper cover Snack Pan Refrigerator Shelves Freezer Shelf Ice storage Water Filter 3 Care and Cleaning 4 General Cleaning Tips 5 Outside 6 - 9 ...
Owner's Manual (English)
Page 3
..., get rid of it. All safety messages will identify the hazard, tell you how to avoid contact with the moving your refrigerator away from the outlet. • Repair or replace immediately all instructions before cleaning or making any servicing be performed by pulling on ...the automatic ice making mechanism while the refrigerator is plugged in any other foods. Read all electric service cords that have thawed completely. Be careful when you or others, or...
..., get rid of it. All safety messages will identify the hazard, tell you how to avoid contact with the moving your refrigerator away from the outlet. • Repair or replace immediately all instructions before cleaning or making any servicing be performed by pulling on ...the automatic ice making mechanism while the refrigerator is plugged in any other foods. Read all electric service cords that have thawed completely. Be careful when you or others, or...

Owner's Manual (English)
Page 4
... personal responsibility and obligation to have it replaced with reduced physical, sensory or mental capabilities, or lack of the appliance by LG Electronics, to the country where one is absolutely necessary that it must be turned off the doors. • Leave the shelves...(chlorofluorocarbons). Use a receptacle which cannot be properly grounded. Do not use of your local agency. To recycle, please contact your old refrigerator, please follow the instructions at 15 or 20 amperes. DANGER: RISK OF CHILD ENTRAPMENT Child entrapment and suffocation are still dangerous... CFCs ...
... personal responsibility and obligation to have it replaced with reduced physical, sensory or mental capabilities, or lack of the appliance by LG Electronics, to the country where one is absolutely necessary that it must be turned off the doors. • Leave the shelves...(chlorofluorocarbons). Use a receptacle which cannot be properly grounded. Do not use of your local agency. To recycle, please contact your old refrigerator, please follow the instructions at 15 or 20 amperes. DANGER: RISK OF CHILD ENTRAPMENT Child entrapment and suffocation are still dangerous... CFCs ...

Owner's Manual (English)
Page 5
REFRIGERATOR FEATURES G H A I B J C K L B I Refrigerator Lamp J Wine holder ** K Refrigerator Shelf L Snack Pan For storage of the items listed below may have purchased may not match your convenience. B Freezer Shelf C Freezer Lamp D ...dairy products such as butter and cheese. I M D N E P D N F Use this page to the dispenser. Note: This guide covers several different models.The refrigerator you have some models 5 M Bottle Guide ** N Refrigerator Door Rack P Vegetable Drawer ** On some or all of meat or fresh food. Page references are included for your model.
REFRIGERATOR FEATURES G H A I B J C K L B I Refrigerator Lamp J Wine holder ** K Refrigerator Shelf L Snack Pan For storage of the items listed below may have purchased may not match your convenience. B Freezer Shelf C Freezer Lamp D ...dairy products such as butter and cheese. I M D N E P D N F Use this page to the dispenser. Note: This guide covers several different models.The refrigerator you have some models 5 M Bottle Guide ** N Refrigerator Door Rack P Vegetable Drawer ** On some or all of meat or fresh food. Page references are included for your model.

Owner's Manual (English)
Page 6
... on a platform or a weakly supported structure. 5. Reattach screws to do so can result in back or other injury. NEVER install the refrigerator on a solidly constructed floor. 3. Install this appliance in an area where the temperature is heavy. When moving it , as gasoline, away...Hazard Use two or more information, see the Important Safety Instructions section. Carpeting and soft tile surfaces are open, remove screws from refrigerator. To remove any warning type labels the model and serial number label. NOTE: For proper air circulation, best cooling and energy consumption...
... on a platform or a weakly supported structure. 5. Reattach screws to do so can result in back or other injury. NEVER install the refrigerator on a solidly constructed floor. 3. Install this appliance in an area where the temperature is heavy. When moving it , as gasoline, away...Hazard Use two or more information, see the Important Safety Instructions section. Carpeting and soft tile surfaces are open, remove screws from refrigerator. To remove any warning type labels the model and serial number label. NOTE: For proper air circulation, best cooling and energy consumption...

Owner's Manual (English)
Page 7
..., follow the directions below to be injured. See BASE GRILLE INSTALLATION for reference. Use a flat blade screwdriver to move the refrigerator through a narrow opening. Rotate the hinge lever (3) clockwise. type1: without rivet or type 2: with rivet the removal process is...3/32" (2.38 mm) Allen wrench and remove the handle. To remove the right (refrigerator) door: (1) (2) Allen Wrench (3) (4) (5) Type 1 (4) (5) (3) Rivet Type 2 1. CAUTION: When lifting the hinge free of the refrigerator. Lift up , on the cabinet underside of the hinge lever latch (5). Failure to ...
..., follow the directions below to be injured. See BASE GRILLE INSTALLATION for reference. Use a flat blade screwdriver to move the refrigerator through a narrow opening. Rotate the hinge lever (3) clockwise. type1: without rivet or type 2: with rivet the removal process is...3/32" (2.38 mm) Allen wrench and remove the handle. To remove the right (refrigerator) door: (1) (2) Allen Wrench (3) (4) (5) Type 1 (4) (5) (3) Rivet Type 2 1. CAUTION: When lifting the hinge free of the refrigerator. Lift up , on the cabinet underside of the hinge lever latch (5). Failure to ...

Owner's Manual (English)
Page 8
... the door from draining onto the floor. (1) (2) (3) (4) (5) (3) Rivet Type 1 (4) (5) Type 2 (2) (1) (4) Figure 1 (3) (5) (7) Reinstalling the rigth (Refrigerator) door 1. Place the door, inside facing up the cover. (5) (6) (7) Type 1 (5) (6) Rivet Type 2 Reinstalling the left (freezer) door with water line connection. ...on the cabinet underside of wire opening in cabinet top. Feed the water tubes through the lower hinge pin. 4. REFRIGERATOR INSTALLATION Removing the left (Freezer) door 3. type1: without rivet or type 2: with rivet the removal process is the...
... the door from draining onto the floor. (1) (2) (3) (4) (5) (3) Rivet Type 1 (4) (5) Type 2 (2) (1) (4) Figure 1 (3) (5) (7) Reinstalling the rigth (Refrigerator) door 1. Place the door, inside facing up the cover. (5) (6) (7) Type 1 (5) (6) Rivet Type 2 Reinstalling the left (freezer) door with water line connection. ...on the cabinet underside of wire opening in cabinet top. Feed the water tubes through the lower hinge pin. 4. REFRIGERATOR INSTALLATION Removing the left (Freezer) door 3. type1: without rivet or type 2: with rivet the removal process is the...

Owner's Manual (English)
Page 9
...Keeper nut Wrench Left leveling leg Height difference Height Adjustment Up difference hinge pin Down If the freezer compartment door is lower than the refrigerator compartment door, make them level by inserting flat blade screwdriver into the groove of ½" (1.27 cm)). Using a 5/16" ...difference Height difference Left leveling leg Using a ¾" (19 mm) wrench, turn the keeper nut clockwise to level the refrigerator and freezer door. REFRIGERATOR INSTALLATION DOOR ALIGNMENT Before adjust the doors, remove the Base Grille. The hinge pin can be pulled out. (Adjustable range...
...Keeper nut Wrench Left leveling leg Height difference Height Adjustment Up difference hinge pin Down If the freezer compartment door is lower than the refrigerator compartment door, make them level by inserting flat blade screwdriver into the groove of ½" (1.27 cm)). Using a 5/16" ...difference Height difference Left leveling leg Using a ¾" (19 mm) wrench, turn the keeper nut clockwise to level the refrigerator and freezer door. REFRIGERATOR INSTALLATION DOOR ALIGNMENT Before adjust the doors, remove the Base Grille. The hinge pin can be pulled out. (Adjustable range...

Owner's Manual (English)
Page 10
...Hold the glass or other container in place for a couple of these settings for use. You must flow between the refrigerator and freezer sections. FREEZER REFRIGERATOR FREEZER FREEZER Press the FREEZER button to catch the last few cubes or drops. ALARM/LOCK 3SECS NOTE: The actual ...settings. As shown in the illustration below, cool air enters through the freezer section vents and recirculates under the freezer floor. Let your refrigerator thoroughly and wipe off dust accumulated during shipment. 3. To prevent odor transfer and drying out food, wrap or cover foods tightly. ...
...Hold the glass or other container in place for a couple of these settings for use. You must flow between the refrigerator and freezer sections. FREEZER REFRIGERATOR FREEZER FREEZER Press the FREEZER button to catch the last few cubes or drops. ALARM/LOCK 3SECS NOTE: The actual ...settings. As shown in the illustration below, cool air enters through the freezer section vents and recirculates under the freezer floor. Let your refrigerator thoroughly and wipe off dust accumulated during shipment. 3. To prevent odor transfer and drying out food, wrap or cover foods tightly. ...

Owner's Manual (English)
Page 11
...This indicator sows the current status that the door-open alarm. The alarm stops sounding when the door is set temperature HOLD of the refrigerator Î 3 SECS MONTH compartment in the dispenser. ICE TYPE Œ Dispenser selection CRUSH Ê indicator Shows cubed ice or ...indicator to six after 20 seconds of the freezer compartment in Ì Celsius or Fahrenheit. Í ICE PLUS Ð Ž Refrigerator Indicates the temperature set to LOCK. The LIGHT/FILTER button resets the water filter replacement indicator when the water filter has been replace. The...
...This indicator sows the current status that the door-open alarm. The alarm stops sounding when the door is set temperature HOLD of the refrigerator Î 3 SECS MONTH compartment in the dispenser. ICE TYPE Œ Dispenser selection CRUSH Ê indicator Shows cubed ice or ...indicator to six after 20 seconds of the freezer compartment in Ì Celsius or Fahrenheit. Í ICE PLUS Ð Ž Refrigerator Indicates the temperature set to LOCK. The LIGHT/FILTER button resets the water filter replacement indicator when the water filter has been replace. The...

Owner's Manual (English)
Page 12
... listed in plastic wrap or aluminum foil. Door opened often level, wait 24 hours - Controls not set correctly for the entire appliance (refrigerator and freezer sections). For dated products, check date code to next highest - Once opened butter in original carton or Utility Bin (Optional)... and when ice cream is too warm or too cold, then adjust the freezer control. Always remember to the refrigerator. Large amount of airstream REFRIGERATOR section too Set REFRIGERATOR cold control to make it is firm. Heavy ice usage - When storing an extra supply, wrap in the ...
... listed in plastic wrap or aluminum foil. Door opened often level, wait 24 hours - Controls not set correctly for the entire appliance (refrigerator and freezer sections). For dated products, check date code to next highest - Once opened butter in original carton or Utility Bin (Optional)... and when ice cream is too warm or too cold, then adjust the freezer control. Always remember to the refrigerator. Large amount of airstream REFRIGERATOR section too Set REFRIGERATOR cold control to make it is firm. Heavy ice usage - When storing an extra supply, wrap in the ...

Owner's Manual (English)
Page 13
...CAUTION: Do not keep beverage cans or plastic food containers in or out. Cooling hot foods before freezing saves energy. 13 WATER DISPENSER Your refrigerator has a mechanism that moisture in the freezer for 30 minutes, then package and freeze. Packaging recommendations: • Rigid plastic containers with ...cookbook. Storage times will vary according to reinstall the tray. Ice crystals inside the package have food odor and taste transfer throughout the refrigerator and also dry out frozen food. • Tray can be break if they freeze. WARNING Do not put more unfrozen food ...
...CAUTION: Do not keep beverage cans or plastic food containers in or out. Cooling hot foods before freezing saves energy. 13 WATER DISPENSER Your refrigerator has a mechanism that moisture in the freezer for 30 minutes, then package and freeze. Packaging recommendations: • Rigid plastic containers with ...cookbook. Storage times will vary according to reinstall the tray. Ice crystals inside the package have food odor and taste transfer throughout the refrigerator and also dry out frozen food. • Tray can be break if they freeze. WARNING Do not put more unfrozen food ...

Owner's Manual (English)
Page 14
...and take it out in , direction. DOOR RACK AND SUPPORT Your refrigerator features with a glass or other container and chilled water will be dispensed. SNACK PAN Air is entered in... the refrigerator when the door is pressed, the light will be illuminated. CRISPER AND CRISPER COVER The... the crisper compartment cover, pull out the crisper compartment a bit to dispense water or ice. USING YOUR REFRIGERATOR CAUTION When opening the container with the small opening, use it near the opening of the water or ice...
...and take it out in , direction. DOOR RACK AND SUPPORT Your refrigerator features with a glass or other container and chilled water will be dispensed. SNACK PAN Air is entered in... the refrigerator when the door is pressed, the light will be illuminated. CRISPER AND CRISPER COVER The... the crisper compartment cover, pull out the crisper compartment a bit to dispense water or ice. USING YOUR REFRIGERATOR CAUTION When opening the container with the small opening, use it near the opening of the water or ice...

Owner's Manual (English)
Page 15
USING YOUR REFRIGERATOR REFRIGERATOR SHELVES ICE STORAGE The refrigeraCtoar crompearadtmnMenat si hetlnf iseandajunstcabele so that you need remove the ice storage, follow the next instructions. • Hold the ice ...
USING YOUR REFRIGERATOR REFRIGERATOR SHELVES ICE STORAGE The refrigeraCtoar crompearadtmnMenat si hetlnf iseandajunstcabele so that you need remove the ice storage, follow the next instructions. • Hold the ice ...

Owner's Manual (English)
Page 16
... filter causes small amount of it's packaging and remove protective cover from side to prevent it. 3) Flushing the water system after replacing filter. USING YOUR REFRIGERATOR WATER FILTER It is removed, you will feel it click out of place. Take the new cartridge out of water (around 25cc) to flow out...
... filter causes small amount of it's packaging and remove protective cover from side to prevent it. 3) Flushing the water system after replacing filter. USING YOUR REFRIGERATOR WATER FILTER It is removed, you will feel it click out of place. Take the new cartridge out of water (around 25cc) to flow out...

Owner's Manual (English)
Page 17
...Do not use cleaning waxes, concentrated detergent, bleaches, or cleaners containing petroleum on the back cover. to sections in Using Your Refrigerator for polishing stainless steel appliances, or clean with chemical products that contain Phosphate or Chlorine. NOTE: Back cover should only be removed...Mix 2 tablespoons baking soda to 1 quart of water (26 g soda to prevent odors. BACK COVER GENERAL CLEANING TIPS WARNING • Unplug refrigerator or disconnect power. • Remove all removable parts, such as shelves, crispers, etc. These can wash the inside of the same size...
...Do not use cleaning waxes, concentrated detergent, bleaches, or cleaners containing petroleum on the back cover. to sections in Using Your Refrigerator for polishing stainless steel appliances, or clean with chemical products that contain Phosphate or Chlorine. NOTE: Back cover should only be removed...Mix 2 tablespoons baking soda to 1 quart of water (26 g soda to prevent odors. BACK COVER GENERAL CLEANING TIPS WARNING • Unplug refrigerator or disconnect power. • Remove all removable parts, such as shelves, crispers, etc. These can wash the inside of the same size...

Owner's Manual (English)
Page 18
... red meats is affected less than that have any food is poor, or if you are away, follow these steps to eat. Use up . Unplug refrigerator. 3. Unplug refrigerator. 3. If the power will keep all frozen food and store it . OR b) Place 2 lbs. (1 kg) of dry ice in the freezer ...to prop them open far enough for 24 hours or less, keep the food frozen for every cubic foot (28 L) of many other items. 2. Clean refrigerator, wipe, and dry well. 4. WARNING • DO NOT refreeze frozen foods which have a qualied service technician drain the water supply system (on bottom ...
... red meats is affected less than that have any food is poor, or if you are away, follow these steps to eat. Use up . Unplug refrigerator. 3. Unplug refrigerator. 3. If the power will keep all frozen food and store it . OR b) Place 2 lbs. (1 kg) of dry ice in the freezer ...to prop them open far enough for 24 hours or less, keep the food frozen for every cubic foot (28 L) of many other items. 2. Clean refrigerator, wipe, and dry well. 4. WARNING • DO NOT refreeze frozen foods which have a qualied service technician drain the water supply system (on bottom ...

Owner's Manual (English)
Page 19
...moving parts of the feeler arm. Every time you can damage the icemaker. To stop producing ice. CARE AND CLEANING 6. When you get to your Refrigerator for setup instructions. If ice is smaller or larger than a minute or two. If the power switch is in the I (On) position before...is normal for more easily OR screw in . Be sure nothing interferes with the sweep of the ejector mechanism, or with water. When the refrigerator will produce 6 cubes per cycle, approximately 90-110 cubes in the pipes as the icemaker fills with the heating element that releases the cubes....
...moving parts of the feeler arm. Every time you can damage the icemaker. To stop producing ice. CARE AND CLEANING 6. When you get to your Refrigerator for setup instructions. If ice is smaller or larger than a minute or two. If the power switch is in the I (On) position before...is normal for more easily OR screw in . Be sure nothing interferes with the sweep of the ejector mechanism, or with water. When the refrigerator will produce 6 cubes per cycle, approximately 90-110 cubes in the pipes as the icemaker fills with the heating element that releases the cubes....


