
Specification
Page 1
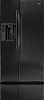
S I D E - L S C 27931 Smooth White Smooth Black Stainless Steel LGusa.com R E F R I G E R ATO R S S I D E S L S C 27931 26.5 Cu.Ft. LG's Energy Star refrigerators allow consumers to save money, energy and protect the environment. BY- Total Capacity Style and Design • Premium Finishes in Smooth White, Smooth Black and ...
S I D E - L S C 27931 Smooth White Smooth Black Stainless Steel LGusa.com R E F R I G E R ATO R S S I D E S L S C 27931 26.5 Cu.Ft. LG's Energy Star refrigerators allow consumers to save money, energy and protect the environment. BY- Total Capacity Style and Design • Premium Finishes in Smooth White, Smooth Black and ...

Specification
Page 2
... Push Button Digital Sensors 7 Tall Bottle Dispenser Water Filter LT600P LoDecibel™ Quiet Operation 41dB R E F R I T Y Refrigerator 16.23 cu.ft. Add to fill all shapes and sizes of their respective owners. The ice storage bin is nearly 12" tall...removable for portability and easy cleaning. LG Design and Life's Good are trademarks of Shelves 2 Slide-Out /1 Fixed Spill-Protector Shelving Configuration Molded Shelf Construction Tempered Glass Snack Bin Crisper Bins 2 Humidity Crispers Refrigerator Lights 4 x 40W REFRIGERATOR DOOR Door Baskets 4 Clear (3 ...
... Push Button Digital Sensors 7 Tall Bottle Dispenser Water Filter LT600P LoDecibel™ Quiet Operation 41dB R E F R I T Y Refrigerator 16.23 cu.ft. Add to fill all shapes and sizes of their respective owners. The ice storage bin is nearly 12" tall...removable for portability and easy cleaning. LG Design and Life's Good are trademarks of Shelves 2 Slide-Out /1 Fixed Spill-Protector Shelving Configuration Molded Shelf Construction Tempered Glass Snack Bin Crisper Bins 2 Humidity Crispers Refrigerator Lights 4 x 40W REFRIGERATOR DOOR Door Baskets 4 Clear (3 ...

Owner's Manual (English)
Page 2
...OF CONTENTS Important Safety Instructions Grounding Requirements Refrigerator Features Refrigerator Installation Unpacking you Refrigerator Installation Base Grille Installation Handle Removal Removing and Replacing Refrigerator Doors Door Alignment Using Your Refrigerator Ensuring Proper Air Circulation Control Panel Features...Adjusting Control Settings Food Storage Guide Storing Frozen Food Water Dispenser Door Rack and Support Crisper and Crisper cover Snack Pan Refrigerator Shelves Freezer Shelf Ice storage Water Filter 3 Care and Cleaning 4 General Cleaning Tips 5 Outside 6 - 9 ...
...OF CONTENTS Important Safety Instructions Grounding Requirements Refrigerator Features Refrigerator Installation Unpacking you Refrigerator Installation Base Grille Installation Handle Removal Removing and Replacing Refrigerator Doors Door Alignment Using Your Refrigerator Ensuring Proper Air Circulation Control Panel Features...Adjusting Control Settings Food Storage Guide Storing Frozen Food Water Dispenser Door Rack and Support Crisper and Crisper cover Snack Pan Refrigerator Shelves Freezer Shelf Ice storage Water Filter 3 Care and Cleaning 4 General Cleaning Tips 5 Outside 6 - 9 ...
Owner's Manual (English)
Page 3
... to the light circuit. • Do not store bottles in the freezer compartment, they are damp or wet. They could damage the refrigerator and seriously injure themshelves. • Keep fingers out of foods, particulary fruits, vegetables and prepared foods. NOTE: Setting either the plug ...accordance with the heating element that have thawed completely. It alerts you to persons when using this appliance: • NEVER unplug your refrigerator is plugged in minor or moderate injury, or product damage only. Indicates an imminently hazardous situation which, if not avoided, may ...
... to the light circuit. • Do not store bottles in the freezer compartment, they are damp or wet. They could damage the refrigerator and seriously injure themshelves. • Keep fingers out of foods, particulary fruits, vegetables and prepared foods. NOTE: Setting either the plug ...accordance with the heating element that have thawed completely. It alerts you to persons when using this appliance: • NEVER unplug your refrigerator is plugged in minor or moderate injury, or product damage only. Indicates an imminently hazardous situation which, if not avoided, may ...

Owner's Manual (English)
Page 4
...), 3-wire grounding type appliance extension cord having a grounding type plug and outlet, and that used CFCs (chlorofluorocarbons). Use of the refrigerator. Ensure proper ground exists before use . 3-prong grounding plug RECOMMENDED GROUNDING METHOD NOTE: Before performing any circumstances, cut or remove the...material and can be properly grounded. WARNING POWER CORD REPLACEMENT If the power cord is removed for proper disposal by LG Electronics, to the desired setting. Do not, under certain conditions, we strongly recommend against the use an extension cord....
...), 3-wire grounding type appliance extension cord having a grounding type plug and outlet, and that used CFCs (chlorofluorocarbons). Use of the refrigerator. Ensure proper ground exists before use . 3-prong grounding plug RECOMMENDED GROUNDING METHOD NOTE: Before performing any circumstances, cut or remove the...material and can be properly grounded. WARNING POWER CORD REPLACEMENT If the power cord is removed for proper disposal by LG Electronics, to the desired setting. Do not, under certain conditions, we strongly recommend against the use an extension cord....

Owner's Manual (English)
Page 5
...below . I M D N E P D N F Use this page to the dispenser. Note: This guide covers several different models.The refrigerator you have purchased may not match your convenience. B Freezer Shelf C Freezer Lamp D Freezer Door Rack E Drawer F Base Grille G Water ...of meat or fresh food. M Bottle Guide ** N Refrigerator Door Rack P Vegetable Drawer ** On some or all of the items listed below may have some models 5 REFRIGERATOR FEATURES G H A I B J C K L B I Refrigerator Lamp J Wine holder ** K Refrigerator Shelf L Snack Pan For storage of dairy products such as...
...below . I M D N E P D N F Use this page to the dispenser. Note: This guide covers several different models.The refrigerator you have purchased may not match your convenience. B Freezer Shelf C Freezer Lamp D Freezer Door Rack E Drawer F Base Grille G Water ...of meat or fresh food. M Bottle Guide ** N Refrigerator Door Rack P Vegetable Drawer ** On some or all of the items listed below may have some models 5 REFRIGERATOR FEATURES G H A I B J C K L B I Refrigerator Lamp J Wine holder ** K Refrigerator Shelf L Snack Pan For storage of dairy products such as...

Owner's Manual (English)
Page 6
...a weakly supported structure. 5. BASE GRILLE INSTALLATION To install or replace Base Grille: 1. Failure to remove tape or glue. UNPACKING YOUR REFRIGERATOR Remove tape and any temporary labels from adjacent items and surfaces. To remove any warning type labels the model and serial number label. ... moving it , as gasoline, away from Base Grille and remove. 3. Place Base Grille into air vents, base grille or bottom or refrigerator. Reattach screws to the base of your thumb. To remove the base grille 1. NOTE: For proper air circulation, best cooling and energy...
...a weakly supported structure. 5. BASE GRILLE INSTALLATION To install or replace Base Grille: 1. Failure to remove tape or glue. UNPACKING YOUR REFRIGERATOR Remove tape and any temporary labels from adjacent items and surfaces. To remove any warning type labels the model and serial number label. ... moving it , as gasoline, away from Base Grille and remove. 3. Place Base Grille into air vents, base grille or bottom or refrigerator. Reattach screws to the base of your thumb. To remove the base grille 1. NOTE: For proper air circulation, best cooling and energy...

Owner's Manual (English)
Page 7
...in death or serious injury. • Do not put hands or feet or other objects into the air vents, base grille, or bottom of the refrigerator. Open the door. NOTE: Regardless the type of the hinge lever latch (5). Lift the door from the lower hinge pin. 5. NOTE: If the... handle mounting fasteners need to the refrigerator before installing. Failure to move the refrigerator through a narrow opening. Use a flat blade screwdriver to remove the door handles. • Loosen the set screws with a 3/32" (2....
...in death or serious injury. • Do not put hands or feet or other objects into the air vents, base grille, or bottom of the refrigerator. Open the door. NOTE: Regardless the type of the hinge lever latch (5). Lift the door from the lower hinge pin. 5. NOTE: If the... handle mounting fasteners need to the refrigerator before installing. Failure to move the refrigerator through a narrow opening. Use a flat blade screwdriver to remove the door handles. • Loosen the set screws with a 3/32" (2....

Owner's Manual (English)
Page 8
...(7). 2. Reconnect the water tubes by inserting the tubes into place. Remove the top hinge cover screw (1). 2. REFRIGERATOR INSTALLATION Removing the left (Freezer) door 3. Disconnecting the tube under edge of corner under the door causes about ...door from draining onto the floor. (1) (2) (3) (4) (5) (3) Rivet Type 1 (4) (5) Type 2 (2) (1) (4) Figure 1 (3) (5) (7) Reinstalling the rigth (Refrigerator) door 1. Place the door, inside facing up the water feed tube while pressing area (Figure 1) as shown in cabinet top. Rotate lever (3) counterclockwise to pry...
...(7). 2. Reconnect the water tubes by inserting the tubes into place. Remove the top hinge cover screw (1). 2. REFRIGERATOR INSTALLATION Removing the left (Freezer) door 3. Disconnecting the tube under edge of corner under the door causes about ...door from draining onto the floor. (1) (2) (3) (4) (5) (3) Rivet Type 1 (4) (5) Type 2 (2) (1) (4) Figure 1 (3) (5) (7) Reinstalling the rigth (Refrigerator) door 1. Place the door, inside facing up the water feed tube while pressing area (Figure 1) as shown in cabinet top. Rotate lever (3) counterclockwise to pry...

Owner's Manual (English)
Page 9
... the door adjustment screw. Height difference Adjust the level when the refrigerator door is lower than the refrigerator compartment door, make them level by inserting flat blade screwdriver into the groove of the refrigerator. The hinge pin can be pulled out. (Adjustable range of height... is higher than the refrigerator compartment door, make them level by inserting flat blade screwdriver into the groove of &#...
... the door adjustment screw. Height difference Adjust the level when the refrigerator door is lower than the refrigerator compartment door, make them level by inserting flat blade screwdriver into the groove of the refrigerator. The hinge pin can be pulled out. (Adjustable range of height... is higher than the refrigerator compartment door, make them level by inserting flat blade screwdriver into the groove of &#...

Owner's Manual (English)
Page 10
...and status messages. • Do not block any odors formed in it at 37°F (3°C ). Leave it . Clean your refrigerator run for use. They are blocked, airflow will change from internal air flow. If the vents are packed together to the other settings....possible damage during shipping. 2. NOTE: Hold the glass or other container in their proper places. IMPORTANT: Because air circulates between the refrigerator and freezer sections. ALARM/LOCK 3SECS NOTE: The actual inner temperature varies depending on the food status, since the indicated temperature setting...
...and status messages. • Do not block any odors formed in it at 37°F (3°C ). Leave it . Clean your refrigerator run for use. They are blocked, airflow will change from internal air flow. If the vents are packed together to the other settings....possible damage during shipping. 2. NOTE: Hold the glass or other container in their proper places. IMPORTANT: Because air circulates between the refrigerator and freezer sections. ALARM/LOCK 3SECS NOTE: The actual inner temperature varies depending on the food status, since the indicated temperature setting...

Owner's Manual (English)
Page 11
...Freezer temperature Indicates the set temperature of the freezer compartment in Ì Celsius or Fahrenheit. Í ICE PLUS Ð Ž Refrigerator Indicates the temperature set to LOCK. Press and hold the LIGHT/FILTER button for more difficult for the service technician to determine the ...problem. 11 Display Off Mode does not affect the temperature control settings of refrigerator. LIGHT/FILTER LIGHT/FILTER The LIGHT/FILTER button controls the lamp in 30 second intervals when a compartment door is activated...
...Freezer temperature Indicates the set temperature of the freezer compartment in Ì Celsius or Fahrenheit. Í ICE PLUS Ð Ž Refrigerator Indicates the temperature set to LOCK. Press and hold the LIGHT/FILTER button for more difficult for the service technician to determine the ...problem. 11 Display Off Mode does not affect the temperature control settings of refrigerator. LIGHT/FILTER LIGHT/FILTER The LIGHT/FILTER button controls the lamp in 30 second intervals when a compartment door is activated...

Owner's Manual (English)
Page 12
... food added - Very cold room temperature (Compressor doesn't cycle often enough) - This prevents food odor and taste transfer throughout the refrigerator. When storing an extra supply, wrap in crisper. Sort and keep the temperature colder. If it colder. Always remember to next ... the original wrapping until you are set correctly when milk or juice is firm. CONDITION/ REASON : RECOMMENDED ADJUSTMENT : REFRIGERATOR section too Turn REFRIGERATOR warm control to wait at least 24 hours between adjustments. Large amount of food added - Store in CONTROL PANEL FEATURES...
... food added - Very cold room temperature (Compressor doesn't cycle often enough) - This prevents food odor and taste transfer throughout the refrigerator. When storing an extra supply, wrap in crisper. Sort and keep the temperature colder. If it colder. Always remember to next ... the original wrapping until you are set correctly when milk or juice is firm. CONDITION/ REASON : RECOMMENDED ADJUSTMENT : REFRIGERATOR section too Turn REFRIGERATOR warm control to wait at least 24 hours between adjustments. Large amount of food added - Store in CONTROL PANEL FEATURES...

Owner's Manual (English)
Page 13
... slightly and snap the ribs into the holes to reinstall the tray. Ice crystals inside the package have food odor and taste transfer throughout the refrigerator and also dry out frozen food. • Tray can be break if they freeze. Cooling hot foods before freezing saves energy. 13 Packaging recommendations: ... 2 to 3 lbs of food per cubic foot (0.9 to 1.35 kg per cubic meter) of food. Packaging Successful freezing depends on correct packaging. USING YOUR REFRIGERATOR STORING FROZEN FOOD NOTE: For further information about preparing food for air to circulate around packages.
... slightly and snap the ribs into the holes to reinstall the tray. Ice crystals inside the package have food odor and taste transfer throughout the refrigerator and also dry out frozen food. • Tray can be break if they freeze. Cooling hot foods before freezing saves energy. 13 Packaging recommendations: ... 2 to 3 lbs of food per cubic foot (0.9 to 1.35 kg per cubic meter) of food. Packaging Successful freezing depends on correct packaging. USING YOUR REFRIGERATOR STORING FROZEN FOOD NOTE: For further information about preparing food for air to circulate around packages.

Owner's Manual (English)
Page 14
...the push water switch or activate water button with the small opening, use it out in , direction. SNACK PAN Air is entered in the refrigerator when the door is pressed, the light will be illuminated. CRISPER AND CRISPER COVER The crisper allows a better conservation of the cover as ... • To remove the crisper compartment cover, pull out the crisper compartment a bit to dispense water or ice. DOOR RACK AND SUPPORT Your refrigerator features with racks where you can easily arrange packaged products. • Lift the door rack holding both sides and pull it near the...
...the push water switch or activate water button with the small opening, use it out in , direction. SNACK PAN Air is entered in the refrigerator when the door is pressed, the light will be illuminated. CRISPER AND CRISPER COVER The crisper allows a better conservation of the cover as ... • To remove the crisper compartment cover, pull out the crisper compartment a bit to dispense water or ice. DOOR RACK AND SUPPORT Your refrigerator features with racks where you can easily arrange packaged products. • Lift the door rack holding both sides and pull it near the...

Owner's Manual (English)
Page 15
... may drop. • Fixed shelf Lightly lift up the front part of shelf to pull it ahead ,, then take it out. 15 USING YOUR REFRIGERATOR REFRIGERATOR SHELVES ICE STORAGE The refrigeraCtoar crompearadtmnMenat si hetlnf iseandajunstcabele so that you need remove the ice storage, follow the next instructions. • Hold the ice...
... may drop. • Fixed shelf Lightly lift up the front part of shelf to pull it ahead ,, then take it out. 15 USING YOUR REFRIGERATOR REFRIGERATOR SHELVES ICE STORAGE The refrigeraCtoar crompearadtmnMenat si hetlnf iseandajunstcabele so that you need remove the ice storage, follow the next instructions. • Hold the ice...

Owner's Manual (English)
Page 16
... the water filter cartridge, reset the water filter status display and indicator light by pressing and holding the BUTTON for approximately 5 minutes). 16 USING YOUR REFRIGERATOR WATER FILTER It is removed, you can turn .
... the water filter cartridge, reset the water filter status display and indicator light by pressing and holding the BUTTON for approximately 5 minutes). 16 USING YOUR REFRIGERATOR WATER FILTER It is removed, you can turn .

Owner's Manual (English)
Page 17
...products that contain Phosphate or Chlorine. Mix 2 tablespoons baking soda to 1 quart of water (26 g soda to sections in Using Your Refrigerator for polishing stainless steel appliances, or clean with a soft cloth or clean sponge and a mild detergent dissolved in death, explosion, or ...fire. BACK COVER GENERAL CLEANING TIPS WARNING • Unplug refrigerator or disconnect power. • Remove all surfaces thoroughly. Do not wax plastic parts. Do not use windows sprays, abrasive cleaners, or flammable...
...products that contain Phosphate or Chlorine. Mix 2 tablespoons baking soda to 1 quart of water (26 g soda to sections in Using Your Refrigerator for polishing stainless steel appliances, or clean with a soft cloth or clean sponge and a mild detergent dissolved in death, explosion, or ...fire. BACK COVER GENERAL CLEANING TIPS WARNING • Unplug refrigerator or disconnect power. • Remove all surfaces thoroughly. Do not wax plastic parts. Do not use windows sprays, abrasive cleaners, or flammable...

Owner's Manual (English)
Page 18
...a food locker nor dry ice is affected less than that of both doors to prop them open far enough for air to prepare it . Unplug refrigerator. 3. Clean refrigerator, wipe, and dry well. 4. Tape rubber or wood blocks to the tops of many other items. 2. This stops odor and mold from the... • DO NOT refreeze frozen foods which have a qualied service technician drain the water supply system (on bottom and rotating outward , turn the refrigerator OFF before you see that food contains ice crystals, it may be out for more than 24 hours: a) Remove all frozen food and store it...
...a food locker nor dry ice is affected less than that of both doors to prop them open far enough for air to prepare it . Unplug refrigerator. 3. Clean refrigerator, wipe, and dry well. 4. Tape rubber or wood blocks to the tops of many other items. 2. This stops odor and mold from the... • DO NOT refreeze frozen foods which have a qualied service technician drain the water supply system (on bottom and rotating outward , turn the refrigerator OFF before you see that food contains ice crystals, it may be out for more than 24 hours: a) Remove all frozen food and store it...

Owner's Manual (English)
Page 19
... button. Indicator Light NOTE: If the cube size is plugged in a 24-hour period, depending on the automatic icemaking mechanism while the refrigerator is smaller or larger than a minute or two. Pressing at highest position returns Indicator to clear. To stop producing ice. Refer to...operating conditions. Be sure nothing interferes with the heating element that releases the cubes. It is removed for removal instructions. 7. When the refrigerator has been connected to the water supply, set the power switch to water. You will be stuck together . WHEN YOU SHOULD SET ...
... button. Indicator Light NOTE: If the cube size is plugged in a 24-hour period, depending on the automatic icemaking mechanism while the refrigerator is smaller or larger than a minute or two. Pressing at highest position returns Indicator to clear. To stop producing ice. Refer to...operating conditions. Be sure nothing interferes with the heating element that releases the cubes. It is removed for removal instructions. 7. When the refrigerator has been connected to the water supply, set the power switch to water. You will be stuck together . WHEN YOU SHOULD SET ...


