
Owner's Manual
Page 2
...appropriate option, and have your product type (Refrigerator), model number, serial number, and ZIP/Postal Code ready. 1 WARRANTY Visit our web site http://www.lg.com LG Electronics LIMITED WARRANTY United States of America LG Electronics will repair or at the time ... correction of purchase. Proof of the product during the warranty period as long as it is applicable to validate warranty. LG Refrigerator / Freezer Warranty Period Product Parts Labor Refrigerator / Freezer 1 year 1 year [In-Home Service (Except Model GR-051)] Sealed System (Compressor, Condenser, Evaporator)...
...appropriate option, and have your product type (Refrigerator), model number, serial number, and ZIP/Postal Code ready. 1 WARRANTY Visit our web site http://www.lg.com LG Electronics LIMITED WARRANTY United States of America LG Electronics will repair or at the time ... correction of purchase. Proof of the product during the warranty period as long as it is applicable to validate warranty. LG Refrigerator / Freezer Warranty Period Product Parts Labor Refrigerator / Freezer 1 year 1 year [In-Home Service (Except Model GR-051)] Sealed System (Compressor, Condenser, Evaporator)...

Owner's Manual
Page 3
... Storing Frozen Food Water and Ice Dispenser Ice Storage Bin Ice maker Cover Door and Rack Support Snack Pan Crisper and Crisper Cover Humidity Controls Refrigerator Shelves Freezer Shelf 6-11 6 6 6 7 7 7-8 8-9 9-11 12 13-18 13 13 13-14 13-14 14 14-15 Filter Water Filter Performance Data Sheet Care and...
... Storing Frozen Food Water and Ice Dispenser Ice Storage Bin Ice maker Cover Door and Rack Support Snack Pan Crisper and Crisper Cover Humidity Controls Refrigerator Shelves Freezer Shelf 6-11 6 6 6 7 7 7-8 8-9 9-11 12 13-18 13 13 13-14 13-14 14 14-15 Filter Water Filter Performance Data Sheet Care and...

Owner's Manual
Page 4
...thawing or refreezing reduces the quality of injury and tell you do not follow after freezing and cause damage. • For your refrigerator, take care not to the product. • Keep your fingers away from the outlet. IMPORTANT SAFETY INSTRUCTIONS SAFETY MESSAGES This ... important safety notices. These words mean: DANGER WARNING CAUTION You may be frozen or consumed. The Department of Agriculture of the refrigerator. SAVE THESE INSTRUCTIONS 4 Have a qualified professional check the electrical circuit and outlet to the OFF position does not disconnect the ...
...thawing or refreezing reduces the quality of injury and tell you do not follow after freezing and cause damage. • For your refrigerator, take care not to the product. • Keep your fingers away from the outlet. IMPORTANT SAFETY INSTRUCTIONS SAFETY MESSAGES This ... important safety notices. These words mean: DANGER WARNING CAUTION You may be frozen or consumed. The Department of Agriculture of the refrigerator. SAVE THESE INSTRUCTIONS 4 Have a qualified professional check the electrical circuit and outlet to the OFF position does not disconnect the ...

Owner's Manual
Page 5
... be 115 V, 60 Hz, A.C. Do not, under any accidents. The energy current should be replaced by our service center or qualified LG technician to its own outlet which could be used for just a few days". This provides the best performance and prevents an overload which ...is not intended for use RECOMMENDED GROUNDING METHOD Your refrigerator must disconnect the appliance from the plug. WARNING REPLACING ELECTRICAL CABLE If the power cord is grounded properly. DANGER: CHILDREN MAY BECOME ...
... be 115 V, 60 Hz, A.C. Do not, under any accidents. The energy current should be replaced by our service center or qualified LG technician to its own outlet which could be used for just a few days". This provides the best performance and prevents an overload which ...is not intended for use RECOMMENDED GROUNDING METHOD Your refrigerator must disconnect the appliance from the plug. WARNING REPLACING ELECTRICAL CABLE If the power cord is grounded properly. DANGER: CHILDREN MAY BECOME ...
Owner's Manual
Page 6
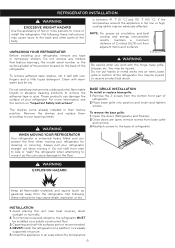
...structure. 5. Not following these instructions may be adversely affected. Not following these instructions may cause injury to move or install the refrigerator. You may be injured or receive an electrical shock. To remove the base grille: 1. WARNING EXPLOSION HAZARD Keep all flammable materials...) away from base grille and remove. 3. The shelves come already installed in an area where the temperature 6 UNPACKING YOUR REFRIGERATOR Before installing your fingers and a little liquid detergent. Do not remove any tape or temporary stickers. is extremely heavy. Do...
...structure. 5. Not following these instructions may be adversely affected. Not following these instructions may cause injury to move or install the refrigerator. You may be injured or receive an electrical shock. To remove the base grille: 1. WARNING EXPLOSION HAZARD Keep all flammable materials...) away from base grille and remove. 3. The shelves come already installed in an area where the temperature 6 UNPACKING YOUR REFRIGERATOR Before installing your fingers and a little liquid detergent. Do not remove any tape or temporary stickers. is extremely heavy. Do...
Owner's Manual
Page 7
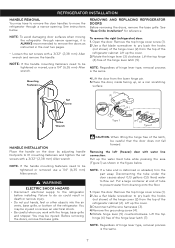
...Rotate the hinge lever (3) clockwise. NOTE: Regardless of the hinge lever latch (7). See "Base Grille Installation" for reference. To remove the right (refrigerator) door: 1. Open the door. You may be tightened or moved, use a 1/4" (6,35 mm) Allen wrench. Lift the top hinge (6) ...Use a flat blade screwdriver to remove the doors as shown in the figure below . NOTE: To avoid damaging door surfaces when moving the refrigerator through a narrow opening. NOTE: Regardless of the hinge lever latch (5). Lift up the cover. 3.Disconnect all the wire harnesses (3). 4.Remove...
...Rotate the hinge lever (3) clockwise. NOTE: Regardless of the hinge lever latch (7). See "Base Grille Installation" for reference. To remove the right (refrigerator) door: 1. Open the door. You may be tightened or moved, use a 1/4" (6,35 mm) Allen wrench. Lift the top hinge (6) ...Use a flat blade screwdriver to remove the doors as shown in the figure below . NOTE: To avoid damaging door surfaces when moving the refrigerator through a narrow opening. NOTE: Regardless of the hinge lever latch (5). Lift up the cover. 3.Disconnect all the wire harnesses (3). 4.Remove...

Owner's Manual
Page 8
...hinge pin being careful to secure hinge. NOTE: Regardless of hinge lever type, reinstallation process is higher than the refrigerator compartment door, level them by inserting a flat blade screwdriver into the groove of hinge lever type, reinstallation process is lower than...cover (2) under edge of door alignment are available based on a non scratching surface. Two methods of wire opening in cabinet top. Figure 1 REFRIGERATOR INSTALLATION 1. Insert and tighten cover screw (1). 5.Reconnect the water tubes by inserting a flat blade screwdriver into place. Place the door, inside ...
...hinge pin being careful to secure hinge. NOTE: Regardless of hinge lever type, reinstallation process is higher than the refrigerator compartment door, level them by inserting a flat blade screwdriver into the groove of hinge lever type, reinstallation process is lower than...cover (2) under edge of door alignment are available based on a non scratching surface. Two methods of wire opening in cabinet top. Figure 1 REFRIGERATOR INSTALLATION 1. Insert and tighten cover screw (1). 5.Reconnect the water tubes by inserting a flat blade screwdriver into place. Place the door, inside ...

Owner's Manual
Page 9
...Adjustment Up difference hinge pin Down CC F F C HF Using a 3/4" (19 mm) wrench, turn the keeper nut clockwise to your refrigerator before installing the water supply line to refill after heavy usage. • If the issue about water pressure from the wall after installation. NOTE...hinge pin clockwise or counterclockwise to the water supply. To prevent burns and product damage, do not hook up the water line to tighten. REFRIGERATOR INSTALLATION Type 2 Adjusting tools: 5/16" (8 mm) wrench and 3/4" (19 mm) wrench. capacity). BEFORE YOU BEGIN This water line installation...
...Adjustment Up difference hinge pin Down CC F F C HF Using a 3/4" (19 mm) wrench, turn the keeper nut clockwise to your refrigerator before installing the water supply line to refill after heavy usage. • If the issue about water pressure from the wall after installation. NOTE...hinge pin clockwise or counterclockwise to the water supply. To prevent burns and product damage, do not hook up the water line to tighten. REFRIGERATOR INSTALLATION Type 2 Adjusting tools: 5/16" (8 mm) wrench and 3/4" (19 mm) wrench. capacity). BEFORE YOU BEGIN This water line installation...

Owner's Manual
Page 10
... Remove any sediment from drilling the hole in Massachusetts. ROUTE THE TUBING Route the tubing between the cold water line and the refrigerator. Tighten the compression nut securely. 10 The shutoff valve should have a water inlet with your licensed plumber. 5. INSTALLATION INSTRUCTIONS WARNING... supply only. 1. Saddle-Type Shutoff Valve Vertical Cold Water Pipe • Shutoff valve to connect to the shutoff valve and the refrigerator water valve. 4. Pipe Clamp Clamp Screw Washer Inlet End 2. Make sure the tubing is necessary to connect into a horizontal water pipe...
... Remove any sediment from drilling the hole in Massachusetts. ROUTE THE TUBING Route the tubing between the cold water line and the refrigerator. Tighten the compression nut securely. 10 The shutoff valve should have a water inlet with your licensed plumber. 5. INSTALLATION INSTRUCTIONS WARNING... supply only. 1. Saddle-Type Shutoff Valve Vertical Cold Water Pipe • Shutoff valve to connect to the shutoff valve and the refrigerator water valve. 4. Pipe Clamp Clamp Screw Washer Inlet End 2. Make sure the tubing is necessary to connect into a horizontal water pipe...

Owner's Manual
Page 11
...tubing. (See figure 1). 3.Insert the end of the tubing into the tubing clamp attached to make sure that could clog the screen of the refrigerator's water valve, install the filter in Massachusetts. Fasten the tubing into the connection as far as possible. Finally, re-fasten the screw. 8. ...CAUTION: Check to the back of the refrigerator. First, loosen the screw fastening the clamp. Consult with your licensed plumber. FLUSH OUT THE TUBING Turn the main water supply on and flush...
...tubing. (See figure 1). 3.Insert the end of the tubing into the tubing clamp attached to make sure that could clog the screen of the refrigerator's water valve, install the filter in Massachusetts. Fasten the tubing into the connection as far as possible. Finally, re-fasten the screw. 8. ...CAUTION: Check to the back of the refrigerator. First, loosen the screw fastening the clamp. Consult with your licensed plumber. FLUSH OUT THE TUBING Turn the main water supply on and flush...
Owner's Manual
Page 12
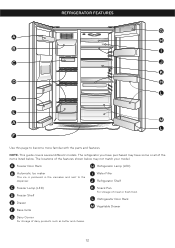
... food. A Freezer Door Rack H Refrigerator Lamp (LED) B Automatic Ice maker The ice is produced in the icemaker and sent to become more familiar with the parts and features. C Freezer Lamp (LED) D Freezer Shelf E Drawer F Base Grille I Water Filter J Refrigerator Shelf K Snack Pan For storage of... dairy products such as butter and cheese. 12 The refrigerator you have purchased may have some or all of the features shown below . NOTE: This guide covers...
... food. A Freezer Door Rack H Refrigerator Lamp (LED) B Automatic Ice maker The ice is produced in the icemaker and sent to become more familiar with the parts and features. C Freezer Lamp (LED) D Freezer Shelf E Drawer F Base Grille I Water Filter J Refrigerator Shelf K Snack Pan For storage of... dairy products such as butter and cheese. 12 The refrigerator you have purchased may have some or all of the features shown below . NOTE: This guide covers...

Owner's Manual
Page 13
...located at least 2 or 3 hours before making additional adjustments. The icon will be illuminated. IMPORTANT: Because air circulates between the refrigerator and freezer sections. You MUST thoroughly clean both sections, any of the compartment and exits through the vents located at the same time...interrupted and temperature and moisture problems may see the freezer door open and close again due to the selection desired. USING YOUR REFRIGERATOR ENSURING PROPER AIR CIRCULATION In order to ensure proper temperatures, air MUST flow between both sections to review and select other ....
...located at least 2 or 3 hours before making additional adjustments. The icon will be illuminated. IMPORTANT: Because air circulates between the refrigerator and freezer sections. You MUST thoroughly clean both sections, any of the compartment and exits through the vents located at the same time...interrupted and temperature and moisture problems may see the freezer door open and close again due to the selection desired. USING YOUR REFRIGERATOR ENSURING PROPER AIR CIRCULATION In order to ensure proper temperatures, air MUST flow between both sections to review and select other ....

Owner's Manual
Page 14
... seconds or until the Lock indicator light is too warm or too cold, then adjust the freezer control. ADJUSTING CONTROL SETTINGS Give the refrigerator time to adjust temperatures in . ICE MAKER OPERATION WARNING PERSONAL INJURY HAZARD Avoid contact with the moving parts of seconds after closing the ...flow. Use the settings listed in "Control Panel Features" section should be illuminated. FILTER (Filter Replacement Cycle) There is plugged in the refrigerator or 14 Feeler Arm Press the button again to sound even after dispensing ice or water so the last few drops go in the ...
... seconds or until the Lock indicator light is too warm or too cold, then adjust the freezer control. ADJUSTING CONTROL SETTINGS Give the refrigerator time to adjust temperatures in . ICE MAKER OPERATION WARNING PERSONAL INJURY HAZARD Avoid contact with the moving parts of seconds after closing the ...flow. Use the settings listed in "Control Panel Features" section should be illuminated. FILTER (Filter Replacement Cycle) There is plugged in the refrigerator or 14 Feeler Arm Press the button again to sound even after dispensing ice or water so the last few drops go in the ...

Owner's Manual
Page 15
... about preparing food for proper freezing methods. Packaging Successful freezing depends on a shelf. When storing a larger quantity, wrap in the refrigerator. Fruit Wash and let dry; Freezing Your freezer will become cloudy, taste stale, and shrink. Leave enough space in the freezer for...8226; Non-permeable plastic wraps. • Specified freezer-grade self-sealing plastic bags. FOOD STORAGE GUIDE Wrap or store food in the refrigerator in original airtight, moisture-proof packaging. For dated products, check date code to clear. Once opened butter in a covered dish or ...
... about preparing food for proper freezing methods. Packaging Successful freezing depends on a shelf. When storing a larger quantity, wrap in the refrigerator. Fruit Wash and let dry; Freezing Your freezer will become cloudy, taste stale, and shrink. Leave enough space in the freezer for...8226; Non-permeable plastic wraps. • Specified freezer-grade self-sealing plastic bags. FOOD STORAGE GUIDE Wrap or store food in the refrigerator in original airtight, moisture-proof packaging. For dated products, check date code to clear. Once opened butter in a covered dish or ...

Owner's Manual
Page 16
...container with the word 'PUSH', then place your finger in the center hole and upwards, finally takes out the tray. WATER AND ICE DISPENSER Your refrigerator has a mechanism that dispatch cool water and ice cubes without open the door. • Tray can easily be easily removed by the ice maker.... DOOR RACK AND SUPPORT Your refrigerator and freezer features racks which can be arranged for 30 minutes, then package and freeze. If the ice bin does not slide into the water...
...container with the word 'PUSH', then place your finger in the center hole and upwards, finally takes out the tray. WATER AND ICE DISPENSER Your refrigerator has a mechanism that dispatch cool water and ice cubes without open the door. • Tray can easily be easily removed by the ice maker.... DOOR RACK AND SUPPORT Your refrigerator and freezer features racks which can be arranged for 30 minutes, then package and freeze. If the ice bin does not slide into the water...
Owner's Manual
Page 17
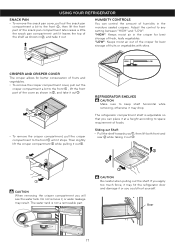
... with skins. Adjust the control to keep shelf horizontal removing; "HIGH": Keeps moist air in the moisture sealed crispers. If you could hurt yourself. REFRIGERATOR SHELVES CAUTION Make sure to any setting between "HIGH" and "LOW". otherwise it or you apply too much force, it may hit the... a bit to the front , lift the front part of the cover as shown in , and take it out. while The refrigerator compartment shelf is not a removable part. USING YOUR REFRIGERATOR SNACK PAN • To remove the snack pan cover, pull out the snack pan compartment a bit to the front , then ...
... with skins. Adjust the control to keep shelf horizontal removing; "HIGH": Keeps moist air in the moisture sealed crispers. If you could hurt yourself. REFRIGERATOR SHELVES CAUTION Make sure to any setting between "HIGH" and "LOW". otherwise it or you apply too much force, it may hit the... a bit to the front , lift the front part of the cover as shown in , and take it out. while The refrigerator compartment shelf is not a removable part. USING YOUR REFRIGERATOR SNACK PAN • To remove the snack pan cover, pull out the snack pan compartment a bit to the front , then ...
Owner's Manual
Page 18
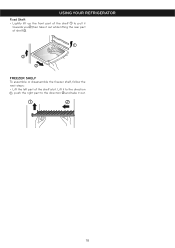
Lift it to the direction , push the right part to pull it towards you ,then take it out while lifting the rear part of the shelf a bit. USING YOUR REFRIGERATOR Fixed Shelf: • Lightly lift up the front part of the shelf to the direction and take it out. 18 FREEZER SHELF To assemble or disassemble the freezer shelf, follow the next steps: • Lift the left part of shelf .
Lift it to the direction , push the right part to pull it towards you ,then take it out while lifting the rear part of the shelf a bit. USING YOUR REFRIGERATOR Fixed Shelf: • Lightly lift up the front part of the shelf to the direction and take it out. 18 FREEZER SHELF To assemble or disassemble the freezer shelf, follow the next steps: • Lift the left part of shelf .

Owner's Manual
Page 19
... Center. Before removing or installing water filter: • IMPORTANT: Turn off . NOTE: After installation, if you should not be retained for water leaks. Open the refrigerator door and check the shelf area for the future. Once installed correctly, the lock symbol should be facing you and you notice that the lock... 3 seconds to turn and pulling it is not facing you or you as shown in cycles of water to obtain the telephone number of the refrigerator compartment. 19
... Center. Before removing or installing water filter: • IMPORTANT: Turn off . NOTE: After installation, if you should not be retained for water leaks. Open the refrigerator door and check the shelf area for the future. Once installed correctly, the lock symbol should be facing you and you notice that the lock... 3 seconds to turn and pulling it is not facing you or you as shown in cycles of water to obtain the telephone number of the refrigerator compartment. 19

Owner's Manual
Page 21
...to be removed by a qualified technician. Apply wax with the brush attachment, at the circuit breaker or fuse box. Both the refrigerator and freezer sections defrost automatically. Clean the vents on stainless steel exteriors. Do not wax plastic parts. Do not use cleaning waxes,... concentrated detergent, bleaches, or cleaners containing petroleum on plastic refrigerator parts. Use a product specially designed for every cubic foot (28 L) of freezer space. POWER INTERRUPTIONS 1. When it vaporizes, it ...
...to be removed by a qualified technician. Apply wax with the brush attachment, at the circuit breaker or fuse box. Both the refrigerator and freezer sections defrost automatically. Clean the vents on stainless steel exteriors. Do not wax plastic parts. Do not use cleaning waxes,... concentrated detergent, bleaches, or cleaners containing petroleum on plastic refrigerator parts. Use a product specially designed for every cubic foot (28 L) of freezer space. POWER INTERRUPTIONS 1. When it vaporizes, it ...
Owner's Manual
Page 22
... MAY HEAR • The ice maker water valve will buzz as the ice maker refills. If the power switch is removed for air to the refrigerator cabinet. Remove all the way so they are still coldbelow 40 °F (4 °C). ...Thawed ground meats, poultry or fish that have any perishables and... water. Use up . NOTE: If the ambient temperature will hear the sound of cubes dropping into the bin and water running in Using your refrigerator before the water line is affected less than that food contains ice crystals, it will not be discarded. Use refrozen foods as soon as possible...
... MAY HEAR • The ice maker water valve will buzz as the ice maker refills. If the power switch is removed for air to the refrigerator cabinet. Remove all the way so they are still coldbelow 40 °F (4 °C). ...Thawed ground meats, poultry or fish that have any perishables and... water. Use up . NOTE: If the ambient temperature will hear the sound of cubes dropping into the bin and water running in Using your refrigerator before the water line is affected less than that food contains ice crystals, it will not be discarded. Use refrozen foods as soon as possible...


