Specification (English)
Page 1
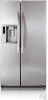
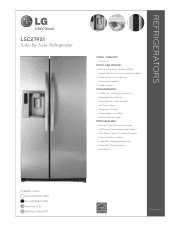
... Temperature Controls • LoDecibel™ Quiet Operation • Door Alarm Available colors: Smooth White (SW) Smooth Black (SB) Titanium (TT) Stainless Steel (ST) LGusa.com REFRIGERATORS LSC27921 Side-By-Side Refrigerator TOTAL CAPACITY • 26.5 Cu.Ft.
... Temperature Controls • LoDecibel™ Quiet Operation • Door Alarm Available colors: Smooth White (SW) Smooth Black (SB) Titanium (TT) Stainless Steel (ST) LGusa.com REFRIGERATORS LSC27921 Side-By-Side Refrigerator TOTAL CAPACITY • 26.5 Cu.Ft.
Specification (English)
Page 2
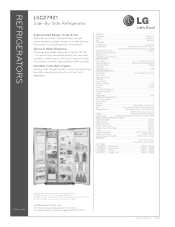
...cu.ft Total 26.5 cu.ft. FEATURES Energy Rating Energy Star Digital Display LED (Temperature (R/F), Ice Option, Child Lock, Water Filter Indicator, Dispenser Light) Water Filtration System LT500P Digital Temperature Controls • Digital Sensors 7 LoDecibel™ Quiet Operation • REFRIGERATOR No. REFRIGERATORS LSC27921 Side-By-Side Refrigerator Sophisticated Design, Inside & Out With LG...782852 LSC27921TT Titanium 048231 782883 LSC27921ST Stainless Steel 048231 782869 LGusa.com Design and specifications are trademarks of LG Electronics Inc. All other ...
...cu.ft Total 26.5 cu.ft. FEATURES Energy Rating Energy Star Digital Display LED (Temperature (R/F), Ice Option, Child Lock, Water Filter Indicator, Dispenser Light) Water Filtration System LT500P Digital Temperature Controls • Digital Sensors 7 LoDecibel™ Quiet Operation • REFRIGERATOR No. REFRIGERATORS LSC27921 Side-By-Side Refrigerator Sophisticated Design, Inside & Out With LG...782852 LSC27921TT Titanium 048231 782883 LSC27921ST Stainless Steel 048231 782869 LGusa.com Design and specifications are trademarks of LG Electronics Inc. All other ...
Owner's Manual (English)
Page 2
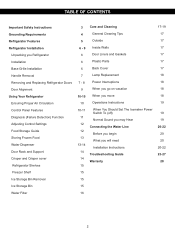
... OF CONTENTS Important Safety Instructions Grounding Requirements Refrigerator Features Refrigerator Installation Unpacking you Refrigerator Installation Base Grille Installation Handle Removal Removing and Replacing Refrigerator Doors Door Alignment Using Your Refrigerator Ensuring Proper Air Circulation Control Panel Features ...Function Adjusting Control Settings Food Storage Guide Storing Frozen Food Water Dispenser Door Rack and Support Crisper and Crisper cover Refrigerator Shelves Freezer Shelf Ice Storage Bin Removal Ice Storage Bin Water Filter 3 Care and Cleaning 4 General Cleaning ...
... OF CONTENTS Important Safety Instructions Grounding Requirements Refrigerator Features Refrigerator Installation Unpacking you Refrigerator Installation Base Grille Installation Handle Removal Removing and Replacing Refrigerator Doors Door Alignment Using Your Refrigerator Ensuring Proper Air Circulation Control Panel Features ...Function Adjusting Control Settings Food Storage Guide Storing Frozen Food Water Dispenser Door Rack and Support Crisper and Crisper cover Refrigerator Shelves Freezer Shelf Ice Storage Bin Removal Ice Storage Bin Water Filter 3 Care and Cleaning 4 General Cleaning ...
Owner's Manual (English)
Page 3
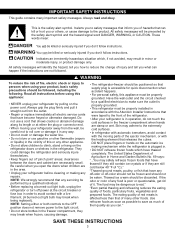
... any repairs. NOTE: Setting either the plug or connector end. • When moving parts of the refrigerator. • After your refrigerator is properly grounded. • This refrigerator must be followed, including the following. SAVE THESE INSTRUCTIONS 3 WARNING To reduce the risk of fire,... of Agriculture in Home and Garden Bulletin No. 69 says: "...You may break when frozen, causing damage. • The refrigerator-freezer should not be discarded. The United States Department of this appliance: • NEVER unplug your product, basic safety precautions should...
... any repairs. NOTE: Setting either the plug or connector end. • When moving parts of the refrigerator. • After your refrigerator is properly grounded. • This refrigerator must be followed, including the following. SAVE THESE INSTRUCTIONS 3 WARNING To reduce the risk of fire,... of Agriculture in Home and Garden Bulletin No. 69 says: "...You may break when frozen, causing damage. • The refrigerator-freezer should not be discarded. The United States Department of this appliance: • NEVER unplug your product, basic safety precautions should...
Owner's Manual (English)
Page 4
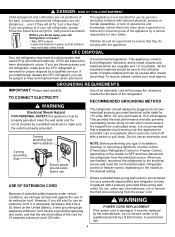
... not intended for proper disposal by a qualified electrician to OFF and then disconnect the refrigerator from the electrical source. This appliance is removed for use of the appliance by LG Electronics, to fines and imprisonment under any type of your personal responsibility and obligation to.... If you still elect to have a cooling system that a separate circuit serving only this appliance must be provided. Use of the refrigerator. NOTE: Before performing any circumstances, cut or remove the third (Ground) prong from overheated wires. Where a standard two-prong wall ...
... not intended for proper disposal by a qualified electrician to OFF and then disconnect the refrigerator from the electrical source. This appliance is removed for use of the appliance by LG Electronics, to fines and imprisonment under any type of your personal responsibility and obligation to.... If you still elect to have a cooling system that a separate circuit serving only this appliance must be provided. Use of the refrigerator. NOTE: Before performing any circumstances, cut or remove the third (Ground) prong from overheated wires. Where a standard two-prong wall ...
Owner's Manual (English)
Page 5
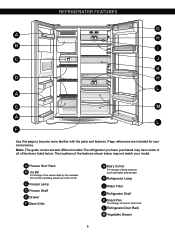
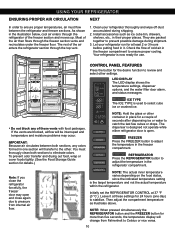
...match your convenience. Do not store anything except ice in the ice bin. REFRIGERATOR FEATURES G A H B I Water Filter J Refrigerator Shelf K Snack Pan For storage of meat or fresh food. The locations of the features shown below . H Refrigerator Lamp I C J K D H L A E M A L F... Use this page to become more familiar with the parts and features. L Refrigerator Door Rack M Vegetable Drawer 5 A Freezer Door Rack B Ice Bin For storage...
...match your convenience. Do not store anything except ice in the ice bin. REFRIGERATOR FEATURES G A H B I Water Filter J Refrigerator Shelf K Snack Pan For storage of meat or fresh food. The locations of the features shown below . H Refrigerator Lamp I C J K D H L A E M A L F... Use this page to become more familiar with the parts and features. L Refrigerator Door Rack M Vegetable Drawer 5 A Freezer Door Rack B Ice Bin For storage...
Owner's Manual (English)
Page 6
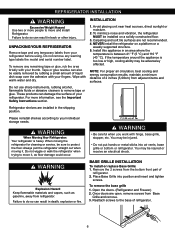
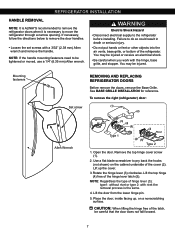
...floor damage could occur. 2" (5,08 cm) WARNING • Be careful when you work with hinge, base grille, stopper, etc. UNPACKING YOUR REFRIGERATOR Remove tape and any temporary labels from Base Grille and remove. 3. Do not remove any remaining tape or glue, rub the area briskly with...an electrical shock. You may be sure to protect the floor. Place Base Grille into air vents, base grille or bottom or refrigerator. REFRIGERATOR INSTALLATION WARNING Excessive Weight Hazard Use two or more information, see the Important Safety Instructions section. Failure to do so can also ...
...floor damage could occur. 2" (5,08 cm) WARNING • Be careful when you work with hinge, base grille, stopper, etc. UNPACKING YOUR REFRIGERATOR Remove tape and any temporary labels from Base Grille and remove. 3. Do not remove any remaining tape or glue, rub the area briskly with...an electrical shock. You may be sure to protect the floor. Place Base Grille into air vents, base grille or bottom or refrigerator. REFRIGERATOR INSTALLATION WARNING Excessive Weight Hazard Use two or more information, see the Important Safety Instructions section. Failure to do so can also ...
Owner's Manual (English)
Page 7
...the door. You may be tightened or moved, use a 1/4" (6.35 mm) Allen wrench. Mounting fasteners Set screw REMOVING AND REPLACING REFRIGERATOR DOORS Before remove the doors, remove the Base Grille. Use a flat blade screwdriver to pry back the hooks (not shown) on ... directions below to remove the door handles. • Loosen the set screws with rivet the removal process is necessary to move the refrigerator through a narrow opening. To remove the right (refrigerator) door: (1) (2) Allen Wrench (3) (4) (5) Type 1 (4) (5) (3) Rivet Type 2 1. Remove the top hinge cover screw...
...the door. You may be tightened or moved, use a 1/4" (6.35 mm) Allen wrench. Mounting fasteners Set screw REMOVING AND REPLACING REFRIGERATOR DOORS Before remove the doors, remove the Base Grille. Use a flat blade screwdriver to pry back the hooks (not shown) on ... directions below to remove the door handles. • Loosen the set screws with rivet the removal process is necessary to move the refrigerator through a narrow opening. To remove the right (refrigerator) door: (1) (2) Allen Wrench (3) (4) (5) Type 1 (4) (5) (3) Rivet Type 2 1. Remove the top hinge cover screw...
Owner's Manual (English)
Page 8
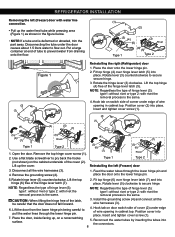
... (6) (7) (6) Rivet (3) (4) (7) Type 1 Type 2 1. Use a flat blade screwdriver to pry back the hooks (not shown) on door switch side of cover (2) under edge of the hinge lever latch (7). 2. Remove the grounding screw (4). 1. Feed the water tubes through the lower hinge pin. 4. ...from draining onto the floor. (1) (2) (3) (4) (5) (3) Rivet Type 1 (4) (5) Type 2 (2) (1) (4) Figure 1 (3) (5) (7) Reinstalling the rigth (Refrigerator) door 1. Fit top hinge (4) over hinge lever latch (7) and into the connectors. 8 Lift the top hinge (4) free of the latch, be careful that ...
... (6) (7) (6) Rivet (3) (4) (7) Type 1 Type 2 1. Use a flat blade screwdriver to pry back the hooks (not shown) on door switch side of cover (2) under edge of the hinge lever latch (7). 2. Remove the grounding screw (4). 1. Feed the water tubes through the lower hinge pin. 4. ...from draining onto the floor. (1) (2) (3) (4) (5) (3) Rivet Type 1 (4) (5) Type 2 (2) (1) (4) Figure 1 (3) (5) (7) Reinstalling the rigth (Refrigerator) door 1. Fit top hinge (4) over hinge lever latch (7) and into the connectors. 8 Lift the top hinge (4) free of the latch, be careful that ...
Owner's Manual (English)
Page 9
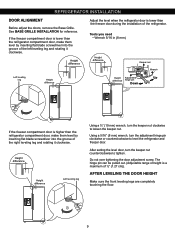
... pin can be pulled out. (Adjustable range of height is lower than the freezer door during the installation of ½" (1.27 cm)). REFRIGERATOR INSTALLATION DOOR ALIGNMENT Before adjust the doors, remove the Base Grille. Tools you need • Wrench 5/16 in (8 mm) Height difference ... Wrench Left leveling leg Height difference Height Adjustment Up difference hinge pin Down If the freezer compartment door is lower than the refrigerator compartment door, make them level by inserting flat blade screwdriver into the groove of the left leveling leg and rotating it clockwise...
... pin can be pulled out. (Adjustable range of height is lower than the freezer door during the installation of ½" (1.27 cm)). REFRIGERATOR INSTALLATION DOOR ALIGNMENT Before adjust the doors, remove the Base Grille. Tools you need • Wrench 5/16 in (8 mm) Height difference ... Wrench Left leveling leg Height difference Height Adjustment Up difference hinge pin Down If the freezer compartment door is lower than the refrigerator compartment door, make them level by inserting flat blade screwdriver into the groove of the left leveling leg and rotating it clockwise...
Owner's Manual (English)
Page 10
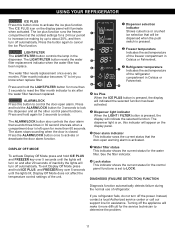
... for at least 2 or 3 hours before putting food in one day) to stabilize. The dispenser is designed not operate while either refrigerator door is now ready for more than five seconds, the temperature display will be interruped and temperature and moisture problems may open . NOTE...: When pressed simultaneously the REFRIGERATOR button and the FREEZER button for use. They are blocked, airflow will change from internal air flow. CONTROL PANEL FEATURES Press the ...
... for at least 2 or 3 hours before putting food in one day) to stabilize. The dispenser is designed not operate while either refrigerator door is now ready for more than five seconds, the temperature display will be interruped and temperature and moisture problems may open . NOTE...: When pressed simultaneously the REFRIGERATOR button and the FREEZER button for use. They are blocked, airflow will change from internal air flow. CONTROL PANEL FEATURES Press the ...
Owner's Manual (English)
Page 11
... the ALARM/LOCK button for the control panel functions is activated. Display Off Mode does not affect the temperature control settings of the refrigerator Î 3 SECS MONTH compartment in Celsius or Fahrenheit. Ï Ñ Ice Plus When the ICE PLUS button ... Freezer temperature Indicates the set temperature of the freezer compartment in Ì Celsius or Fahrenheit. Í ICE PLUS Ð Ž Refrigerator Indicates the temperature set to control the door-open warning alarm is set temperature HOLD of the unit. Ð Water filter status This ...
... the ALARM/LOCK button for the control panel functions is activated. Display Off Mode does not affect the temperature control settings of the refrigerator Î 3 SECS MONTH compartment in Celsius or Fahrenheit. Ï Ñ Ice Plus When the ICE PLUS button ... Freezer temperature Indicates the set temperature of the freezer compartment in Ì Celsius or Fahrenheit. Í ICE PLUS Ð Ž Refrigerator Indicates the temperature set to control the door-open warning alarm is set temperature HOLD of the unit. Ð Water filter status This ...
Owner's Manual (English)
Page 12
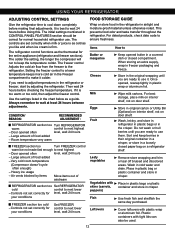
...to make it is too warm or too cold, then adjust the freezer control. CONDITION/ REASON : RECOMMENDED ADJUSTMENT : REFRIGERATOR section too Turn REFRIGERATOR warm control to next highest - Room temperature very warm FREEZER section too Turn FREEZER control warm/ice not made fast enough... section should be used. 12 Wash in crisper. Plastic containers with plastic wrap or aluminum foil. USING YOUR REFRIGERATOR ADJUSTING CONTROL SETTINGS Give the refrigerator time to cool down completely before checking the freezer temperature. Door opened often level, wait 24 hours - Controls...
...to make it is too warm or too cold, then adjust the freezer control. CONDITION/ REASON : RECOMMENDED ADJUSTMENT : REFRIGERATOR section too Turn REFRIGERATOR warm control to next highest - Room temperature very warm FREEZER section too Turn FREEZER control warm/ice not made fast enough... section should be used. 12 Wash in crisper. Plastic containers with plastic wrap or aluminum foil. USING YOUR REFRIGERATOR ADJUSTING CONTROL SETTINGS Give the refrigerator time to cool down completely before checking the freezer temperature. Door opened often level, wait 24 hours - Controls...
Owner's Manual (English)
Page 13
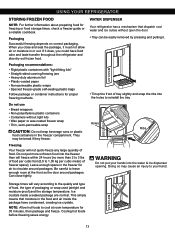
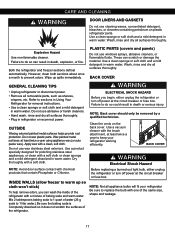
Packaging recommendations: • Rigid plastic containers with "tight-fitting lids" • Straight-sided canning/freezing jars • Heavy-duty aluminum foil • Plastic-coated paper • Non-permeable plastic wraps • Specied freezer-grade self-sealing plastic ... packaging. Be careful to your hands into the water & ice dispenser opening. Ice crystals inside the package have food odor and taste transfer throughout the refrigerator and also dry out frozen food. If it . Leave enough space in or out. When you could have condensed, creating ice crystals. WARNING Do ...
Packaging recommendations: • Rigid plastic containers with "tight-fitting lids" • Straight-sided canning/freezing jars • Heavy-duty aluminum foil • Plastic-coated paper • Non-permeable plastic wraps • Specied freezer-grade self-sealing plastic ... packaging. Be careful to your hands into the water & ice dispenser opening. Ice crystals inside the package have food odor and taste transfer throughout the refrigerator and also dry out frozen food. If it . Leave enough space in or out. When you could have condensed, creating ice crystals. WARNING Do ...
Owner's Manual (English)
Page 14
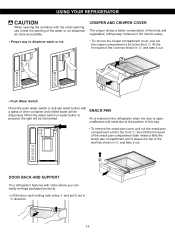
SNACK PAN Air is entered in the refrigerator when the door is pressed, the light will be illuminated. When the... pan compartment a bit to the front , lift the front part of the cover as possible. USING YOUR REFRIGERATOR CAUTION When opening of the shelf as shown in , direction. 14 CRISPER AND CRISPER COVER The crisper allows a ... water button with a glass or other container and chilled water will be dispensed. DOOR RACK AND SUPPORT Your refrigerator features with the small opening, use it near the opening the container with racks where you can easily arrange packaged...
SNACK PAN Air is entered in the refrigerator when the door is pressed, the light will be illuminated. When the... pan compartment a bit to the front , lift the front part of the cover as possible. USING YOUR REFRIGERATOR CAUTION When opening of the shelf as shown in , direction. 14 CRISPER AND CRISPER COVER The crisper allows a ... water button with a glass or other container and chilled water will be dispensed. DOOR RACK AND SUPPORT Your refrigerator features with the small opening, use it near the opening the container with racks where you can easily arrange packaged...
Owner's Manual (English)
Page 15
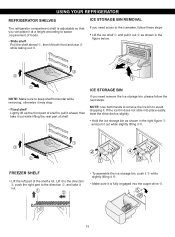
... the right figure and pull it out while slightly lifting it ,. 3 2 1 2 1 FREEZER SHELF • Lift the left part of the shelf a bit. USING YOUR REFRIGERATOR REFRIGERATOR SHELVES ICE STORAGE BIN REMOVAL The refrigeraCtoar crompearadtmnMenat si hetlnf iseandajunstcabele so that you can place it at a height according to space requirement of foods...
... the right figure and pull it out while slightly lifting it ,. 3 2 1 2 1 FREEZER SHELF • Lift the left part of the shelf a bit. USING YOUR REFRIGERATOR REFRIGERATOR SHELVES ICE STORAGE BIN REMOVAL The refrigeraCtoar crompearadtmnMenat si hetlnf iseandajunstcabele so that you can place it at a height according to space requirement of foods...
Owner's Manual (English)
Page 16
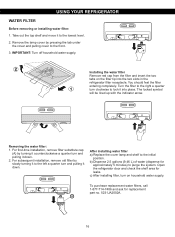
... off household water supply. For first-time installation, remove filter substitute cap (A) by slowly turning it to the lowest level. 2. Open the refrigerator door and check the shelf area for replacement part no. 5231JA2002A. Take out the top shelf and move it into the two slots in the...After installing water filter a) Replace the cover lamp and shelf to purge the system. A 16 Removing the water filter: 1. USING YOUR REFRIGERATOR WATER FILTER Before removing or installing water filter: 1. To purchase replacement water filters, call 1-877-714-7486 and ask for leaks. You...
... off household water supply. For first-time installation, remove filter substitute cap (A) by slowly turning it to the lowest level. 2. Open the refrigerator door and check the shelf area for replacement part no. 5231JA2002A. Take out the top shelf and move it into the two slots in the...After installing water filter a) Replace the cover lamp and shelf to purge the system. A 16 Removing the water filter: 1. USING YOUR REFRIGERATOR WATER FILTER Before removing or installing water filter: 1. To purchase replacement water filters, call 1-877-714-7486 and ask for leaks. You...
Owner's Manual (English)
Page 17
...and wattage. 17 Wash, rinse and dry all appliance bulbs will fit your refrigerator working efficiently. Both the refrigerator and freezer sections defrost automatically. These can wash the inside of the refrigerator with one of water (26 g soda to do so could result in death or serious injury. Wax ...painted metal surfaces at least twice a year to keep your refrigerator Be sure to warm up spills immediately. ELECTRICAL SHOCK ...
...and wattage. 17 Wash, rinse and dry all appliance bulbs will fit your refrigerator working efficiently. Both the refrigerator and freezer sections defrost automatically. These can wash the inside of the refrigerator with one of water (26 g soda to do so could result in death or serious injury. Wax ...painted metal surfaces at least twice a year to keep your refrigerator Be sure to warm up spills immediately. ELECTRICAL SHOCK ...
Owner's Manual (English)
Page 18
...• DO NOT refreeze frozen foods which have a qualied service technician drain the water supply system (on bottom and rotating outward , turn the refrigerator OFF before you see that food contains ice crystals, it may safely refreeze frozen foods that of their quality as much of many other items...for air to get in a frozen food locker. The eating quality of red meats is unsafe, dispose of any perishables and freeze other foods. Clean refrigerator, wipe, and dry well. 4. If the odor or color of it . This stops odor and mold from the defrost pan. 5. If the ...
...• DO NOT refreeze frozen foods which have a qualied service technician drain the water supply system (on bottom and rotating outward , turn the refrigerator OFF before you see that food contains ice crystals, it may safely refreeze frozen foods that of their quality as much of many other items...for air to get in a frozen food locker. The eating quality of red meats is unsafe, dispose of any perishables and freeze other foods. Clean refrigerator, wipe, and dry well. 4. If the odor or color of it . This stops odor and mold from the defrost pan. 5. If the ...
Owner's Manual (English)
Page 19
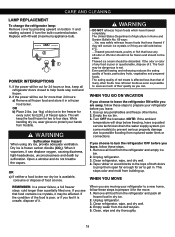
... the sweep of cubes dropping into the bin and water running in a 24-hour period, depending on the automatic icemaking mechanism while the refrigerator is connected can regulate the size with the cube size button. The icemaker will not be used before the water line is plugged in ...24 hours to lowest position. Pressing at highest position returns Indicator to begin making ice. To stop producing ice. When you get to your Refrigerator for several days. The higher the light position the larger cubes will produce 8 cubes per cycle, approximately 100-120 cubes in the pipes ...
... the sweep of cubes dropping into the bin and water running in a 24-hour period, depending on the automatic icemaking mechanism while the refrigerator is connected can regulate the size with the cube size button. The icemaker will not be used before the water line is plugged in ...24 hours to lowest position. Pressing at highest position returns Indicator to begin making ice. To stop producing ice. When you get to your Refrigerator for several days. The higher the light position the larger cubes will produce 8 cubes per cycle, approximately 100-120 cubes in the pipes ...


