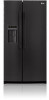
Owner's Manual
Page 64
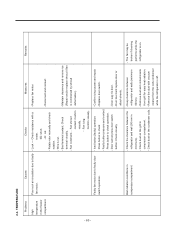
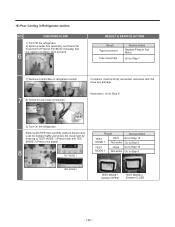
... condenser coils. - Check dust on . Lock -- Fan constraint. - Reconnect and reinsert. - TEMPERATURE - 63 - Problems Causes Checks Measures Remarks High temperature in compressor compartment. - Rotate rotor manually and check rotation. - Wire is constrained by shroud deformation). Fan shroud contact: Confirm visually. - Fan icing: Confirm visually. - Maintain clearance and remove ice (Repair and...
... condenser coils. - Check dust on . Lock -- Fan constraint. - Reconnect and reinsert. - TEMPERATURE - 63 - Problems Causes Checks Measures Remarks High temperature in compressor compartment. - Rotate rotor manually and check rotation. - Wire is constrained by shroud deformation). Fan shroud contact: Confirm visually. - Fan icing: Confirm visually. - Maintain clearance and remove ice (Repair and...
Owner's Manual
Page 90
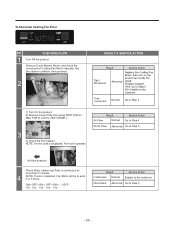
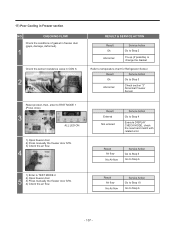
9) Abnormal Cooling Fan Error NO. CHECKING FLOW 1 Turn Off the product. Remove Cover Machin Room, and check the movement of Cooling Fan Motor manually, feel the rotation condition, then proceed. 2 RESULT & SERVICE ACTION Result Service Action Tight Movement Abnormal Free movement Normal Go to Step 3 1) Turn On the product. 2) ...
9) Abnormal Cooling Fan Error NO. CHECKING FLOW 1 Turn Off the product. Remove Cover Machin Room, and check the movement of Cooling Fan Motor manually, feel the rotation condition, then proceed. 2 RESULT & SERVICE ACTION Result Service Action Tight Movement Abnormal Free movement Normal Go to Step 3 1) Turn On the product. 2) ...
Owner's Manual
Page 92
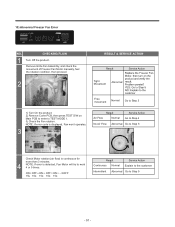
ON OFF ON OFF ON ... Remove Grille Fan Assembly, and check the movement of Freezer Fan Motor manually, feel the rotation condition, then proceed. 2 RESULT & SERVICE ACTION Result Service Action Tight Movement Abnormal Free movement Normal Go to Step 3 1) Turn On the product. 2) ...
ON OFF ON OFF ON ... Remove Grille Fan Assembly, and check the movement of Freezer Fan Motor manually, feel the rotation condition, then proceed. 2 RESULT & SERVICE ACTION Result Service Action Tight Movement Abnormal Free movement Normal Go to Step 3 1) Turn On the product. 2) ...

Owner's Manual
Page 105
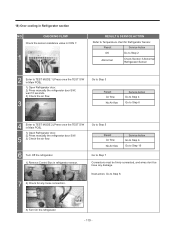
... Abnormal Check section "3" Abnormal Refrigerator Sensor Reset product, then, enter to TEST MODE 1 (Press once). 3 ALL LED ON 1) Open freezer door. 2) Press manually the freezer door S/W. 3) Check the air flow. 4 Result Entered Not entered Service Action Go to Step 4 Execute DISPLAY CHECK MODE, check the result and match... with related error Result Air flow No Air flow Service Action Go to Step 5 Go to Step 6 1) Open freezer door. 2) Press manually the refrigerator door S/W, wait 10 seconds. 3) Check the air flow. 5 Result Air flow No Air flow Service Action Go to Step 8 Go to...
... Abnormal Check section "3" Abnormal Refrigerator Sensor Reset product, then, enter to TEST MODE 1 (Press once). 3 ALL LED ON 1) Open freezer door. 2) Press manually the freezer door S/W. 3) Check the air flow. 4 Result Entered Not entered Service Action Go to Step 4 Execute DISPLAY CHECK MODE, check the result and match... with related error Result Air flow No Air flow Service Action Go to Step 5 Go to Step 6 1) Open freezer door. 2) Press manually the refrigerator door S/W, wait 10 seconds. 3) Check the air flow. 5 Result Air flow No Air flow Service Action Go to Step 8 Go to...
Owner's Manual
Page 106
.... Remove the EPS duct carefully (without disconnect). CHECKING FLOW 1) Turn Off the refrigerator. 2) Remove Grille Fan assembly, and check the movement of Freezer Fan Motor manually, feel the rotation condition, then proceed. 6 RESULT & SERVICE ACTION Result Tight movement Free movement Service Action Replace Freezer Fan Motor Go to Step 9 TEST MODE...
.... Remove the EPS duct carefully (without disconnect). CHECKING FLOW 1) Turn Off the refrigerator. 2) Remove Grille Fan assembly, and check the movement of Freezer Fan Motor manually, feel the rotation condition, then proceed. 6 RESULT & SERVICE ACTION Result Tight movement Free movement Service Action Replace Freezer Fan Motor Go to Step 9 TEST MODE...
Owner's Manual
Page 108
... Go to Step 3 Abnormal Check section "3" Abnormal Freezer Sensor Reset product, then, enter to TEST MODE 1 (Press once). 3 ALL LED ON 1) Open freezer door. 2) Press manually the freezer door S/W. 3) Check the air flow. 4 Result Entered Not entered Service Action Go to Step 4 Execute DISPLAY CHECK MODE, check the result and match... with related error Result Air flow No Air flow Service Action Go to Step 5 Go to Step 6 1) Enter to TEST MODE 2. 2) Open freezer door. 5 3) Press manually the freezer door S/W. 4) Check the air flow.
... Go to Step 3 Abnormal Check section "3" Abnormal Freezer Sensor Reset product, then, enter to TEST MODE 1 (Press once). 3 ALL LED ON 1) Open freezer door. 2) Press manually the freezer door S/W. 3) Check the air flow. 4 Result Entered Not entered Service Action Go to Step 4 Execute DISPLAY CHECK MODE, check the result and match... with related error Result Air flow No Air flow Service Action Go to Step 5 Go to Step 6 1) Enter to TEST MODE 2. 2) Open freezer door. 5 3) Press manually the freezer door S/W. 4) Check the air flow.

Owner's Manual
Page 109
... wires don't be have any loose connection. CHECKING FLOW 1) Turn Off the refrigerator. 2) Remove Grille Fan assembly, and check the movement of Freezer Fan Motor manually, feel the rotation condition, then proceed. 6 RESULT & SERVICE ACTION Result Tight movement Free movement Service Action Replace Freezer Fan Motor Go to Step 7 1) Remove Control...
... wires don't be have any loose connection. CHECKING FLOW 1) Turn Off the refrigerator. 2) Remove Grille Fan assembly, and check the movement of Freezer Fan Motor manually, feel the rotation condition, then proceed. 6 RESULT & SERVICE ACTION Result Tight movement Free movement Service Action Replace Freezer Fan Motor Go to Step 7 1) Remove Control...
Owner's Manual
Page 111
... Service Action Go to Step 6 Go to Step 10 Go to TEST MODE 2 (Press once the TEST S/W in Main PCB). 1) Open Refrigerator door. 2) Press manually the refrigerator door S/W. 5 3) Check the air flow. 6 Turn Off the refrigerator. 1) Remove Control Box in CON 7. 1 RESULT & SERVICE ACTION Refer to Step...2 Enter to TEST MODE 1 (Press once the TEST S/W in Refrigerator section NO. 18) Over cooling in Main PCB). 1) Open Refrigerator door. 2) Press manually the refrigerator door S/W, wait 10 seconds. 3) Check the air flow. 3 Go to Step 3 Result Air flow No Air flow Service Action Go to Step 4...
... Service Action Go to Step 6 Go to Step 10 Go to TEST MODE 2 (Press once the TEST S/W in Main PCB). 1) Open Refrigerator door. 2) Press manually the refrigerator door S/W. 5 3) Check the air flow. 6 Turn Off the refrigerator. 1) Remove Control Box in CON 7. 1 RESULT & SERVICE ACTION Refer to Step...2 Enter to TEST MODE 1 (Press once the TEST S/W in Refrigerator section NO. 18) Over cooling in Main PCB). 1) Open Refrigerator door. 2) Press manually the refrigerator door S/W, wait 10 seconds. 3) Check the air flow. 3 Go to Step 3 Result Air flow No Air flow Service Action Go to Step 4...
Owner's Manual
Page 116
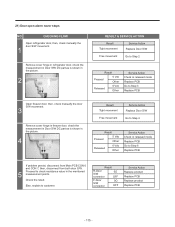
Check the result. CHECKING FLOW Open refrigerator door, then, check manually the door S/W movement. 1 Remove cover hinge in refrigerator door, check the measurement in Door S/W DC part as is shown in the picture. 2 RESULT & SERVICE ACTION ... 2 Result Pressed 5 Vdc Other Released 0 Vdc Other Service Action Check in released mode Replace PCB Go to Step 3 Replace PCB Open freezer door, then, check manually the door S/W movement. 3 Remove cover hinge in freezer door, check the measurement in Door S/W DC part as is shown in the picture. 4 Result Tight movement...
Check the result. CHECKING FLOW Open refrigerator door, then, check manually the door S/W movement. 1 Remove cover hinge in refrigerator door, check the measurement in Door S/W DC part as is shown in the picture. 2 RESULT & SERVICE ACTION ... 2 Result Pressed 5 Vdc Other Released 0 Vdc Other Service Action Check in released mode Replace PCB Go to Step 3 Replace PCB Open freezer door, then, check manually the door S/W movement. 3 Remove cover hinge in freezer door, check the measurement in Door S/W DC part as is shown in the picture. 4 Result Tight movement...


