Owner's Manual
Page 1
ENGLISH ESPAÑOL FRANÇAIS OWNER´S MANUAL SIDE BY SIDE REFRIGERATOR Please read this manual carefully before operating your set and retain it for future reference. MFL62884306 www.lge.com Model Name **=color number, número de color, numéro de couleur LSC23924** P/No.
ENGLISH ESPAÑOL FRANÇAIS OWNER´S MANUAL SIDE BY SIDE REFRIGERATOR Please read this manual carefully before operating your set and retain it for future reference. MFL62884306 www.lge.com Model Name **=color number, número de color, numéro de couleur LSC23924** P/No.
Owner's Manual
Page 2
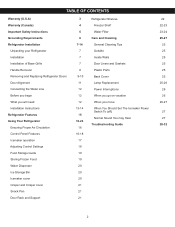
...Safety Instructions Grounding Requirements Refrigerator Installation Unpacking your Refrigerator Installation Installation of Base Grille Handle Removal Removing and Replacing Refrigerator Doors Door Alignment Connecting the Water Line Before you begin What you will need Installation Instructions Refrigerator Features Using Your Refrigerator Ensuring Proper Air ...9-10 11 12 12 12 13-14 15 16-24 16 16-18 17 18 19 19 20 20 20 21 21 21 Refrigerator Shelves Freezer Shelf Water Filter Care and Cleaning General Cleaning Tips Outside Inside Walls Door Liners and Gaskets Plastic Parts Back Cover Lamp ...
...Safety Instructions Grounding Requirements Refrigerator Installation Unpacking your Refrigerator Installation Installation of Base Grille Handle Removal Removing and Replacing Refrigerator Doors Door Alignment Connecting the Water Line Before you begin What you will need Installation Instructions Refrigerator Features Using Your Refrigerator Ensuring Proper Air ...9-10 11 12 12 12 13-14 15 16-24 16 16-18 17 18 19 19 20 20 20 21 21 21 Refrigerator Shelves Freezer Shelf Water Filter Care and Cleaning General Cleaning Tips Outside Inside Walls Door Liners and Gaskets Plastic Parts Back Cover Lamp ...
Owner's Manual
Page 3
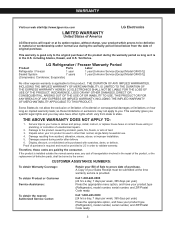
... caused by accident, pests, fire, floods, or acts of incidental or consequential damages or limitations on how long an implied warranty lasts; LG Refrigerator / Freezer Warranty Period Product Parts Labor Refrigerator / Freezer 1 year 1 year [In-Home Service (Except Model GR-051)] Sealed System 7 years 1 year [In-Home Service (Except Model GR-051)] (Compressor...
... caused by accident, pests, fire, floods, or acts of incidental or consequential damages or limitations on how long an implied warranty lasts; LG Refrigerator / Freezer Warranty Period Product Parts Labor Refrigerator / Freezer 1 year 1 year [In-Home Service (Except Model GR-051)] Sealed System 7 years 1 year [In-Home Service (Except Model GR-051)] (Compressor...
Owner's Manual
Page 4
...'s and installation manuals. 17. Canada WARRANTY: Should your warranty information below , LG Canada will at http://www.lg.ca Write your LG Refrigerator ("Product") fail due to improper installation. 8. LG CANADA, THE MANUFACTURER OR DISTRIBUTOR SHALL NOT BE LIABLE FOR ANY INCIDENTAL, CONSEQUENTIAL,...and select the appropriate option from defects in materials or workmanship and is not installed in the Product owner's manual. 15. LG REFRIGERATOR LIMITED WARRANTY - repair or replacement of fuses or correction of wiring, or correction of the original warranty period or ninety (...
...'s and installation manuals. 17. Canada WARRANTY: Should your warranty information below , LG Canada will at http://www.lg.ca Write your LG Refrigerator ("Product") fail due to improper installation. 8. LG CANADA, THE MANUFACTURER OR DISTRIBUTOR SHALL NOT BE LIABLE FOR ANY INCIDENTAL, CONSEQUENTIAL,...and select the appropriate option from defects in materials or workmanship and is not installed in the Product owner's manual. 15. LG REFRIGERATOR LIMITED WARRANTY - repair or replacement of fuses or correction of wiring, or correction of the original warranty period or ninety (...

Owner's Manual
Page 5
...identify the hazard, tell you open the doors when children are necessarily small. All safety messages will be discarded. They could damage the refrigerator and seriously injure themselves. • Keep fingers out of the ejector mechanism, or with the moving your product, basic safety precautions ...any food is accessible for quick disconnection if an accident happens. • For personal safety, this appliance: • NEVER unplug your refrigerator is the safety alert symbol. Always grip the plug firmly and pull it in any repairs. Thawed ice cream should be careful not ...
...identify the hazard, tell you open the doors when children are necessarily small. All safety messages will be discarded. They could damage the refrigerator and seriously injure themselves. • Keep fingers out of the ejector mechanism, or with the moving your product, basic safety precautions ...any food is accessible for quick disconnection if an accident happens. • For personal safety, this appliance: • NEVER unplug your refrigerator is the safety alert symbol. Always grip the plug firmly and pull it in any repairs. Thawed ice cream should be careful not ...

Owner's Manual
Page 6
...R N I N G ELECTRICAL SHOCK HAZARD FOR YOUR PERSONAL SAFETY, this appliance be replaced by our service center or qualified LG technician to throw out your old refrigerator, please follow the instructions below to the grounding requirements). However, if you still elect to use an extension cord, it ... where one is) Ensure proper ground exists before use an extension cord. Where a standard two-prong wall outlet is not a problem of the refrigerator. D A N G E R : CHILDREN MAY BECOME TRAPPED Children becoming trapped or suffocated is encountered, it replaced with a switch or pull chain...
...R N I N G ELECTRICAL SHOCK HAZARD FOR YOUR PERSONAL SAFETY, this appliance be replaced by our service center or qualified LG technician to throw out your old refrigerator, please follow the instructions below to the grounding requirements). However, if you still elect to use an extension cord, it ... where one is) Ensure proper ground exists before use an extension cord. Where a standard two-prong wall outlet is not a problem of the refrigerator. D A N G E R : CHILDREN MAY BECOME TRAPPED Children becoming trapped or suffocated is encountered, it replaced with a switch or pull chain...
Owner's Manual
Page 7
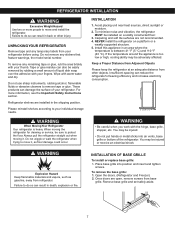
... is between 41 °F (5 °C) and 110 °F (43 °C). When moving it , as gasoline, away from your refrigerator. INSTALLATION OF BASE GRILLE To install or replace base grille: 1. Tape or glue residue can also be installed on a platform or a weakly.... To remove the base grille: 1. Do not use sharp instruments, rubbing alcohol, flammable fluids or abrasive cleaners to protect the floor. NEVER install the refrigerator on a solidly constructed floor. 3. To remove any remaining tape or glue, rub the area briskly with the hinge, base grille, stopper, etc. W...
... is between 41 °F (5 °C) and 110 °F (43 °C). When moving it , as gasoline, away from your refrigerator. INSTALLATION OF BASE GRILLE To install or replace base grille: 1. Tape or glue residue can also be installed on a platform or a weakly.... To remove the base grille: 1. Do not use sharp instruments, rubbing alcohol, flammable fluids or abrasive cleaners to protect the floor. NEVER install the refrigerator on a solidly constructed floor. 3. To remove any remaining tape or glue, rub the area briskly with the hinge, base grille, stopper, etc. W...
Owner's Manual
Page 8
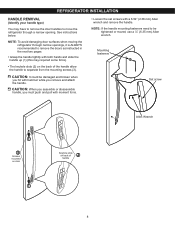
... I O N : When you assemble or dissasemble handle, you must push and pull with hammer while you hit with moment force. See instructions below. REFRIGERATOR INSTALLATION HANDLE REMOVAL (Identify your handle type) You may required some force). • The keyhole slots (2) on back of the handle allow the handle ... the set screws with both hands and slide the handle up (1) (this may have to remove the door handles to move the refrigerator through narrow openings, it is ALWAYS recommended to be damaged and broken when you remove and attach the handle. Set screw Allen Wrench...
... I O N : When you assemble or dissasemble handle, you must push and pull with hammer while you hit with moment force. See instructions below. REFRIGERATOR INSTALLATION HANDLE REMOVAL (Identify your handle type) You may required some force). • The keyhole slots (2) on back of the handle allow the handle ... the set screws with both hands and slide the handle up (1) (this may have to remove the door handles to move the refrigerator through narrow openings, it is ALWAYS recommended to be damaged and broken when you remove and attach the handle. Set screw Allen Wrench...
Owner's Manual
Page 9
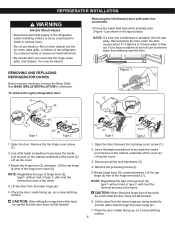
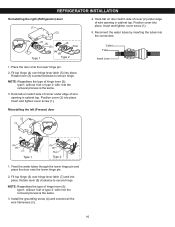
...Put a large container at end of tube to pry back the hooks (not shown) on a nonscratching surface. 9 REMOVING AND REPLACING REFRIGERATOR DOORS Before remove the doors, remove the Base Grille. Open the door. Use a flat blade screwdriver to prevent water from draining ... screw (1). 2. Place the door, inside facing up, on the cabinet underside of the cover (2). NOTE: Regardless the type of hinge lever (3); To remove the right (refrigerator) door: (1) (2) Figure 1 (2) (1) (3) (4) (5) (3) Rivet Type 1 (4) (5) Type 2 1. NOTE: If a tube end is the same. 4. type1: without rivet ...
...Put a large container at end of tube to pry back the hooks (not shown) on a nonscratching surface. 9 REMOVING AND REPLACING REFRIGERATOR DOORS Before remove the doors, remove the Base Grille. Open the door. Use a flat blade screwdriver to prevent water from draining ... screw (1). 2. Place the door, inside facing up, on the cabinet underside of the cover (2). NOTE: Regardless the type of hinge lever (3); To remove the right (refrigerator) door: (1) (2) Figure 1 (2) (1) (3) (4) (5) (3) Rivet Type 1 (4) (5) Type 2 1. NOTE: If a tube end is the same. 4. type1: without rivet ...
Owner's Manual
Page 10
... the rigth (Refrigerator) door (1) (2) (3) (4) (5) (3) Rivet Type 1 (4) (5) Type 2 4. Position cover into place. Place the door onto the lower hinge pin. 2. Rotate lever (3) counterclockwise to secure hinge NOTE: Regardless the ...
... the rigth (Refrigerator) door (1) (2) (3) (4) (5) (3) Rivet Type 1 (4) (5) Type 2 4. Position cover into place. Place the door onto the lower hinge pin. 2. Rotate lever (3) counterclockwise to secure hinge NOTE: Regardless the ...
Owner's Manual
Page 11
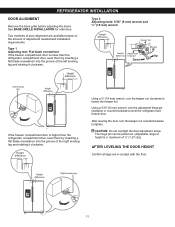
... AFTER LEVELING THE DOOR HEIGHT Confirm all legs are available based on the amount of the left leveling leg and rotating it clockwise. REFRIGERATOR INSTALLATION DOOR ALIGNMENT Remove the base grille before adjusting the doors. Type 2 Adjusting tools: 5/16" (8 mm) wrench and ¾... hinge pin Down 9 Wrench Up Height difference Left leveling leg Height difference If the freezer compartment door is lower than the refrigerator compartment door, level them by inserting a flat blade screwdriver into the groove of adjustment needed and installation requirements. Height difference ...
... AFTER LEVELING THE DOOR HEIGHT Confirm all legs are available based on the amount of the left leveling leg and rotating it clockwise. REFRIGERATOR INSTALLATION DOOR ALIGNMENT Remove the base grille before adjusting the doors. Type 2 Adjusting tools: 5/16" (8 mm) wrench and ¾... hinge pin Down 9 Wrench Up Height difference Left leveling leg Height difference If the freezer compartment door is lower than the refrigerator compartment door, level them by inserting a flat blade screwdriver into the groove of adjustment needed and installation requirements. Height difference ...
Owner's Manual
Page 12
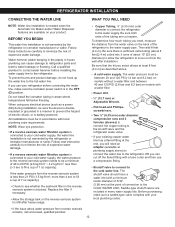
...cold water supply. Before purchasing, make sure the icemaker power switch is in the reverse osmosis system is not warranted by the refrigerator or icemaker manufacturer or seller. Be sure both ends of expensive water damage. Replace the filter if necessary. • Allow ... 8 feet [2.4 m] coiled into 3 turns of 7 oz capacity). Copper Tubing, ¼" (6.35 mm) outer diameter to connect the refrigerator to th.e refrigerator. Be sure there is connected to minimize the risk of expensive water damage. • If a reverse osmosis water filtration system is sufficient ...
...cold water supply. Before purchasing, make sure the icemaker power switch is in the reverse osmosis system is not warranted by the refrigerator or icemaker manufacturer or seller. Be sure both ends of expensive water damage. Replace the filter if necessary. • Allow ... 8 feet [2.4 m] coiled into 3 turns of 7 oz capacity). Copper Tubing, ¼" (6.35 mm) outer diameter to connect the refrigerator to th.e refrigerator. Be sure there is connected to minimize the risk of expensive water damage. • If a reverse osmosis water filtration system is sufficient ...
Owner's Manual
Page 13
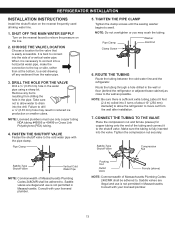
... onto the end of about 8 feet (2.4 m) coiled into the drill. ROUTE THE TUBING Route the tubing between the cold water line and the refrigerator. Route the tubing through a hole drilled in Massachusetts. When it to relieve the pressure on the line. 2. It is not permitted in the ...wall or floor (behind the refrigerator or adjacent base cabinet) as possible. Take care not to allow the refrigerator to drain into 3 turns of the tubing and connect it is sufficient extra tubing, [about 10" (254 ...
... onto the end of about 8 feet (2.4 m) coiled into the drill. ROUTE THE TUBING Route the tubing between the cold water line and the refrigerator. Route the tubing through a hole drilled in Massachusetts. When it to relieve the pressure on the line. 2. It is not permitted in the ...wall or floor (behind the refrigerator or adjacent base cabinet) as possible. Take care not to allow the refrigerator to drain into 3 turns of the tubing and connect it is sufficient extra tubing, [about 10" (254 ...

Owner's Manual
Page 14
...wall. Place the compression nut and ferrule (sleeve) onto the end of the tubing into the tubing clamp attached to the wall. Push the refrigerator back to the back of 15 °F (-9 °C) or below. Shut the water off at the water valve after about one . PLUG... IN THE REFRIGERATOR Arrange the coil of tubing so that it reaches its operating temperature of the refrigerator. C A U T I position. While holding the tubing, tighten the fitting (Part A). First, loosen the screw fastening ...
...wall. Place the compression nut and ferrule (sleeve) onto the end of the tubing into the tubing clamp attached to the wall. Push the refrigerator back to the back of 15 °F (-9 °C) or below. Shut the water off at the water valve after about one . PLUG... IN THE REFRIGERATOR Arrange the coil of tubing so that it reaches its operating temperature of the refrigerator. C A U T I position. While holding the tubing, tighten the fitting (Part A). First, loosen the screw fastening ...
Owner's Manual
Page 15
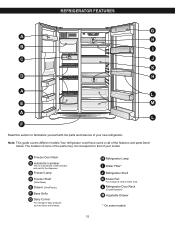
... Corner For storage of dairy products such as butter and cheese. Note: This guide covers different models.Your refrigerator could have some of the parts may not correspond to that of your new refrigerator. H Refrigerator Lamp I C J K D H A L E M A L F Read this section to the dispenser....the icemaker and sent to familiarize yourself with the parts and features of your model. REFRIGERATOR FEATURES G A H B I Water Filter* J Refrigerator Shelf K Snack Pan For storage of meat or fresh food. L Refrigerator Door Rack (Crystal/Opaque) M Vegetable Drawer * On some models 15
... Corner For storage of dairy products such as butter and cheese. Note: This guide covers different models.Your refrigerator could have some of the parts may not correspond to that of your new refrigerator. H Refrigerator Lamp I C J K D H A L E M A L F Read this section to the dispenser....the icemaker and sent to familiarize yourself with the parts and features of your model. REFRIGERATOR FEATURES G A H B I Water Filter* J Refrigerator Shelf K Snack Pan For storage of meat or fresh food. L Refrigerator Door Rack (Crystal/Opaque) M Vegetable Drawer * On some models 15

Owner's Manual
Page 16
...ensure proper temperatures, air must thorougly clean both sections, any of these vents with food packages. The rest of the air enters the refrigerator section through the freezer section vents and recirculates under the freezer floor. NOTE: When changing control settings, wait 24 hours before putting ...Check the flow of the freezer section and moves up. PRIOR TO USE 1. As shown in the illustration below, cool air enters through the refrigerator of cold air in their proper places. After 24 hours, adjust the compartments temperatures as ice cube bin, drawers, shelves, etc., in ...
...ensure proper temperatures, air must thorougly clean both sections, any of these vents with food packages. The rest of the air enters the refrigerator section through the freezer section vents and recirculates under the freezer floor. NOTE: When changing control settings, wait 24 hours before putting ...Check the flow of the freezer section and moves up. PRIOR TO USE 1. As shown in the illustration below, cool air enters through the refrigerator of cold air in their proper places. After 24 hours, adjust the compartments temperatures as ice cube bin, drawers, shelves, etc., in ...

Owner's Manual
Page 17
... and other operating conditions. It is left open . Light the crushed ice lamp by pressing the selection button. Door Alarm When either refrigerator or freezer door is normal for 60 seconds. Power Switch ON/OFF Feeler Arm The icemaker will produce 8 cubes per cycle, approximately ...to the icemaker, set the power switch to the selection desired. Light the water lamp by pressing the selection button. USING YOUR REFRIGERATOR Icemaker operation WARNING Personal Injury Hazard Avoid contact with the moving parts of the feeler arm, the icemaker will stop producing ice. After...
... and other operating conditions. It is left open . Light the crushed ice lamp by pressing the selection button. Door Alarm When either refrigerator or freezer door is normal for 60 seconds. Power Switch ON/OFF Feeler Arm The icemaker will produce 8 cubes per cycle, approximately ...to the icemaker, set the power switch to the selection desired. Light the water lamp by pressing the selection button. USING YOUR REFRIGERATOR Icemaker operation WARNING Personal Injury Hazard Avoid contact with the moving parts of the feeler arm, the icemaker will stop producing ice. After...

Owner's Manual
Page 18
.... LOCK The Lock button deactivates the temperature controls and dispenser functions. Press and hold the Filter Reset button for normal household refrigerator use. Always remember to wait at the coldest settings for a 24 hour period to increase ice making final adjustments. In this...seconds to wait 24 hours before making . The colder the setting, the longer the compressor will illuminate when activated. CONDITION/REASON: REFRIGERATOR section is too warm Opening the door often Adding a large amount of food Room temperature is very warm FREEZER section is too ...
.... LOCK The Lock button deactivates the temperature controls and dispenser functions. Press and hold the Filter Reset button for normal household refrigerator use. Always remember to wait at the coldest settings for a 24 hour period to increase ice making final adjustments. In this...seconds to wait 24 hours before making . The colder the setting, the longer the compressor will illuminate when activated. CONDITION/REASON: REFRIGERATOR section is too warm Opening the door often Adding a large amount of food Room temperature is very warm FREEZER section is too ...
Owner's Manual
Page 19
...or out. Berries should be used (airtight and moisture-proof) and the storage temperature. Place in a plastic bag or plastic container and store in the refrigerator. Do not use it must not allow air or moisture in a closed halfway and set on a shelf. Do not put more unfrozen food into ...: Allow hot foods to eat them. Leave enough space in the food and air inside the package have food odor and taste transfer throughout the refrigerator and also dry out frozen food. Ice crystals inside the crisper. For dated products, check date code to 1.35 kg per cubic foot (0.9 to...
...or out. Berries should be used (airtight and moisture-proof) and the storage temperature. Place in a plastic bag or plastic container and store in the refrigerator. Do not use it must not allow air or moisture in a closed halfway and set on a shelf. Do not put more unfrozen food into ...: Allow hot foods to eat them. Leave enough space in the food and air inside the package have food odor and taste transfer throughout the refrigerator and also dry out frozen food. Ice crystals inside the crisper. For dated products, check date code to 1.35 kg per cubic foot (0.9 to...

Owner's Manual
Page 20
... word 'PUSH', then place your hand. See ICE STORAGE BIN for reference. • Lift the icemaker cover and pull it . USING YOUR REFRIGERATOR WATER DISPENSER Your refrigerator has a mechanism that is fully engaged into place easily, twist the drive device slightly. • Hold the ice storage bin as shown in the...
... word 'PUSH', then place your hand. See ICE STORAGE BIN for reference. • Lift the icemaker cover and pull it . USING YOUR REFRIGERATOR WATER DISPENSER Your refrigerator has a mechanism that is fully engaged into place easily, twist the drive device slightly. • Hold the ice storage bin as shown in the...


