
Service Manual
Page 6
... Range, Cooling Mode Temperature Increment Auto Operation(electronic control) Self Diagnosis Timer Sleep Operation Healthy Dehumidification Mode Restart Delay minutes Refrigerant(R-22) Charge g(oz) Power cord AWG #: P*mm2 Fuse or breaker Capacity A Connecting Cable AWG #: P*mm2 Connecting Tube Liquid ...Side mm(in Net Weight Indoor kg(lbs) Outdoor kg(lbs) LSC091PMA 1, 115V, 60 9,000 940 8.5 46 9.6 7.1(250) 1.2(2.6) 39 34 30 46 Thermistor 4-way ...
... Range, Cooling Mode Temperature Increment Auto Operation(electronic control) Self Diagnosis Timer Sleep Operation Healthy Dehumidification Mode Restart Delay minutes Refrigerant(R-22) Charge g(oz) Power cord AWG #: P*mm2 Fuse or breaker Capacity A Connecting Cable AWG #: P*mm2 Connecting Tube Liquid ...Side mm(in Net Weight Indoor kg(lbs) Outdoor kg(lbs) LSC091PMA 1, 115V, 60 9,000 940 8.5 46 9.6 7.1(250) 1.2(2.6) 39 34 30 46 Thermistor 4-way ...

Service Manual
Page 28
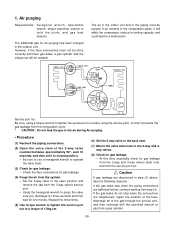
Air Purging 1) Air purging Air and moisture remaining in the refrigerant system have been properly connected and all joints of leaks, relieve the nitrogen pressure by loosening the charge hose connector at this purpose. Therefore, the indoor unit and tubing between the indoor and outdoor units .... Indoor unit Outdoor unit Manifold valve Pressure gauge Lo Hi Charge hose Nitrogen gas cylinder(in a vertical standing position. • Do a leak test of all wiring for air purging. CAUTION To avoid nitrogen entering the refrigerant system in the refrigera- 5. The "Hi" knob of ...
Air Purging 1) Air purging Air and moisture remaining in the refrigerant system have been properly connected and all joints of leaks, relieve the nitrogen pressure by loosening the charge hose connector at this purpose. Therefore, the indoor unit and tubing between the indoor and outdoor units .... Indoor unit Outdoor unit Manifold valve Pressure gauge Lo Hi Charge hose Nitrogen gas cylinder(in a vertical standing position. • Do a leak test of all wiring for air purging. CAUTION To avoid nitrogen entering the refrigerant system in the refrigera- 5. The "Hi" knob of ...

Service Manual
Page 31
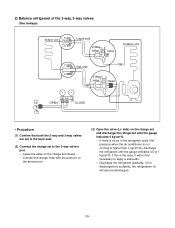
... lower than shown, the system is most likely undercharged, and charge should be used for 15~20 minutes, then check the system refrigerant charge: 1. PUMP DOWN This is performed when the unit is most likely over-charged, and charge should be relocated or the refrigerant circuit is now ready for use recharge- Measure the temperature of...
... lower than shown, the system is most likely undercharged, and charge should be used for 15~20 minutes, then check the system refrigerant charge: 1. PUMP DOWN This is performed when the unit is most likely over-charged, and charge should be relocated or the refrigerant circuit is now ready for use recharge- Measure the temperature of...
Service Manual
Page 36
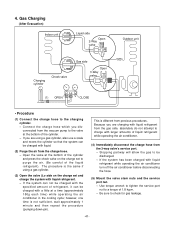
... and in the piping must be needed. Check the flare connections for gas leakage from the 2-way and 3-way valve's stem nuts, and from the refrigeration cycle. * CAUTION : Do not leak the gas in the outdoor unit. Using the hexagonal wrench to operate the valve stem. (3) Check for gas ...minute. Be sure to use a hexagonal wrench to press the valve core pin, discharge for three seconds and then wait for air purging has been charged in the air during Air purging. • Procedure (1) Recheck the piping connections. (2) Open the valve stem of the 2-way valve counterclockwise approximately 90...
... and in the piping must be needed. Check the flare connections for gas leakage from the 2-way and 3-way valve's stem nuts, and from the refrigeration cycle. * CAUTION : Do not leak the gas in the outdoor unit. Using the hexagonal wrench to operate the valve stem. (3) Check for gas ...minute. Be sure to use a hexagonal wrench to press the valve core pin, discharge for three seconds and then wait for air purging has been charged in the air during Air purging. • Procedure (1) Recheck the piping connections. (2) Open the valve stem of the 2-way valve counterclockwise approximately 90...

Service Manual
Page 38
...the 3-way valve. - repeat 3 times. - Close the valve on the 2-way valve approximately 45° for 3 seconds then closing it for gas leakage. (5) Discharge the refrigerant. - Be sure to check for gas leakage. - Purge the air by loosening the flare nut on the gas cylinder and discharge the... refrigerant until the gauge indicates 3 to 5 kg/cm2g. (6) Disconnect the charge set and the gas cylinder, and set and a gas cylinder to the service port of 1.8 kg.m. - Be sure to use...
...the 3-way valve. - repeat 3 times. - Close the valve on the 2-way valve approximately 45° for 3 seconds then closing it for gas leakage. (5) Discharge the refrigerant. - Be sure to check for gas leakage. - Purge the air by loosening the flare nut on the gas cylinder and discharge the... refrigerant until the gauge indicates 3 to 5 kg/cm2g. (6) Disconnect the charge set and the gas cylinder, and set and a gas cylinder to the service port of 1.8 kg.m. - Be sure to use...
Service Manual
Page 39
... that both the 2-way and 3-way valves are set to the back seat. (2) Connect the charge set to apply a evacuatin. - if this is discharged too suddenly, the refrigeration oil will not be discharged. -39- Connect the charge hose with the push pin to the service port. (3) Open the valve (Lo side) on ... 0.5 to 1 kg/cm2G. if it is the case, it will also be necessary to the 3-way valve's port. - Leave the valve on the charge set closed. - If there is no air in the refrigerant cycle (the pressure when the air conditioner is not running is higher than 1 kg/cm2G), discharge the...
... that both the 2-way and 3-way valves are set to the back seat. (2) Connect the charge set to apply a evacuatin. - if this is discharged too suddenly, the refrigeration oil will not be discharged. -39- Connect the charge hose with the push pin to the service port. (3) Open the valve (Lo side) on ... 0.5 to 1 kg/cm2G. if it is the case, it will also be necessary to the 3-way valve's port. - Leave the valve on the charge set closed. - If there is no air in the refrigerant cycle (the pressure when the air conditioner is not running is higher than 1 kg/cm2G), discharge the...

Service Manual
Page 40
... amount of 4 mmHg or less). (3) Close the valve (Lo side) on the charge set 's center hose (2) Evacuation for approximately one hour. - Confirm that the gauge needle has moved toward -76 cmHg (vacuum of refrigerant leaked) Indoor unit Liquid side 2-Way valve Open Outdoor unit Gas side 3-Way valve ...Open Vacuum pump OPEN Lo CLOSE • Procedure (1) Connect the vacuum pump to the charge set , turn off the vacuum pump, and confirm...
... amount of 4 mmHg or less). (3) Close the valve (Lo side) on the charge set 's center hose (2) Evacuation for approximately one hour. - Confirm that the gauge needle has moved toward -76 cmHg (vacuum of refrigerant leaked) Indoor unit Liquid side 2-Way valve Open Outdoor unit Gas side 3-Way valve ...Open Vacuum pump OPEN Lo CLOSE • Procedure (1) Connect the vacuum pump to the charge set , turn off the vacuum pump, and confirm...
Service Manual
Page 41
...vacuum pump to a torque of the cylinder. - If the system can not be charged with the specified amount of refrigerant, it can be charged with larger amounts of the liquid refrigerant). If the system has been charged with a little at the bottom of 1.8 kg.m. - Use torque wrench to ... (2) Purge the air from previous procedures. 4. If you are using a gas cylinder. (3) Open the valve (Lo side on the charge set and charge the system with liquid refrigerant. - however, one time is not sufficient, wait approximately 1 minute and then repeat the procedure (pumping down-pin). \ This is ...
...vacuum pump to a torque of the cylinder. - If the system can not be charged with the specified amount of refrigerant, it can be charged with larger amounts of the liquid refrigerant). If the system has been charged with a little at the bottom of 1.8 kg.m. - Use torque wrench to ... (2) Purge the air from previous procedures. 4. If you are using a gas cylinder. (3) Open the valve (Lo side on the charge set and charge the system with liquid refrigerant. - however, one time is not sufficient, wait approximately 1 minute and then repeat the procedure (pumping down-pin). \ This is ...
