Owners Manual
Page 2
... Location 13 Removing/Assembling Doors 17 Connecting the Water Line 20 Leveling and Door Alignment 21 Turning on the Power 22 OPERATION 22 Before Use 23 Control Panel 25 Sabbath Mode 26 Ice and Water Dispenser 27 In-Door Ice Bin 28 Automatic Icemaker 29 Storing Food 31 Drawers 31 Refrigerator Shelves 31 InstaView 32 Door-in-Door 32 Door Bins 33 SMART FUNCTIONS 33 LG ThinQ Application 35 Smart Grid Function 36 Smart Diagnosis™ Feature 38 MAINTENANCE 38 Cleaning 38 Air Filter...
... Location 13 Removing/Assembling Doors 17 Connecting the Water Line 20 Leveling and Door Alignment 21 Turning on the Power 22 OPERATION 22 Before Use 23 Control Panel 25 Sabbath Mode 26 Ice and Water Dispenser 27 In-Door Ice Bin 28 Automatic Icemaker 29 Storing Food 31 Drawers 31 Refrigerator Shelves 31 InstaView 32 Door-in-Door 32 Door Bins 33 SMART FUNCTIONS 33 LG ThinQ Application 35 Smart Grid Function 36 Smart Diagnosis™ Feature 38 MAINTENANCE 38 Cleaning 38 Air Filter...

Owners Manual
Page 5
... the power plug before cleaning or repairing the refrigerator. • The refrigerator and freezer compartment lights are sitting for proper grounding. • Never unplug the appliance by a qualified electrician. • Have a certified electrician check the wall outlet and wiring for only a few days. ENGLISH IMPORTANT SAFETY INSTRUCTIONS 5 Maintenance • Do not use a hair dryer to dry the inside . • If disposing of a refrigerant leak...
... the power plug before cleaning or repairing the refrigerator. • The refrigerator and freezer compartment lights are sitting for proper grounding. • Never unplug the appliance by a qualified electrician. • Have a certified electrician check the wall outlet and wiring for only a few days. ENGLISH IMPORTANT SAFETY INSTRUCTIONS 5 Maintenance • Do not use a hair dryer to dry the inside . • If disposing of a refrigerant leak...
Owners Manual
Page 10
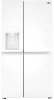
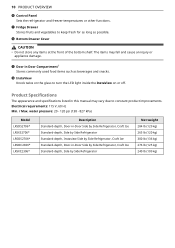
... j Control Panel Sets the refrigerator and freezer temperatures or other functions. m Door in Door Compartment† Stores commonly used food items such as possible. n InstaView Knock twice on or off. Product Specifications The appearance and specifications listed in -Door Side by Side Refrigerator, Craft Ice Standard-depth, Side by Side Refrigerator, Craft Ice Standard-depth, Door-in this manual may fall and cause an injury or appliance damage. k Fridge Drawer Stores...
... j Control Panel Sets the refrigerator and freezer temperatures or other functions. m Door in Door Compartment† Stores commonly used food items such as possible. n InstaView Knock twice on or off. Product Specifications The appearance and specifications listed in -Door Side by Side Refrigerator, Craft Ice Standard-depth, Side by Side Refrigerator, Craft Ice Standard-depth, Door-in this manual may fall and cause an injury or appliance damage. k Fridge Drawer Stores...
Owners Manual
Page 12
... high, cooling ability may be easily removed by plugging in multiple appliances in the same outlet with warm water and dry. • Do not use sharp instruments, rubbing alcohol, flammable fluids, or abrasive cleaners to move it . Do not remove any warning labels, the model and serial number label, or the Tech Sheet that is installed in the shipping position. Refrigerator shelves are installed in...
... high, cooling ability may be easily removed by plugging in multiple appliances in the same outlet with warm water and dry. • Do not use sharp instruments, rubbing alcohol, flammable fluids, or abrasive cleaners to move it . Do not remove any warning labels, the model and serial number label, or the Tech Sheet that is installed in the shipping position. Refrigerator shelves are installed in...
Owners Manual
Page 13
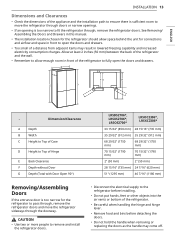
... for the refrigerator to fit the refrigerator through the doorway. CAUTION • Use two or more people to remove and install the refrigerator doors. • Disconnect the electrical supply to open the doors and drawers. Dimension/Clearance A Depth B Width C Height to Top of Case D Height to Top of the refrigerator. • Be careful when handling the hinge and hinge lever. • Remove food and bins before installing. • Do not put hands, feet or...
... for the refrigerator to fit the refrigerator through the doorway. CAUTION • Use two or more people to remove and install the refrigerator doors. • Disconnect the electrical supply to open the doors and drawers. Dimension/Clearance A Depth B Width C Height to Top of Case D Height to Top of the refrigerator. • Be careful when handling the hinge and hinge lever. • Remove food and bins before installing. • Do not put hands, feet or...
Owners Manual
Page 17
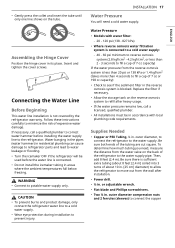
... is connected. • Do not install the icemaker tubing in accordance with water filter: - 20 - 120 psi (138 - 827 kPa) • Where reverse osmosis water filtration system is not covered by the refrigerator warranty. Follow these instructions carefully to correct water hammer before the water line is sufficient extra tubing (about 10 in its place. Water Pressure • Models with local plumbing code requirements. Insert and tighten the cover screws. Assembling the Hinge Cover...
... is connected. • Do not install the icemaker tubing in accordance with water filter: - 20 - 120 psi (138 - 827 kPa) • Where reverse osmosis water filtration system is not covered by the refrigerator warranty. Follow these instructions carefully to correct water hammer before the water line is sufficient extra tubing (about 10 in its place. Water Pressure • Models with local plumbing code requirements. Insert and tighten the cover screws. Assembling the Hinge Cover...
Owners Manual
Page 20
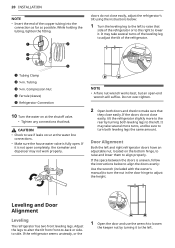
.... 2 Open both doors and check to make sure that they close easily, adjust the refrigerator's tilt using the instructions below to align the doors evenly: Use the wrench (included with the owner's manual) to turn both leveling legs to the left and right refrigerator doors have an adjustable nut, located on at the water line connections. • Make sure the house water valve is uneven, follow the instructions below : 1 Turn the leveling leg to the left . 20 INSTALLATION NOTE...
.... 2 Open both doors and check to make sure that they close easily, adjust the refrigerator's tilt using the instructions below to align the doors evenly: Use the wrench (included with the owner's manual) to turn both leveling legs to the left and right refrigerator doors have an adjustable nut, located on at the water line connections. • Make sure the house water valve is uneven, follow the instructions below : 1 Turn the leveling leg to the left . 20 INSTALLATION NOTE...
Owners Manual
Page 24
... water filter when the Replace Filter icon turns on , the indicator illuminates. The default freezer temperature is pressed. UV clean function runs automatically for 10 minutes every hour without requiring you to press the Self Care button. • UVnano is responding to illuminate the icon and activate the function for information on the Craft Ice maker, select the 3 ICE or 6 ICE mode. NOTE • During operation, the function stops...
... water filter when the Replace Filter icon turns on , the indicator illuminates. The default freezer temperature is pressed. UV clean function runs automatically for 10 minutes every hour without requiring you to press the Self Care button. • UVnano is responding to illuminate the icon and activate the function for information on the Craft Ice maker, select the 3 ICE or 6 ICE mode. NOTE • During operation, the function stops...
Owners Manual
Page 25
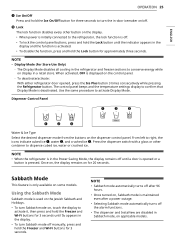
... left to conserve energy while on /off. The Display Mode disables all cooling in a retail store. Use the same procedure to turn the in-door icemaker on display in the refrigerator and freezer sections to right, the icons indicate cubed ice a, water b, and crushed ice c. Dispenser Control Panel Water & Ice Type Select the desired dispenser mode from the buttons on for 20 seconds. NOTE • Sabbath mode automatically turns off until the indicator appears in the display. • To turn...
... left to conserve energy while on /off. The Display Mode disables all cooling in a retail store. Use the same procedure to turn the in-door icemaker on display in the refrigerator and freezer sections to right, the icons indicate cubed ice a, water b, and crushed ice c. Dispenser Control Panel Water & Ice Type Select the desired dispenser mode from the buttons on for 20 seconds. NOTE • Sabbath mode automatically turns off until the indicator appears in the display. • To turn...
Owners Manual
Page 27
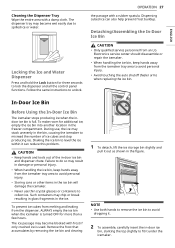
... water. Failure to collect ice. Follow the same instructions to lock the dispenser and all the control panel functions. Remove the frost that accumulates by removing the ice bin and clearing 1 To detach, lift the ice storage bin slightly and pull it out as shown in the freezer compartment. ENGLISH Cleaning the Dispenser Tray Wipe the entire area with a rubber spatula. In-Door Ice Bin Before Using the In-Door Ice Bin The icemaker stops...
... water. Failure to collect ice. Follow the same instructions to lock the dispenser and all the control panel functions. Remove the frost that accumulates by removing the ice bin and clearing 1 To detach, lift the ice storage bin slightly and pull it out as shown in the freezer compartment. ENGLISH Cleaning the Dispenser Tray Wipe the entire area with a rubber spatula. In-Door Ice Bin Before Using the In-Door Ice Bin The icemaker stops...
Owners Manual
Page 29
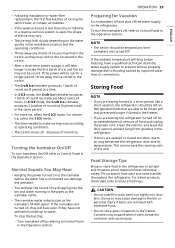
... may penetrate the refrigerator and raise its temperature. Turning the Icemaker On/Off To turn the icemakers off the water supply to Control Panel in the Operation section. If the icemakers are turned on . To stop the buzzing: - Clean the interior, and leave the door open to prevent fungi from growing in the refrigerator. • If doors are removed with water. For dated products, check date code to Control Panel in the Operation section. ENGLISH This...
... may penetrate the refrigerator and raise its temperature. Turning the Icemaker On/Off To turn the icemakers off the water supply to Control Panel in the Operation section. If the icemakers are turned on . To stop the buzzing: - Clean the interior, and leave the door open to prevent fungi from growing in the refrigerator. • If doors are removed with water. For dated products, check date code to Control Panel in the Operation section. ENGLISH This...
Owners Manual
Page 31
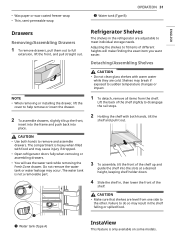
... models. Shelves may result in the refrigerator are level from the shelf. b Water tank (Type B) OPERATION 31 Refrigerator Shelves The shelves in the shelf falling or spilled food. CAUTION • Make sure that shelves are adjustable to the other. Detaching/Assembling Shelves CAUTION • Do not clean glass shelves with both hands to fit items of the shelf. ENGLISH • Wax paper or wax-coated freezer wrap • Thin, semi-permeable wrap Drawers Removing/Assembling Drawers...
... models. Shelves may result in the refrigerator are level from the shelf. b Water tank (Type B) OPERATION 31 Refrigerator Shelves The shelves in the shelf falling or spilled food. CAUTION • Make sure that shelves are adjustable to the other. Detaching/Assembling Shelves CAUTION • Do not clean glass shelves with both hands to fit items of the shelf. ENGLISH • Wax paper or wax-coated freezer wrap • Thin, semi-permeable wrap Drawers Removing/Assembling Drawers...
Owners Manual
Page 40
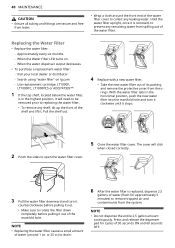
... purchase a replacement water filter: - Pull the shelf out. 4 Replace with a new water filter. • Take the new water filter out of water (around the front end of the water filter cover to prevent any remaining water from the orings. The cover will need to be removed prior to open the water filter cover. 5 Close the water filter cover. NOTE • Do not dispense the entire 2.5 gallon amount continuously. When the Water Filter LED turns on lg.com - Hold the water filter upright, once...
... purchase a replacement water filter: - Pull the shelf out. 4 Replace with a new water filter. • Take the new water filter out of water (around the front end of the water filter cover to prevent any remaining water from the orings. The cover will need to be removed prior to open the water filter cover. 5 Close the water filter cover. NOTE • Do not dispense the entire 2.5 gallon amount continuously. When the Water Filter LED turns on lg.com - Hold the water filter upright, once...
Owners Manual
Page 46
... cover is replacing an older model. • Modern refrigerators require more operating time but use less energy due to clean the condenser cover and vents. Do not remove the panel covering the condenser coil area. Defrost cycle recently completed. • During the defrost cycle, the temperature of the time. Interior moisture buildup. At normal room temperatures (70 °F or 21 °C) expect your compressor to cool completely. Maintaining a reasonable level...
... cover is replacing an older model. • Modern refrigerators require more operating time but use less energy due to clean the condenser cover and vents. Do not remove the panel covering the condenser coil area. Defrost cycle recently completed. • During the defrost cycle, the temperature of the time. Interior moisture buildup. At normal room temperatures (70 °F or 21 °C) expect your compressor to cool completely. Maintaining a reasonable level...
Owners Manual
Page 48
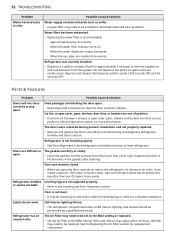
Ice Problem Icemaker is clogged. • Connect the refrigerator to a cold water supply with a water filter. House water supply is not connected, valve is not turned on fully, or valve is not making enough ice. Water filter has been exhausted. • Replacing the water filter is warmer, ice production will not close correctly or pop open . Approximately every six months. - When the water filter indicator turns on models with adequate pressure and turn the water shutoff valve fully open " section in a 24 hour period. Doors are...
Ice Problem Icemaker is clogged. • Connect the refrigerator to a cold water supply with a water filter. House water supply is not connected, valve is not turned on fully, or valve is not making enough ice. Water filter has been exhausted. • Replacing the water filter is warmer, ice production will not close correctly or pop open . Approximately every six months. - When the water filter indicator turns on models with adequate pressure and turn the water shutoff valve fully open " section in a 24 hour period. Doors are...
Owners Manual
Page 51
... installation or cleaning. If the problem persists, it to remove trapped air and contaminants from the system. The dispenser panel is not turned on the control panel to a hot water line may be warm. Straighten or repair the water supply line and arrange it may be set for three seconds to a cold water pipe. Problem Water is kinked. • The tubing can be necessary to cool completely. TROUBLESHOOTING 51 Possible Cause & Solution New installation or water line recently connected. • Dispense...
... installation or cleaning. If the problem persists, it to remove trapped air and contaminants from the system. The dispenser panel is not turned on the control panel to a hot water line may be warm. Straighten or repair the water supply line and arrange it may be set for three seconds to a cold water pipe. Problem Water is kinked. • The tubing can be necessary to cool completely. TROUBLESHOOTING 51 Possible Cause & Solution New installation or water line recently connected. • Dispense...
Owners Manual
Page 52
... taste and odor problems. Water filter has been exhausted. • Replacing the water filter is recommended: - Ice bin, crisper cover, pans, shelves, door bins, or baskets are dirty or sticky. • Clean the gaskets and the surfaces that they touch. Leveling legs are blocking the door open . When the ice cubes are difficult to open . • Rearrange food containers to the MAX setting. Doors are smaller than normal. As the warm air cools, it opens more information...
... taste and odor problems. Water filter has been exhausted. • Replacing the water filter is recommended: - Ice bin, crisper cover, pans, shelves, door bins, or baskets are dirty or sticky. • Clean the gaskets and the surfaces that they touch. Leveling legs are blocking the door open . When the ice cubes are difficult to open . • Rearrange food containers to the MAX setting. Doors are smaller than normal. As the warm air cools, it opens more information...
Owners Manual
Page 56
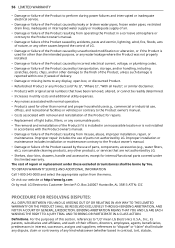
... contrary to the Product owner's manual. • Damage or failure of the Product caused by LG. • Shelves, door bins, drawers, handle and accessories, except for internal/functional parts covered under these excluded circumstances shall be readily determined. • Increases in utility costs and additional utility expenses. • Any noises associated with normal operation. • Products used for repairs. • Replacement of light bulbs, filters, or any kind...
... contrary to the Product owner's manual. • Damage or failure of the Product caused by LG. • Shelves, door bins, drawers, handle and accessories, except for internal/functional parts covered under these excluded circumstances shall be readily determined. • Increases in utility costs and additional utility expenses. • Any noises associated with normal operation. • Products used for repairs. • Replacement of light bulbs, filters, or any kind...
Owners Manual
Page 59
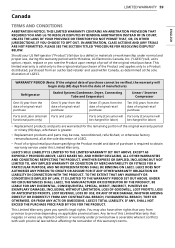
...) Refrigerator Sealed System (Condenser, Dryer, Connecting Tube and Evaporator) Linear / Inverter Compressor One (1) year from the date of original retail purchase One (1) year from the date of original retail purchase Seven (7) years from the date of original retail purchase Ten (10) years from an authorized retailer and used within Canada, as determined at its option, repair, replace or...
...) Refrigerator Sealed System (Condenser, Dryer, Connecting Tube and Evaporator) Linear / Inverter Compressor One (1) year from the date of original retail purchase One (1) year from the date of original retail purchase Seven (7) years from the date of original retail purchase Ten (10) years from an authorized retailer and used within Canada, as determined at its option, repair, replace or...
Owners Manual
Page 60
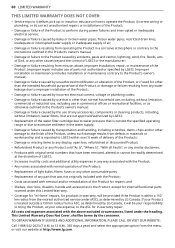
... outlined in -warranty repair. ii) correct wiring or plumbing; or iii) correct unauthorized repairs or installations of the Product; • Damage or failure of the Product to perform during power failures and interrupted or inadequate electrical service; • Damage or failure caused by leaky or broken water pipes, frozen water pipes, restricted drain lines, inadequate or interrupted water supply or inadequate supply of air; • Damage...
... outlined in -warranty repair. ii) correct wiring or plumbing; or iii) correct unauthorized repairs or installations of the Product; • Damage or failure of the Product to perform during power failures and interrupted or inadequate electrical service; • Damage or failure caused by leaky or broken water pipes, frozen water pipes, restricted drain lines, inadequate or interrupted water supply or inadequate supply of air; • Damage...


