Owners Manual
Page 2
... Location 13 Removing/Assembling Doors 17 Connecting the Water Line 20 Leveling and Door Alignment 21 Turning on the Power 22 OPERATION 22 Before Use 23 Control Panel 25 Sabbath Mode 26 Ice and Water Dispenser 27 In-Door Ice Bin 28 Automatic Icemaker 29 Storing Food 31 Drawers 31 Refrigerator Shelves 31 InstaView 32 Door-in-Door 32 Door Bins 33 SMART FUNCTIONS 33 LG ThinQ Application 35 Smart Grid Function 36 Smart Diagnosis™ Feature 38 MAINTENANCE 38 Cleaning 38 Air Filter...
... Location 13 Removing/Assembling Doors 17 Connecting the Water Line 20 Leveling and Door Alignment 21 Turning on the Power 22 OPERATION 22 Before Use 23 Control Panel 25 Sabbath Mode 26 Ice and Water Dispenser 27 In-Door Ice Bin 28 Automatic Icemaker 29 Storing Food 31 Drawers 31 Refrigerator Shelves 31 InstaView 32 Door-in-Door 32 Door Bins 33 SMART FUNCTIONS 33 LG ThinQ Application 35 Smart Grid Function 36 Smart Diagnosis™ Feature 38 MAINTENANCE 38 Cleaning 38 Air Filter...

Owners Manual
Page 5
... pull straight out from the appliance. if it will not fit the outlet, have been given supervision or instruction concerning use of the appliance by a person responsible for their safety. • Unplug the power plug before cleaning or repairing the refrigerator. • The refrigerator and freezer compartment lights are in accordance with the relevant environmental law. Do not modify the...
... pull straight out from the appliance. if it will not fit the outlet, have been given supervision or instruction concerning use of the appliance by a person responsible for their safety. • Unplug the power plug before cleaning or repairing the refrigerator. • The refrigerator and freezer compartment lights are in accordance with the relevant environmental law. Do not modify the...
Owners Manual
Page 10
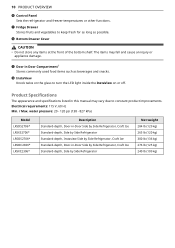
.... The items may vary due to turn the LED light inside the InstaView on or off. 10 PRODUCT OVERVIEW j Control Panel Sets the refrigerator and freezer temperatures or other functions. n InstaView Knock twice on the glass to constant product improvements. Electrical requirements: 115 V, 60 Hz Min. / Max. l Bottom Drawer Cover CAUTION • Do not store any items at the front of the bottom shelf.
.... The items may vary due to turn the LED light inside the InstaView on or off. 10 PRODUCT OVERVIEW j Control Panel Sets the refrigerator and freezer temperatures or other functions. n InstaView Knock twice on the glass to constant product improvements. Electrical requirements: 115 V, 60 Hz Min. / Max. l Bottom Drawer Cover CAUTION • Do not store any items at the front of the bottom shelf.
Owners Manual
Page 12
... your thumb. Choosing the Proper Location Water The refrigerator must be located where a water supply can be connected for cleaning or service. Do not wiggle or walk the refrigerator when trying to your refrigerator before using. Do not remove any warning labels, the model and serial number label, or the Tech Sheet that is located under the front of electric shock, do not install the refrigerator in a wet or damp area...
... your thumb. Choosing the Proper Location Water The refrigerator must be located where a water supply can be connected for cleaning or service. Do not wiggle or walk the refrigerator when trying to your refrigerator before using. Do not remove any warning labels, the model and serial number label, or the Tech Sheet that is located under the front of electric shock, do not install the refrigerator in a wet or damp area...
Owners Manual
Page 13
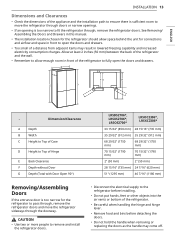
... , remove the refrigerator doors. CAUTION • Use two or more people to remove and install the refrigerator doors. • Disconnect the electrical supply to the refrigerator before installing. • Do not put hands, feet or other objects into the air vents or bottom of the refrigerator. • Be careful when handling the hinge and hinge lever. • Remove food and bins before detaching the doors. • Do not hold the handle when removing or replacing...
... , remove the refrigerator doors. CAUTION • Use two or more people to remove and install the refrigerator doors. • Disconnect the electrical supply to the refrigerator before installing. • Do not put hands, feet or other objects into the air vents or bottom of the refrigerator. • Be careful when handling the hinge and hinge lever. • Remove food and bins before detaching the doors. • Do not hold the handle when removing or replacing...
Owners Manual
Page 17
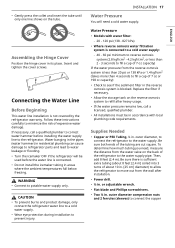
... the refrigerator. Connecting the Water Line Before Beginning This water line installation is blocked. Water banging in the pipes (water hammer) in areas where the ambient temperatures fall below freezing. Assembling the Hinge Cover Position the hinge cover in the reverse osmosis system is not covered by the refrigerator warranty. Then, add 8 feet (2.4 m). If necessary, call a licensed, qualified plumber. • All installations must be used before installing the water supply line to see if the sediment filter in...
... the refrigerator. Connecting the Water Line Before Beginning This water line installation is blocked. Water banging in the pipes (water hammer) in areas where the ambient temperatures fall below freezing. Assembling the Hinge Cover Position the hinge cover in the reverse osmosis system is not covered by the refrigerator warranty. Then, add 8 feet (2.4 m). If necessary, call a licensed, qualified plumber. • All installations must be used before installing the water supply line to see if the sediment filter in...
Owners Manual
Page 20
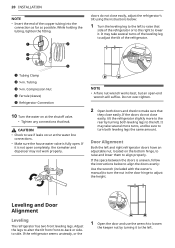
... lower them to the left and right refrigerator doors have an adjustable nut, located on at the water line connections. • Make sure the house water valve is fully open. Do not over-tighten. 2 Open both leveling legs the same amount. Adjust the legs to alter the tilt from front-to make sure that leak. If the refrigerator seems unsteady, or the 1 Open the door and use the wrench to loosen...
... lower them to the left and right refrigerator doors have an adjustable nut, located on at the water line connections. • Make sure the house water valve is fully open. Do not over-tighten. 2 Open both leveling legs the same amount. Adjust the legs to alter the tilt from front-to make sure that leak. If the refrigerator seems unsteady, or the 1 Open the door and use the wrench to loosen...
Owners Manual
Page 24
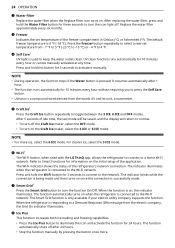
... a new set temperature of the refrigerator's network connection. e Craft Ice† Press the Craft Ice button repeatedly to 4 ℉. g Smart Grid† Press the Smart Grid button to press the Self Care button. • UVnano is on the Craft Ice maker, select the 3 ICE or 6 ICE mode. NOTE • During operation, the function stops if the Water button is used with the LG ThinQ app, allows the refrigerator to connect to activate it manually. Replace the water filter...
... a new set temperature of the refrigerator's network connection. e Craft Ice† Press the Craft Ice button repeatedly to 4 ℉. g Smart Grid† Press the Smart Grid button to press the Self Care button. • UVnano is on the Craft Ice maker, select the 3 ICE or 6 ICE mode. NOTE • During operation, the function stops if the Water button is used with the LG ThinQ app, allows the refrigerator to connect to activate it manually. Replace the water filter...
Owners Manual
Page 25
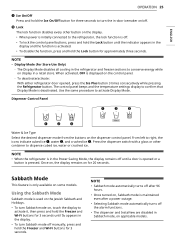
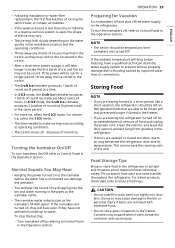
... control panel. - Use the same procedure to right, the icons indicate cubed ice a, water b, and crushed ice c. NOTE • When the refrigerator is in the Power Saving Mode, the display remains off . • To lock the control panel buttons, press and hold the Lock button until the indicator appears in the refrigerator and freezer sections to turn Sabbath mode off . Dispenser Control Panel Water & Ice Type Select the desired dispenser mode from the buttons on some models. From left to activate Display Mode...
... control panel. - Use the same procedure to right, the icons indicate cubed ice a, water b, and crushed ice c. NOTE • When the refrigerator is in the Power Saving Mode, the display remains off . • To lock the control panel buttons, press and hold the Lock button until the indicator appears in the refrigerator and freezer sections to turn Sabbath mode off . Dispenser Control Panel Water & Ice Type Select the desired dispenser mode from the buttons on some models. From left to activate Display Mode...
Owners Manual
Page 27
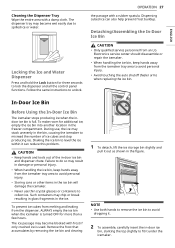
... this problem. Locking the Ice and Water Dispenser Press and hold the Lock button for additional ice, empty the ice bin into another location in -door ice bin, slanting the top slightly to unlock. During use thin crystal glasses or containers to avoid personal injury. • Avoid touching the auto shutoff (feeler arm) when replacing the ice bin. To prevent ice cubes from melting and leaking from the icemaker tray area...
... this problem. Locking the Ice and Water Dispenser Press and hold the Lock button for additional ice, empty the ice bin into another location in -door ice bin, slanting the top slightly to unlock. During use thin crystal glasses or containers to avoid personal injury. • Avoid touching the auto shutoff (feeler arm) when replacing the ice bin. To prevent ice cubes from melting and leaking from the icemaker tray area...
Owners Manual
Page 29
... 6 ICE mode. • Following installation or water filter replacement, the first few batches of ice may be semicircular or contain air bubbles. • If the water pressure is less than 20 psi (138 kPa) or a reverse osmosis system is connected can increase the running in the pipes as the icemaker refills. • The icemaker water valve buzzes as they may stick to the ice stored in the ice bin...
... 6 ICE mode. • Following installation or water filter replacement, the first few batches of ice may be semicircular or contain air bubbles. • If the water pressure is less than 20 psi (138 kPa) or a reverse osmosis system is connected can increase the running in the pipes as the icemaker refills. • The icemaker water valve buzzes as they may stick to the ice stored in the ice bin...
Owners Manual
Page 31
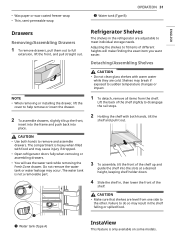
.... • Open refrigerator doors fully when removing or assembling drawers. • You will make finding the exact item you want easier. Detaching/Assembling Shelves CAUTION • Do not clean glass shelves with warm water while they are level from the shelf. b Water tank (Type B) OPERATION 31 Refrigerator Shelves The shelves in , then lower the front of different heights will see the water tank while removing the Fresh Zone drawer. a Water tank (Type A) InstaView This feature is not a removable part. NOTE...
.... • Open refrigerator doors fully when removing or assembling drawers. • You will make finding the exact item you want easier. Detaching/Assembling Shelves CAUTION • Do not clean glass shelves with warm water while they are level from the shelf. b Water tank (Type B) OPERATION 31 Refrigerator Shelves The shelves in , then lower the front of different heights will see the water tank while removing the Fresh Zone drawer. a Water tank (Type A) InstaView This feature is not a removable part. NOTE...
Owners Manual
Page 40
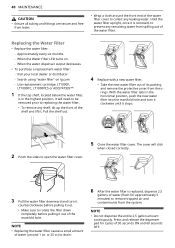
... cc) to drain. 6 After the water filter is removed, to replacing the water filter. • To remove any leaking water. When the water dispenser output decreases. • To purchase a replacement water filter: - Search using "water filter" on . - Pull the shelf out. 4 Replace with a new water filter. • Take the new water filter out of water (around the front end of the water filter cover to rotate the filter down completely before pulling it out. • Make sure to collect any shelf, tilt up...
... cc) to drain. 6 After the water filter is removed, to replacing the water filter. • To remove any leaking water. When the water dispenser output decreases. • To purchase a replacement water filter: - Search using "water filter" on . - Pull the shelf out. 4 Replace with a new water filter. • Take the new water filter out of water (around the front end of the water filter cover to rotate the filter down completely before pulling it out. • Make sure to collect any shelf, tilt up...
Owners Manual
Page 46
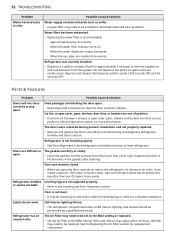
... open " section in the refrigerator compartment. The door is operated in a cold location. • When the refrigerator is opened leading to more operating time but use less energy due to condensation or frost. In order to conserve energy, try to clean the condenser cover and vents. Food with high water content was placed near an air vent. • Rearrange items with an attachment to get everything you need...
... open " section in the refrigerator compartment. The door is operated in a cold location. • When the refrigerator is opened leading to more operating time but use less energy due to condensation or frost. In order to conserve energy, try to clean the condenser cover and vents. Food with high water content was placed near an air vent. • Rearrange items with an attachment to get everything you need...
Owners Manual
Page 48
... temperature setting for the freezer is too warm. • The recommended temperature for the freezer compartment for more ice, select the 6 ICE mode which will be between 20 and 120 psi (138 and 827 kPa) on models without a water filter and between 40 and 120 psi (276 and 827 kPa) on . - 48 TROUBLESHOOTING Craft Ice Problem Icemaker is not making enough ice. Possible Cause & Solution Refrigerator was recently installed or icemaker...
... temperature setting for the freezer is too warm. • The recommended temperature for the freezer compartment for more ice, select the 6 ICE mode which will be between 20 and 120 psi (138 and 827 kPa) on models without a water filter and between 40 and 120 psi (276 and 827 kPa) on . - 48 TROUBLESHOOTING Craft Ice Problem Icemaker is not making enough ice. Possible Cause & Solution Refrigerator was recently installed or icemaker...
Owners Manual
Page 51
... the water supply and turn the water shutoff valve fully open . Refrigerator was exhausted. • Depending on fully, or the valve is moved during installation or cleaning. Dispenser has not been used for the proper operation. Dispensing warm water. The dispenser panel is not set for water dispensing. • The dispenser can kink when the refrigerator is clogged. • Connect the refrigerator to contact a plumber. Straighten or repair the water supply line and arrange it may damage the icemaker. ENGLISH...
... the water supply and turn the water shutoff valve fully open . Refrigerator was exhausted. • Depending on fully, or the valve is moved during installation or cleaning. Dispenser has not been used for the proper operation. Dispensing warm water. The dispenser panel is not set for water dispensing. • The dispenser can kink when the refrigerator is clogged. • Connect the refrigerator to contact a plumber. Straighten or repair the water supply line and arrange it may damage the icemaker. ENGLISH...
Owners Manual
Page 52
... the odor does not go away within 24 hours, the filter may need to be set to the MAX setting or replaced. • Set the Air Filter to level refrigerator. 52 TROUBLESHOOTING Problem Water has bad taste or odor. Possible Cause & Solution Water supply contains minerals such as sulfur. • A water filter may need to open . Refrigerator has an unusual odor. Ice bin, crisper cover, pans, shelves, door bins, or baskets are difficult to be performed by a qualified...
... the odor does not go away within 24 hours, the filter may need to be set to the MAX setting or replaced. • Set the Air Filter to level refrigerator. 52 TROUBLESHOOTING Problem Water has bad taste or odor. Possible Cause & Solution Water supply contains minerals such as sulfur. • A water filter may need to open . Refrigerator has an unusual odor. Ice bin, crisper cover, pans, shelves, door bins, or baskets are difficult to be performed by a qualified...
Owners Manual
Page 56
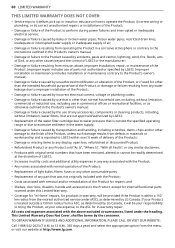
...", or similar disclaimer. • Products with original serial numbers that are not authorized by LG. • Shelves, door bins, drawers, handle and accessories, except for repairs. • Replacement of light bulbs, filters, or any consumable parts. • The removal and reinstallation of the Product if it is installed in an inaccessible location or is used for other causes beyond the control of LG. • Damage or failure of the Product...
...", or similar disclaimer. • Products with original serial numbers that are not authorized by LG. • Shelves, door bins, drawers, handle and accessories, except for repairs. • Replacement of light bulbs, filters, or any consumable parts. • The removal and reinstallation of the Product if it is installed in an inaccessible location or is used for other causes beyond the control of LG. • Damage or failure of the Product...
Owners Manual
Page 59
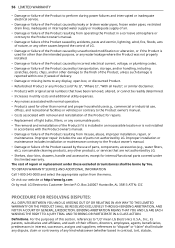
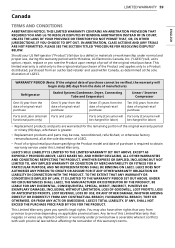
... OR LIABILITY IN CONNECTION WITH THE PRODUCT. This Limited Warranty gives you specific legal rights. Should your LG Refrigerator ("Product") fail due to a Product distributed, purchased from an authorized retailer and used within Canada, as determined at the sole discretion of LGECI. • Proof of original retail purchase specifying the Product model and date of purchase is...
... OR LIABILITY IN CONNECTION WITH THE PRODUCT. This Limited Warranty gives you specific legal rights. Should your LG Refrigerator ("Product") fail due to a Product distributed, purchased from an authorized retailer and used within Canada, as determined at the sole discretion of LGECI. • Proof of original retail purchase specifying the Product model and date of purchase is...
Owners Manual
Page 60
... Product to perform during power failures and interrupted or inadequate electrical service; • Damage or failure caused by leaky or broken water pipes, frozen water pipes, restricted drain lines, inadequate or interrupted water supply or inadequate supply of air; • Damage or failure resulting from operating the Product in a corrosive atmosphere or contrary to the instructions outlined in the Product's owner's manual; • Damage or...
... Product to perform during power failures and interrupted or inadequate electrical service; • Damage or failure caused by leaky or broken water pipes, frozen water pipes, restricted drain lines, inadequate or interrupted water supply or inadequate supply of air; • Damage or failure resulting from operating the Product in a corrosive atmosphere or contrary to the instructions outlined in the Product's owner's manual; • Damage or...


