User Guide
Page 10
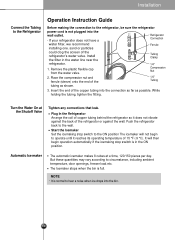
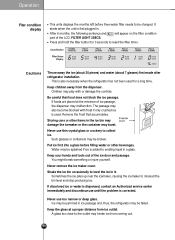
...day. NOTE • It is full. Push the refrigerator back to circumstance, including ambient temperature, door openings, freezer load.etc. Automatic Ice maker The automatic icemaker makes 8 cubes at the Shutoff Valve Tighten any connections that leak. The Icemaker stops when the bin is normal to ...hear a noise when ice drops into the wall outlet. • If your refrigerator does not have a Refrigerator Connection water filter, we recommend installing one. It...
...day. NOTE • It is full. Push the refrigerator back to circumstance, including ambient temperature, door openings, freezer load.etc. Automatic Ice maker The automatic icemaker makes 8 cubes at the Shutoff Valve Tighten any connections that leak. The Icemaker stops when the bin is normal to ...hear a noise when ice drops into the wall outlet. • If your refrigerator does not have a Refrigerator Connection water filter, we recommend installing one. It...
User Guide
Page 11
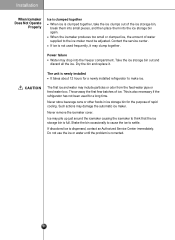
Power failure Water may pile up just around the icemaker causing the icemaker to think that the ice storage bin is full. Dry the bin and replace it may damage the automatic ice maker. The unit is newly installed It takes about 12 hours for a long time. This is also necessary... Not Operate Properly Ice is clumped together When ice is clumped together, take the ice clumps out of water supplied to the ice maker must be adjusted. Such actions may clump together. Contact the service center. Take the ice storage bin out and discard all the ice. CAUTION The first ice and water may ...
Power failure Water may pile up just around the icemaker causing the icemaker to think that the ice storage bin is full. Dry the bin and replace it may damage the automatic ice maker. The unit is newly installed It takes about 12 hours for a long time. This is also necessary... Not Operate Properly Ice is clumped together When ice is clumped together, take the ice clumps out of water supplied to the ice maker must be adjusted. Such actions may clump together. Contact the service center. Take the ice storage bin out and discard all the ice. CAUTION The first ice and water may ...
User Guide
Page 16
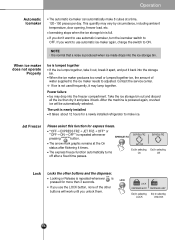
... SECS If you unlock them. Locking or Release is repeated whenever LOCK is powered again, crushed ice will work until you use automatic ice-maker again, change the switch to OFF. Power failure Ice may vary by circumstance, including ambient temperature, door opening, freezer load. The express freeze function ...After the machine is LOCK pressed for express freeze. If you don't want to use the LOCK button, none of water supplied to the ice maker needs to make 8 cubes at the On status after a fixed time passes. DISPENSER & KEY DISPENSER & KEY Ex) In selecting Ex) ...
... SECS If you unlock them. Locking or Release is repeated whenever LOCK is powered again, crushed ice will work until you use automatic ice-maker again, change the switch to OFF. Power failure Ice may vary by circumstance, including ambient temperature, door opening, freezer load. The express freeze function ...After the machine is LOCK pressed for express freeze. If you don't want to use the LOCK button, none of water supplied to the ice maker needs to make 8 cubes at the On status after a fixed time passes. DISPENSER & KEY DISPENSER & KEY Ex) In selecting Ex) ...
User Guide
Page 19
... 3SECS FILTER LIGHT will appear on the filter condition part of the ice door and passage. This is used for 3 seconds to existing liquid in a glass. Never remove the ice maker cover. A glass too close to collect ice. FILTER LIGHT 3SECS. Press and hold the filter button for a long... time. Remove the frost that food does not block the ice passage. Such glasses or containers may malfunction. Ice may play with frost if only ...
... 3SECS FILTER LIGHT will appear on the filter condition part of the ice door and passage. This is used for 3 seconds to existing liquid in a glass. Never remove the ice maker cover. A glass too close to collect ice. FILTER LIGHT 3SECS. Press and hold the filter button for a long... time. Remove the frost that food does not block the ice passage. Such glasses or containers may malfunction. Ice may play with frost if only ...

User Guide
Page 32
...refrigerator's location. Check to freshen the supply. Sound of water This sound is normally made when automatically made by the ice maker should operate. CUSTOMER ASSISTANCE NUMBERS: http://www.lgservice.com Retain your product type (Monitor, TV, VCR, MWO, Refrigerator) and... Automatic icemaker and dispenser in proper position. A copy of the ice maker, the bar (I) is dropped into ice storage dropping bin. Ice cubes are jamming the dispenser. Only the ice cubes made ice is on the ice maker. Ice maker is still receiving water. Water has been in the dispenser. Remove...
...refrigerator's location. Check to freshen the supply. Sound of water This sound is normally made when automatically made by the ice maker should operate. CUSTOMER ASSISTANCE NUMBERS: http://www.lgservice.com Retain your product type (Monitor, TV, VCR, MWO, Refrigerator) and... Automatic icemaker and dispenser in proper position. A copy of the ice maker, the bar (I) is dropped into ice storage dropping bin. Ice cubes are jamming the dispenser. Only the ice cubes made ice is on the ice maker. Ice maker is still receiving water. Water has been in the dispenser. Remove...
Service Manual
Page 3
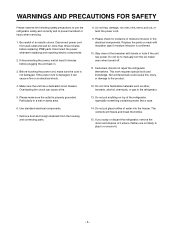
... cause a fire. 5. WARNINGS AND PRECAUTIONS FOR SAFETY Please observe the following safety precautions to use the refrigerator safely and correctly and to manually turn the ice maker even when turned off. 11. If disconnecting the power, wait at least 5 minutes before replacing PWB parts. Make sure the unit has a dedicated circuit breaker...
... cause a fire. 5. WARNINGS AND PRECAUTIONS FOR SAFETY Please observe the following safety precautions to use the refrigerator safely and correctly and to manually turn the ice maker even when turned off. 11. If disconnecting the power, wait at least 5 minutes before replacing PWB parts. Make sure the unit has a dedicated circuit breaker...
Service Manual
Page 16
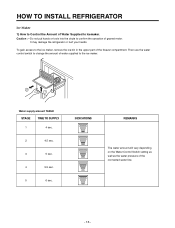
To gain access to the ice maker, remove the ice bin in the upper part of water supplied to the ice maker. 2 1 Water supply amount TABLE STAGE TIME TO SUPPLY 1 4 sec. 2 4.5 sec. 3 5 sec. 4 5.5 sec. 5 6 sec. Then use the water control switch to change the amount of the ...freezer compartment. It may damage the refrigerator or hurt your hands. HOW TO INSTALL REFRIGERATOR Ice Maker 1) How to Control the Amount of geared motor. Caution : • Do not put hands or tools into the chute to confirm the operation of Water...
To gain access to the ice maker, remove the ice bin in the upper part of water supplied to the ice maker. 2 1 Water supply amount TABLE STAGE TIME TO SUPPLY 1 4 sec. 2 4.5 sec. 3 5 sec. 4 5.5 sec. 5 6 sec. Then use the water control switch to change the amount of the ...freezer compartment. It may damage the refrigerator or hurt your hands. HOW TO INSTALL REFRIGERATOR Ice Maker 1) How to Control the Amount of geared motor. Caution : • Do not put hands or tools into the chute to confirm the operation of Water...
Service Manual
Page 59
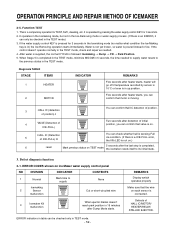
... doesn't reach park position in up position. Defects of initial position, you can confirm that motor is completed, Mark previous status on Ice Maker water supply control panel NO DIVISION INDICATOR CONTENTS 1 Normal Mark time to its initial state. 3. If the water supply control KEY is... in the TEST mode.) 3. This is a compulsory operation for 3 seconds in the Icemaking mode (no matter what condition the Ice-Making tray is pressed for TEST, SVC, cleaning, etc. After water is supplied, the normal CYCLE is connected. ERROR indicators in table ...
... doesn't reach park position in up position. Defects of initial position, you can confirm that motor is completed, Mark previous status on Ice Maker water supply control panel NO DIVISION INDICATOR CONTENTS 1 Normal Mark time to its initial state. 3. If the water supply control KEY is... in the TEST mode.) 3. This is a compulsory operation for 3 seconds in the Icemaking mode (no matter what condition the Ice-Making tray is pressed for TEST, SVC, cleaning, etc. After water is supplied, the normal CYCLE is connected. ERROR indicators in table ...
Service Manual
Page 105
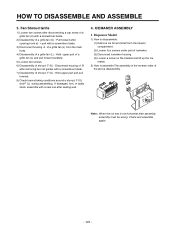
... of a grille fan (U) : Pull forward after opening hook at ➝ part with a screwdriver blade. 7) Disassembly of shroud. Note : When the ice tray is the reverse order of shroud. Check and assemble again. - 105 - ICEMAKER ASSEMBLY 1. F (U) : Disconnect housing of B after removing two rail...(2) Loosen four screws under part of icemaker. (3) Disconnect icemaker housing. (4) Loosen a screw on the bracket and lift up the Ice maker. 2) How to disassemble: (1) Remove ice bin and shelf from the main body. 4) Disassembly of a grille fan (L) : Hold upper part of a grille fan (L) ...
... of a grille fan (U) : Pull forward after opening hook at ➝ part with a screwdriver blade. 7) Disassembly of shroud. Note : When the ice tray is the reverse order of shroud. Check and assemble again. - 105 - ICEMAKER ASSEMBLY 1. F (U) : Disconnect housing of B after removing two rail...(2) Loosen four screws under part of icemaker. (3) Disconnect icemaker housing. (4) Loosen a screw on the bracket and lift up the Ice maker. 2) How to disassemble: (1) Remove ice bin and shelf from the main body. 4) Disassembly of a grille fan (L) : Hold upper part of a grille fan (L) ...


