User Guide
Page 2
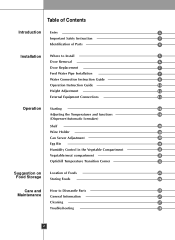
...3 Identification of Parts 4 Installation Where to Install 5 Door Removal 6 Door Replacement 7 Feed Water Pipe Installation 7 Water Connection Instruction Guide 8 Operation Instruction Guide 10 Height Adjustment 12 External Equipment Connections 13 Operation Starting 14 Adjusting the Temperatures and functions 14 (Dispenser/Automatic Icemaker) Shelf 20 Wine Holder 20 Can Server Adjustment 20 Egg Bin 21 Humidity Control in the Vegetable Compartment 21 Vegetable/meat compartment 21 Optichill Temperature Transition Corner 22 Suggestion on Location of Foods 23...
...3 Identification of Parts 4 Installation Where to Install 5 Door Removal 6 Door Replacement 7 Feed Water Pipe Installation 7 Water Connection Instruction Guide 8 Operation Instruction Guide 10 Height Adjustment 12 External Equipment Connections 13 Operation Starting 14 Adjusting the Temperatures and functions 14 (Dispenser/Automatic Icemaker) Shelf 20 Wine Holder 20 Can Server Adjustment 20 Egg Bin 21 Humidity Control in the Vegetable Compartment 21 Vegetable/meat compartment 21 Optichill Temperature Transition Corner 22 Suggestion on Location of Foods 23...
User Guide
Page 3
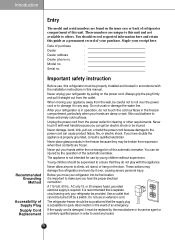
.... : Serial no. : Recommended Grounding Method Accessibility of Supply Plug Supply Cord Replacement Important safety instruction Before use, this refrigerator must be careful not to roll over , causing severe personal injury. Do not crush or damage the water line. After your hands are frozen. Never put your receipt here. Never allow anyone to these extremely cold surfaces. These actions may be properly installed and located...
.... : Serial no. : Recommended Grounding Method Accessibility of Supply Plug Supply Cord Replacement Important safety instruction Before use, this refrigerator must be careful not to roll over , causing severe personal injury. Do not crush or damage the water line. After your hands are frozen. Never put your receipt here. Never allow anyone to these extremely cold surfaces. These actions may be properly installed and located...
User Guide
Page 6
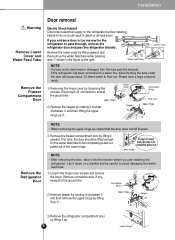
... out pulled out of the lower hinge. Installation Warning Remove Lower Cover and Water Feed Tube Remove the Freezer Compartment Door Door removal Electric Shock Hazard Disconnect electrical supply to flow out. Water Feed Tube Lower Cover NOTE • If a tube end is too narrow for the refrigerator to avoid damaging the water feed tube. 1) Loosen the hinge cover screws and remove the cover. Disconnect all connections except the ground line. Connection Wires 2) Remove keeper by rotating it clockwise and...
... out pulled out of the lower hinge. Installation Warning Remove Lower Cover and Water Feed Tube Remove the Freezer Compartment Door Door removal Electric Shock Hazard Disconnect electrical supply to flow out. Water Feed Tube Lower Cover NOTE • If a tube end is too narrow for the refrigerator to avoid damaging the water feed tube. 1) Loosen the hinge cover screws and remove the cover. Disconnect all connections except the ground line. Connection Wires 2) Remove keeper by rotating it clockwise and...
User Guide
Page 7
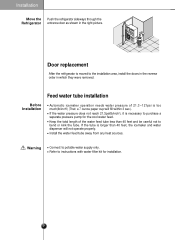
... water tube installation Before Installation Automatic icemaker operation needs water pressure of the water feed tube less than 40 feet, the icemaker and water dispenser will fill within 3 sec.). If the tube is moved to instructions with water filter kit for the cool water feed. Refer to the installation area, install the doors in the reverse order in the right picture. Install the water feed tube away from any heat sources. Max 5 4 3 2 1 Min 1 2 TFERMZP 3 4 TREEMFP 5 Max Door replacement After the refrigerator...
... water tube installation Before Installation Automatic icemaker operation needs water pressure of the water feed tube less than 40 feet, the icemaker and water dispenser will fill within 3 sec.). If the tube is moved to instructions with water filter kit for the cool water feed. Refer to the installation area, install the doors in the reverse order in the right picture. Install the water feed tube away from any heat sources. Max 5 4 3 2 1 Min 1 2 TFERMZP 3 4 TREEMFP 5 Max Door replacement After the refrigerator...
User Guide
Page 8
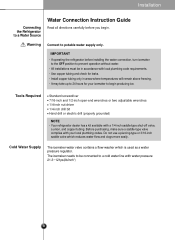
... producing ice. Tools Required Standard screwdriver 7/16-inch and 1/2-inch open-end wrenches or two adjustable wrenches 1/4-inch nut driver 1/4-inch drill bit Hand drill or electric drill (properly grounded) NOTE • Your refrigerator dealer has a kit available with a 1/4-inch saddle-type shut-off valve, a union, and copper tubing. Before purchasing, make sure a saddle-type valve complies with your icemaker to begin . Warning Connect to potable water supply...
... producing ice. Tools Required Standard screwdriver 7/16-inch and 1/2-inch open-end wrenches or two adjustable wrenches 1/4-inch nut driver 1/4-inch drill bit Hand drill or electric drill (properly grounded) NOTE • Your refrigerator dealer has a kit available with a 1/4-inch saddle-type shut-off valve, a union, and copper tubing. Before purchasing, make sure a saddle-type valve complies with your icemaker to begin . Warning Connect to potable water supply...
User Guide
Page 10
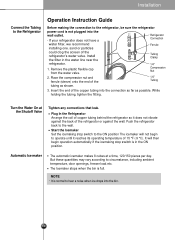
... ambient temperature, door openings, freezer load.etc. While holding the tubing, tighten the fitting. Automatic Ice maker The automatic icemaker makes 8 cubes at the Shutoff Valve Tighten any connections that leak. Install the filter in the ON position. Insert the end of the 1/4" Tubing tubing as possible. The Icemaker stops when the bin is in the water line near the Tubing Clamp refrigerator. 1/4" 1. NOTE • It is normal to hear a noise when ice drops into...
... ambient temperature, door openings, freezer load.etc. While holding the tubing, tighten the fitting. Automatic Ice maker The automatic icemaker makes 8 cubes at the Shutoff Valve Tighten any connections that leak. Install the filter in the ON position. Insert the end of the 1/4" Tubing tubing as possible. The Icemaker stops when the bin is in the water line near the Tubing Clamp refrigerator. 1/4" 1. NOTE • It is normal to hear a noise when ice drops into...
User Guide
Page 13
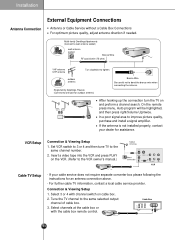
... UHF antenna Turn clockwise to bend the bronze wire when connecting the antenna. Select 3 or 4 with the cable box remote control. 13 If the antenna is not installed properly, contact your cable service does not require separate converter box please following the instructions for an antenna connection above. - Connection & Viewing Setup 1. If your dealer for outdoor antenna) Bronze Wire Be careful not to...
... UHF antenna Turn clockwise to bend the bronze wire when connecting the antenna. Select 3 or 4 with the cable box remote control. 13 If the antenna is not installed properly, contact your cable service does not require separate converter box please following the instructions for an antenna connection above. - Connection & Viewing Setup 1. If your dealer for outdoor antenna) Bronze Wire Be careful not to...
User Guide
Page 16
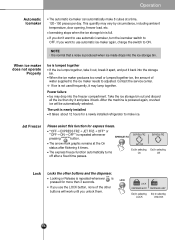
... quantity may drop into the ice storage bin. If you use automatic ice-maker again, change the switch to adjusted. Power failure Ice may vary by circumstance, including ambient temperature, door opening, freezer load. The unit is not used frequently, it back. Icemaking stops when the ice storage bin is repeated whenever pressing button. NOTE • It is normal that a noise is lumped together If the ice lumps together, take it out...
... quantity may drop into the ice storage bin. If you use automatic ice-maker again, change the switch to adjusted. Power failure Ice may vary by circumstance, including ambient temperature, door opening, freezer load. The unit is not used frequently, it back. Icemaking stops when the ice storage bin is repeated whenever pressing button. NOTE • It is normal that a noise is lumped together If the ice lumps together, take it out...
User Guide
Page 17
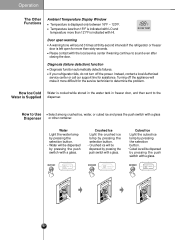
... ice will make it more than sixty seconds. How to Use Dispenser Select among crushed ice, water, or cubed ice and press the push switch with the local service center if warning continue to the Water is indicated with LO and temperature more difficult for the service technician to determine the problem. Turning off the power. ROOM TEMP Door open for assistance. Operation The Other Functions Ambient Temperature Display Window Temperature is left open warning...
... ice will make it more than sixty seconds. How to Use Dispenser Select among crushed ice, water, or cubed ice and press the push switch with the local service center if warning continue to the Water is indicated with LO and temperature more difficult for the service technician to determine the problem. Turning off the power. ROOM TEMP Door open for assistance. Operation The Other Functions Ambient Temperature Display Window Temperature is left open warning...
User Guide
Page 19
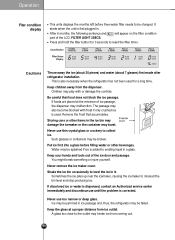
... 2 FILTER MONTH Pass of 5 months Pass of the LCD. You might break something or injure yourself. Never remove the ice maker cover. If discolored ice or water is dispensed, contact an Authorized service center immediately and discontinue use until the problem is first plugged in. This is added to level the ice in the ice bin may damage the icemaker or the container may hinder ice from ice outlet. Remove...
... 2 FILTER MONTH Pass of 5 months Pass of the LCD. You might break something or injure yourself. Never remove the ice maker cover. If discolored ice or water is dispensed, contact an Authorized service center immediately and discontinue use until the problem is first plugged in. This is added to level the ice in the ice bin may damage the icemaker or the container may hinder ice from ice outlet. Remove...
User Guide
Page 25
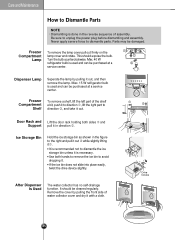
... sure to dismantle parts. Parts may be cleaned regularly. Max. 40 W refrigerator bulb is necessary. Turn the bulb counterclockwise. EXPRESS/JET FRZ DISPENSER FREEZER REFRIGERATER FILTER/LIGHT LOCK 1 2 Door Rack and Lift the door rack holding both hands to remove the ice bin to dismantle the ice storage bin unless it . Freezer Compartment Shelf To remove a shelf, lift the left part of assembly. After Dispenser Is Used The water collector has no self-drainage function. Remove the cover by pulling...
... sure to dismantle parts. Parts may be cleaned regularly. Max. 40 W refrigerator bulb is necessary. Turn the bulb counterclockwise. EXPRESS/JET FRZ DISPENSER FREEZER REFRIGERATER FILTER/LIGHT LOCK 1 2 Door Rack and Lift the door rack holding both hands to remove the ice bin to dismantle the ice storage bin unless it . Freezer Compartment Shelf To remove a shelf, lift the left part of assembly. After Dispenser Is Used The water collector has no self-drainage function. Remove the cover by pulling...
User Guide
Page 26
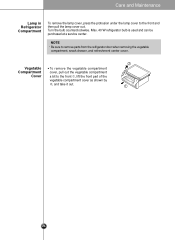
... take it out. 26 Vegetable To remove the vegetable compartment Compartment cover, pull out the vegetable compartment Cover a bit to remove parts from the refrigerator door when removing the vegetable compartment, snack drawer, and refreshment center cover. Turn the bulb counterclockwise. Care and Maintenance Lamp in Refrigerator Compartment To remove the lamp cover, press the protrusion under the lamp cover to the front and then pull the...
... take it out. 26 Vegetable To remove the vegetable compartment Compartment cover, pull out the vegetable compartment Cover a bit to remove parts from the refrigerator door when removing the vegetable compartment, snack drawer, and refreshment center cover. Turn the bulb counterclockwise. Care and Maintenance Lamp in Refrigerator Compartment To remove the lamp cover, press the protrusion under the lamp cover to the front and then pull the...
User Guide
Page 28
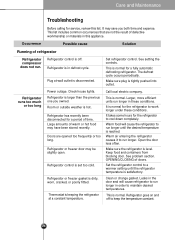
... this list. Refrigerator control is hot. Make sure the refrigerator is tightly pushed into outlet. Leaks in order to run longer. Care and Maintenance Troubleshooting Before calling for a fully automatic defrosting refrigerator. Plug at a constant temperature. This is normal for a period of warm or hot food may save you owned. Make sure plug is level. Call local electric company. It is normal for service, review this appliance. Warm air entering the refrigerator causes...
... this list. Refrigerator control is hot. Make sure the refrigerator is tightly pushed into outlet. Leaks in order to run longer. Care and Maintenance Troubleshooting Before calling for a fully automatic defrosting refrigerator. Plug at a constant temperature. This is normal for a period of warm or hot food may save you owned. Make sure plug is level. Call local electric company. It is normal for service, review this appliance. Warm air entering the refrigerator causes...
Service Manual
Page 20
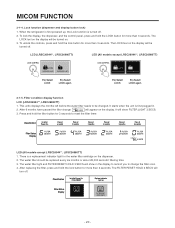
... Power On / Filter RESET Replace indicator light on the display will turn off . 2. Lock function (dispenser and display button lock) 1. To unlock the controls, press and hold the filter button for 3 seconds to change FILTER LIGHT 3 SECS will be turned off. Filter condition display function LCD (LRSC26944**, LRSC26980TT) 1. The water filter should be changed. The water filter light and FILTER RESET HOLD 3 SECS will show in . 2. To lock the display, the dispenser, and the control panel, press and hold the lock button for the water filter cartridge...
... Power On / Filter RESET Replace indicator light on the display will turn off . 2. Lock function (dispenser and display button lock) 1. To unlock the controls, press and hold the filter button for 3 seconds to change FILTER LIGHT 3 SECS will be turned off. Filter condition display function LCD (LRSC26944**, LRSC26980TT) 1. The water filter should be changed. The water filter light and FILTER RESET HOLD 3 SECS will show in . 2. To lock the display, the dispenser, and the control panel, press and hold the lock button for the water filter cartridge...
Service Manual
Page 22
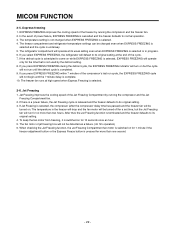
... original setting. 3. If you press EXPRESS FREEZING during the defrost cycle, the EXPRESS FREEZING indicator will turn on . The freezer fan runs at the end of the Jet Freezing Compartment by running the compressor and the Jet Freezing Compartment fan. 2. Jet Freezing improves the cooling speed of the cycle. 7. The freezer compartment and refrigerator temperature settings can be detected as a failure. (dc 12v operation) 6. If there is a power failure, the Jet Freezing cycle...
... original setting. 3. If you press EXPRESS FREEZING during the defrost cycle, the EXPRESS FREEZING indicator will turn on . The freezer fan runs at the end of the Jet Freezing Compartment by running the compressor and the Jet Freezing Compartment fan. 2. Jet Freezing improves the cooling speed of the cycle. 7. The freezer compartment and refrigerator temperature settings can be detected as a failure. (dc 12v operation) 6. If there is a power failure, the Jet Freezing cycle...
Service Manual
Page 59
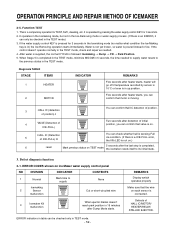
... water is supplied, the normal CYCLE is in 18 minutes after the last step is in the TEST mode.) 3. OPERATION PRINCIPLE AND REPAIR METHOD OF ICEMAKER 2-5. When Stage 5 is connected. Function TEST 1. REMARKS Display switch operates properly Make sure that valve is on each sensor is completed in the TEST mode, minimize MICOM in table can confirm that the wire on . ERROR indicators in 5 seconds, the time needed . 4. It is operated...
... water is supplied, the normal CYCLE is in 18 minutes after the last step is in the TEST mode.) 3. OPERATION PRINCIPLE AND REPAIR METHOD OF ICEMAKER 2-5. When Stage 5 is connected. Function TEST 1. REMARKS Display switch operates properly Make sure that valve is on each sensor is completed in the TEST mode, minimize MICOM in table can confirm that the wire on . ERROR indicators in 5 seconds, the time needed . 4. It is operated...
Service Manual
Page 74
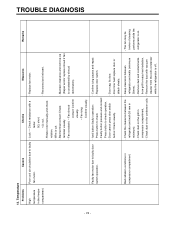
... and remove ice (Repair and/or replace shroud if fan is on. button: Check visually. - Remove dust and contaminants compressor compartment. Poor cool air circulation due to check - Bad terminal contact: Check terminal visually. - Press button to faulty - Faulty button pressure and contact: Press button to faulty door switch operation. - Door liner bent:replace door or attach sheets. from the coils condenser while the refrigerator is cut . - Replace fan motor. - Faulty fan motor due to check operation. - Replace door switch...
... and remove ice (Repair and/or replace shroud if fan is on. button: Check visually. - Remove dust and contaminants compressor compartment. Poor cool air circulation due to check - Bad terminal contact: Check terminal visually. - Press button to faulty - Faulty button pressure and contact: Press button to faulty door switch operation. - Door liner bent:replace door or attach sheets. from the coils condenser while the refrigerator is cut . - Replace fan motor. - Faulty fan motor due to check operation. - Replace door switch...

Service Manual
Page 80
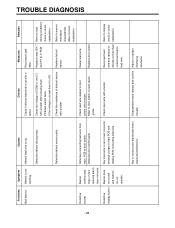
... freezer compartment. - Replace when it can not be repaired. 3) Over freezing in the - Heater wire is stored. Defrosting cycle - Check ice on the ice tray. - use . Be acquainted with how to defrosting if the problem is Clogged. - Surface of cooling air.) evaporator and pipes after - compartment. - Cool air dissembling shroud and fan grille. Check icing at weak. -Replace defective parts. 4) Bad defrosting. - Basket(rack) refrigerator compartment. Correct the gasket attachement - Check the parts related to use . - Refrigerator operates...
... freezer compartment. - Replace when it can not be repaired. 3) Over freezing in the - Heater wire is stored. Defrosting cycle - Check ice on the ice tray. - use . Be acquainted with how to defrosting if the problem is Clogged. - Surface of cooling air.) evaporator and pipes after - compartment. - Cool air dissembling shroud and fan grille. Check icing at weak. -Replace defective parts. 4) Bad defrosting. - Basket(rack) refrigerator compartment. Correct the gasket attachement - Check the parts related to use . - Refrigerator operates...
Service Manual
Page 88
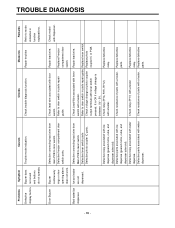
... display wire and replace or circuit in main PCB and display PCB connecting lead wire. Key input wire is cut with a tester after pressing main PCB test switch twice. Check if defrost lead wire is cut . Check the voltage of defrost sensor Replace defrost with a tester. Defective buzzer Buzzer continuously rings or door opening alarm does not work. sensor. Defective display button Buzzer does not sound and buttons do not operate. Defective defrost...
... display wire and replace or circuit in main PCB and display PCB connecting lead wire. Key input wire is cut with a tester after pressing main PCB test switch twice. Check if defrost lead wire is cut . Check the voltage of defrost sensor Replace defrost with a tester. Defective buzzer Buzzer continuously rings or door opening alarm does not work. sensor. Defective display button Buzzer does not sound and buttons do not operate. Defective defrost...
Service Manual
Page 89
.... Repair lead wire. Replace Freezer compartment door switch. pressed. TROUBLE DIAGNOSIS - 89 - not sound and buttons do not operate. Door Buzzer Buzzer continuously rings or door opening alarm does not work. Defective relay associated with ice dispense (geared motor, cube, and dispenser solenoid). Defective freezer compartment door switch parts. Defective parts associated with water dispense. relay. Replace defective parts. Refer to door switch in parts repair guide. switch with water dispenser. Replace defective parts. Defective parts associated...
.... Repair lead wire. Replace Freezer compartment door switch. pressed. TROUBLE DIAGNOSIS - 89 - not sound and buttons do not operate. Door Buzzer Buzzer continuously rings or door opening alarm does not work. Defective relay associated with ice dispense (geared motor, cube, and dispenser solenoid). Defective freezer compartment door switch parts. Defective parts associated with water dispense. relay. Replace defective parts. Refer to door switch in parts repair guide. switch with water dispenser. Replace defective parts. Defective parts associated...


