User Guide
Page 2
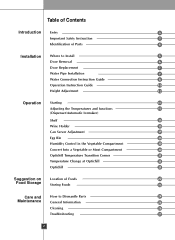
... of Parts 4 Installation Where to Install 5 Door Removal 6 Door Replacement 7 Water Pipe Installation 7 Water Connection Instruction Guide 8 Operation Instruction Guide 10 Height Adjustment 12 Operation Starting 13 Adjusting the Temperatures and functions 13 (Dispenser/Automatic Icemaker) Shelf 19 Wine Holder 19 Can Server Adjustment 19 Egg Bin 20 Humidity Control in the Vegetable Compartment 20 Convert Into a Vegetable or Meat Compartment 20 Optichill Temperature Transition Corner 21 Temperature Change at Optichill 21 Optichill 21 Suggestion on Location...
... of Parts 4 Installation Where to Install 5 Door Removal 6 Door Replacement 7 Water Pipe Installation 7 Water Connection Instruction Guide 8 Operation Instruction Guide 10 Height Adjustment 12 Operation Starting 13 Adjusting the Temperatures and functions 13 (Dispenser/Automatic Icemaker) Shelf 19 Wine Holder 19 Can Server Adjustment 19 Egg Bin 20 Humidity Control in the Vegetable Compartment 20 Convert Into a Vegetable or Meat Compartment 20 Optichill Temperature Transition Corner 21 Temperature Change at Optichill 21 Optichill 21 Suggestion on Location...
User Guide
Page 3
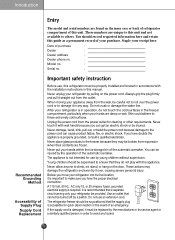
... the installation instructions in the freezer compartment, particularly when your refrigerator by the operation of Supply Plug Supply Cord Replacement Important safety instruction Before use, this refrigerator must be so positioned that they may damage the refrigerator and even tip it in the freezer because they do not touch the cold surfaces in this manual. Never allow anyone to climb, sit, stand, or hang on the power...
... the installation instructions in the freezer compartment, particularly when your refrigerator by the operation of Supply Plug Supply Cord Replacement Important safety instruction Before use, this refrigerator must be so positioned that they may damage the refrigerator and even tip it in the freezer because they do not touch the cold surfaces in this manual. Never allow anyone to climb, sit, stand, or hang on the power...

User Guide
Page 4
... use gasoline or other models. (i.c. Introduction Child Entrapment Warning Don't Store Grounding (Earthing) DANGER: Risk of different from your old refrigerator or freezer: Take off the doors but leave the shelves in place so that they may not easily climb inside. Door Rack Automatic Icemaker Lamp Shelf (steel or glass) Jet Freezing Door Rack Drawer Door Rack Lower Cover Identification of Parts Freezer Compartment Refrigerator Compartment Dairy Corner Water Filter Lamp Shelf...
... use gasoline or other models. (i.c. Introduction Child Entrapment Warning Don't Store Grounding (Earthing) DANGER: Risk of different from your old refrigerator or freezer: Take off the doors but leave the shelves in place so that they may not easily climb inside. Door Rack Automatic Icemaker Lamp Shelf (steel or glass) Jet Freezing Door Rack Drawer Door Rack Lower Cover Identification of Parts Freezer Compartment Refrigerator Compartment Dairy Corner Water Filter Lamp Shelf...
User Guide
Page 6
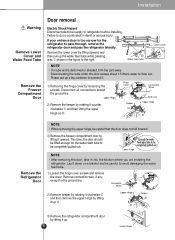
... Refrigerator Door NOTE • When removing the upper hinge, be careful that the door does not fall forward . 3) Remove the freezer compartment door by rotating it down on a blanket and be completely pulled out. Hinge 1) Removing the hinge cover by lifting upward, and then pull up . Installation Warning Remove Lower Cover and Water Feed Tube Remove the Freezer Compartment Door Door removal Electric Shock Hazard Disconnect electrical supply to flow out. Please put up . 6 Lower Hinge Upper Hinge Connection Wires...
... Refrigerator Door NOTE • When removing the upper hinge, be careful that the door does not fall forward . 3) Remove the freezer compartment door by rotating it down on a blanket and be completely pulled out. Hinge 1) Removing the hinge cover by lifting upward, and then pull up . Installation Warning Remove Lower Cover and Water Feed Tube Remove the Freezer Compartment Door Door removal Electric Shock Hazard Disconnect electrical supply to flow out. Please put up . 6 Lower Hinge Upper Hinge Connection Wires...
User Guide
Page 7
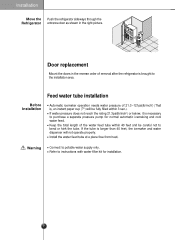
... for installation. 7 Install the water feed tube at a place free from heat. Installation Move the Push the refrigerator sideways through the Refrigerator entrance door as shown in the reverse order of removal after the refrigerator is longer than 40 feet, the icemaker and water dispenser will be fully filled within 40 feet and be careful not to bend or kink the tube. Max 5 4 3 2 1 Min 1 2 TFERMZP TREEMFP 3 4 5 Max Door replacement Mount the doors...
... for installation. 7 Install the water feed tube at a place free from heat. Installation Move the Push the refrigerator sideways through the Refrigerator entrance door as shown in the reverse order of removal after the refrigerator is longer than 40 feet, the icemaker and water dispenser will be fully filled within 40 feet and be careful not to bend or kink the tube. Max 5 4 3 2 1 Min 1 2 TFERMZP TREEMFP 3 4 5 Max Door replacement Mount the doors...

User Guide
Page 8
... saddle-type shut-off valve, a union, and copper tubing. IMPORTANT • If operating the refrigerator before you begin producing ice. Warning Connect to potable water supply only. Do not use a piercing-type or 3/16-inch saddle valve which is used as a water pressure regulator. Installation Connecting the Refrigerator to a Water Source Water Connection Instruction Guide Read all directions carefully before installing the water connection, turn icemaker to the OFF position to prevent operation without water. • All installations must be connected to a cold water line...
... saddle-type shut-off valve, a union, and copper tubing. IMPORTANT • If operating the refrigerator before you begin producing ice. Warning Connect to potable water supply only. Do not use a piercing-type or 3/16-inch saddle valve which is used as a water pressure regulator. Installation Connecting the Refrigerator to a Water Source Water Connection Instruction Guide Read all directions carefully before installing the water connection, turn icemaker to the OFF position to prevent operation without water. • All installations must be connected to a cold water line...
User Guide
Page 9
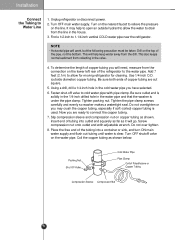
... tighten. 8. Installation Connect the Tubing to allow the water to connect the copper tubing. 7. Be sure outlet end is solidly in the 1/4-inch drilled hole in the valve. 4. Unplug refrigerator or disconnect power. 2. Coil the copper tubing as shown. This also keeps normal sediment from the connection on the top of the refrigerator to cold water pipe with adjustable wrench. Add 7 feet (2.1m) to Water Line 1. Insert end...
... tighten. 8. Installation Connect the Tubing to allow the water to connect the copper tubing. 7. Be sure outlet end is solidly in the 1/4-inch drilled hole in the valve. 4. Unplug refrigerator or disconnect power. 2. Coil the copper tubing as shown. This also keeps normal sediment from the connection on the top of the refrigerator to cold water pipe with adjustable wrench. Add 7 feet (2.1m) to Water Line 1. Insert end...

User Guide
Page 10
... icemaking stop switch is normal to hear a noise when ice drips into the connection as far as shown. 3. Remove the plastic flexible cap from the refrigerator connection. While holding the tubing, tighten the fitting. Insert the end of the refrigerator or against the back of the copper tubing into the bin. 10 Push the refrigerator back to circumstance, including ambient temperature, door openings, freezer load.etc. Installation Connect the Tubing to the Refrigerator Operation Instruction Guide...
... icemaking stop switch is normal to hear a noise when ice drips into the connection as far as shown. 3. Remove the plastic flexible cap from the refrigerator connection. While holding the tubing, tighten the fitting. Insert the end of the refrigerator or against the back of the copper tubing into the bin. 10 Push the refrigerator back to circumstance, including ambient temperature, door openings, freezer load.etc. Installation Connect the Tubing to the Refrigerator Operation Instruction Guide...

User Guide
Page 11
... the icemaker to the ice maker must be adjusted. CAUTION Throw away the ice. Never remove the icemaker cover. Do not use the ice or water until the problem is dispensed, contact an Authorized Service Center immediately. Ice may drop into the ice storage bin again. The unit is newly installed It takes about 12 hours for the purpose of rapid cooling. Shake the bin occasionally to cause the ice to make ice...
... the icemaker to the ice maker must be adjusted. CAUTION Throw away the ice. Never remove the icemaker cover. Do not use the ice or water until the problem is dispensed, contact an Authorized Service Center immediately. Ice may drop into the ice storage bin again. The unit is newly installed It takes about 12 hours for the purpose of rapid cooling. Shake the bin occasionally to cause the ice to make ice...

User Guide
Page 12
Connect the power supply cord (or plug) to prevent possible damage during shipping and clean your appliance thoroughly. 2. Install accessories such as the ice cube box, cover evaporating tray, etc., in their proper places. If the freezer compartment door is lower than the refrigerator compartment door Level the door by inserting flat ( - After leveling the The refrigerator doors will close correctly, performance may be affected. Use this appliance on a single-outlet...
Connect the power supply cord (or plug) to prevent possible damage during shipping and clean your appliance thoroughly. 2. Install accessories such as the ice cube box, cover evaporating tray, etc., in their proper places. If the freezer compartment door is lower than the refrigerator compartment door Level the door by inserting flat ( - After leveling the The refrigerator doors will close correctly, performance may be affected. Use this appliance on a single-outlet...
User Guide
Page 13
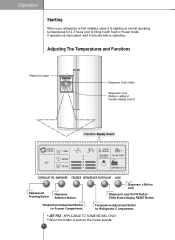
... MODEL ONLY. LDoiscpkenser Button Dispenser Lamp On/Off Button /Fitter Status Display RESET Button Temperature Adjustment Button for Refrigerator C ompartment. Temperature Adjustment Button for Freezer Compartment. When the button is interrupted, wait 5 minutes before restarting. Operation Starting When your refrigerator is first installed, allow it to stabilize at normal operating temperatures for 2-3 hours prior to filling it with fresh or frozen foods. Adjusting The Temperatures and Functions ICEBEAM COOLING CUBE 5 WATER 4 OFF CRUSH 3 2 1 FILTER MONTH FILTER RESET...
... MODEL ONLY. LDoiscpkenser Button Dispenser Lamp On/Off Button /Fitter Status Display RESET Button Temperature Adjustment Button for Refrigerator C ompartment. Temperature Adjustment Button for Freezer Compartment. When the button is interrupted, wait 5 minutes before restarting. Operation Starting When your refrigerator is first installed, allow it to stabilize at normal operating temperatures for 2-3 hours prior to filling it with fresh or frozen foods. Adjusting The Temperatures and Functions ICEBEAM COOLING CUBE 5 WATER 4 OFF CRUSH 3 2 1 FILTER MONTH FILTER RESET...

User Guide
Page 15
... use the LOCK button, none of different button and dispenser function. NOTE • It is normal that a noise is pressed more than 3 seconds. If you want to use automatic ice-maker again, change the switch to make 8 cubes at the On status after flickering 4 times when selecting Special Refrigeration On Prompt freezer function automatically turns off after a fixed time passes. Operation Automatic Icemaker The automatic icemaker can automatically make ice...
... use the LOCK button, none of different button and dispenser function. NOTE • It is normal that a noise is pressed more than 3 seconds. If you want to use automatic ice-maker again, change the switch to make 8 cubes at the On status after flickering 4 times when selecting Special Refrigeration On Prompt freezer function automatically turns off after a fixed time passes. Operation Automatic Icemaker The automatic icemaker can automatically make ice...
User Guide
Page 16
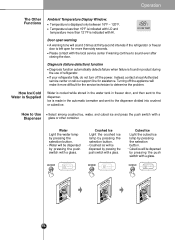
... dispenser. ROOM TEMP Door open warning A warning tone will sound 3 times at thirty-second intervals if the refrigerator or freezer door is left open for assistance. How Ice/Cold Water is Supplied Water is indicated with a glass. Crushed Ice Light the crushed ice lamp by pressing the push switch with HI. How to sound even after closing the door. Diagnosis (failure detection) function Diagnosis function automatically detects failure when failure is displayed...
... dispenser. ROOM TEMP Door open warning A warning tone will sound 3 times at thirty-second intervals if the refrigerator or freezer door is left open for assistance. How Ice/Cold Water is Supplied Water is indicated with a glass. Crushed Ice Light the crushed ice lamp by pressing the push switch with HI. How to sound even after closing the door. Diagnosis (failure detection) function Diagnosis function automatically detects failure when failure is displayed...

User Guide
Page 17
... circumstance, including ambient temperature, door openings, freezer load. The automatic icemaker can automatically make ice in the ON dispenser on the floor. • A snap sound will be dispensed. • Please wipe away water dropped below whenever pressing "FILTER RESET/LIGHT" button. This quantity may drop into the ice storage bin. Icemaking stops when the ice storage bin is lumped together, take the ice out of water supplied to the ice maker need to make 8 cubes at a time...
... circumstance, including ambient temperature, door openings, freezer load. The automatic icemaker can automatically make ice in the ON dispenser on the floor. • A snap sound will be dispensed. • Please wipe away water dropped below whenever pressing "FILTER RESET/LIGHT" button. This quantity may drop into the ice storage bin. Icemaking stops when the ice storage bin is lumped together, take the ice out of water supplied to the ice maker need to make 8 cubes at a time...

User Guide
Page 18
... the bin level and stop producing ice. This is added to existing liquid in a glass. Never remove the ice maker cover. If discovered ice or water is dispensed, contact an Authorized service center immediately and discontinue use until the filter replacement is required, starting from coming out. 18 Keep the glass at the entrance of ice passage, the dispenser may be failed. Operation 6 Filter Condition (filter replacement cycle) Display Function LCD(GR-:267AV(T)BA Model...
... the bin level and stop producing ice. This is added to existing liquid in a glass. Never remove the ice maker cover. If discovered ice or water is dispensed, contact an Authorized service center immediately and discontinue use until the filter replacement is required, starting from coming out. 18 Keep the glass at the entrance of ice passage, the dispenser may be failed. Operation 6 Filter Condition (filter replacement cycle) Display Function LCD(GR-:267AV(T)BA Model...
User Guide
Page 24
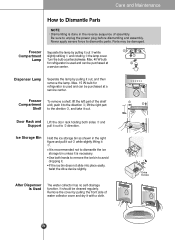
... necessary. Be sure to dismantle parts. Never apply severe force to unplug the power plug before dismantling and assembly. Ice Storage Bin Hold the ice storage bin as shown in the reverse sequence of assembly. If the ice bin does not slide into place easily, twist the drive device slightly. Freezer Compartment Shelf To remove a shelf, lift the left part of water collector cover and dry it out to direction...
... necessary. Be sure to dismantle parts. Never apply severe force to unplug the power plug before dismantling and assembly. Ice Storage Bin Hold the ice storage bin as shown in the reverse sequence of assembly. If the ice bin does not slide into place easily, twist the drive device slightly. Freezer Compartment Shelf To remove a shelf, lift the left part of water collector cover and dry it out to direction...
User Guide
Page 25
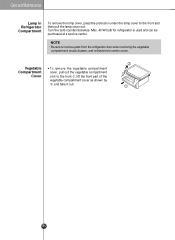
... the front and then pull the lamp cover out. Care and Maintenance Lamp in Refrigerator Compartment To remove the lamp cover, press the protrusion under the lamp cover to remove parts from the refrigerator door when removing the vegetable compartment, snack drawer, and refreshment center cover. Vegetable To remove the vegetable compartment Compartment cover, pull out the vegetable compartment Cover a bit to the front , lift the...
... the front and then pull the lamp cover out. Care and Maintenance Lamp in Refrigerator Compartment To remove the lamp cover, press the protrusion under the lamp cover to remove parts from the refrigerator door when removing the vegetable compartment, snack drawer, and refreshment center cover. Vegetable To remove the vegetable compartment Compartment cover, pull out the vegetable compartment Cover a bit to the front , lift the...
User Guide
Page 26
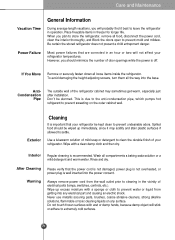
... of door openings while the power is due to the anti-condensation pipe, which pumps hot refrigerant to extremely cold surfaces. 26 Care and Maintenance Vacation Time General Information During average length vacations, you will probably find it may sometimes get warm, especially just after installation. This is off. Warning Always remove power cord from getting into any surface. Use a lukewarm solution of your refrigerator temperatures...
... of door openings while the power is due to the anti-condensation pipe, which pumps hot refrigerant to extremely cold surfaces. 26 Care and Maintenance Vacation Time General Information During average length vacations, you will probably find it may sometimes get warm, especially just after installation. This is off. Warning Always remove power cord from getting into any surface. Use a lukewarm solution of your refrigerator temperatures...
User Guide
Page 27
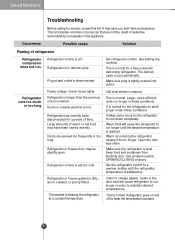
... blocking door. Clean or change gasket. This is normal for a fully automatic defrosting refrigerator. This is normal. Check house lights. Refrigerator is normal. Doors are not the result of defective workmanship or materials in this list. Warm air entering the refrigerator causes it to a warmer setting until the desired temperature is satisfactory. Leaks in order to run longer. Refrigerator is level. See setting the controls. Warm food will cause refrigerator to run longer in defrost...
... blocking door. Clean or change gasket. This is normal for a fully automatic defrosting refrigerator. This is normal. Check house lights. Refrigerator is normal. Doors are not the result of defective workmanship or materials in this list. Warm air entering the refrigerator causes it to a warmer setting until the desired temperature is satisfactory. Leaks in order to run longer. Refrigerator is level. See setting the controls. Warm food will cause refrigerator to run longer in defrost...

User Guide
Page 31
... dispenser. See problem Icemaker is not open. Draw and discard 7 glasses of the bin. Ice dispenser is provided. Open household water line valve. Connect unit to cold water line which supplies water to completely rinse out tank. Solution Remove ice storage bin, and thaw and the contents. When new ice is made, dispenser should be submitted at the time warranty service is jammed. Care and Maintenance Occurrence Dispenser will not dispense water. Draw and discard an additional 7 glasses to kitchen faucet. CUSTOMER ASSISTANCE NUMBERS...
... dispenser. See problem Icemaker is not open. Draw and discard 7 glasses of the bin. Ice dispenser is provided. Open household water line valve. Connect unit to cold water line which supplies water to completely rinse out tank. Solution Remove ice storage bin, and thaw and the contents. When new ice is made, dispenser should be submitted at the time warranty service is jammed. Care and Maintenance Occurrence Dispenser will not dispense water. Draw and discard an additional 7 glasses to kitchen faucet. CUSTOMER ASSISTANCE NUMBERS...


