
Owners Manual
Page 2
2 TABLE OF CONTENTS 3 IMPORTANT SAFETY INSTRUCTIONS 3 READ ALL INSTRUCTIONS BEFORE USE 3 WARNING 6 CAUTION 7 PRODUCT OVERVIEW 7 Product Features 9 INSTALLATION 9 Before Installing 9 Choosing the Proper Location 10 Leveling 11 Turning on the Power 12 OPERATION 12 Before Use 13 Control Panel 13 Defrosting Mode 14 Water Dispenser 15 Storing Food 17 Refrigerator Shelves 17 Ice Tray 18 Door Bins 19 MAINTENANCE 19 Cleaning 20 TROUBLESHOOTING 20 FAQs 20 Before Calling for Service 25 LIMITED WARRANTY 25 USA 29 CANADA
2 TABLE OF CONTENTS 3 IMPORTANT SAFETY INSTRUCTIONS 3 READ ALL INSTRUCTIONS BEFORE USE 3 WARNING 6 CAUTION 7 PRODUCT OVERVIEW 7 Product Features 9 INSTALLATION 9 Before Installing 9 Choosing the Proper Location 10 Leveling 11 Turning on the Power 12 OPERATION 12 Before Use 13 Control Panel 13 Defrosting Mode 14 Water Dispenser 15 Storing Food 17 Refrigerator Shelves 17 Ice Tray 18 Door Bins 19 MAINTENANCE 19 Cleaning 20 TROUBLESHOOTING 20 FAQs 20 Before Calling for Service 25 LIMITED WARRANTY 25 USA 29 CANADA
Owners Manual
Page 3
... use of long-sleeved gloves and safety glasses. • Never attempt to operate this manual and on electrical parts may happen if the instructions are very important. This is a risk of suffocation. • Do not install the refrigerator in this appliance if it to roll over or damage the power cord. • Contact an authorized service center when installing or relocating the refrigerator...
... use of long-sleeved gloves and safety glasses. • Never attempt to operate this manual and on electrical parts may happen if the instructions are very important. This is a risk of suffocation. • Do not install the refrigerator in this appliance if it to roll over or damage the power cord. • Contact an authorized service center when installing or relocating the refrigerator...

Owners Manual
Page 4
... plug the power plug into the air vents or bottom of pinch point areas; Do not touch the refrigerator or power cord of the refrigerator. • Disconnect the power cord immediately and contact an authorized service center if there is a strange noise, odor, or smoke coming from the appliance. • Do not use any fuse (such as copper, steel wire, etc.) other working...
... plug the power plug into the air vents or bottom of pinch point areas; Do not touch the refrigerator or power cord of the refrigerator. • Disconnect the power cord immediately and contact an authorized service center if there is a strange noise, odor, or smoke coming from the appliance. • Do not use any fuse (such as copper, steel wire, etc.) other working...

Owners Manual
Page 5
... the power plug before cleaning or repairing the refrigerator. • The refrigerator and freezer compartment lights are damaged. Always grip the plug firmly and pull straight out from the door or take off if water or dust penetrates into the refrigerator. Contents may not easily climb inside the appliance. Risk of Fire and Flammable Materials This appliance contains a small amount of fire and electric...
... the power plug before cleaning or repairing the refrigerator. • The refrigerator and freezer compartment lights are damaged. Always grip the plug firmly and pull straight out from the door or take off if water or dust penetrates into the refrigerator. Contents may not easily climb inside the appliance. Risk of Fire and Flammable Materials This appliance contains a small amount of fire and electric...

Owners Manual
Page 6
... installed in accordance with the Installation Instructions. • This appliance does not require changes in domestic and similar applications. • Do not strike or apply excessive force to any glass surface. Clean with excessive force. Maintenance • Do not use based on the inside or outside of the refrigerator. • Do not clean glass shelves or covers with warm water when they are cold. 6 IMPORTANT SAFETY INSTRUCTIONS...
... installed in accordance with the Installation Instructions. • This appliance does not require changes in domestic and similar applications. • Do not strike or apply excessive force to any glass surface. Clean with excessive force. Maintenance • Do not use based on the inside or outside of the refrigerator. • Do not clean glass shelves or covers with warm water when they are cold. 6 IMPORTANT SAFETY INSTRUCTIONS...

Owners Manual
Page 7
... different height. e Fridge Shelf This is where food items are subject to store foods such as meat, fish, and ice cream can be stored. NOTE • The shelf height can use this guide may not get cold enough to freeze fresh food or to change by inserting the shelf in this tray to produce and store ice. Interior † This feature is only available on some models.
... different height. e Fridge Shelf This is where food items are subject to store foods such as meat, fish, and ice cream can be stored. NOTE • The shelf height can use this guide may not get cold enough to freeze fresh food or to change by inserting the shelf in this tray to produce and store ice. Interior † This feature is only available on some models.
Owners Manual
Page 8
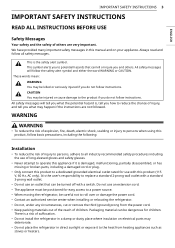
.... g Leveling Screws h Water Dispenser Tank† Stores water to constant product improvements. It requires manual filling. j Fridge Door Basket This is where fruits and vegetables are stored to model. Electrical requirements: 115 V, 60 Hz Model LRONC0705* LRONC0605* Top freezer refrigerator Top freezer refrigerator Description Net weight 75 lb (34kg) 68 lb (31kg) k Drip Tray l Back View Product Specifications The appearance and specifications listed in this manual may vary due to supply the dispenser. i Fridge Temperature Controller...
.... g Leveling Screws h Water Dispenser Tank† Stores water to constant product improvements. It requires manual filling. j Fridge Door Basket This is where fruits and vegetables are stored to model. Electrical requirements: 115 V, 60 Hz Model LRONC0705* LRONC0605* Top freezer refrigerator Top freezer refrigerator Description Net weight 75 lb (34kg) 68 lb (31kg) k Drip Tray l Back View Product Specifications The appearance and specifications listed in this manual may vary due to supply the dispenser. i Fridge Temperature Controller...
Owners Manual
Page 9
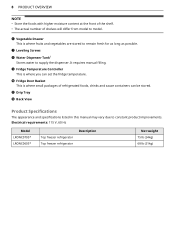
..., adjust the leveling legs to do so can result in an area with your refrigerator. • Reinstall or adjust shelves as gasoline, away from your thumb. Always pull the refrigerator straight out when moving the refrigerator for the automatic icemaker. Do not remove any warning labels, the model and serial number label, or the Tech Sheet that is heavy. Choosing the Proper Location Water The refrigerator...
..., adjust the leveling legs to do so can result in an area with your refrigerator. • Reinstall or adjust shelves as gasoline, away from your thumb. Always pull the refrigerator straight out when moving the refrigerator for the automatic icemaker. Do not remove any warning labels, the model and serial number label, or the Tech Sheet that is heavy. Choosing the Proper Location Water The refrigerator...

Owners Manual
Page 10
...-tighten. Dimensions/Clearances A Depth without Handle B Width C Height to Top of Case D Height to Top of the appliance and the installation path to ensure there is sufficient room to move the refrigerator through doors or narrow openings. • If an opening is too narrow to open -end wrench will suffice. See Removing/ Assembling Doors and Drawers in this manual. • The installation location chosen for connections and airflow...
...-tighten. Dimensions/Clearances A Depth without Handle B Width C Height to Top of Case D Height to Top of the appliance and the installation path to ensure there is sufficient room to move the refrigerator through doors or narrow openings. • If an opening is too narrow to open -end wrench will suffice. See Removing/ Assembling Doors and Drawers in this manual. • The installation location chosen for connections and airflow...
Owners Manual
Page 13
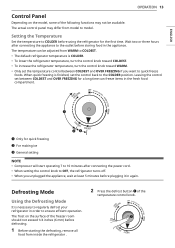
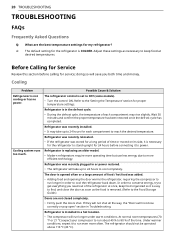
... making ice c General setting NOTE • Compressor will start operating 7 to 10 minutes after connecting the appliance to quick freeze foods. Leaving the control set between COLDEST and OVER FREEZING if you unplugged the appliance, wait at least 5 minutes before storing food in the appliance. Defrosting Mode Using the Defrosting Mode It is COLDER. • To lower the refrigerator temperature, turn the control knob toward COLDEST. • To increase the refrigerator temperature, turn...
... making ice c General setting NOTE • Compressor will start operating 7 to 10 minutes after connecting the appliance to quick freeze foods. Leaving the control set between COLDEST and OVER FREEZING if you unplugged the appliance, wait at least 5 minutes before storing food in the appliance. Defrosting Mode Using the Defrosting Mode It is COLDER. • To lower the refrigerator temperature, turn the control knob toward COLDEST. • To increase the refrigerator temperature, turn...

Owners Manual
Page 15
... 1 Remove the water tank cover. 5 Clean the water tank and the water valve in running costs of the unit. 2 Empty the water tank. OPERATION 15 3 Hold the water tank with a clean cloth. 6 Mount the water tank in the reverse order of the removal process. Wipe the inside and outside of the water tank and the fridge door with both hands and pull it is not assembled correctly, water may penetrate the refrigerator...
... 1 Remove the water tank cover. 5 Clean the water tank and the water valve in running costs of the unit. 2 Empty the water tank. OPERATION 15 3 Hold the water tank with a clean cloth. 6 Mount the water tank in the reverse order of the removal process. Wipe the inside and outside of the water tank and the fridge door with both hands and pull it is not assembled correctly, water may penetrate the refrigerator...

Owners Manual
Page 16
... at room temperature for air to 3 pounds of food per cubic foot of food. Doing so may expand when frozen, break the container and cause injury. Place in plastic bags or plastic container and store in original carton on interior shelf, not on refrigerator shelf. • Leafy Vegetables - This simply means that moisture in cold water, and drain. Cooling hot foods...
... at room temperature for air to 3 pounds of food per cubic foot of food. Doing so may expand when frozen, break the container and cause injury. Place in plastic bags or plastic container and store in original carton on interior shelf, not on refrigerator shelf. • Leafy Vegetables - This simply means that moisture in cold water, and drain. Cooling hot foods...

Owners Manual
Page 17
... if exposed to meet individual storage needs. ENGLISH have food odor and taste transfer throughout the refrigerator and could also dry out frozen food. Adjusting the shelves to the tray. 2 To assemble, slide the shelf into the guides until it stops. • To remove ice cubes easily, pour water on some models. Detaching/Assembling Shelves CAUTION • Do not clean glass shelves with tight-fitting lids • Straight...
... if exposed to meet individual storage needs. ENGLISH have food odor and taste transfer throughout the refrigerator and could also dry out frozen food. Adjusting the shelves to the tray. 2 To assemble, slide the shelf into the guides until it stops. • To remove ice cubes easily, pour water on some models. Detaching/Assembling Shelves CAUTION • Do not clean glass shelves with tight-fitting lids • Straight...
Owners Manual
Page 20
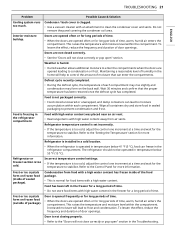
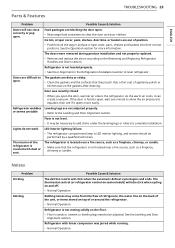
... the refrigerator at desired temperatures. Refrigerator was recently plugged in a hot location. • The compressor will take up to 24 hours to 24 hours for proper temperature settings. Cooling Problem Refrigerator is set to more often. Possible Cause & Solution The refrigerator control is not cooling or has no power. Refrigerator is replacing an older model. • Modern refrigerators require more operating time but use less energy due to OFF (some models). • Turn the control ON...
... the refrigerator at desired temperatures. Refrigerator was recently plugged in a hot location. • The compressor will take up to 24 hours to 24 hours for proper temperature settings. Cooling Problem Refrigerator is set to more often. Possible Cause & Solution The refrigerator control is not cooling or has no power. Refrigerator is replacing an older model. • Modern refrigerators require more operating time but use less energy due to OFF (some models). • Turn the control ON...
Owners Manual
Page 21
... form on frozen food (inside of moisture that the proper temperature has been restored once the defrost cycle has completed. Interior moisture buildup. Refrigerator or Freezer section is freezing in the Troubleshooting. Door is operated in the refrigerator compartment. Condenser / back cover is opened frequently or for more information. The refrigerator should not be operated in sealed packaging to the 'Setting the Temperature' section for long periods...
... form on frozen food (inside of moisture that the proper temperature has been restored once the defrost cycle has completed. Interior moisture buildup. Refrigerator or Freezer section is freezing in the Troubleshooting. Door is operated in the refrigerator compartment. Condenser / back cover is opened frequently or for more information. The refrigerator should not be operated in sealed packaging to the 'Setting the Temperature' section for long periods...
Owners Manual
Page 22
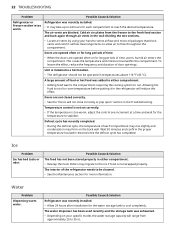
.... • Locate air vents by using your specific model, the water storage capacity will range from approximately 20 to run. To lessen the effect, reduce the frequency and duration of time, warm, humid air enters the compartment. The interior of the refrigerator needs to reach the desired temperature. The air vents are opened often or for long periods of time. • When the doors are blocked...
.... • Locate air vents by using your specific model, the water storage capacity will range from approximately 20 to run. To lessen the effect, reduce the frequency and duration of time, warm, humid air enters the compartment. The interior of the refrigerator needs to reach the desired temperature. The air vents are opened often or for long periods of time. • When the doors are blocked...
Owners Manual
Page 23
... in the Refrigeration Installation section to the Leveling and Door Alignment section. Ice bin, crisper cover, pans, shelves, door bins, or baskets are out of the refrigerator is covered with linear compressor was recently closed. • When you open . The gaskets are difficult to equalize, then see if it can create a vacuum. Door was jarred while running. • Normal Operation As the warm air cools, it opens more information. Floor is not located near a fire...
... in the Refrigeration Installation section to the Leveling and Door Alignment section. Ice bin, crisper cover, pans, shelves, door bins, or baskets are out of the refrigerator is covered with linear compressor was recently closed. • When you open . The gaskets are difficult to equalize, then see if it can create a vacuum. Door was jarred while running. • Normal Operation As the warm air cools, it opens more information. Floor is not located near a fire...

Owners Manual
Page 26
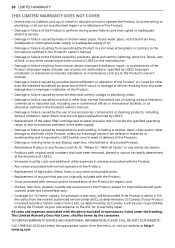
... ACTION. Improper repair includes the use of parts not authorized by mail: LG Electronics Customer Service P.O. 26 LIMITED WARRANTY • Damage or failure of the Product to perform during power failures and interrupted or inadequate electrical service. • Damage or failure of the Product caused by leaky or broken water pipes, frozen water pipes, restricted drain lines, inadequate or interrupted water supply or inadequate supply of air. •...
... ACTION. Improper repair includes the use of parts not authorized by mail: LG Electronics Customer Service P.O. 26 LIMITED WARRANTY • Damage or failure of the Product to perform during power failures and interrupted or inadequate electrical service. • Damage or failure of the Product caused by leaky or broken water pipes, frozen water pipes, restricted drain lines, inadequate or interrupted water supply or inadequate supply of air. •...
Owners Manual
Page 29
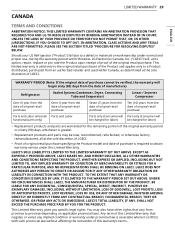
... warranty service under this warranty's terms. This limited warranty is greater. • Replacement products and parts may also have other rights that negates or varies any implied condition or warranty under normal and proper use, during the warranty period set forth below, LG Electronics Canada, Inc. ("LGECI") will begin sixty (60) days from the date of manufacture) Refrigerator Sealed System (Condenser, Dryer, Connecting Tube...
... warranty service under this warranty's terms. This limited warranty is greater. • Replacement products and parts may also have other rights that negates or varies any implied condition or warranty under normal and proper use, during the warranty period set forth below, LG Electronics Canada, Inc. ("LGECI") will begin sixty (60) days from the date of manufacture) Refrigerator Sealed System (Condenser, Dryer, Connecting Tube...
Owners Manual
Page 30
... noises associated with removal and/or reinstallation of the Product for internal/functional parts covered under the heading, This Limited Warranty Does Not Cover, shall be borne by LG Canada, it will be provided if the Product is reported to LGECI within a 150 km radius from misuse, abuse, improper installation, repair, or maintenance of the Product. and • Shelves, door bins, drawers, handle and...
... noises associated with removal and/or reinstallation of the Product for internal/functional parts covered under the heading, This Limited Warranty Does Not Cover, shall be borne by LG Canada, it will be provided if the Product is reported to LGECI within a 150 km radius from misuse, abuse, improper installation, repair, or maintenance of the Product. and • Shelves, door bins, drawers, handle and...


