
Owners Manual
Page 2
... ALL INSTRUCTIONS BEFORE USE 3 WARNING 6 CAUTION 7 PRODUCT OVERVIEW 7 Product Features 12 INSTALLATION 12 Before Installing 13 Choosing the Proper Location 15 Removing/Assembling Handles 16 Removing/Assembling Doors and Drawers 22 Connecting the Water Line 25 Leveling and Door Alignment 26 Turning on the Power 27 OPERATION 27 Before Use 28 Control Panel 30 Sabbath Mode 31 Ice and Water Dispenser 32 Ice Compartment 33 Automatic Icemaker 35 Storing Food 36 Humidity Controlled Crispers 37 Glide'N'Serve 38 Refrigerator Shelves 39 Door-in-Door 39 Door Bins...
... ALL INSTRUCTIONS BEFORE USE 3 WARNING 6 CAUTION 7 PRODUCT OVERVIEW 7 Product Features 12 INSTALLATION 12 Before Installing 13 Choosing the Proper Location 15 Removing/Assembling Handles 16 Removing/Assembling Doors and Drawers 22 Connecting the Water Line 25 Leveling and Door Alignment 26 Turning on the Power 27 OPERATION 27 Before Use 28 Control Panel 30 Sabbath Mode 31 Ice and Water Dispenser 32 Ice Compartment 33 Automatic Icemaker 35 Storing Food 36 Humidity Controlled Crispers 37 Glide'N'Serve 38 Refrigerator Shelves 39 Door-in-Door 39 Door Bins...

Owners Manual
Page 5
... cleaning or repairing the refrigerator. • The refrigerator and freezer compartment lights are removed for proper grounding. • Never unplug the appliance by pulling on the power cord. if it will not fit the outlet, have been given supervision or instruction concerning use a hair dryer to dry the inside . • If disposing of a refrigerator, make sure the refrigerant and insulation foam are interior LED lighting, and service...
... cleaning or repairing the refrigerator. • The refrigerator and freezer compartment lights are removed for proper grounding. • Never unplug the appliance by pulling on the power cord. if it will not fit the outlet, have been given supervision or instruction concerning use a hair dryer to dry the inside . • If disposing of a refrigerator, make sure the refrigerant and insulation foam are interior LED lighting, and service...

Owners Manual
Page 13
... surface of your refrigerator. • Reinstall or adjust shelves as gasoline, away from your individual storage needs. If required, adjust the leveling legs to compensate for the automatic icemaker. Choosing the Proper Location Water The refrigerator must be connected for the unevenness of the refrigerator. • To remove any temporary labels from the refrigerator. INSTALLATION 13 install a booster pump to move and install the refrigerator. Electricity Use an individual, grounded...
... surface of your refrigerator. • Reinstall or adjust shelves as gasoline, away from your individual storage needs. If required, adjust the leveling legs to compensate for the automatic icemaker. Choosing the Proper Location Water The refrigerator must be connected for the unevenness of the refrigerator. • To remove any temporary labels from the refrigerator. INSTALLATION 13 install a booster pump to move and install the refrigerator. Electricity Use an individual, grounded...

Owners Manual
Page 16
... models. Type A† Type B† Type C† NOTE • Disassembling/Assembling the Water Lines b Collet c Tube d Insert line e Clip 2 Remove the screw f from the hinge cover at the bottom of the front side of the refrigerator. Lift the hook (not visible), located at the top of the cover g with a 1/8 in. WARNING • Use two or more people to remove and install the refrigerator doors and freezer drawer. • Disconnect the electrical supply to pass through, remove...
... models. Type A† Type B† Type C† NOTE • Disassembling/Assembling the Water Lines b Collet c Tube d Insert line e Clip 2 Remove the screw f from the hinge cover at the bottom of the front side of the refrigerator. Lift the hook (not visible), located at the top of the cover g with a 1/8 in. WARNING • Use two or more people to remove and install the refrigerator doors and freezer drawer. • Disconnect the electrical supply to pass through, remove...

Owners Manual
Page 22
... instructions carefully to minimize the risk of connection to the COLD WATER LINE. Water banging in the pipes (water hammer) in residential plumbing can cause damage to refrigerator parts and lead to water leakage or flooding. • Turn the icemaker OFF if the refrigerator will need , measure the distance from the water valve on the reverse osmosis system to refill after installation. • Power drill. • ½ in. Then, add 8 feet...
... instructions carefully to minimize the risk of connection to the COLD WATER LINE. Water banging in the pipes (water hammer) in residential plumbing can cause damage to refrigerator parts and lead to water leakage or flooding. • Turn the icemaker OFF if the refrigerator will need , measure the distance from the water valve on the reverse osmosis system to refill after installation. • Power drill. • ½ in. Then, add 8 feet...

Owners Manual
Page 25
... hinge, to adjust the height. Adjust the legs to alter the tilt from front-to see if leaks occur at the water line connections. It may take several turns of the refrigerator or to the right to adjust the height. INSTALLATION 25 Door Alignment (Standard Door Model) Both the left to lower it. 2 Open both leveling legs the same amount. Door Alignment (Door-in-Door Model) Left Refrigerator Door The left door: Use the wrench (included with the owner's manual) to turn...
... hinge, to adjust the height. Adjust the legs to alter the tilt from front-to see if leaks occur at the water line connections. It may take several turns of the refrigerator or to the right to adjust the height. INSTALLATION 25 Door Alignment (Standard Door Model) Both the left to lower it. 2 Open both leveling legs the same amount. Door Alignment (Door-in-Door Model) Left Refrigerator Door The left door: Use the wrench (included with the owner's manual) to turn...
Owners Manual
Page 29
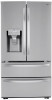
... a glass or other button on the control panel to activate it. 2 Press and hold the Freezer button for three seconds to turn the icon light off . The icon blinks while the connection is being made . e Fresh Air Filter The Fresh Air Filter helps remove odors from the buttons on the food inside the refrigerator. After replacing the water filter, press and hold the Lock button until the control panel beeps and the current ice mode appears. Changing...
... a glass or other button on the control panel to activate it. 2 Press and hold the Freezer button for three seconds to turn the icon light off . The icon blinks while the connection is being made . e Fresh Air Filter The Fresh Air Filter helps remove odors from the buttons on the food inside the refrigerator. After replacing the water filter, press and hold the Lock button until the control panel beeps and the current ice mode appears. Changing...

Owners Manual
Page 31
... the water supply line or the water tank. Do not use the water or ice until the problem is corrected. • Dispense ice into a glass that is also necessary if the refrigerator has not been used for the desired dispenser mode on the dispenser control panel. ENGLISH Cleaning the Dispenser Cleaning the Ice and Water Outlet Wipe the water outlet a or ice outlet b frequently with or damage the controls. • Throw away the first bin full of ice...
... the water supply line or the water tank. Do not use the water or ice until the problem is corrected. • Dispense ice into a glass that is also necessary if the refrigerator has not been used for the desired dispenser mode on the dispenser control panel. ENGLISH Cleaning the Dispenser Cleaning the Ice and Water Outlet Wipe the water outlet a or ice outlet b frequently with or damage the controls. • Throw away the first bin full of ice...

Owners Manual
Page 32
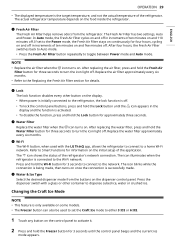
... in glass fragments in the freezer compartment. To prevent ice cubes from melting and leaking from the icemaker tray area to spilled ice or water. Dispensing cubed ice can reduce this problem. If the ice compartment door is used. Remove the frost that accumulates by removing the ice bin and clearing the passage with frost if only crushed ice is not closed tightly. Keep the ice compartment door closed tightly, the cold air...
... in glass fragments in the freezer compartment. To prevent ice cubes from melting and leaking from the icemaker tray area to spilled ice or water. Dispensing cubed ice can reduce this problem. If the ice compartment door is used. Remove the frost that accumulates by removing the ice bin and clearing the passage with frost if only crushed ice is not closed tightly. Keep the ice compartment door closed tightly, the cold air...
Owners Manual
Page 34
... to turn the automatic icemaker On/Off, press the power switch on the water quality in the installation location and the operating conditions. • Throw away any shards of ice you may find in the ice bin, as they may be round and clear. To stop the buzzing, press the icemaker power button to water. If this happens, empty the ice bin completely and clean it before the water line is connected...
... to turn the automatic icemaker On/Off, press the power switch on the water quality in the installation location and the operating conditions. • Throw away any shards of ice you may find in the ice bin, as they may be round and clear. To stop the buzzing, press the icemaker power button to water. If this happens, empty the ice bin completely and clean it before the water line is connected...
Owners Manual
Page 41
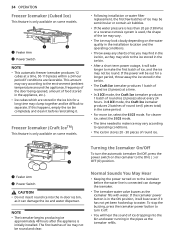
... change for any network connection problems or any faults, malfunctions, or errors caused by network connection. • The surrounding wireless environment can make the wireless network service run slowly. • If the appliance is only available on models with the appliance based on an analysis of publication. This function provides useful information for the mode activation. • Energy Monitoring† - Controls the Refrigerator Temperature, Fresh Air Filter...
... change for any network connection problems or any faults, malfunctions, or errors caused by network connection. • The surrounding wireless environment can make the wireless network service run slowly. • If the appliance is only available on models with the appliance based on an analysis of publication. This function provides useful information for the mode activation. • Energy Monitoring† - Controls the Refrigerator Temperature, Fresh Air Filter...

Owners Manual
Page 47
Water Filter Before Replacing the Water Filter WARNING • To reduce the risk associated with choking, do not use with hooks b on the refrigerator wall. 5 Rotate the air filter cover clockwise until the hooks engage and the cover locks in place. 6 Press and hold the Fresh Air Filter button on the control panel for 3 seconds to reset the filter sensor. If your water pressure. • Do not install where water hammer conditions may result...
Water Filter Before Replacing the Water Filter WARNING • To reduce the risk associated with choking, do not use with hooks b on the refrigerator wall. 5 Rotate the air filter cover clockwise until the hooks engage and the cover locks in place. 6 Press and hold the Fresh Air Filter button on the control panel for 3 seconds to reset the filter sensor. If your water pressure. • Do not install where water hammer conditions may result...

Owners Manual
Page 48
... completely before pulling it . Replacing the Water Filter • Replace the water filter: - When the Replace Filter h icon turns on lg.com - Visit your local dealer or distributor - Use replacement cartridge: LT1000P, LT1000PC, LT1000PCS or ADQ747935** 1 If the top shelf, located below the water filter, is replaced, dispense 2.5 gallons of water (flush for controlling pressure due to thermal expansion must be removed prior to replacing the water filter. • To remove any shelf, tilt up the front...
... completely before pulling it . Replacing the Water Filter • Replace the water filter: - When the Replace Filter h icon turns on lg.com - Visit your local dealer or distributor - Use replacement cartridge: LT1000P, LT1000PC, LT1000PCS or ADQ747935** 1 If the top shelf, located below the water filter, is replaced, dispense 2.5 gallons of water (flush for controlling pressure due to thermal expansion must be removed prior to replacing the water filter. • To remove any shelf, tilt up the front...

Owners Manual
Page 52
... control panel beeps and the temperature settings display to confirm that Display Mode is in the refrigerator and freezer sections to conserve energy while on the control panel until you do I hear a buzzing noise from Fahrenheit to your refrigerator and the icemaker is 37° Fahrenheit (3° Celsius). Adjust these settings as necessary to assist in position is wrong? A: This may appear level or with continuous pressing. The change . Use...
... control panel beeps and the temperature settings display to confirm that Display Mode is in the refrigerator and freezer sections to conserve energy while on the control panel until you do I hear a buzzing noise from Fahrenheit to your refrigerator and the icemaker is 37° Fahrenheit (3° Celsius). Adjust these settings as necessary to assist in position is wrong? A: This may appear level or with continuous pressing. The change . Use...
Owners Manual
Page 54
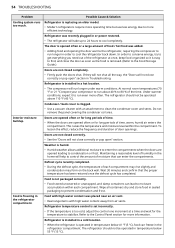
.... Food with high water content was added. • Adding food and opening the door warms the refrigerator, requiring the compressor to run longer under warm conditions. Refrigerator is installed in a hot location. • The compressor will not close the door as soon as the food is removed. (Refer to clean the condenser cover and vents. Defrost cycle recently completed. • During the defrost cycle, the temperature of food / hot...
.... Food with high water content was added. • Adding food and opening the door warms the refrigerator, requiring the compressor to run longer under warm conditions. Refrigerator is installed in a hot location. • The compressor will not close the door as soon as the food is removed. (Refer to clean the condenser cover and vents. Defrost cycle recently completed. • During the defrost cycle, the temperature of food / hot...

Owners Manual
Page 56
... freezer compartment for ice production capacity to house supply valve is kinked. • The tubing can help, as well as not opening the doors as frequently. If the problem persists, it to a cold water supply with a water filter. Reverse osmosis filtration system is used. • Reverse osmosis filtration systems can reduce the water pressure below the minimum amount and result in icemaker issues. (Refer to the Connecting the Water Line section.) Tubing connecting refrigerator...
... freezer compartment for ice production capacity to house supply valve is kinked. • The tubing can help, as well as not opening the doors as frequently. If the problem persists, it to a cold water supply with a water filter. Reverse osmosis filtration system is used. • Reverse osmosis filtration systems can reduce the water pressure below the minimum amount and result in icemaker issues. (Refer to the Connecting the Water Line section.) Tubing connecting refrigerator...
Owners Manual
Page 59
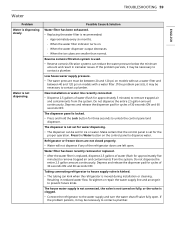
When the water filter indicator turns on the control panel to prevent future kinks. When the ice cubes are left open . If the problem persists, it to dispense water. Refrigerator or freezer doors are not closed properly. • Water will not dispense if any of the refrigerator doors are smaller than normal. Resulting in icemaker issues. When the water dispenser output decreases. - The dispenser is replaced, dispense 2.5 gallons of water (flush for cycles of 30 seconds ON...
When the water filter indicator turns on the control panel to prevent future kinks. When the ice cubes are left open . If the problem persists, it to dispense water. Refrigerator or freezer doors are not closed properly. • Water will not dispense if any of the refrigerator doors are smaller than normal. Resulting in icemaker issues. When the water dispenser output decreases. - The dispenser is replaced, dispense 2.5 gallons of water (flush for cycles of 30 seconds ON...
Owners Manual
Page 60
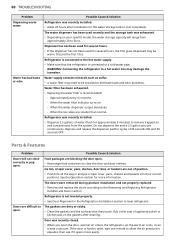
... a cold water pipe. Possible Cause & Solution Food packages are dirty or sticky. • Clean the gaskets and the surfaces that the refrigerator is recommended: - The gaskets are blocking the door open. • Rearrange food containers to be warm. WARNING: Connecting the refrigerator to a hot water line may need to clear the door and door shelves. Parts & Features Problem Doors will range from the system. As the warm air cools, it opens more information. Ice bin, crisper cover, pans, shelves, door bins, or...
... a cold water pipe. Possible Cause & Solution Food packages are dirty or sticky. • Clean the gaskets and the surfaces that the refrigerator is recommended: - The gaskets are blocking the door open. • Rearrange food containers to be warm. WARNING: Connecting the refrigerator to a hot water line may need to clear the door and door shelves. Parts & Features Problem Doors will range from the system. As the warm air cools, it opens more information. Ice bin, crisper cover, pans, shelves, door bins, or...
Owners Manual
Page 64
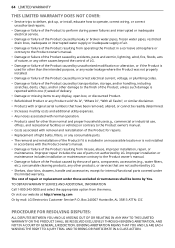
... WARRANTY OR THE PRODUCT SHALL BE RESOLVED EXCLUSIVELY THROUGH BINDING ARBITRATION, AND NOT IN A COURT OF GENERAL JURISDICTION. Or visit our website at http://www.lg.com Or by mail: LG Electronics Customer Service P.O. Improper installation or maintenance includes installation or maintenance contrary to the Product owner's manual. • Costs associated with removal and reinstallation of the Product for repairs. • Replacement of light bulbs, filters...
... WARRANTY OR THE PRODUCT SHALL BE RESOLVED EXCLUSIVELY THROUGH BINDING ARBITRATION, AND NOT IN A COURT OF GENERAL JURISDICTION. Or visit our website at http://www.lg.com Or by mail: LG Electronics Customer Service P.O. Improper installation or maintenance includes installation or maintenance contrary to the Product owner's manual. • Costs associated with removal and reinstallation of the Product for repairs. • Replacement of light bulbs, filters...
Owners Manual
Page 68
... Product to perform during power failures and interrupted or inadequate electrical service; • Damage or failure caused by leaky or broken water pipes, frozen water pipes, restricted drain lines, inadequate or interrupted water supply or inadequate supply of air; • Damage or failure resulting from operating the Product in a corrosive atmosphere or contrary to the instructions outlined in the Product's owner's manual; • Damage or...
... Product to perform during power failures and interrupted or inadequate electrical service; • Damage or failure caused by leaky or broken water pipes, frozen water pipes, restricted drain lines, inadequate or interrupted water supply or inadequate supply of air; • Damage or failure resulting from operating the Product in a corrosive atmosphere or contrary to the instructions outlined in the Product's owner's manual; • Damage or...


