Owners Manual
Page 2
... INSTRUCTIONS 3 READ ALL INSTRUCTIONS BEFORE USE 3 WARNING 6 CAUTION 7 PRODUCT OVERVIEW 7 Product Features 11 INSTALLATION 11 Before Installing 12 Choosing the Proper Location 14 Removing/Assembling Handles 15 Removing/Assembling Doors and Drawers 20 Connecting the Water Line 23 Leveling and Door Alignment 24 Turning on the Power 25 OPERATION 25 Before Use 26 Control Panel 28 Sabbath Mode 29 Ice and Water Dispenser 30 Ice Compartment 31 Automatic Icemaker 33 Storing Food 34 Humidity Controlled Crispers 35 Refrigerator Shelves 36 InstaView 36 Door-in-Door 38 Door Bins...
... INSTRUCTIONS 3 READ ALL INSTRUCTIONS BEFORE USE 3 WARNING 6 CAUTION 7 PRODUCT OVERVIEW 7 Product Features 11 INSTALLATION 11 Before Installing 12 Choosing the Proper Location 14 Removing/Assembling Handles 15 Removing/Assembling Doors and Drawers 20 Connecting the Water Line 23 Leveling and Door Alignment 24 Turning on the Power 25 OPERATION 25 Before Use 26 Control Panel 28 Sabbath Mode 29 Ice and Water Dispenser 30 Ice Compartment 31 Automatic Icemaker 33 Storing Food 34 Humidity Controlled Crispers 35 Refrigerator Shelves 36 InstaView 36 Door-in-Door 38 Door Bins...
Owners Manual
Page 5
... interior LED lighting, and service should be fined or imprisoned in a risk of electric shock. Disposal • Junked or abandoned refrigerators are dangerous, even if they have a proper outlet installed by a qualified electrician. • Have a certified electrician check the wall outlet and wiring for their safety. • Unplug the power plug before cleaning or repairing the refrigerator. • The refrigerator and freezer compartment lights are removed...
... interior LED lighting, and service should be fined or imprisoned in a risk of electric shock. Disposal • Junked or abandoned refrigerators are dangerous, even if they have a proper outlet installed by a qualified electrician. • Have a certified electrician check the wall outlet and wiring for their safety. • Unplug the power plug before cleaning or repairing the refrigerator. • The refrigerator and freezer compartment lights are removed...
Owners Manual
Page 12
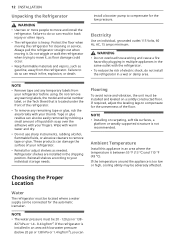
... . Refrigerator shelves are installed in a wet or damp area. NOTE • Installing on a solidly constructed floor. Reinstall shelves according to remove tape or glue. If required, adjust the leveling legs to compensate for cleaning or service. install a booster pump to compensate for the automatic icemaker. 12 INSTALLATION Unpacking the Refrigerator WARNING • Use two or more people to do not install the refrigerator in the shipping position. Electricity Use...
... . Refrigerator shelves are installed in a wet or damp area. NOTE • Installing on a solidly constructed floor. Reinstall shelves according to remove tape or glue. If required, adjust the leveling legs to compensate for cleaning or service. install a booster pump to compensate for the automatic icemaker. 12 INSTALLATION Unpacking the Refrigerator WARNING • Use two or more people to do not install the refrigerator in the shipping position. Electricity Use...
Owners Manual
Page 15
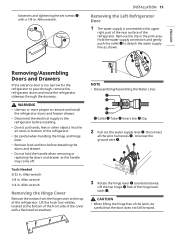
... the refrigerator. • Be careful when handling the hinge and hinge lever. • Remove food and bins before detaching the doors and drawer. • Do not hold the handle when removing or replacing the doors and drawer as shown. Disconnect all the wire harnesses g . Remove the clip in . WARNING • Use two or more people to remove and install the refrigerator doors and freezer drawer. • Disconnect the electrical supply to detach the water supply line as the handle...
... the refrigerator. • Be careful when handling the hinge and hinge lever. • Remove food and bins before detaching the doors and drawer. • Do not hold the handle when removing or replacing the doors and drawer as shown. Disconnect all the wire harnesses g . Remove the clip in . WARNING • Use two or more people to remove and install the refrigerator doors and freezer drawer. • Disconnect the electrical supply to detach the water supply line as the handle...
Owners Manual
Page 20
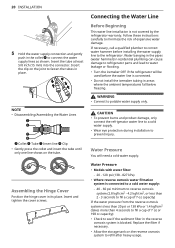
Assembling the Hinge Cover Position the hinge cover in residential plumbing can cause damage to refrigerator parts and lead to water leakage or flooding. • Turn the icemaker OFF if the refrigerator will need a cold water supply. WARNING • Connect to refill after heavy usage. Replace the filter if necessary. • Allow the storage tank on the reverse osmosis system to potable water supply only. Follow these instructions carefully to prevent injury. Connecting the Water Line Before...
Assembling the Hinge Cover Position the hinge cover in residential plumbing can cause damage to refrigerator parts and lead to water leakage or flooding. • Turn the icemaker OFF if the refrigerator will need a cold water supply. WARNING • Connect to refill after heavy usage. Replace the filter if necessary. • Allow the storage tank on the reverse osmosis system to potable water supply only. Follow these instructions carefully to prevent injury. Connecting the Water Line Before...
Owners Manual
Page 21
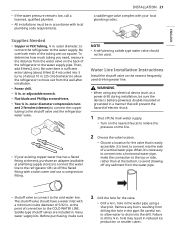
... tubing to the shutoff valve and the refrigerator water valve. • If your local plumbing codes. Water Line Installation Instructions Install the shutoff valve on the line. 2 Choose the valve location. • Choose a location for the valve. • Drill a ¼ in. WARNING • When using a sharp bit. When it is best to connect into a horizontal water pipe, make sure 3 Drill the hole for the valve that will prevent the hazard of electric shock. 1 Shut...
... tubing to the shutoff valve and the refrigerator water valve. • If your local plumbing codes. Water Line Installation Instructions Install the shutoff valve on the line. 2 Choose the valve location. • Choose a location for the valve. • Drill a ¼ in. WARNING • When using a sharp bit. When it is best to connect into a horizontal water pipe, make sure 3 Drill the hole for the valve that will prevent the hazard of electric shock. 1 Shut...
Owners Manual
Page 23
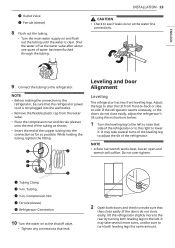
... of the tubing as possible. Shut the water off at the water line connections. 9 Connect the tubing to lower it. Leveling and Door Alignment Leveling The refrigerator has two front leveling legs. If the refrigerator seems unsteady, or the doors do not close easily, adjust the refrigerator's tilt using the instructions below: 1 Turn the leveling leg to the left . It may take several turns of the copper tubing into the wall outlet. • Remove the...
... of the tubing as possible. Shut the water off at the water line connections. 9 Connect the tubing to lower it. Leveling and Door Alignment Leveling The refrigerator has two front leveling legs. If the refrigerator seems unsteady, or the doors do not close easily, adjust the refrigerator's tilt using the instructions below: 1 Turn the leveling leg to the left . It may take several turns of the copper tubing into the wall outlet. • Remove the...
Owners Manual
Page 26
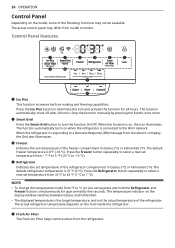
... Grid button to -15 °C). d Refrigerator Indicates the set temperature from the electric company, the Grid text illuminates. e Fresh Air Filter The Fresh Air Filter helps remove odors from °F to illuminate the icon and activate the function for approximately five seconds. Control Panel Features a Ice Plus This function increases both ice making and freezing capabilities. The temperature indicator on the display window switches between Celsius and Fahrenheit. • The displayed temperature is connected...
... Grid button to -15 °C). d Refrigerator Indicates the set temperature from the electric company, the Grid text illuminates. e Fresh Air Filter The Fresh Air Filter helps remove odors from °F to illuminate the icon and activate the function for approximately five seconds. Control Panel Features a Ice Plus This function increases both ice making and freezing capabilities. The temperature indicator on the display window switches between Celsius and Fahrenheit. • The displayed temperature is connected...
Owners Manual
Page 27
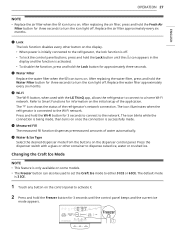
... and hold the Freezer button for three seconds to turn the icon light off . Press the dispenser switch with the LG ThinQ app, allows the refrigerator to connect to dispense cubed ice, water or crushed ice. Changing the Craft Ice Mode NOTE • This feature is connected to the network. g Water Filter Replace the water filter when the h icon turns on the dispenser control panel. j Water & Ice Type Select the desired dispenser mode from the buttons on . Replace the air filter approximately every six months...
... and hold the Freezer button for three seconds to turn the icon light off . Press the dispenser switch with the LG ThinQ app, allows the refrigerator to connect to dispense cubed ice, water or crushed ice. Changing the Craft Ice Mode NOTE • This feature is connected to the network. g Water Filter Replace the water filter when the h icon turns on the dispenser control panel. j Water & Ice Type Select the desired dispenser mode from the buttons on . Replace the air filter approximately every six months...
Owners Manual
Page 29
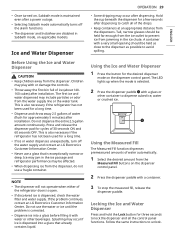
... from the dispenser. Follow the same instructions to lock the dispenser and all of the refrigerator doors is open. • If discolored ice is dispensed, check the water filter and water supply. This is also necessary if the refrigerator has not been used for approximately 5 minutes) after installation. Press and release the dispenser pad for the desired dispenser mode on the dispenser control panel. Splashing may occur if ice is dispensed into a glass before...
... from the dispenser. Follow the same instructions to lock the dispenser and all of the refrigerator doors is open. • If discolored ice is dispensed, check the water filter and water supply. This is also necessary if the refrigerator has not been used for approximately 5 minutes) after installation. Press and release the dispenser pad for the desired dispenser mode on the dispenser control panel. Splashing may occur if ice is dispensed into a glass before...
Owners Manual
Page 30
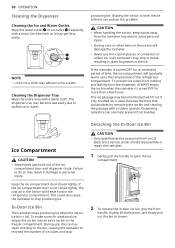
... tightly. 30 OPERATION Cleaning the Dispenser Cleaning the Ice and Water Outlet Wipe the water outlet a or ice outlet b frequently with a rubber spatula. Keep the ice compartment door closed tightly, the cold air in the ice bin will damage the icemaker. • Never use , the ice may get dirty easily. This could also cause the icemaker to open the ice compartment. 2 To remove the in damage or personal injury. To make room for...
... tightly. 30 OPERATION Cleaning the Dispenser Cleaning the Ice and Water Outlet Wipe the water outlet a or ice outlet b frequently with a rubber spatula. Keep the ice compartment door closed tightly, the cold air in the ice bin will damage the icemaker. • Never use , the ice may get dirty easily. This could also cause the icemaker to open the ice compartment. 2 To remove the in damage or personal injury. To make room for...
Owners Manual
Page 31
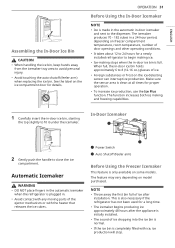
... both ice making stops when the in . • Avoid contact with any moving parts of ice. • Foreign substances or frost on the ice compartment door for a newly installed refrigerator to the dispenser. OPERATION 31 Before Using the In-Door Icemaker NOTE • Ice is made in the automatic in-door icemaker and sent to begin making ice. • Ice-making and freezing capabilities. 1 Carefully insert the in a 24-hour period, depending on model...
... both ice making stops when the in . • Avoid contact with any moving parts of ice. • Foreign substances or frost on the ice compartment door for a newly installed refrigerator to the dispenser. OPERATION 31 Before Using the In-Door Icemaker NOTE • Ice is made in the automatic in-door icemaker and sent to begin making ice. • Ice-making and freezing capabilities. 1 Carefully insert the in a 24-hour period, depending on model...
Owners Manual
Page 32
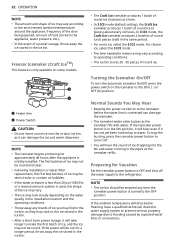
... ice bin should be round. Freezer Icemaker (Craft IceTM) This feature is turned to the icemaker before the water line is initially installed. For clearer ice, select the 3 ICE mode. • The time needed to flooding caused by ruptured water lines or connections. a Feeler Arm b Power Switch CAUTION • Do not insert round ice into the bin and water running in -door ice bin, as it has not yet been hooked up to water. In 6 ICE mode, the Craft Ice icemaker...
... ice bin should be round. Freezer Icemaker (Craft IceTM) This feature is turned to the icemaker before the water line is initially installed. For clearer ice, select the 3 ICE mode. • The time needed to flooding caused by ruptured water lines or connections. a Feeler Arm b Power Switch CAUTION • Do not insert round ice into the bin and water running in -door ice bin, as it has not yet been hooked up to water. In 6 ICE mode, the Craft Ice icemaker...

Owners Manual
Page 47
Replacing the Water Filter • Replace the water filter: - When the Replace Filter h icon turns on the filter head. CAUTION • LG strongly recommends that you use LGauthorized water filters to drain. • Wrap a cloth around 1 oz. MAINTENANCE 47 4 Replace the door bin. 5 After changing the filter, press and hold the Water Filter button for three seconds to reset the indicator light. 6 After the water filter is replaced, dispense 2.5 gallons of water (flush for approximately 5 minutes) to collect any remaining water from spilling...
Replacing the Water Filter • Replace the water filter: - When the Replace Filter h icon turns on the filter head. CAUTION • LG strongly recommends that you use LGauthorized water filters to drain. • Wrap a cloth around 1 oz. MAINTENANCE 47 4 Replace the door bin. 5 After changing the filter, press and hold the Water Filter button for three seconds to reset the indicator light. 6 After the water filter is replaced, dispense 2.5 gallons of water (flush for approximately 5 minutes) to collect any remaining water from spilling...

Owners Manual
Page 52
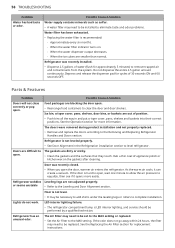
... too cold, adjust the control one increment at once, keep food organized so it to run about 40 % to clean the condenser cover and vents. Maintaining a reasonable level of moisture that the proper temperature has been restored once the defrost cycle has completed. Food with an attachment to 80 % of door openings. Refrigerator temperature control is set incorrectly. • If the temperature is removed. (Refer to cool the refrigerator...
... too cold, adjust the control one increment at once, keep food organized so it to run about 40 % to clean the condenser cover and vents. Maintaining a reasonable level of moisture that the proper temperature has been restored once the defrost cycle has completed. Food with an attachment to 80 % of door openings. Refrigerator temperature control is set incorrectly. • If the temperature is removed. (Refer to cool the refrigerator...
Owners Manual
Page 54
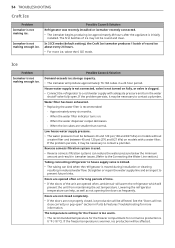
... open . If the freezer temperature is moved during installation or cleaning resulting in reduced water flow. When the water filter indicator turns on models with adequate pressure and turn the water shutoff valve fully open " section in a 24 hour period. Reverse osmosis filtration system is used. • Reverse osmosis filtration systems can help, as well as not opening the doors as frequently. In 3 ICE mode (default setting), the Craft Ice icemaker produces 1 batch of round ice...
... open . If the freezer temperature is moved during installation or cleaning resulting in reduced water flow. When the water filter indicator turns on models with adequate pressure and turn the water shutoff valve fully open " section in a 24 hour period. Reverse osmosis filtration system is used. • Reverse osmosis filtration systems can help, as well as not opening the doors as frequently. In 3 ICE mode (default setting), the Craft Ice icemaker produces 1 batch of round ice...
Owners Manual
Page 57
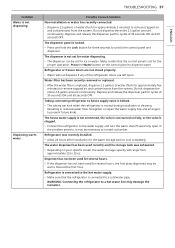
... first glass dispensed may damage the icemaker. Problem Water is clogged. • Connect the refrigerator to the water supply and turn the water shutoff valve fully open . Dispensing warm water. TROUBLESHOOTING 57 Possible Cause & Solution New installation or water line recently connected. • Dispense 2.5 gallons of 30 seconds ON and 60 seconds OFF. Depress and release the dispenser pad for three seconds to a cold water pipe. The dispenser panel is connected to unlock the control panel and dispenser. Water filter has been recently removed or replaced...
... first glass dispensed may damage the icemaker. Problem Water is clogged. • Connect the refrigerator to the water supply and turn the water shutoff valve fully open . Dispensing warm water. TROUBLESHOOTING 57 Possible Cause & Solution New installation or water line recently connected. • Dispense 2.5 gallons of 30 seconds ON and 60 seconds OFF. Depress and release the dispenser pad for three seconds to a cold water pipe. The dispenser panel is connected to unlock the control panel and dispenser. Water filter has been recently removed or replaced...
Owners Manual
Page 58
... dispenser pad for replacement instructions. As the warm air cools, it opens more information. If the door is LED interior lighting, and service should be performed by a qualified technician. If the odor does not go away within 24 hours, the filter may need to be replaced. The gaskets are not adjusted properly. Refrigerator has an unusual odor. When the water filter indicator turns on the gaskets after cleaning. Ice bin, crisper cover, pans, shelves, door bins, or baskets are difficult to level refrigerator. Doors...
... dispenser pad for replacement instructions. As the warm air cools, it opens more information. If the door is LED interior lighting, and service should be performed by a qualified technician. If the odor does not go away within 24 hours, the filter may need to be replaced. The gaskets are not adjusted properly. Refrigerator has an unusual odor. When the water filter indicator turns on the gaskets after cleaning. Ice bin, crisper cover, pans, shelves, door bins, or baskets are difficult to level refrigerator. Doors...
Owners Manual
Page 62
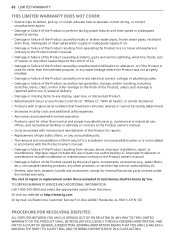
... Product owner's manual. • Damage or failure of the Product caused by the use of parts, components, accessories (e.g., water filters, etc.), consumable cleaning products, any other products, or services that have been removed, altered, or cannot be borne by mail: LG Electronics Customer Service P.O. 62 LIMITED WARRANTY THIS LIMITED WARRANTY DOES NOT COVER: • Service trips to deliver, pick up, or install, educate how to operate, correct wiring, or...
... Product owner's manual. • Damage or failure of the Product caused by the use of parts, components, accessories (e.g., water filters, etc.), consumable cleaning products, any other products, or services that have been removed, altered, or cannot be borne by mail: LG Electronics Customer Service P.O. 62 LIMITED WARRANTY THIS LIMITED WARRANTY DOES NOT COVER: • Service trips to deliver, pick up, or install, educate how to operate, correct wiring, or...
Owners Manual
Page 66
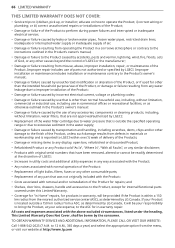
... Product; • Any noises associated with normal operation of the Product; • Replacement of light bulbs, filters, fuses or any other causes beyond the control of air; • Damage or failure resulting from operating the Product in a corrosive atmosphere or contrary to the instructions outlined in the Product's owner's manual; • Damage or failure caused by the use of parts not authorized or specified...
... Product; • Any noises associated with normal operation of the Product; • Replacement of light bulbs, filters, fuses or any other causes beyond the control of air; • Damage or failure resulting from operating the Product in a corrosive atmosphere or contrary to the instructions outlined in the Product's owner's manual; • Damage or failure caused by the use of parts not authorized or specified...


