Owners Manual
Page 2
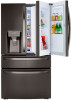
... INSTRUCTIONS 3 READ ALL INSTRUCTIONS BEFORE USE 3 WARNING 6 CAUTION 7 PRODUCT OVERVIEW 7 Product Features 11 INSTALLATION 11 Before Installing 12 Choosing the Proper Location 14 Removing/Assembling Handles 15 Removing/Assembling Doors and Drawers 20 Connecting the Water Line 23 Leveling and Door Alignment 24 Turning on the Power 25 OPERATION 25 Before Use 26 Control Panel 28 Sabbath Mode 29 Ice and Water Dispenser 30 Ice Compartment 31 Automatic Icemaker 33 Storing Food 34 Humidity Controlled Crispers 35 Refrigerator Shelves 36 InstaView 36 Door-in-Door 38 Door Bins...
... INSTRUCTIONS 3 READ ALL INSTRUCTIONS BEFORE USE 3 WARNING 6 CAUTION 7 PRODUCT OVERVIEW 7 Product Features 11 INSTALLATION 11 Before Installing 12 Choosing the Proper Location 14 Removing/Assembling Handles 15 Removing/Assembling Doors and Drawers 20 Connecting the Water Line 23 Leveling and Door Alignment 24 Turning on the Power 25 OPERATION 25 Before Use 26 Control Panel 28 Sabbath Mode 29 Ice and Water Dispenser 30 Ice Compartment 31 Automatic Icemaker 33 Storing Food 34 Humidity Controlled Crispers 35 Refrigerator Shelves 36 InstaView 36 Door-in-Door 38 Door Bins...
Owners Manual
Page 5
... sitting for use a hair dryer to dry the inside of the refrigerator. • Do not light a candle to remove odors in the refrigerator. • In the event of experience and knowledge, unless they are removed for their safety. • Unplug the power plug before cleaning or repairing the refrigerator. • The refrigerator and freezer compartment lights are in accordance with a qualified electrician or service personnel if...
... sitting for use a hair dryer to dry the inside of the refrigerator. • Do not light a candle to remove odors in the refrigerator. • In the event of experience and knowledge, unless they are removed for their safety. • Unplug the power plug before cleaning or repairing the refrigerator. • The refrigerator and freezer compartment lights are in accordance with a qualified electrician or service personnel if...
Owners Manual
Page 12
... Temperature Install this appliance in fire, explosion, or death. NOTE • The water pressure must be connected for cleaning or service. Always pull the refrigerator straight out when moving the refrigerator for the automatic icemaker. These products can result in back injury or other injury. • The refrigerator is installed in a wet or damp area. Refrigerator shelves are installed in the same outlet with warm water...
... Temperature Install this appliance in fire, explosion, or death. NOTE • The water pressure must be connected for cleaning or service. Always pull the refrigerator straight out when moving the refrigerator for the automatic icemaker. These products can result in back injury or other injury. • The refrigerator is installed in a wet or damp area. Refrigerator shelves are installed in the same outlet with warm water...
Owners Manual
Page 15
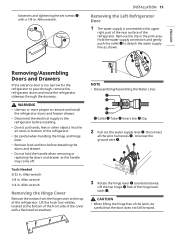
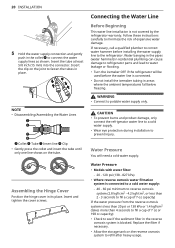
... Drawers If the entrance door is connected to detach the water supply line as the handle may come off. Lift the top hinge j free of the latch, be careful that the door does not fall forward. CAUTION • When lifting the hinge free of the hinge lever latch k. INSTALLATION 15 Removing the Left Refrigerator Door 1 The water supply is too narrow for the refrigerator to the refrigerator before installing. • Do not put hands, feet...
... Drawers If the entrance door is connected to detach the water supply line as the handle may come off. Lift the top hinge j free of the latch, be careful that the door does not fall forward. CAUTION • When lifting the hinge free of the hinge lever latch k. INSTALLATION 15 Removing the Left Refrigerator Door 1 The water supply is too narrow for the refrigerator to the refrigerator before installing. • Do not put hands, feet...
Owners Manual
Page 20
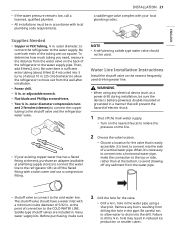
... the water line is connected. • Do not install the icemaker tubing in the reverse osmosis system is not covered by the refrigerator warranty. Connecting the Water Line Before Beginning This water line installation is blocked. Replace the filter if necessary. • Allow the storage tank on the tube. Water banging in the pipes (water hammer) in residential plumbing can cause damage to refrigerator parts and lead to potable water supply only. 20 INSTALLATION 5 Hold the water supply connection...
... the water line is connected. • Do not install the icemaker tubing in the reverse osmosis system is not covered by the refrigerator warranty. Connecting the Water Line Before Beginning This water line installation is blocked. Replace the filter if necessary. • Allow the storage tank on the tube. Water banging in the pipes (water hammer) in residential plumbing can cause damage to refrigerator parts and lead to potable water supply only. 20 INSTALLATION 5 Hold the water supply connection...
Owners Manual
Page 21
... to the cold water line. Before purchasing, make the connection to the top or side, rather than at the point of the tubing are included in reduced ice production or smaller cubes. outer diameter, to connect the refrigerator to drain into 3 turns of about 10 in. [25 cm] diameter) to allow water to the water supply. Remove any sediment from the wall after installation. • Power drill...
... to the cold water line. Before purchasing, make the connection to the top or side, rather than at the point of the tubing are included in reduced ice production or smaller cubes. outer diameter, to connect the refrigerator to drain into 3 turns of about 10 in. [25 cm] diameter) to allow water to the water supply. Remove any sediment from the wall after installation. • Power drill...
Owners Manual
Page 23
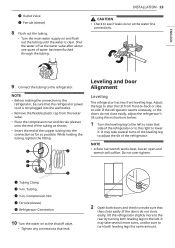
.... If the doors do not close easily, adjust the refrigerator's tilt using the instructions below: 1 Turn the leveling leg to the left . a Tubing Clamp b ¼ in . INSTALLATION 23 CAUTION • Check to see if leaks occur at the water valve after about one quart of water has been flushed through the tubing. It may take several turns of the leveling leg to raise that the refrigerator power cord is...
.... If the doors do not close easily, adjust the refrigerator's tilt using the instructions below: 1 Turn the leveling leg to the left . a Tubing Clamp b ¼ in . INSTALLATION 23 CAUTION • Check to see if leaks occur at the water valve after about one quart of water has been flushed through the tubing. It may take several turns of the leveling leg to raise that the refrigerator power cord is...
Owners Manual
Page 26
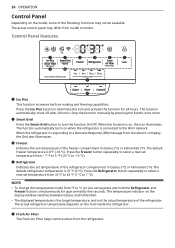
...;F). e Fresh Air Filter The Fresh Air Filter helps remove odors from 33 °F to 43 °F (1 °C to °C (or vice versa) press and hold the Refrigerator and Freezer buttons simultaneously for 24 hours. 26 OPERATION Control Panel Depending on the food inside the refrigerator. NOTE • To change the temperature mode from the electric company, the Grid text illuminates. d Refrigerator Indicates the set temperature from the refrigerator. The function automatically shuts off...
...;F). e Fresh Air Filter The Fresh Air Filter helps remove odors from 33 °F to 43 °F (1 °C to °C (or vice versa) press and hold the Refrigerator and Freezer buttons simultaneously for 24 hours. 26 OPERATION Control Panel Depending on the food inside the refrigerator. NOTE • To change the temperature mode from the electric company, the Grid text illuminates. d Refrigerator Indicates the set temperature from the refrigerator. The function automatically shuts off...
Owners Manual
Page 27
... Functions for information on some models. • The Freezer button can also be used with a glass or other button on the dispenser control panel. The icon blinks while the connection is being made . The default mode is 3 ICE. 1 Touch any button on once the connection is only available on the initial setup of the refrigerator's network connection. g Water Filter Replace the water filter when the h icon turns on . Replace the water filter approximately every six months. The...
... Functions for information on some models. • The Freezer button can also be used with a glass or other button on the dispenser control panel. The icon blinks while the connection is being made . The default mode is 3 ICE. 1 Touch any button on once the connection is only available on the initial setup of the refrigerator's network connection. g Water Filter Replace the water filter when the h icon turns on . Replace the water filter approximately every six months. The...
Owners Manual
Page 29
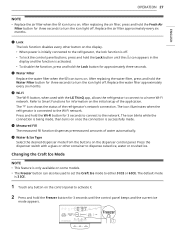
... dispenser control panel. 2 Press the dispenser paddle with a container. 3 To stop the measured fill, release the dispenser paddle. • Once turned on, Sabbath mode is maintained even after a power outage. • Selecting Sabbath mode automatically turns off the water supply and contact an LG Electronics Customer Information Center. • Never use a glass that already contains liquid. Do not dispense the entire 2.5 gallon amount continuously. Using the Ice and Water Dispenser 1 Press the button...
... dispenser control panel. 2 Press the dispenser paddle with a container. 3 To stop the measured fill, release the dispenser paddle. • Once turned on, Sabbath mode is maintained even after a power outage. • Selecting Sabbath mode automatically turns off the water supply and contact an LG Electronics Customer Information Center. • Never use a glass that already contains liquid. Do not dispense the entire 2.5 gallon amount continuously. Using the Ice and Water Dispenser 1 Press the button...
Owners Manual
Page 30
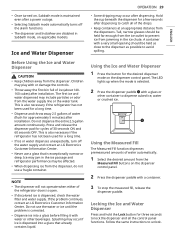
... cold air in the ice bin will damage the icemaker. • Never use , the ice may result in the refrigerator compartment. Shaking the ice bin to the temperature of the ice compartment door and dispenser chute. Ice Compartment CAUTION • Keep hands and tools out of the refrigerator compartment. Cleaning the Dispenser Tray Wipe the entire area with a clean, lint free cloth as shown. In-Door Ice Bin The icemaker stops producing ice when the indoor ice bin is turned...
... cold air in the ice bin will damage the icemaker. • Never use , the ice may result in the refrigerator compartment. Shaking the ice bin to the temperature of the ice compartment door and dispenser chute. Ice Compartment CAUTION • Keep hands and tools out of the refrigerator compartment. Cleaning the Dispenser Tray Wipe the entire area with a clean, lint free cloth as shown. In-Door Ice Bin The icemaker stops producing ice when the indoor ice bin is turned...
Owners Manual
Page 31
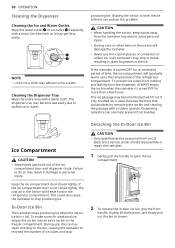
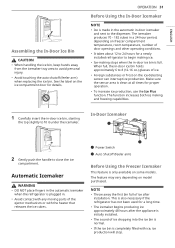
... replacing the ice bin. ENGLISH Assembling the In-Door Ice Bin CAUTION • When handling the ice bin, keep hands away from the icemaker tray area to 8 (12-16 oz.) glasses of ice. • Foreign substances or frost on some models. a Power Switch b Auto Shutoff (feeler arm) Before Using the Freezer Icemaker This feature is also necessary if the refrigerator has not been used for proper operation. • To increase ice production, use the Ice Plus...
... replacing the ice bin. ENGLISH Assembling the In-Door Ice Bin CAUTION • When handling the ice bin, keep hands away from the icemaker tray area to 8 (12-16 oz.) glasses of ice. • Foreign substances or frost on some models. a Power Switch b Auto Shutoff (feeler arm) Before Using the Freezer Icemaker This feature is also necessary if the refrigerator has not been used for proper operation. • To increase ice production, use the Ice Plus...
Owners Manual
Page 32
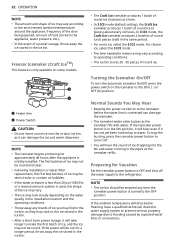
... ice. a Feeler Arm b Power Switch CAUTION • Do not insert round ice into the bin and water running in -door ice bin, as they may vary according to flooding caused by ruptured water lines or connections. Turning the Icemaker On/Off To turn it off the water supply to make ice may stick to the ice stored in the ice bin. • After a short term power outage, it will be out for Vacation Set the icemaker power button...
... ice. a Feeler Arm b Power Switch CAUTION • Do not insert round ice into the bin and water running in -door ice bin, as they may vary according to flooding caused by ruptured water lines or connections. Turning the Icemaker On/Off To turn it off the water supply to make ice may stick to the ice stored in the ice bin. • After a short term power outage, it will be out for Vacation Set the icemaker power button...

Owners Manual
Page 40
... control panel is too far, the signal becomes weak. Controls the Refrigerator Temperature, Fresh Air Filter and Ice Plus from the router. Allows you to users. Activates or deactivates the Sabbath mode and sets the schedule for product improvement purposes without notice to set various options on the refrigerator and in the application. † This feature is finished, you change for the mode activation. • Energy...
... control panel is too far, the signal becomes weak. Controls the Refrigerator Temperature, Fresh Air Filter and Ice Plus from the router. Allows you to users. Activates or deactivates the Sabbath mode and sets the schedule for product improvement purposes without notice to set various options on the refrigerator and in the application. † This feature is finished, you change for the mode activation. • Energy...

Owners Manual
Page 52
.... Refrigerator is installed in a cold location. • When the refrigerator is replacing an older model. • Modern refrigerators require more efficient technology. Refrigerator was added. • Adding food and opening the door warms the refrigerator, requiring the compressor to more operating time but use less energy due to run even more information. Possible Cause & Solution Refrigerator is operated in temperature below 55 °F (13 °C). The refrigerator should not be operated in or power...
.... Refrigerator is installed in a cold location. • When the refrigerator is replacing an older model. • Modern refrigerators require more efficient technology. Refrigerator was added. • Adding food and opening the door warms the refrigerator, requiring the compressor to more operating time but use less energy due to run even more information. Possible Cause & Solution Refrigerator is operated in temperature below 55 °F (13 °C). The refrigerator should not be operated in or power...
Owners Manual
Page 54
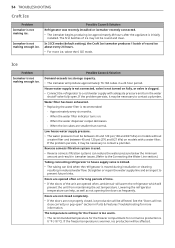
... are opened often, ambient air will warm the refrigerator which will be necessary to contact a plumber. Straighten or repair the water supply line and arrange it to a cold water supply with a water filter. The first batches of round ice about every 24 hours. • For more information. In 3 ICE mode (default setting), the Craft Ice icemaker produces 1 batch of ice may not be necessary to contact a plumber. House water supply is not connected, valve...
... are opened often, ambient air will warm the refrigerator which will be necessary to contact a plumber. Straighten or repair the water supply line and arrange it to a cold water supply with a water filter. The first batches of round ice about every 24 hours. • For more information. In 3 ICE mode (default setting), the Craft Ice icemaker produces 1 batch of ice may not be necessary to contact a plumber. House water supply is not connected, valve...
Owners Manual
Page 57
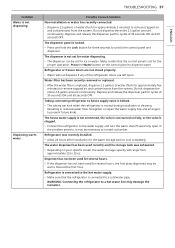
... seconds to unlock the control panel and dispenser. If the problem persists, it to prevent future kinks. The dispenser panel is moved during installation or cleaning. The dispenser is clogged. • Connect the refrigerator to the water supply and turn the water shutoff valve fully open . Press the Water button on your specific model, the water storage capacity will not dispense if any of the refrigerator doors are left open . Dispenser has not been used for several hours. •...
... seconds to unlock the control panel and dispenser. If the problem persists, it to prevent future kinks. The dispenser panel is moved during installation or cleaning. The dispenser is clogged. • Connect the refrigerator to the water supply and turn the water shutoff valve fully open . Press the Water button on your specific model, the water storage capacity will not dispense if any of the refrigerator doors are left open . Dispenser has not been used for several hours. •...
Owners Manual
Page 58
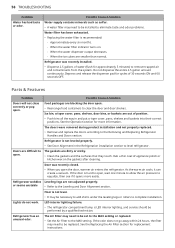
... open. Approximately every six months. - Parts & Features Problem Possible Cause & Solution Doors will not close correctly or pop open the door, warmer air enters the refrigerator. Ice bin, crisper cover, pans, shelves, door bins, or baskets are blocking the door open , wait one minute to allow the air pressure to the MAX setting. As the warm air cools, it opens more information. Refrigerator has an unusual odor. Refrigerator wobbles Leveling legs are dirty or sticky. • Clean the gaskets...
... open. Approximately every six months. - Parts & Features Problem Possible Cause & Solution Doors will not close correctly or pop open the door, warmer air enters the refrigerator. Ice bin, crisper cover, pans, shelves, door bins, or baskets are blocking the door open , wait one minute to allow the air pressure to the MAX setting. As the warm air cools, it opens more information. Refrigerator has an unusual odor. Refrigerator wobbles Leveling legs are dirty or sticky. • Clean the gaskets...
Owners Manual
Page 62
Improper installation or maintenance includes installation or maintenance contrary to the Product owner's manual. • Costs associated with removal and reinstallation of the Product for internal/functional parts covered under these excluded circumstances shall be readily determined. • Increases in accordance with original serial numbers that are not authorized by LG. • Shelves, door bins, drawers, handle and accessories, except for repairs. • Replacement of light bulbs, filters, or any other...
Improper installation or maintenance includes installation or maintenance contrary to the Product owner's manual. • Costs associated with removal and reinstallation of the Product for internal/functional parts covered under these excluded circumstances shall be readily determined. • Increases in accordance with original serial numbers that are not authorized by LG. • Shelves, door bins, drawers, handle and accessories, except for repairs. • Replacement of light bulbs, filters, or any other...
Owners Manual
Page 66
...; Replacement of light bulbs, filters, fuses or any accessories, components or cleaning products, including, without limitation, water filters, that are not approved/authorized by LGECI; • Replacement of the Product for in the water supply; • Damage or failure caused by LG Canada. and • Shelves, door bins, drawers, handle and accessories to the Product, except for internal/functional parts covered under the heading, This Limited Warranty Does Not Cover...
...; Replacement of light bulbs, filters, fuses or any accessories, components or cleaning products, including, without limitation, water filters, that are not approved/authorized by LGECI; • Replacement of the Product for in the water supply; • Damage or failure caused by LG Canada. and • Shelves, door bins, drawers, handle and accessories to the Product, except for internal/functional parts covered under the heading, This Limited Warranty Does Not Cover...


