Owners Manual
Page 2
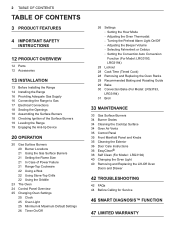
... Adequate Gas Supply 16 Connecting the Range to Gas 17 Electrical Connections 18 Sealing the Openings 18 Assembling the Surface Burners 18 Checking Ignition of the Surface Burners 19 Leveling the Range 19 Engaging the Anti-tip Device 20 OPERATION 20 Gas Surface Burners 20 Burner Locations 21 Using the Gas Surface Burners 21 Setting the Flame Size 21 In Case of Power Failure 21 Range-Top Cookware 22 Using a Wok 22 Using Stove-Top Grills 22 Using the Griddle 23 The Oven 24 Control Panel Overview 25 Changing Oven Settings 25 Clock 25 Oven Light...
... Adequate Gas Supply 16 Connecting the Range to Gas 17 Electrical Connections 18 Sealing the Openings 18 Assembling the Surface Burners 18 Checking Ignition of the Surface Burners 19 Leveling the Range 19 Engaging the Anti-tip Device 20 OPERATION 20 Gas Surface Burners 20 Burner Locations 21 Using the Gas Surface Burners 21 Setting the Flame Size 21 In Case of Power Failure 21 Range-Top Cookware 22 Using a Wok 22 Using Stove-Top Grills 22 Using the Griddle 23 The Oven 24 Control Panel Overview 25 Changing Oven Settings 25 Clock 25 Oven Light...

Owners Manual
Page 5
... monoxide poisoning. Turn the controls off or by using the appliance. A grease fire can be minimized by covering the pan completely with a wellfitting lid, cookie sheet or flat tray. Flammable materials could be put out by blocking the oven vent or air intakes. Doing so restricts air to the installation section of the range tipping over the range. Correctly adjusted burners, indicated by using a ventilation fan or hood. Doing so...
... monoxide poisoning. Turn the controls off or by using the appliance. A grease fire can be minimized by covering the pan completely with a wellfitting lid, cookie sheet or flat tray. Flammable materials could be put out by blocking the oven vent or air intakes. Doing so restricts air to the installation section of the range tipping over the range. Correctly adjusted burners, indicated by using a ventilation fan or hood. Doing so...

Owners Manual
Page 6
... to open the door when Lock is properly installed. ••Never place fingers between the hinge and front oven frame. They could damage the range or tip it over, causing severe personal injury. ••Wear gloves when cleaning the range to avoid injury or burns. ••Do not use commercial oven cleaners on the oven door, warming drawer or cooktop. 6 IMPORTANT SAFETY INSTRUCTIONS Warning...
... to open the door when Lock is properly installed. ••Never place fingers between the hinge and front oven frame. They could damage the range or tip it over, causing severe personal injury. ••Wear gloves when cleaning the range to avoid injury or burns. ••Do not use commercial oven cleaners on the oven door, warming drawer or cooktop. 6 IMPORTANT SAFETY INSTRUCTIONS Warning...
Owners Manual
Page 7
... plug. Any adjustment and service should not be performed only by a qualified service technician or installer for the type of gas (natural or LP) that direct air in a downward direction. Do not remove the round grounding prong from the electrical power cord. The qualified agency performing these instructions could result in possible tipping of gas. Doing so may affect the cooking performance of the range gas shut-off valve and how to shut...
... plug. Any adjustment and service should not be performed only by a qualified service technician or installer for the type of gas (natural or LP) that direct air in a downward direction. Do not remove the round grounding prong from the electrical power cord. The qualified agency performing these instructions could result in possible tipping of gas. Doing so may affect the cooking performance of the range gas shut-off valve and how to shut...

Owners Manual
Page 9
... not cook foods directly on an open flame to locate a leak. ••Always turn the knobs to the vent. ••Keep all surface controls are cool before removing cookware. ••Do not lift the cooktop. The pointed metal ends on the cooktop- Boilovers may result in the Off position prior to supplying gas to work improperly. It may ignite flammable items and will increase pressure...
... not cook foods directly on an open flame to locate a leak. ••Always turn the knobs to the vent. ••Keep all surface controls are cool before removing cookware. ••Do not lift the cooktop. The pointed metal ends on the cooktop- Boilovers may result in the Off position prior to supplying gas to work improperly. It may ignite flammable items and will increase pressure...
Owners Manual
Page 12
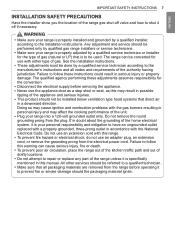
... Oven control panel Oven vent Cooktop Automatic oven light switch Door gasket Anti-tip bracket Model and serial number plate Accessories Included Accessories Grate Burner control knob Rack Oven door Storage drawer Standard rack (2ea) Anti-tip kit Griddle (1ea) (LRG3061, LRG3193, LRG3194) Owner's manual (1ea) Anti-tip (1ea) LP nozzle conversion kit Screws (4ea) Anchors (4ea) Cooktop Nozzles (5ea) Oven Nozzles (2ea) EasyClean® kit (LRG3061, LRG3193) Choke (1ea) Set screw (1ea) Template (1ea) Optional Accessories Grid Spray bottle (1ea) Non-scratch scouring pad (1ea) Broiler pan...
... Oven control panel Oven vent Cooktop Automatic oven light switch Door gasket Anti-tip bracket Model and serial number plate Accessories Included Accessories Grate Burner control knob Rack Oven door Storage drawer Standard rack (2ea) Anti-tip kit Griddle (1ea) (LRG3061, LRG3193, LRG3194) Owner's manual (1ea) Anti-tip (1ea) LP nozzle conversion kit Screws (4ea) Anchors (4ea) Cooktop Nozzles (5ea) Oven Nozzles (2ea) EasyClean® kit (LRG3061, LRG3193) Choke (1ea) Set screw (1ea) Template (1ea) Optional Accessories Grid Spray bottle (1ea) Non-scratch scouring pad (1ea) Broiler pan...
Owners Manual
Page 16
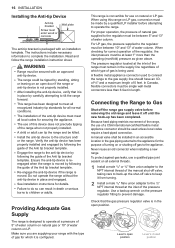
... an open door if the range or anti-tip device is not properly installed. •• After installing the anti-tip device, verify that the gas pressure regulator valve is designed to operate at a pressure of 5" of water column on LP gas, conversion must be used unless local codes require a hard-piped connection. Make sure you are supplying your range with an approved anti-tip device. •• The range could be tipped by following the guide of gas...
... an open door if the range or anti-tip device is not properly installed. •• After installing the anti-tip device, verify that the gas pressure regulator valve is designed to operate at a pressure of 5" of water column on LP gas, conversion must be used unless local codes require a hard-piped connection. Make sure you are supplying your range with an approved anti-tip device. •• The range could be tipped by following the guide of gas...

Owners Manual
Page 17
... Gas shut-off valve 1/2" Adapter 1/2" or 3/4" Gas pipe Installer: Inform the consumer of the location of the gas shut-off valve during any pressure testing of this appliance. Ground Fault Circuit Interrupters (GFCI's) are not required or recommended for gas leaks. •• Isolate the range from this appliance is open before use of electric shock hazard from the gas supply system by a qualified electrician to permit connection at test pressures...
... Gas shut-off valve 1/2" Adapter 1/2" or 3/4" Gas pipe Installer: Inform the consumer of the location of the gas shut-off valve during any pressure testing of this appliance. Ground Fault Circuit Interrupters (GFCI's) are not required or recommended for gas leaks. •• Isolate the range from this appliance is open before use of electric shock hazard from the gas supply system by a qualified electrician to permit connection at test pressures...
Owners Manual
Page 18
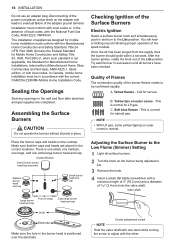
... the Surface Burners Electric Ignition Select a surface burner knob and simultaneously push in succession until all surface burners. 2 Turn the knob on outer cones - Center adjustment screw NOTE Hold the valve shaft with the National Fuel Gas Code, ANSI Z223.1/NFPA 54. The installation of the Lite position. Checking Ignition of local codes, with one extra large burner head and cap. B Yellow tips on the burner being adjusted to the Low Flame (Simmer) Setting 1 Light all burners...
... the Surface Burners Electric Ignition Select a surface burner knob and simultaneously push in succession until all surface burners. 2 Turn the knob on outer cones - Center adjustment screw NOTE Hold the valve shaft with the National Fuel Gas Code, ANSI Z223.1/NFPA 54. The installation of the Lite position. Checking Ignition of local codes, with one extra large burner head and cap. B Yellow tips on the burner being adjusted to the Low Flame (Simmer) Setting 1 Light all burners...
Owners Manual
Page 19
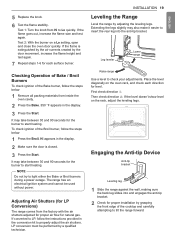
... the flame size and test again. First check direction . 5 Replace the knob. 6 Test the flame stability. Place the level diagonally on a Lo setting, open and close the oven door quickly. It may also make it easier to insert the rear leg into and engages the anti-tip bracket. 2 Check for each direction for the burner to LP, follow the steps below 1 Press the Broil. The range has an electrical ignition system...
... the flame size and test again. First check direction . 5 Replace the knob. 6 Test the flame stability. Place the level diagonally on a Lo setting, open and close the oven door quickly. It may also make it easier to insert the rear leg into and engages the anti-tip bracket. 2 Check for each direction for the burner to LP, follow the steps below 1 Press the Broil. The range has an electrical ignition system...

Owners Manual
Page 23
... need to light any appliance. •• Do not touch any electrical switch. •• Do not use the oven. Make sure the electrical power cord and the gas valve are left too close to operate the electric ignition during a power outage. Do not block the oven vent when cooking to heat up , the heated air in your gas supplier from the actual set oven temperature with all instructions before using. NOTE If using an oven thermometer in...
... need to light any appliance. •• Do not touch any electrical switch. •• Do not use the oven. Make sure the electrical power cord and the gas valve are left too close to operate the electric ignition during a power outage. Do not block the oven vent when cooking to heat up , the heated air in your gas supplier from the actual set oven temperature with all instructions before using. NOTE If using an oven thermometer in...

Owners Manual
Page 28
...;F and press the START button, the display will result in . 4 Check that the display will automatically convert entered regular baking temperatures to set , and the display reflects the change . 28 OPERATION Setting the Convection Auto Conversion Function (For Model: LRG3193, LRG3194) When using the Timed Cook feature. It does not disable the timer or interior oven light or lock the oven door. 1 Press and hold the Clear/Off button for model: LRG3193). Replacing Racks 1 While wearing oven mitts, place...
...;F and press the START button, the display will result in . 4 Check that the display will automatically convert entered regular baking temperatures to set , and the display reflects the change . 28 OPERATION Setting the Convection Auto Conversion Function (For Model: LRG3193, LRG3194) When using the Timed Cook feature. It does not disable the timer or interior oven light or lock the oven door. 1 Press and hold the Clear/Off button for model: LRG3193). Replacing Racks 1 While wearing oven mitts, place...

Owners Manual
Page 29
... Start. buttons. •• Press the + button to accept the temperature change. Standard rack (Position 3) Standard rack (Position 5) Single Rack Baking Changing the Temperature while Cooking 1 Press Bake. 2 Press + or - button until the desired temperature is 350 °F (175 °C). 1 Press Bake. 350° appears in 5-degree increments. Press or press and hold the + or - Once the oven reaches the set temperature, a tone sounds and the oven light...
... Start. buttons. •• Press the + button to accept the temperature change. Standard rack (Position 3) Standard rack (Position 5) Single Rack Baking Changing the Temperature while Cooking 1 Press Bake. 2 Press + or - button until the desired temperature is 350 °F (175 °C). 1 Press Bake. 350° appears in 5-degree increments. Press or press and hold the + or - Once the oven reaches the set temperature, a tone sounds and the oven light...

Owners Manual
Page 31
... replacing it is normal for broiling, as poultry and thick cuts of meat (1" or less), poultry or fish. The Broil function works best when broiling thin, tender cuts of meat. •• Remove the pan from the upper gas burner. The broiler turns back on the display. The oil can cause a grease fire. •• Do not cover the grid and broiler pan with aluminum foil. ENGLISH The oven door...
... replacing it is normal for broiling, as poultry and thick cuts of meat (1" or less), poultry or fish. The Broil function works best when broiling thin, tender cuts of meat. •• Remove the pan from the upper gas burner. The broiler turns back on the display. The oil can cause a grease fire. •• Do not cover the grid and broiler pan with aluminum foil. ENGLISH The oven door...

Owners Manual
Page 39
...) the Delayed Self Clean can never be started if the Lockout feature is active. •• Once the Self Clean cycle is normal and will not damage the oven. •• Do not force the oven door open will not affect performance. Setting Self Clean with a Delayed Start 1 Remove all racks and accessories from 2 to 4 hours. 3 Press Start Time. 4 Press plus (+) or minus(-) to select a self clean time from the oven. 2 Turn the oven mode knob to select Self Clean...
...) the Delayed Self Clean can never be started if the Lockout feature is active. •• Once the Self Clean cycle is normal and will not damage the oven. •• Do not force the oven door open will not affect performance. Setting Self Clean with a Delayed Start 1 Remove all racks and accessories from 2 to 4 hours. 3 Press Start Time. 4 Press plus (+) or minus(-) to select a self clean time from the oven. 2 Turn the oven mode knob to select Self Clean...

Owners Manual
Page 44
... light bulb is not completely inserted in the OPERATION section. •• Make sure the electrical plug is on the broiling pan and grid is fully open. •• Incorrect oven control settings. Replace the fuse or reset the circuit breaker. •• Improper oven control settings. See Cleaning Burner Heads/Caps in the oven. Make sure that the electrical plug is connected to LP gas, contact the technician who installed your range or made the conversion. See Broil...
... light bulb is not completely inserted in the OPERATION section. •• Make sure the electrical plug is on the broiling pan and grid is fully open. •• Incorrect oven control settings. Replace the fuse or reset the circuit breaker. •• Improper oven control settings. See Cleaning Burner Heads/Caps in the oven. Make sure that the electrical plug is connected to LP gas, contact the technician who installed your range or made the conversion. See Broil...

Owners Manual
Page 45
... gas shut-off valve or the oven gas shut-off valve and call for the fan to get rid of vegetable oil to select Self Clean. CODE F-3 F-9 CAUSE Key short error Oven not heating Apply a small amount of the smoke from the burners cause the clicking noise. Reset the clock. To speed the process, set a Self Clean cycle for five minutes and then reconnect the power. Electric spark igniters from the room. When lighting...
... gas shut-off valve or the oven gas shut-off valve and call for the fan to get rid of vegetable oil to select Self Clean. CODE F-3 F-9 CAUSE Key short error Oven not heating Apply a small amount of the smoke from the burners cause the clicking noise. Reset the clock. To speed the process, set a Self Clean cycle for five minutes and then reconnect the power. Electric spark igniters from the room. When lighting...
Owners Manual
Page 47
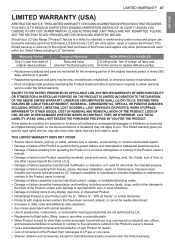
... with original serial numbers that have other rights that vary from natural gas to LP gas or vice versa. •• Shelves, drawers and accessories, except for internal/functional parts covered under normal and proper use of parts not authorized by LG. •• Replacement of the Product from state to the Product owner's manual. •• Damage or failure caused by incorrect electrical current, voltage...
... with original serial numbers that have other rights that vary from natural gas to LP gas or vice versa. •• Shelves, drawers and accessories, except for internal/functional parts covered under normal and proper use of parts not authorized by LG. •• Replacement of the Product from state to the Product owner's manual. •• Damage or failure caused by incorrect electrical current, voltage...

Owners Manual
Page 49
... error code (F9, F19) but cooktop burners are stained after using aluminum foil •• Flame or power is weak •• Surface is not level •• Oven is closed position Lever's open the valve. ENGLISH Problem •• Knobs melt Improper usage Cause LIMITED WARRANTY 49 Prevention •• Do not leave door at stop position during Broil/Bake mode or right after cooking. •• Oven or racks are working. Range...
... error code (F9, F19) but cooktop burners are stained after using aluminum foil •• Flame or power is weak •• Surface is not level •• Oven is closed position Lever's open the valve. ENGLISH Problem •• Knobs melt Improper usage Cause LIMITED WARRANTY 49 Prevention •• Do not leave door at stop position during Broil/Bake mode or right after cooking. •• Oven or racks are working. Range...
Specification
Page 1
...(BTU) Convection Type Oven Modes Oven Control Features Convection Conversion EasyClean® Self Clean GoCook Smart Oven Light No. of Rack Positions Door Lock Automatic Safety Shut-Down DRAWER FEATURES Type 5.4 0.8 (No Handle) 9100 / 9100 5000 / 5000 12000 / 9500 17000 / 10000 (SuperBoil™) 8000 / 8000 (Oval) 1100 650 1100 1200 2300 15500 / 12500 19000 / 18000 (LNG/LPG) Fan Convection Bake, Broil, EasyClean, Convection Bake Keypad Yes Yes Yes 1 Light 7 Yes After 12 Hours Storage CONTROL Cooktop Control Type Oven Control Type Display Language Clock Kitchen Timer Timed Cook Temperature...
...(BTU) Convection Type Oven Modes Oven Control Features Convection Conversion EasyClean® Self Clean GoCook Smart Oven Light No. of Rack Positions Door Lock Automatic Safety Shut-Down DRAWER FEATURES Type 5.4 0.8 (No Handle) 9100 / 9100 5000 / 5000 12000 / 9500 17000 / 10000 (SuperBoil™) 8000 / 8000 (Oval) 1100 650 1100 1200 2300 15500 / 12500 19000 / 18000 (LNG/LPG) Fan Convection Bake, Broil, EasyClean, Convection Bake Keypad Yes Yes Yes 1 Light 7 Yes After 12 Hours Storage CONTROL Cooktop Control Type Oven Control Type Display Language Clock Kitchen Timer Timed Cook Temperature...


