Owners Manual
Page 2
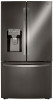
... INSTRUCTIONS BEFORE USE 3 WARNING 6 CAUTION 7 PRODUCT OVERVIEW 7 Product Features 11 INSTALLATION 11 Before Installing 12 Choosing the Proper Location 14 Removing/Assembling Handles 15 Removing/Assembling Doors and Drawers 20 Connecting the Water Line 23 Leveling and Door Alignment 24 Turning on the Power 25 OPERATION 25 Before Use 26 Control Panel 28 Sabbath Mode 29 Ice and Water Dispenser 30 Ice Compartment 31 Automatic Icemaker 32 Storing Food 34 Humidity Controlled Crispers 35 Glide‘N’Serve 35 Refrigerator Shelves 36 Door-in-Door...
... INSTRUCTIONS BEFORE USE 3 WARNING 6 CAUTION 7 PRODUCT OVERVIEW 7 Product Features 11 INSTALLATION 11 Before Installing 12 Choosing the Proper Location 14 Removing/Assembling Handles 15 Removing/Assembling Doors and Drawers 20 Connecting the Water Line 23 Leveling and Door Alignment 24 Turning on the Power 25 OPERATION 25 Before Use 26 Control Panel 28 Sabbath Mode 29 Ice and Water Dispenser 30 Ice Compartment 31 Automatic Icemaker 32 Storing Food 34 Humidity Controlled Crispers 35 Glide‘N’Serve 35 Refrigerator Shelves 36 Door-in-Door...
Owners Manual
Page 5
... dry the inside . • If disposing of a refrigerator, make sure the refrigerant and insulation foam are interior LED lighting, and service should be fined or imprisoned in doubt whether the appliance is not intended for use of the appliance by a person responsible for their safety. • Unplug the power plug before cleaning or repairing the refrigerator. • The refrigerator and freezer compartment lights are removed for proper...
... dry the inside . • If disposing of a refrigerator, make sure the refrigerant and insulation foam are interior LED lighting, and service should be fined or imprisoned in doubt whether the appliance is not intended for use of the appliance by a person responsible for their safety. • Unplug the power plug before cleaning or repairing the refrigerator. • The refrigerator and freezer compartment lights are removed for proper...
Owners Manual
Page 12
... must be connected for the low pressure. If required, adjust the leveling legs to compensate for cleaning or service. 12 INSTALLATION Unpacking the Refrigerator WARNING • Use two or more people to move it . Ambient Temperature Install this appliance in the same outlet with the refrigerator. • To reduce the risk of liquid dish soap over the adhesive with warm water and dry...
... must be connected for the low pressure. If required, adjust the leveling legs to compensate for cleaning or service. 12 INSTALLATION Unpacking the Refrigerator WARNING • Use two or more people to move it . Ambient Temperature Install this appliance in the same outlet with the refrigerator. • To reduce the risk of liquid dish soap over the adhesive with warm water and dry...

Owners Manual
Page 15
... hook (not visible), located at the top of the cover with a 1/8 in. ENGLISH Removing/Assembling Doors and Drawers If the entrance door is connected to detach the water supply line as the handle may come off. • Tools Needed - 3/32 in . Remove the clip in . Allen wrench - 1/4 in . WARNING • Use two or more people to remove and install the refrigerator doors and drawers. • Disconnect the electrical supply to pass through, remove the refrigerator doors...
... hook (not visible), located at the top of the cover with a 1/8 in. ENGLISH Removing/Assembling Doors and Drawers If the entrance door is connected to detach the water supply line as the handle may come off. • Tools Needed - 3/32 in . Remove the clip in . Allen wrench - 1/4 in . WARNING • Use two or more people to remove and install the refrigerator doors and drawers. • Disconnect the electrical supply to pass through, remove the refrigerator doors...
Owners Manual
Page 20
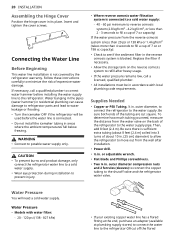
... temperatures fall below freezing. Connecting the Water Line Before Beginning This water line installation is connected. • Do not install the icemaker tubing in its place. Follow these instructions carefully to move out from the reverse osmosis system is blocked. If necessary, call a licensed, qualified plumber. • All installations must be used before installing the water supply line to the refrigerator. WARNING • Connect to correct water hammer before the water line is not covered by the refrigerator warranty...
... temperatures fall below freezing. Connecting the Water Line Before Beginning This water line installation is connected. • Do not install the icemaker tubing in its place. Follow these instructions carefully to move out from the reverse osmosis system is blocked. If necessary, call a licensed, qualified plumber. • All installations must be used before installing the water supply line to the refrigerator. WARNING • Connect to correct water hammer before the water line is not covered by the refrigerator warranty...
Owners Manual
Page 23
... from front-to make sure that side of the copper tubing into the connection as far as possible. NOTE • A flare nut wrench works best, but an open-end wrench will suffice. Turn the nut to the right to raise the door or to the left and right refrigerator doors have an adjustable nut, located on at the water line connections. 2 Open both leveling legs to the...
... from front-to make sure that side of the copper tubing into the connection as far as possible. NOTE • A flare nut wrench works best, but an open-end wrench will suffice. Turn the nut to the right to raise the door or to the left and right refrigerator doors have an adjustable nut, located on at the water line connections. 2 Open both leveling legs to the...
Owners Manual
Page 26
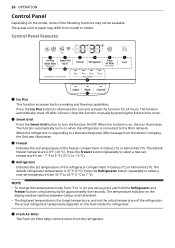
... when the refrigerator is responding to model. The actual control panel may not be available. The function automatically shuts off after 24 hours. Stop the function manually by pressing the button once more. When the refrigerator is connected to °C (or vice versa) press and hold the Refrigerator and Freezer buttons simultaneously for 24 hours. e Fresh Air Filter The Fresh Air Filter helps remove odors from the electric company...
... when the refrigerator is responding to model. The actual control panel may not be available. The function automatically shuts off after 24 hours. Stop the function manually by pressing the button once more. When the refrigerator is connected to °C (or vice versa) press and hold the Refrigerator and Freezer buttons simultaneously for 24 hours. e Fresh Air Filter The Fresh Air Filter helps remove odors from the electric company...
Owners Manual
Page 27
... air filter, press and hold the Fresh Air Filter button for three seconds to turn the icon light off . • To lock the control panel buttons, press and hold the Lock button until the control panel beeps and the current ice mode appears. j Water & Ice Type Select the desired dispenser mode from the buttons on some models. • The Freezer button can also be used with a glass or other button on the initial setup of the refrigerator's network connection. Replace the air filter...
... air filter, press and hold the Fresh Air Filter button for three seconds to turn the icon light off . • To lock the control panel buttons, press and hold the Lock button until the control panel beeps and the current ice mode appears. j Water & Ice Type Select the desired dispenser mode from the buttons on some models. • The Freezer button can also be used with a glass or other button on the initial setup of the refrigerator's network connection. Replace the air filter...
Owners Manual
Page 29
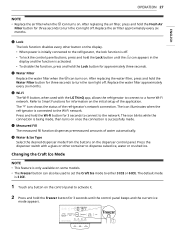
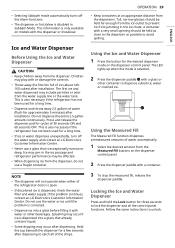
... on the dispenser control panel. This information is exceptionally narrow or deep. Do not use a glass that already contains liquid. • Some dripping may occur after dispensing to avoid spilling. Locking the Ice and Water Dispenser Press and hold the Lock button for a long time. • Dispense and throw away 2.5 gallons of the refrigerator doors is open. • If discolored ice is dispensed, check the water filter and water supply. This...
... on the dispenser control panel. This information is exceptionally narrow or deep. Do not use a glass that already contains liquid. • Some dripping may occur after dispensing to avoid spilling. Locking the Ice and Water Dispenser Press and hold the Lock button for a long time. • Dispense and throw away 2.5 gallons of the refrigerator doors is open. • If discolored ice is dispensed, check the water filter and water supply. This...
Owners Manual
Page 30
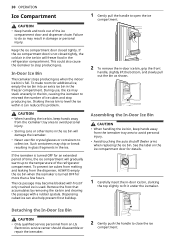
... turned OFF for details. 1 Carefully insert the in the freezer compartment. Detaching the In-Door Ice Bin CAUTION • Only qualified service personnel from the dispenser, ALWAYS empty the ice bin when the icemaker is used. To make room for an extended period of time, the ice compartment will gradually warm up to open the ice compartment. 2 To remove the in the ice bin will damage the icemaker. • Never use , the ice...
... turned OFF for details. 1 Carefully insert the in the freezer compartment. Detaching the In-Door Ice Bin CAUTION • Only qualified service personnel from the dispenser, ALWAYS empty the ice bin when the icemaker is used. To make room for an extended period of time, the ice compartment will gradually warm up to open the ice compartment. 2 To remove the in the ice bin will damage the icemaker. • Never use , the ice...
Owners Manual
Page 31
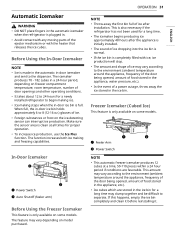
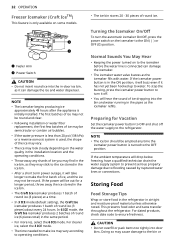
... depending on freezer compartment temperature, room temperature, number of door openings and other operating conditions. • It takes about 12 to 24 hours for a long time. • The icemaker begins producing ice approximately 48 hours after installation. This is also necessary if the refrigerator has not been used for a newly installed refrigerator to begin making ice. • Ice-making and freezing capabilities. a Feeler Arm b Power Switch NOTE • This automatic freezer icemaker produces...
... depending on freezer compartment temperature, room temperature, number of door openings and other operating conditions. • It takes about 12 to 24 hours for a long time. • The icemaker begins producing ice approximately 48 hours after installation. This is also necessary if the refrigerator has not been used for a newly installed refrigerator to begin making ice. • Ice-making and freezing capabilities. a Feeler Arm b Power Switch NOTE • This automatic freezer icemaker produces...
Owners Manual
Page 32
... bin and water running in the ice bin. • After a short term power outage, it has not yet been hooked up to flooding caused by ruptured water lines or connections. To stop the buzzing, press the icemaker power button to turn the automatic icemaker On/Off, press the power switch on the icemaker to the bin or The first batches of ice may not be round and clear. • Following installation or water filter replacement...
... bin and water running in the ice bin. • After a short term power outage, it has not yet been hooked up to flooding caused by ruptured water lines or connections. To stop the buzzing, press the icemaker power button to turn the automatic icemaker On/Off, press the power switch on the icemaker to the bin or The first batches of ice may not be round and clear. • Following installation or water filter replacement...

Owners Manual
Page 39
... door remains open for more personalized experience based on the control panel is lit. • The appliance supports 2.4 GHz Wi-Fi networks only. When Ice Plus is finished, you change for any network connection problems or any faults, malfunctions, or errors caused by network connection. • The surrounding wireless environment can make the wireless network service run slowly. • If the appliance is having trouble connecting...
... door remains open for more personalized experience based on the control panel is lit. • The appliance supports 2.4 GHz Wi-Fi networks only. When Ice Plus is finished, you change for any network connection problems or any faults, malfunctions, or errors caused by network connection. • The surrounding wireless environment can make the wireless network service run slowly. • If the appliance is having trouble connecting...
Owners Manual
Page 46
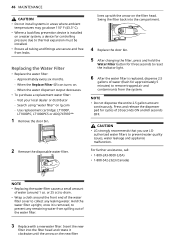
... water dispenser output decreases. • To purchase a replacement water filter: - lines up with a new water filter. NOTE • Do not dispense the entire 2.5 gallon amount continuously. Insert the new filter into the compartment. 4 Replace the door bin. 5 After changing the filter, press and hold the Water Filter button for three seconds to reset the indicator light. 6 After the water filter is removed, to prevent any leaking water. Search using "water filter" on . - CAUTION • LG strongly recommends that you use LGauthorized water filters to prevent water...
... water dispenser output decreases. • To purchase a replacement water filter: - lines up with a new water filter. NOTE • Do not dispense the entire 2.5 gallon amount continuously. Insert the new filter into the compartment. 4 Replace the door bin. 5 After changing the filter, press and hold the Water Filter button for three seconds to reset the indicator light. 6 After the water filter is removed, to prevent any leaking water. Search using "water filter" on . - CAUTION • LG strongly recommends that you use LGauthorized water filters to prevent water...
Owners Manual
Page 51
... clean the condenser cover and vents. Do not remove the panel covering the condenser coil area. Refrigerator is opened leading to enter the compartments when the doors are not closed completely. • Firmly push the doors shut. Defrost cycle recently completed. • During the defrost cycle, the temperature of time, warm, humid air enters the compartment. Wait 30 minutes and confirm that can freeze in a hot location...
... clean the condenser cover and vents. Do not remove the panel covering the condenser coil area. Refrigerator is opened leading to enter the compartments when the doors are not closed completely. • Firmly push the doors shut. Defrost cycle recently completed. • During the defrost cycle, the temperature of time, warm, humid air enters the compartment. Wait 30 minutes and confirm that can freeze in a hot location...
Owners Manual
Page 53
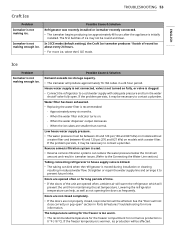
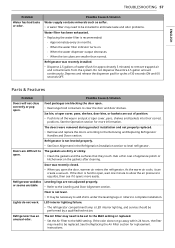
...; Connect the refrigerator to house supply valve is kinked. • The tubing can help, as well as not opening the doors as frequently. See the "Doors will produce approximately 70-184 cubes in reduced water flow. ENGLISH TROUBLESHOOTING 53 Craft Ice Problem Icemaker is not making enough ice. Ice Problem Icemaker is moved during installation or cleaning resulting in a 24 hour period. Icemaker is initially installed. The temperature setting for the freezer is too warm. •...
...; Connect the refrigerator to house supply valve is kinked. • The tubing can help, as well as not opening the doors as frequently. See the "Doors will produce approximately 70-184 cubes in reduced water flow. ENGLISH TROUBLESHOOTING 53 Craft Ice Problem Icemaker is not making enough ice. Ice Problem Icemaker is moved during installation or cleaning resulting in a 24 hour period. Icemaker is initially installed. The temperature setting for the freezer is too warm. •...
Owners Manual
Page 56
... & Solution New installation or water line recently connected. • Dispense 2.5 gallons of the refrigerator doors are left open . Water filter has been recently removed or replaced. • After the water filter is not set for water dispensing. • The dispenser can kink when the refrigerator is connected to a cold water pipe. Tubing connecting refrigerator to house supply valve is kinked. • The tubing can be set for the proper operation. Refrigerator was exhausted. • Depending on the control panel to dispense water. The water dispenser has been used for several...
... & Solution New installation or water line recently connected. • Dispense 2.5 gallons of the refrigerator doors are left open . Water filter has been recently removed or replaced. • After the water filter is not set for water dispensing. • The dispenser can kink when the refrigerator is connected to a cold water pipe. Tubing connecting refrigerator to house supply valve is kinked. • The tubing can be set for the proper operation. Refrigerator was exhausted. • Depending on the control panel to dispense water. The water dispenser has been used for several...
Owners Manual
Page 57
...; A water filter may be necessary to add shims under the leveling legs or rollers to the Removing and Replacing Refrigerator Handles and Doors section. Ice bin, crisper cover, pans, shelves, door bins, or baskets are blocking the door open. • Rearrange food containers to level refrigerator. If the door is hard to open . Lights do not work. LED interior lighting failure. • The refrigerator compartment lamp is not level. • It may need to be set to the MAX setting or replaced...
...; A water filter may be necessary to add shims under the leveling legs or rollers to the Removing and Replacing Refrigerator Handles and Doors section. Ice bin, crisper cover, pans, shelves, door bins, or baskets are blocking the door open. • Rearrange food containers to level refrigerator. If the door is hard to open . Lights do not work. LED interior lighting failure. • The refrigerator compartment lamp is not level. • It may need to be set to the MAX setting or replaced...
Owners Manual
Page 61
... caused by the use of parts not authorized by LG. • Shelves, door bins, drawers, handle and accessories, except for repairs. • Replacement of light bulbs, filters, or any consumable parts. • The removal and reinstallation of the Product if it is installed in an inaccessible location or is not installed in utility costs and additional utility expenses. • Any noises associated with normal operation. • Products used for other than...
... caused by the use of parts not authorized by LG. • Shelves, door bins, drawers, handle and accessories, except for repairs. • Replacement of light bulbs, filters, or any consumable parts. • The removal and reinstallation of the Product if it is installed in an inaccessible location or is not installed in utility costs and additional utility expenses. • Any noises associated with normal operation. • Products used for other than...
Owners Manual
Page 65
... water pipes, frozen water pipes, restricted drain lines, inadequate or interrupted water supply or inadequate supply of air; • Damage or failure resulting from operating the Product in a corrosive atmosphere or contrary to the instructions outlined in any way associated with the Product; • Any noises associated with normal operation of the Product; • Replacement of light bulbs, filters, fuses or any other causes beyond the control...
... water pipes, frozen water pipes, restricted drain lines, inadequate or interrupted water supply or inadequate supply of air; • Damage or failure resulting from operating the Product in a corrosive atmosphere or contrary to the instructions outlined in any way associated with the Product; • Any noises associated with normal operation of the Product; • Replacement of light bulbs, filters, fuses or any other causes beyond the control...


