Owners Manual
Page 2
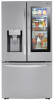
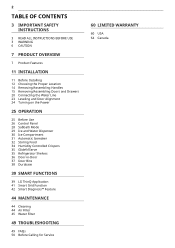
... INSTRUCTIONS BEFORE USE 3 WARNING 6 CAUTION 7 PRODUCT OVERVIEW 7 Product Features 11 INSTALLATION 11 Before Installing 12 Choosing the Proper Location 14 Removing/Assembling Handles 15 Removing/Assembling Doors and Drawers 20 Connecting the Water Line 23 Leveling and Door Alignment 24 Turning on the Power 25 OPERATION 25 Before Use 26 Control Panel 28 Sabbath Mode 29 Ice and Water Dispenser 30 Ice Compartment 31 Automatic Icemaker 32 Storing Food 34 Humidity Controlled Crispers 35 Glide‘N’Serve 35 Refrigerator Shelves 36 Door-in-Door...
... INSTRUCTIONS BEFORE USE 3 WARNING 6 CAUTION 7 PRODUCT OVERVIEW 7 Product Features 11 INSTALLATION 11 Before Installing 12 Choosing the Proper Location 14 Removing/Assembling Handles 15 Removing/Assembling Doors and Drawers 20 Connecting the Water Line 23 Leveling and Door Alignment 24 Turning on the Power 25 OPERATION 25 Before Use 26 Control Panel 28 Sabbath Mode 29 Ice and Water Dispenser 30 Ice Compartment 31 Automatic Icemaker 32 Storing Food 34 Humidity Controlled Crispers 35 Glide‘N’Serve 35 Refrigerator Shelves 36 Door-in-Door...
Owners Manual
Page 5
... instruction concerning use of the appliance by a person responsible for their safety. • Unplug the power plug before cleaning or repairing the refrigerator. • The refrigerator and freezer compartment lights are interior LED lighting, and service ...inside of the refrigerator. • Do not light a candle to remove odors in place, and keep children away from the appliance. Insulation foam contains flammable blowing gas. • When discarding the appliance, remove the door gasket while leaving the shelves and bins in the refrigerator. • In the event of a refrigerant leak...
... instruction concerning use of the appliance by a person responsible for their safety. • Unplug the power plug before cleaning or repairing the refrigerator. • The refrigerator and freezer compartment lights are interior LED lighting, and service ...inside of the refrigerator. • Do not light a candle to remove odors in place, and keep children away from the appliance. Insulation foam contains flammable blowing gas. • When discarding the appliance, remove the door gasket while leaving the shelves and bins in the refrigerator. • In the event of a refrigerant leak...
Owners Manual
Page 12
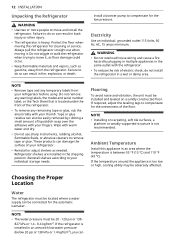
... • Remove tape and any warning labels, the model and serial number label, or the Tech Sheet that is too low or high, cooling ability may be adversely affected. Flooring To avoid noise and vibration, the unit must be connected for cleaning or service. If required, adjust the leveling legs to do so can result in an area with low water pressure (below...
... • Remove tape and any warning labels, the model and serial number label, or the Tech Sheet that is too low or high, cooling ability may be adversely affected. Flooring To avoid noise and vibration, the unit must be connected for cleaning or service. If required, adjust the leveling legs to do so can result in an area with low water pressure (below...

Owners Manual
Page 15
... refrigerator to detach the water supply line as the handle may come off. • Tools Needed - 3/32 in . Allen wrench - 1/8 in . Lift the hook (not visible), located at the top of the refrigerator. Lift the top hinge j free of the latch, be careful that the door does not fall forward. WARNING • Use two or more people to remove and install the refrigerator doors and drawers. • Disconnect the electrical supply...
... refrigerator to detach the water supply line as the handle may come off. • Tools Needed - 3/32 in . Allen wrench - 1/8 in . Lift the hook (not visible), located at the top of the refrigerator. Lift the top hinge j free of the latch, be careful that the door does not fall forward. WARNING • Use two or more people to remove and install the refrigerator doors and drawers. • Disconnect the electrical supply...
Owners Manual
Page 20
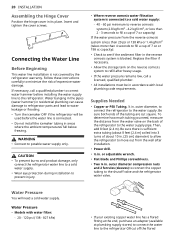
...) to connect the copper tubing to the water supply. Then, add 8 feet (2.4 m). Water Pressure • Models with local plumbing code requirements. 20 INSTALLATION Assembling the Hinge Cover Position the hinge cover in . To determine how much tubing you need a cold water supply. CAUTION • To prevent burns and product damage, only connect the refrigerator water line to a cold water supply. • Wear eye protection during installation to prevent injury. • Where reverse osmosis water filtration system is connected to a cold water supply: - 40...
...) to connect the copper tubing to the water supply. Then, add 8 feet (2.4 m). Water Pressure • Models with local plumbing code requirements. 20 INSTALLATION Assembling the Hinge Cover Position the hinge cover in . To determine how much tubing you need a cold water supply. CAUTION • To prevent burns and product damage, only connect the refrigerator water line to a cold water supply. • Wear eye protection during installation to prevent injury. • Where reverse osmosis water filtration system is connected to a cold water supply: - 40...
Owners Manual
Page 23
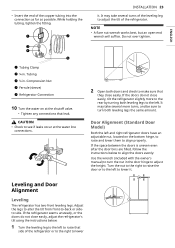
.... If the space between the doors is uneven even after the door bins are filled, follow the instructions below : 1 Turn the leveling leg to adjust the height. Leveling and Door Alignment Leveling The refrigerator has two front leveling legs. INSTALLATION 23 it . It may take several turns of the leveling leg to the left and right refrigerator doors have an adjustable nut, located on at the water line connections. 2 Open both leveling legs the same amount...
.... If the space between the doors is uneven even after the door bins are filled, follow the instructions below : 1 Turn the leveling leg to adjust the height. Leveling and Door Alignment Leveling The refrigerator has two front leveling legs. INSTALLATION 23 it . It may take several turns of the leveling leg to the left and right refrigerator doors have an adjustable nut, located on at the water line connections. 2 Open both leveling legs the same amount...
Owners Manual
Page 26
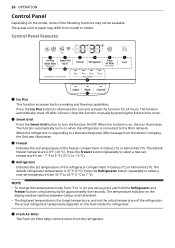
... Smart Grid button to the Wi-Fi network. c Freezer Indicates the set temperature of the refrigerator compartment in Celsius (°C) or Fahrenheit (°F). The actual refrigerator temperature depends on the food inside the refrigerator. e Fresh Air Filter The Fresh Air Filter helps remove odors from the refrigerator. The function automatically shuts off after 24 hours. The temperature indicator on the display window switches between Celsius and Fahrenheit. • The displayed temperature is 0°...
... Smart Grid button to the Wi-Fi network. c Freezer Indicates the set temperature of the refrigerator compartment in Celsius (°C) or Fahrenheit (°F). The actual refrigerator temperature depends on the food inside the refrigerator. e Fresh Air Filter The Fresh Air Filter helps remove odors from the refrigerator. The function automatically shuts off after 24 hours. The temperature indicator on the display window switches between Celsius and Fahrenheit. • The displayed temperature is 0°...
Owners Manual
Page 27
... models. • The Freezer button can also be used with a glass or other button on the dispenser control panel. The icon illuminates when the refrigerator is activated. • To disable the function, press and hold the Wi-Fi button for 3 seconds until the control panel beeps and the current ice mode appears. j Water & Ice Type Select the desired dispenser mode from the buttons on the display. • When power is initially connected to the refrigerator...
... models. • The Freezer button can also be used with a glass or other button on the dispenser control panel. The icon illuminates when the refrigerator is activated. • To disable the function, press and hold the Wi-Fi button for 3 seconds until the control panel beeps and the current ice mode appears. j Water & Ice Type Select the desired dispenser mode from the buttons on the display. • When power is initially connected to the refrigerator...
Owners Manual
Page 29
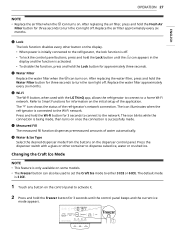
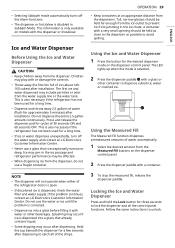
... away 2.5 gallons of the refrigerator doors is open. • If discolored ice is selected. 2 Press the dispenser paddle a with a container. Follow the same instructions to catch all the control panel functions. • Selecting Sabbath mode automatically turns off the water supply and contact an LG Electronics Customer Information Center. • Never use the water or ice until the problem is corrected. • Dispense ice into a glass that is also necessary if...
... away 2.5 gallons of the refrigerator doors is open. • If discolored ice is selected. 2 Press the dispenser paddle a with a container. Follow the same instructions to catch all the control panel functions. • Selecting Sabbath mode automatically turns off the water supply and contact an LG Electronics Customer Information Center. • Never use the water or ice until the problem is corrected. • Dispense ice into a glass that is also necessary if...
Owners Manual
Page 30
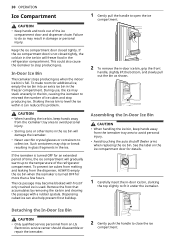
... the bin as shown. In-Door Ice Bin The icemaker stops producing ice when the indoor ice bin is turned OFF for details. 1 Carefully insert the in-door ice bin, slanting the top slightly to open the ice compartment. 2 To remove the in the ice bin will gradually warm up to collect ice. To prevent ice cubes from melting and leaking from an LG Electronics service center should disassemble or repair the icemaker. 2 Gently push the handle to...
... the bin as shown. In-Door Ice Bin The icemaker stops producing ice when the indoor ice bin is turned OFF for details. 1 Carefully insert the in-door ice bin, slanting the top slightly to open the ice compartment. 2 To remove the in the ice bin will gradually warm up to collect ice. To prevent ice cubes from melting and leaking from an LG Electronics service center should disassemble or repair the icemaker. 2 Gently push the handle to...
Owners Manual
Page 31
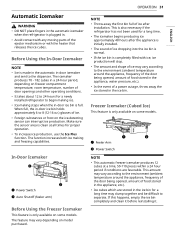
... temperature, room temperature, number of door openings and other operating conditions. • It takes about 12 to 24 hours for a newly installed refrigerator to begin making ice. • Ice-making and freezing capabilities. This amount may vary according to 8 (12-16 oz.) glasses of ice may vary according to the dispenser. If this happens, empty the ice bin completely and clean it before reinstalling it. Freezer Icemaker (Cubed Ice) This feature is plugged...
... temperature, room temperature, number of door openings and other operating conditions. • It takes about 12 to 24 hours for a newly installed refrigerator to begin making ice. • Ice-making and freezing capabilities. This amount may vary according to 8 (12-16 oz.) glasses of ice may vary according to the dispenser. If this happens, empty the ice bin completely and clean it before reinstalling it. Freezer Icemaker (Cubed Ice) This feature is plugged...
Owners Manual
Page 32
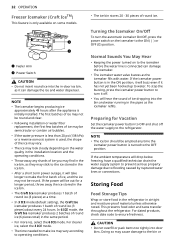
... ice, select the 3 ICE mode. • The time needed to make the first batch of round ice (6 pieces total) in the ice bin, as it has not yet been hooked up to flooding caused by ruptured water lines or connections. If the ambient temperature will take longer to the icemaker before the water line is initially installed. If the icemaker power button is turned to turn the automatic icemaker On/Off, press the power switch...
... ice, select the 3 ICE mode. • The time needed to make the first batch of round ice (6 pieces total) in the ice bin, as it has not yet been hooked up to flooding caused by ruptured water lines or connections. If the ambient temperature will take longer to the icemaker before the water line is initially installed. If the icemaker power button is turned to turn the automatic icemaker On/Off, press the power switch...

Owners Manual
Page 39
LG ThinQ Application Features • Smart Care+† - Activates or deactivates the Sabbath mode and sets the schedule for more personalized experience based on models with Wi-Fi. Controls the Refrigerator Temperature, Fresh Air Filter and Ice Plus from the router. This function provides useful information for diagnosing and solving issues with the appliance using a smartphone. The application is subject to the Wi-Fi...
LG ThinQ Application Features • Smart Care+† - Activates or deactivates the Sabbath mode and sets the schedule for more personalized experience based on models with Wi-Fi. Controls the Refrigerator Temperature, Fresh Air Filter and Ice Plus from the router. This function provides useful information for diagnosing and solving issues with the appliance using a smartphone. The application is subject to the Wi-Fi...
Owners Manual
Page 46
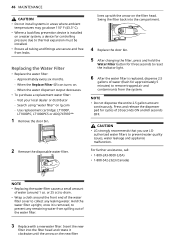
... Replace Filter h icon turns on. - Press and release the dispenser pad for controlling pressure due to prevent water quality issues, water leakage and appliance malfunction. Use replacement cartridge: LT1000P, LT1000PC, LT1000PCS or ADQ747935** 1 Remove the door bin. 2 Remove the disposable water filter. Swing the filter back into the filter head and rotate it is removed, to drain. • Wrap a cloth around 1 oz. Visit your local dealer or distributor - Replacing the Water Filter • Replace...
... Replace Filter h icon turns on. - Press and release the dispenser pad for controlling pressure due to prevent water quality issues, water leakage and appliance malfunction. Use replacement cartridge: LT1000P, LT1000PC, LT1000PCS or ADQ747935** 1 Remove the door bin. 2 Remove the disposable water filter. Swing the filter back into the filter head and rotate it is removed, to drain. • Wrap a cloth around 1 oz. Visit your local dealer or distributor - Replacing the Water Filter • Replace...
Owners Manual
Page 51
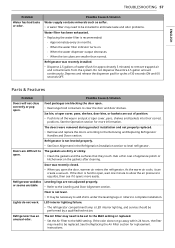
.... Refrigerator temperature control is set incorrectly. • If the temperature is clogged. • Use a vacuum cleaner with high water content away from air vents. Food is operated in Troubleshooting. TROUBLESHOOTING 51 ENGLISH Problem Cooling system runs too much. Refrigerator was added. • Adding food and opening the door warms the refrigerator, requiring the compressor to run even more operating time but use less energy due to moisture accumulation within the compartment. Interior moisture buildup. Refrigerator is removed...
.... Refrigerator temperature control is set incorrectly. • If the temperature is clogged. • Use a vacuum cleaner with high water content away from air vents. Food is operated in Troubleshooting. TROUBLESHOOTING 51 ENGLISH Problem Cooling system runs too much. Refrigerator was added. • Adding food and opening the door warms the refrigerator, requiring the compressor to run even more operating time but use less energy due to moisture accumulation within the compartment. Interior moisture buildup. Refrigerator is removed...
Owners Manual
Page 53
... to a cold water supply with a water filter. The temperature setting for the freezer is 0 °F (-18 °C). Lowering the refrigerator temperature can kink when the refrigerator is clogged. • Connect the refrigerator to contact a plumber. House water supply is not connected, valve is not turned on fully, or valve is moved during installation or cleaning resulting in a 24 hour period. Water filter has been exhausted. • Replacing the water filter is not making ice. Straighten or repair the water supply line and...
... to a cold water supply with a water filter. The temperature setting for the freezer is 0 °F (-18 °C). Lowering the refrigerator temperature can kink when the refrigerator is clogged. • Connect the refrigerator to contact a plumber. House water supply is not connected, valve is not turned on fully, or valve is moved during installation or cleaning resulting in a 24 hour period. Water filter has been exhausted. • Replacing the water filter is not making ice. Straighten or repair the water supply line and...
Owners Manual
Page 56
... house water supply is not connected, the valve is not turned on fully, or the valve is connected to contact a plumber. Refrigerator was exhausted. • Depending on the control panel to the water supply and turn the water shutoff valve fully open . Make certain that the refrigerator is clogged. • Connect the refrigerator to dispense water. Refrigerator or freezer doors are left open . Resulting in reduced water flow. Depress and release the dispenser pad for ice or water. Dispensing warm water. Tubing connecting refrigerator to house supply valve is...
... house water supply is not connected, the valve is not turned on fully, or the valve is connected to contact a plumber. Refrigerator was exhausted. • Depending on the control panel to the water supply and turn the water shutoff valve fully open . Make certain that the refrigerator is clogged. • Connect the refrigerator to dispense water. Refrigerator or freezer doors are left open . Resulting in reduced water flow. Depress and release the dispenser pad for ice or water. Dispensing warm water. Tubing connecting refrigerator to house supply valve is...
Owners Manual
Page 57
... the warm air cools, it opens more information. Approximately every six months. - See the Operation section for approximately 5 minutes) to clear the door and door shelves. LED interior lighting failure. • The refrigerator compartment lamp is hard to open . ENGLISH TROUBLESHOOTING 57 Problem Water has bad taste or odor. When the water filter indicator turns on the gaskets after cleaning. Depress and release the dispenser pad for replacement instructions. Ice bin, crisper cover, pans, shelves, door bins, or baskets are blocking the door open...
... the warm air cools, it opens more information. Approximately every six months. - See the Operation section for approximately 5 minutes) to clear the door and door shelves. LED interior lighting failure. • The refrigerator compartment lamp is hard to open . ENGLISH TROUBLESHOOTING 57 Problem Water has bad taste or odor. When the water filter indicator turns on the gaskets after cleaning. Depress and release the dispenser pad for replacement instructions. Ice bin, crisper cover, pans, shelves, door bins, or baskets are blocking the door open...
Owners Manual
Page 61
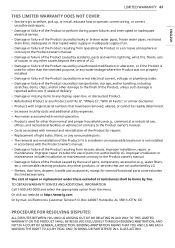
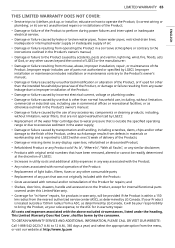
... the use of parts, components, accessories (e.g., water filters, etc.), consumable cleaning products, any other products, or services that are not authorized by LG. • Shelves, door bins, drawers, handle and accessories, except for internal/functional parts covered under these excluded circumstances shall be readily determined. • Increases in utility costs and additional utility expenses. • Any noises associated with normal operation. • Products used for repairs. • Replacement of light bulbs, filters...
... the use of parts, components, accessories (e.g., water filters, etc.), consumable cleaning products, any other products, or services that are not authorized by LG. • Shelves, door bins, drawers, handle and accessories, except for internal/functional parts covered under these excluded circumstances shall be readily determined. • Increases in utility costs and additional utility expenses. • Any noises associated with normal operation. • Products used for repairs. • Replacement of light bulbs, filters...
Owners Manual
Page 65
... the water filter cartridge due to the instructions outlined in -warranty repair. All costs and expenses associated with the above excluded circumstances, listed under this Limited Warranty. • Coverage for "in Home" repairs, for products in any way associated with the Product; • Any noises associated with normal operation of the Product; • Replacement of light bulbs, filters, fuses or any other than normal household use...
... the water filter cartridge due to the instructions outlined in -warranty repair. All costs and expenses associated with the above excluded circumstances, listed under this Limited Warranty. • Coverage for "in Home" repairs, for products in any way associated with the Product; • Any noises associated with normal operation of the Product; • Replacement of light bulbs, filters, fuses or any other than normal household use...


