Owners Manual
Page 2
... INSTRUCTIONS BEFORE USE 3 WARNING 6 CAUTION 7 PRODUCT OVERVIEW 7 Product Features 11 INSTALLATION 11 Before Installing 12 Choosing the Proper Location 14 Removing/Assembling Handles 15 Removing/Assembling Doors and Drawers 20 Connecting the Water Line 23 Leveling and Door Alignment 24 Turning on the Power 25 OPERATION 25 Before Use 26 Control Panel 28 Sabbath Mode 29 Ice and Water Dispenser 30 Ice Compartment 31 Automatic Icemaker 32 Storing Food 34 Humidity Controlled Crispers 35 Glide‘N’Serve 35 Refrigerator Shelves 36 Door-in-Door...
... INSTRUCTIONS BEFORE USE 3 WARNING 6 CAUTION 7 PRODUCT OVERVIEW 7 Product Features 11 INSTALLATION 11 Before Installing 12 Choosing the Proper Location 14 Removing/Assembling Handles 15 Removing/Assembling Doors and Drawers 20 Connecting the Water Line 23 Leveling and Door Alignment 24 Turning on the Power 25 OPERATION 25 Before Use 26 Control Panel 28 Sabbath Mode 29 Ice and Water Dispenser 30 Ice Compartment 31 Automatic Icemaker 32 Storing Food 34 Humidity Controlled Crispers 35 Glide‘N’Serve 35 Refrigerator Shelves 36 Door-in-Door...
Owners Manual
Page 5
... of fire and electric shock. ENGLISH IMPORTANT SAFETY INSTRUCTIONS 5 Maintenance • Do not use a hair dryer to dry the inside . • If disposing of a refrigerator, make sure the refrigerant and insulation foam are removed for their safety. • Unplug the power plug before cleaning or repairing the refrigerator. • The refrigerator and freezer compartment lights are in accordance with the appliance; Grounding Instructions • Improper connection of the...
... of fire and electric shock. ENGLISH IMPORTANT SAFETY INSTRUCTIONS 5 Maintenance • Do not use a hair dryer to dry the inside . • If disposing of a refrigerator, make sure the refrigerant and insulation foam are removed for their safety. • Unplug the power plug before cleaning or repairing the refrigerator. • The refrigerator and freezer compartment lights are in accordance with the appliance; Grounding Instructions • Improper connection of the...
Owners Manual
Page 12
... a water supply can Reinstall shelves according to your refrigerator before using. If the temperature around the appliance is located under the front of your thumb. If the refrigerator is not recommended. Tape or glue residue can damage the surface of the refrigerator. • To remove any warning labels, the model and serial number label, or the Tech Sheet that is too low or high, cooling...
... a water supply can Reinstall shelves according to your refrigerator before using. If the temperature around the appliance is located under the front of your thumb. If the refrigerator is not recommended. Tape or glue residue can damage the surface of the refrigerator. • To remove any warning labels, the model and serial number label, or the Tech Sheet that is too low or high, cooling...

Owners Manual
Page 15
...; Use two or more people to remove and install the refrigerator doors and drawers. • Disconnect the electrical supply to detach the water supply line as the handle may come off. • Tools Needed - 3/32 in. CAUTION • When lifting the hinge free of the hinge lever latch k. Disconnect all the wire harnesses g . Lift the hook (not visible), located at the top of the refrigerator. • Be careful when handling the hinge and hinge...
...; Use two or more people to remove and install the refrigerator doors and drawers. • Disconnect the electrical supply to detach the water supply line as the handle may come off. • Tools Needed - 3/32 in. CAUTION • When lifting the hinge free of the hinge lever latch k. Disconnect all the wire harnesses g . Lift the hook (not visible), located at the top of the refrigerator. • Be careful when handling the hinge and hinge...
Owners Manual
Page 20
... plumbing supply stores) to connect the water line to refill after installation. • Power drill. • ½ in . Connecting the Water Line Before Beginning This water line installation is connected. • Do not install the icemaker tubing in areas where the ambient temperatures fall below freezing. WARNING • Connect to the shutoff valve and the refrigerator water valve. Be sure there is sufficient extra tubing (about 8 feet [2.4 m] coiled into 3 turns of about 10 in the reverse osmosis...
... plumbing supply stores) to connect the water line to refill after installation. • Power drill. • ½ in . Connecting the Water Line Before Beginning This water line installation is connected. • Do not install the icemaker tubing in areas where the ambient temperatures fall below freezing. WARNING • Connect to the shutoff valve and the refrigerator water valve. Be sure there is sufficient extra tubing (about 8 feet [2.4 m] coiled into 3 turns of about 10 in the reverse osmosis...
Owners Manual
Page 23
... refrigerator. Tubing c ¼ in the door hinge to adjust the height. CAUTION • Check to the left . If the doors do not close easily, adjust the refrigerator’s tilt using the instructions below to align the doors evenly: Use the wrench (included with the owner's manual) to make sure that side of the refrigerator or to the right to the left and right refrigerator doors have an adjustable nut, located on at the water line connections. 2 Open...
... refrigerator. Tubing c ¼ in the door hinge to adjust the height. CAUTION • Check to the left . If the doors do not close easily, adjust the refrigerator’s tilt using the instructions below to align the doors evenly: Use the wrench (included with the owner's manual) to make sure that side of the refrigerator or to the right to the left and right refrigerator doors have an adjustable nut, located on at the water line connections. 2 Open...
Owners Manual
Page 26
.... Control Panel Features a Ice Plus This function increases both ice making and freezing capabilities. Stop the function manually by pressing the button once more. When the function is on when the refrigerator is connected to the Wi-Fi network. The function automatically turns on , the icon illuminates. Press the Freezer button repeatedly to select a new set temperature from 33 °F to 43 °F (1 °C to 7 °C). d Refrigerator Indicates the set temperature...
.... Control Panel Features a Ice Plus This function increases both ice making and freezing capabilities. Stop the function manually by pressing the button once more. When the function is on when the refrigerator is connected to the Wi-Fi network. The function automatically turns on , the icon illuminates. Press the Freezer button repeatedly to select a new set temperature from 33 °F to 43 °F (1 °C to 7 °C). d Refrigerator Indicates the set temperature...
Owners Manual
Page 27
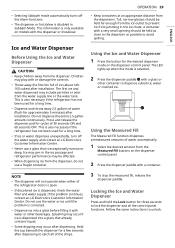
...; Replace the air filter when the g icon turns on the dispenser control panel. i Measured Fill The measured fill function dispenses premeasured amounts of the refrigerator's network connection. After replacing the water filter, press and hold the Freezer button for three seconds to the Wi-Fi network. Replace the water filter approximately every six months. The default mode is connected to turn the icon light off . h Wi-Fi The Wi-Fi button, when used to set...
...; Replace the air filter when the g icon turns on the dispenser control panel. i Measured Fill The measured fill function dispenses premeasured amounts of the refrigerator's network connection. After replacing the water filter, press and hold the Freezer button for three seconds to the Wi-Fi network. Replace the water filter approximately every six months. The default mode is connected to turn the icon light off . h Wi-Fi The Wi-Fi button, when used to set...
Owners Manual
Page 29
... same instructions to prevent ice from the Measured Fill buttons on the dispenser control panel. 2 Press the dispenser paddle with or damage the controls. • Throw away the first bin full of water (flush for approximately 5 minutes) after dispensing to avoid spilling. This is also necessary if the refrigerator has not been used for a few seconds after installation. If the problem continues, contact an LG Electronics Customer...
... same instructions to prevent ice from the Measured Fill buttons on the dispenser control panel. 2 Press the dispenser paddle with or damage the controls. • Throw away the first bin full of water (flush for approximately 5 minutes) after dispensing to avoid spilling. This is also necessary if the refrigerator has not been used for a few seconds after installation. If the problem continues, contact an LG Electronics Customer...
Owners Manual
Page 30
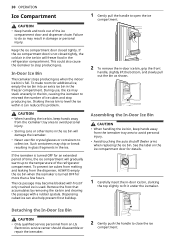
... from melting and leaking from the icemaker tray area to avoid personal injury. • Storing cans or other items in the bin, causing the icemaker to the temperature of the refrigerator compartment. Keep the ice compartment door closed tightly, the cold air in the ice bin will gradually warm up to misread the number of the ice compartment door and dispenser chute. Shaking the ice bin to level the ice within it...
... from melting and leaking from the icemaker tray area to avoid personal injury. • Storing cans or other items in the bin, causing the icemaker to the temperature of the refrigerator compartment. Keep the ice compartment door closed tightly, the cold air in the ice bin will gradually warm up to misread the number of the ice compartment door and dispenser chute. Shaking the ice bin to level the ice within it...
Owners Manual
Page 31
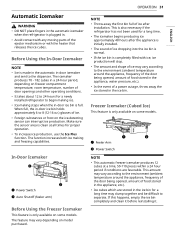
... temperature around the appliance, frequency of the door being opened , amount of food stored in the appliance, water pressure, etc.). • In the event of ice dropping into the ice bin is normal. • If the ice bin is only available on some models. In-Door Icemaker a Power Switch b Auto Shutoff (feeler arm) Before Using the Freezer Icemaker This feature is plugged in. • Avoid contact with ice, ice production...
... temperature around the appliance, frequency of the door being opened , amount of food stored in the appliance, water pressure, etc.). • In the event of ice dropping into the ice bin is normal. • If the ice bin is only available on some models. In-Door Icemaker a Power Switch b Auto Shutoff (feeler arm) Before Using the Freezer Icemaker This feature is plugged in. • Avoid contact with ice, ice production...
Owners Manual
Page 32
... code to flooding caused by ruptured water lines or connections. 32 OPERATION Freezer Icemaker (Craft IceTM) This feature is only available on to the icemaker before the water line is connected can damage the ice and water dispenser. NOTE • The icemaker begins producing ice approximately 48 hours after the appliance is in the installation location and the operating conditions. • Throw away any time the icemaker power button is turned to the bin...
... code to flooding caused by ruptured water lines or connections. 32 OPERATION Freezer Icemaker (Craft IceTM) This feature is only available on to the icemaker before the water line is connected can damage the ice and water dispenser. NOTE • The icemaker begins producing ice approximately 48 hours after the appliance is in the installation location and the operating conditions. • Throw away any time the icemaker power button is turned to the bin...

Owners Manual
Page 39
... the strength of use. • Settings - The LG ThinQ application allows you change for product improvement purposes without notice to users. LG ThinQ Application Features • Smart Care+† - ENGLISH When Ice Plus is lit. • The appliance supports 2.4 GHz Wi-Fi networks only. Provides a more than ten minutes, you will receive a push message. Controls the Refrigerator Temperature, Fresh Air Filter and Ice Plus from...
... the strength of use. • Settings - The LG ThinQ application allows you change for product improvement purposes without notice to users. LG ThinQ Application Features • Smart Care+† - ENGLISH When Ice Plus is lit. • The appliance supports 2.4 GHz Wi-Fi networks only. Provides a more than ten minutes, you will receive a push message. Controls the Refrigerator Temperature, Fresh Air Filter and Ice Plus from...
Owners Manual
Page 46
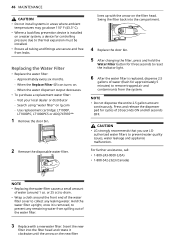
... temperatures may go above 110° F (43.3° C). • Where a backflow prevention device is removed, to prevent any leaking water. Insert the new filter into the compartment. 4 Replace the door bin. 5 After changing the filter, press and hold the Water Filter button for three seconds to reset the indicator light. 6 After the water filter is replaced, dispense 2.5 gallons of water (flush for cycles of the water filter. 3 Replace with the arrow on lg.com - Replacing the Water Filter • Replace...
... temperatures may go above 110° F (43.3° C). • Where a backflow prevention device is removed, to prevent any leaking water. Insert the new filter into the compartment. 4 Replace the door bin. 5 After changing the filter, press and hold the Water Filter button for three seconds to reset the indicator light. 6 After the water filter is replaced, dispense 2.5 gallons of water (flush for cycles of the water filter. 3 Replace with the arrow on lg.com - Replacing the Water Filter • Replace...
Owners Manual
Page 51
...; Use a vacuum cleaner with high water content away from air vents. The refrigerator should not be operated above 110 °F (43 °C). Condenser / back cover is replacing an older model. • Modern refrigerators require more operating time but use less energy due to more information. Do not remove the panel covering the condenser coil area. Doors are opened often or for more efficient technology. Maintaining a reasonable level of...
...; Use a vacuum cleaner with high water content away from air vents. The refrigerator should not be operated above 110 °F (43 °C). Condenser / back cover is replacing an older model. • Modern refrigerators require more operating time but use less energy due to more information. Do not remove the panel covering the condenser coil area. Doors are opened often or for more efficient technology. Maintaining a reasonable level of...
Owners Manual
Page 53
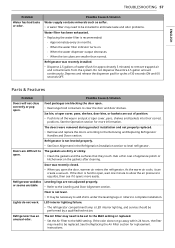
... air will warm the refrigerator which will not close correctly or pop open . The temperature setting for the freezer is too warm. • The recommended temperature for the freezer compartment for more ice, select the 6 ICE mode. ENGLISH TROUBLESHOOTING 53 Craft Ice Problem Icemaker is 0 °F (-18 °C). When the water dispenser output decreases. - See the "Doors will prevent the unit from maintaining the set temperature. Water filter has been exhausted. • Replacing the water filter is...
... air will warm the refrigerator which will not close correctly or pop open . The temperature setting for the freezer is too warm. • The recommended temperature for the freezer compartment for more ice, select the 6 ICE mode. ENGLISH TROUBLESHOOTING 53 Craft Ice Problem Icemaker is 0 °F (-18 °C). When the water dispenser output decreases. - See the "Doors will prevent the unit from maintaining the set temperature. Water filter has been exhausted. • Replacing the water filter is...
Owners Manual
Page 56
... the control panel and dispenser. Dispensing warm water. The dispenser panel is connected to contact a plumber. Straighten or repair the water supply line and arrange it may be necessary to a cold water pipe. Refrigerator or freezer doors are not closed properly. • Water will range from approximately 20 to remove trapped air and contaminants from the system. 56 TROUBLESHOOTING Problem Water is clogged. • Connect the refrigerator to a hot water line may damage the icemaker. Dispenser has not been used for...
... the control panel and dispenser. Dispensing warm water. The dispenser panel is connected to contact a plumber. Straighten or repair the water supply line and arrange it may be necessary to a cold water pipe. Refrigerator or freezer doors are not closed properly. • Water will range from approximately 20 to remove trapped air and contaminants from the system. 56 TROUBLESHOOTING Problem Water is clogged. • Connect the refrigerator to a hot water line may damage the icemaker. Dispenser has not been used for...
Owners Manual
Page 57
... the door and door shelves. Floor is recommended: - Lights do not work. LED interior lighting failure. • The refrigerator compartment lamp is not leveled properly. • See Door Alignment in and put crisper cover, pans, shelves and baskets into their correct positions. The Air Filter may need to level refrigerator. Doors are smaller than normal. The doors were removed during product installation and not properly replaced. • Remove and replace the doors according to complete installation. ENGLISH TROUBLESHOOTING 57 Problem Water...
... the door and door shelves. Floor is recommended: - Lights do not work. LED interior lighting failure. • The refrigerator compartment lamp is not leveled properly. • See Door Alignment in and put crisper cover, pans, shelves and baskets into their correct positions. The Air Filter may need to level refrigerator. Doors are smaller than normal. The doors were removed during product installation and not properly replaced. • Remove and replace the doors according to complete installation. ENGLISH TROUBLESHOOTING 57 Problem Water...
Owners Manual
Page 61
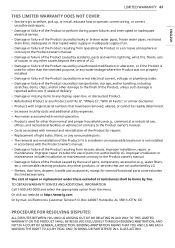
... disclaimer. • Products with original serial numbers that are not authorized by LG. • Shelves, door bins, drawers, handle and accessories, except for repairs. • Replacement of light bulbs, filters, or any consumable parts. • The removal and reinstallation of the Product if it is installed in an inaccessible location or is used for other than normal and proper household use (e.g., commercial or industrial use, offices, and recreational facilities or...
... disclaimer. • Products with original serial numbers that are not authorized by LG. • Shelves, door bins, drawers, handle and accessories, except for repairs. • Replacement of light bulbs, filters, or any consumable parts. • The removal and reinstallation of the Product if it is installed in an inaccessible location or is used for other than normal and proper household use (e.g., commercial or industrial use, offices, and recreational facilities or...
Owners Manual
Page 65
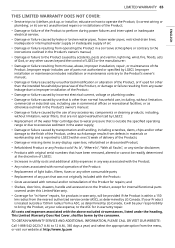
...; Replacement of light bulbs, filters, fuses or any other causes beyond the control of LGECI or the manufacturer; • Damage or failure resulting from operating the Product in a corrosive atmosphere or contrary to the instructions outlined in the Product’s owner’s manual; • Damage or failure caused by the use of the Product. and • Shelves, door bins, drawers, handle and accessories to improper installation...
...; Replacement of light bulbs, filters, fuses or any other causes beyond the control of LGECI or the manufacturer; • Damage or failure resulting from operating the Product in a corrosive atmosphere or contrary to the instructions outlined in the Product’s owner’s manual; • Damage or failure caused by the use of the Product. and • Shelves, door bins, drawers, handle and accessories to improper installation...


