Owner's Manual
Page 3
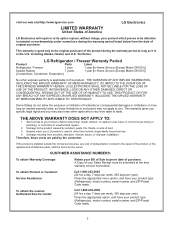
LG Refrigerator / Freezer Warranty Period Product Parts Labor Refrigerator / Freezer 1 year 1 year [In-Home Service (Except Model GR-051)] Sealed System 7 years 1 year [In-Home Service (Except Model GR-051)] (Compressor, Condenser, Evaporator) No other rights which proves to the original purchaser of the ...consequential damages or limitations on how long an implied warranty lasts; Repairs when your product type (Refrigerator), model number, serial number, and ZIP/Postal Code ready. LG ELECTRONICS SHALL NOT BE LIABLE FOR THE LOSS OF USE OF THE PRODUCT, INCONVIENCE, LOSS OR ANY...
LG Refrigerator / Freezer Warranty Period Product Parts Labor Refrigerator / Freezer 1 year 1 year [In-Home Service (Except Model GR-051)] Sealed System 7 years 1 year [In-Home Service (Except Model GR-051)] (Compressor, Condenser, Evaporator) No other rights which proves to the original purchaser of the ...consequential damages or limitations on how long an implied warranty lasts; Repairs when your product type (Refrigerator), model number, serial number, and ZIP/Postal Code ready. LG ELECTRONICS SHALL NOT BE LIABLE FOR THE LOSS OF USE OF THE PRODUCT, INCONVIENCE, LOSS OR ANY...
Owner's Manual
Page 6
...). Electrical Shock Hazard FOR PERSONAL SAFETY, this appliance must be properly grounded. Have the wall outlet and the circuit checked by LG Electronics, to avoid some risk. 6 CFCs are not problems of your personal responsibility and obligation to have a cooling system that..., reconnect the refrigerator to the electrical source and reset the control (Thermostat, Refrigerator Control or Freezer Control, depending on the model) to the desired setting. GROUNDING REQUIREMENTS IMPORTANT: Please read carefully. USE OF EXTENSION CORDS Because of potential safety hazards under ...
...). Electrical Shock Hazard FOR PERSONAL SAFETY, this appliance must be properly grounded. Have the wall outlet and the circuit checked by LG Electronics, to avoid some risk. 6 CFCs are not problems of your personal responsibility and obligation to have a cooling system that..., reconnect the refrigerator to the electrical source and reset the control (Thermostat, Refrigerator Control or Freezer Control, depending on the model) to the desired setting. GROUNDING REQUIREMENTS IMPORTANT: Please read carefully. USE OF EXTENSION CORDS Because of potential safety hazards under ...
Owner's Manual
Page 7
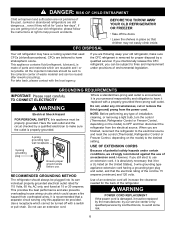
The refrigerator you have purchased may not match your model. PARTS AND FEATURES A K B L C M D E N F G O H P I Full-Width Wire Basket J Wire Durabase K Filter (inside)* L Dairy Bin M Egg Box N Design-A-Door Bins O Freezer Light P Wire Basket *On some or ... fresh and crisper G Customcube Icemaker H Ice Bin I J Use this section to become more familiar with the parts and features. NOTE: This guide covers several different models. The locations of the items listed below may have some...
The refrigerator you have purchased may not match your model. PARTS AND FEATURES A K B L C M D E N F G O H P I Full-Width Wire Basket J Wire Durabase K Filter (inside)* L Dairy Bin M Egg Box N Design-A-Door Bins O Freezer Light P Wire Basket *On some or ... fresh and crisper G Customcube Icemaker H Ice Bin I J Use this section to become more familiar with the parts and features. NOTE: This guide covers several different models. The locations of the items listed below may have some...
Owner's Manual
Page 8
... Hazard Keep flammable materials and vapors, such as gasoline, away from your fingers. To remove the base grille: 1. Remove tape and any warningtype labels, the model and serial number label, or the TechSheet that is heavy. Tape or glue residue can be easily removed by tipping the cabinet slightly. Always pull...
... Hazard Keep flammable materials and vapors, such as gasoline, away from your fingers. To remove the base grille: 1. Remove tape and any warningtype labels, the model and serial number label, or the TechSheet that is heavy. Tape or glue residue can be easily removed by tipping the cabinet slightly. Always pull...
Owner's Manual
Page 10
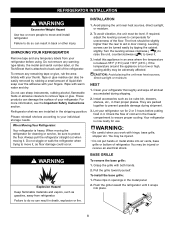
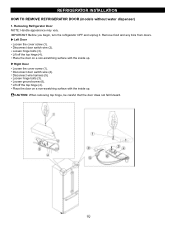
... the refrigerator OFF and unplug it. Disconnect wire harness (5). Right Door Loosen the cover screw (1). Loosen hinge bolts (3). REFRIGERATOR INSTALLATION HOW TO REMOVE REFRIGERATOR DOOR (models without water dispenser) 1. Removing Refrigerator Door NOTE: Handle appearance may vary. Place the door on a non-scratching surface with the inside up . Loosen ground screw...
... the refrigerator OFF and unplug it. Disconnect wire harness (5). Right Door Loosen the cover screw (1). Loosen hinge bolts (3). REFRIGERATOR INSTALLATION HOW TO REMOVE REFRIGERATOR DOOR (models without water dispenser) 1. Removing Refrigerator Door NOTE: Handle appearance may vary. Place the door on a non-scratching surface with the inside up . Loosen ground screw...
Owner's Manual
Page 12
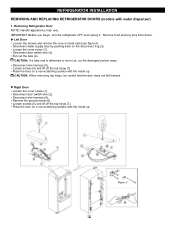
... surface with water dispenser) 1. Disconnect wire harness (4). Place the door on a non-scratching surface with the inside up . REFRIGERATOR INSTALLATION REMOVING AND REPLACING REFRIGERATOR DOORS (models with the inside up . IMPORTANT: Before you begin, turn the refrigerator OFF and unplug it. Disconnect water supply tube by pushing back on back side...
... surface with water dispenser) 1. Disconnect wire harness (4). Place the door on a non-scratching surface with the inside up . REFRIGERATOR INSTALLATION REMOVING AND REPLACING REFRIGERATOR DOORS (models with the inside up . IMPORTANT: Before you begin, turn the refrigerator OFF and unplug it. Disconnect water supply tube by pushing back on back side...

Owner's Manual
Page 16
... and effective cooling operation. DOOR ALARM With this setting for 3 sec again. *In the temperature control it is forced up to freezer. SETTING THE CONTROLS (Models without water dispenser) Your refrigerator has two controls that let you want to change °F to stabilize. If the vents are blocked, airflow will become...
... and effective cooling operation. DOOR ALARM With this setting for 3 sec again. *In the temperature control it is forced up to freezer. SETTING THE CONTROLS (Models without water dispenser) Your refrigerator has two controls that let you want to change °F to stabilize. If the vents are blocked, airflow will become...
Owner's Manual
Page 17
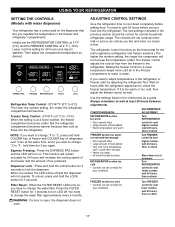
... temperature keeps more cold air in the chart below as desired. Always remember to wait at the same time. USING YOUR REFRIGERATOR SETTING THE CONTROLS (Models with water dispenser) Your refrigerator has a control pad on the dispenser that lets you need to change the water filter. EXPRESS FRZ ON DIGITAL CONTROL...
... temperature keeps more cold air in the chart below as desired. Always remember to wait at the same time. USING YOUR REFRIGERATOR SETTING THE CONTROLS (Models with water dispenser) Your refrigerator has a control pad on the dispenser that lets you need to change the water filter. EXPRESS FRZ ON DIGITAL CONTROL...
Owner's Manual
Page 19
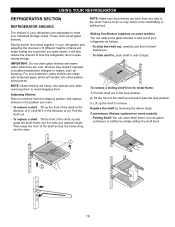
... as bumping. Failure to do so may break if exposed to meet your individual storage needs. Sliding Out Shelves (optional on some models) Folding Shelf: You can slide some models) You can store taller items such as follows. Pull the shelf out to remove. To slide the shelf out, carefully pull front...
... as bumping. Failure to do so may break if exposed to meet your individual storage needs. Sliding Out Shelves (optional on some models) Folding Shelf: You can slide some models) You can store taller items such as follows. Pull the shelf out to remove. To slide the shelf out, carefully pull front...
Owner's Manual
Page 20
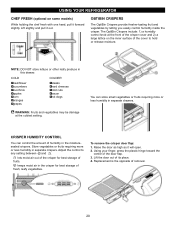
... cuts ¥bacon ¥hot dogs WARNING: Fruits and vegetables may be damage at the front of the crisper cover and 2) a large lattice on some models) While holding the chef fresh with one hand, pull it forward slightly. keeps moist air in separate crispers. Raise the door as high as it...
... cuts ¥bacon ¥hot dogs WARNING: Fruits and vegetables may be damage at the front of the crisper cover and 2) a large lattice on some models) While holding the chef fresh with one hand, pull it forward slightly. keeps moist air in separate crispers. Raise the door as high as it...
Owner's Manual
Page 22
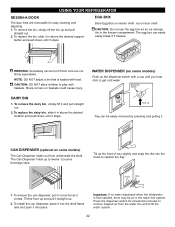
USING YOUR REFRIGERATOR DESIGN-A-DOOR The door bins are not firmly assembled. To replace the bin, slide it stops. WATER DISPENSER (on some models) Push up to play with food. Holes Ribs 1. CAUTION: DO NOT allow children to twelve 12-ounce beverage cans. To remove the dairy bin, simply ... 1. Push up the front of tray slightly and snap the ribs into the shelf frame rails and push it stops. CAN DISPENSER (optional on some models) The Can Dispenser slides out from the water line and to get cold water. To remove the can easily easily break if it comes. Press...
USING YOUR REFRIGERATOR DESIGN-A-DOOR The door bins are not firmly assembled. To replace the bin, slide it stops. WATER DISPENSER (on some models) Push up to play with food. Holes Ribs 1. CAUTION: DO NOT allow children to twelve 12-ounce beverage cans. To remove the dairy bin, simply ... 1. Push up the front of tray slightly and snap the ribs into the shelf frame rails and push it stops. CAN DISPENSER (optional on some models) The Can Dispenser slides out from the water line and to get cold water. To remove the can easily easily break if it comes. Press...
Owner's Manual
Page 23
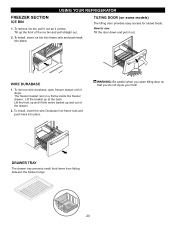
... (on a frame inside the freezer drawer. To Install, insert ice bin into frame rails and push back into place. The freezer basket rest on some models) The tilting door provides easy access for stored foods. To install, insert the wire Durabase into frame rails and push back into place. Tilt up...
... (on a frame inside the freezer drawer. To Install, insert ice bin into frame rails and push back into place. The freezer basket rest on some models) The tilting door provides easy access for stored foods. To install, insert the wire Durabase into frame rails and push back into place. Tilt up...
Owner's Manual
Page 25
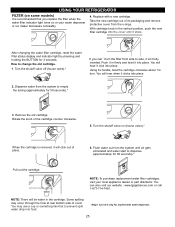
...;t turn . You may occur through the hole at rear bottom side of cover. How to side, it stops. USING YOUR REFRIGERATOR FILTER (on some models) It is removed, it will click out of place. 6. With cartridge knob in firmly and twist it into the cover until air gets eliminated and... water start to empty the tubing (approximately for models with a new cartridge. Flush water out from the o-rings. Remove the old cartridge. Some spilling may use a cup or something like that you can...
...;t turn . You may occur through the hole at rear bottom side of cover. How to side, it stops. USING YOUR REFRIGERATOR FILTER (on some models) It is removed, it will click out of place. 6. With cartridge knob in firmly and twist it into the cover until air gets eliminated and... water start to empty the tubing (approximately for models with a new cartridge. Flush water out from the o-rings. Remove the old cartridge. Some spilling may use a cup or something like that you can...
Owner's Manual
Page 27
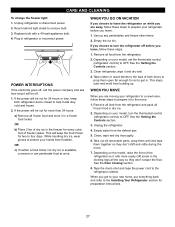
... or reconnect power. If the power will be out for two to get to your new home, put everything back and refer to prepare your model, turn the refrigerator off . 1. While handling dry ice, wear gloves to the refrigerator cabinet. Remove all food from the defrost pan. 5.... the refrigerator and pack all removable parts, wrap them well and tape them open far enough for air to four days. Depending on your model, set the thermostat control (refrigerator control) to leave the refrigerator on your refrigerator before you choose to OFF. Unplug refrigerator or disconnect power....
... or reconnect power. If the power will be out for two to get to your new home, put everything back and refer to prepare your model, turn the refrigerator off . 1. While handling dry ice, wear gloves to the refrigerator cabinet. Remove all food from the defrost pan. 5.... the refrigerator and pack all removable parts, wrap them well and tape them open far enough for air to four days. Depending on your model, set the thermostat control (refrigerator control) to leave the refrigerator on your refrigerator before you choose to OFF. Unplug refrigerator or disconnect power....
Owner's Manual
Page 28
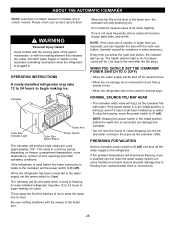
... not used before the water line is connected can regulate the size with the cube size button. (nomally caused by variations in the I (on some models) to prevent serious property damage due to the level of the ejector mechanism, or with the sweep of ice to allow the water line to... water. When the ice storage bin is included only in certain models. A newly-installed refrigerator may take 12 to 24 hours to begin making ice. WARNING Personal Injury Hazard Avoid contact with water. It is on ) position...
... not used before the water line is connected can regulate the size with the cube size button. (nomally caused by variations in the I (on some models) to prevent serious property damage due to the level of the ejector mechanism, or with the sweep of ice to allow the water line to... water. When the ice storage bin is included only in certain models. A newly-installed refrigerator may take 12 to 24 hours to begin making ice. WARNING Personal Injury Hazard Avoid contact with water. It is on ) position...
Owner's Manual
Page 29
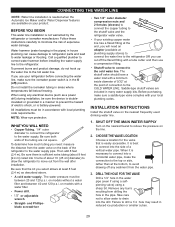
Be sure both ends of expensive water damage. Be sure that is not warranted by the refrigerator or icemaker manufacturer. on models without a water filter and between 20 and 120 p.s.i. The shutoff valve should have a water inlet with your refrigerator before installing the...sure the icemaker power switch is in the O (off any sediment from the wall after installation. INSTALLATION INSTRUCTIONS Install the shutoff valve on models with local plumbing code requirements. When it is necessary to connect into the side of electric shock, or is battery-powered. Take care ...
Be sure both ends of expensive water damage. Be sure that is not warranted by the refrigerator or icemaker manufacturer. on models without a water filter and between 20 and 120 p.s.i. The shutoff valve should have a water inlet with your refrigerator before installing the...sure the icemaker power switch is in the O (off any sediment from the wall after installation. INSTALLATION INSTRUCTIONS Install the shutoff valve on models with local plumbing code requirements. When it is necessary to connect into the side of electric shock, or is battery-powered. Take care ...
Owner's Manual
Page 32
.... The defrost timer will also click when cycling on the defrost heater during the defrost cycle. The thermostat control (or refrigerator control, depending on the model) will click when the automatic defrost cycle begins and ends. Your refrigerator is not resting solidly on top of refrigerant, the water line, or items...
.... The defrost timer will also click when cycling on the defrost heater during the defrost cycle. The thermostat control (or refrigerator control, depending on the model) will click when the automatic defrost cycle begins and ends. Your refrigerator is not resting solidly on top of refrigerant, the water line, or items...
Owner's Manual
Page 33
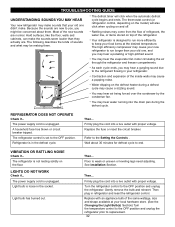
... during product installation and not properly replaced. Remove and replace the doors according to clear door and door shelves. The refrigerator control was an older model. Clean gaskets and the surface that was replaced was not set correctly The refrigerator will not shut all the way in frost. 33 TROUBLESHOOTING GUIDE...
... during product installation and not properly replaced. Remove and replace the doors according to clear door and door shelves. The refrigerator control was an older model. Clean gaskets and the surface that was replaced was not set correctly The refrigerator will not shut all the way in frost. 33 TROUBLESHOOTING GUIDE...


