Owner's Manual
Page 3
... have your product type (Refrigerator), model number, serial number, and ZIP/Postal Code ready. 3 LG Refrigerator / Freezer Warranty Period Product Parts Labor Refrigerator / Freezer 1 year 1 year [In-Home Service (Except Model GR-051)] Sealed System 7 years 1 year [In-Home Service (Except Model GR-051)] (Compressor,...a day, 7 days per week, 365 days per year) Press the appropriate menu option, and have your product type (Refrigerator), model number, serial number, and ZIP/Postal Code ready. including Alaska, Hawaii, and U.S. visit our web site/http://www.lgservice....
... have your product type (Refrigerator), model number, serial number, and ZIP/Postal Code ready. 3 LG Refrigerator / Freezer Warranty Period Product Parts Labor Refrigerator / Freezer 1 year 1 year [In-Home Service (Except Model GR-051)] Sealed System 7 years 1 year [In-Home Service (Except Model GR-051)] (Compressor,...a day, 7 days per week, 365 days per year) Press the appropriate menu option, and have your product type (Refrigerator), model number, serial number, and ZIP/Postal Code ready. including Alaska, Hawaii, and U.S. visit our web site/http://www.lgservice....
Owner's Manual
Page 6
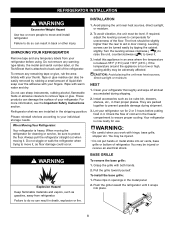
...past. Have the wall outlet and the circuit checked by LG Electronics, to use of an extension cord. DANGER: RISK OF CHILD ENTRAPMENT Child entrapment and suffocation are getting rid of your old refrigerator, please follow the instructions at 15 or 20 amperes. ... CORDS Because of installation, cleaning, or removing a light bulb, turn the control (Thermostat, Refrigerator Control or Freezer Control, depending on the model) to OFF and then disconnect the refrigerator from overheated wires. WARNING POWER CORD REPLACEMENT If the power cord is absolutely necessary that a ...
...past. Have the wall outlet and the circuit checked by LG Electronics, to use of an extension cord. DANGER: RISK OF CHILD ENTRAPMENT Child entrapment and suffocation are getting rid of your old refrigerator, please follow the instructions at 15 or 20 amperes. ... CORDS Because of installation, cleaning, or removing a light bulb, turn the control (Thermostat, Refrigerator Control or Freezer Control, depending on the model) to OFF and then disconnect the refrigerator from overheated wires. WARNING POWER CORD REPLACEMENT If the power cord is absolutely necessary that a ...
Owner's Manual
Page 7
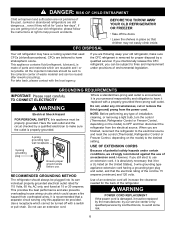
... and vegetable fresh and crisper G Customcube Icemaker H Ice Bin I J Use this section to become more familiar with the parts and features. The refrigerator you have purchased may not match your model. PARTS AND FEATURES A K B L C M D E N F G O H P I Full-Width Wire Basket J Wire Durabase K Filter (inside)* L Dairy Bin M Egg Box N Design-A-Door Bins O Freezer Light P Wire...
... and vegetable fresh and crisper G Customcube Icemaker H Ice Bin I J Use this section to become more familiar with the parts and features. The refrigerator you have purchased may not match your model. PARTS AND FEATURES A K B L C M D E N F G O H P I Full-Width Wire Basket J Wire Durabase K Filter (inside)* L Dairy Bin M Egg Box N Design-A-Door Bins O Freezer Light P Wire...
Owner's Manual
Page 8
...between 55°F (13°C) and 110°F (43°C.) If the temperature around the appliance is heavy. When Moving Your Refrigerator: Your refrigerator is too low or high, cooling ability may be easily removed by tipping the cabinet slightly. WARNING: Be careful when you work ...into place. 8 The front should be injured or receive an electrical shock. Remove tape and any temporary labels from refrigerator. To remove any warningtype labels, the model and serial number label, or the TechSheet that is now ready for cleaning or service, be injured. You may be...
...between 55°F (13°C) and 110°F (43°C.) If the temperature around the appliance is heavy. When Moving Your Refrigerator: Your refrigerator is too low or high, cooling ability may be easily removed by tipping the cabinet slightly. WARNING: Be careful when you work ...into place. 8 The front should be injured or receive an electrical shock. Remove tape and any temporary labels from refrigerator. To remove any warningtype labels, the model and serial number label, or the TechSheet that is now ready for cleaning or service, be injured. You may be...
Owner's Manual
Page 10
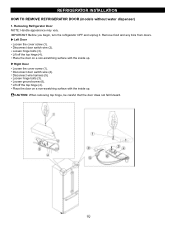
...scratching surface with the inside up . CAUTION: When removing top hinge, be careful that the door does not fall forward. Removing Refrigerator Door NOTE: Handle appearance may vary. Loosen hinge bolts (3). Lift off the top hinge (4). Remove food and any bins from doors.... Lift off the top hinge (4). Loosen ground screw (6). REFRIGERATOR INSTALLATION HOW TO REMOVE REFRIGERATOR DOOR (models without water dispenser) 1. IMPORTANT: Before you begin, turn the refrigerator OFF and unplug it. Loosen hinge bolts (3). Place the door on a non-scratching ...
...scratching surface with the inside up . CAUTION: When removing top hinge, be careful that the door does not fall forward. Removing Refrigerator Door NOTE: Handle appearance may vary. Loosen hinge bolts (3). Lift off the top hinge (4). Remove food and any bins from doors.... Lift off the top hinge (4). Loosen ground screw (6). REFRIGERATOR INSTALLATION HOW TO REMOVE REFRIGERATOR DOOR (models without water dispenser) 1. IMPORTANT: Before you begin, turn the refrigerator OFF and unplug it. Loosen hinge bolts (3). Place the door on a non-scratching ...
Owner's Manual
Page 12
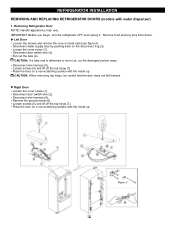
Right Door Loosen the cover screw (1). IMPORTANT: Before you begin, turn the refrigerator OFF and unplug it. Remove food and any bins from doors. Left Door Loosen the screws and remove the cove on the ...surface with the inside up . Disconnect wire harness (4). Place the door on a non-scratching surface with water dispenser) 1. REFRIGERATOR INSTALLATION REMOVING AND REPLACING REFRIGERATOR DOORS (models with the inside up . Removing Refrigerator Door NOTE: Handle appearance may vary. Disconnect water supply tube by pushing back on back side (see figure A). Loosen the...
Right Door Loosen the cover screw (1). IMPORTANT: Before you begin, turn the refrigerator OFF and unplug it. Remove food and any bins from doors. Left Door Loosen the screws and remove the cove on the ...surface with the inside up . Disconnect wire harness (4). Place the door on a non-scratching surface with water dispenser) 1. REFRIGERATOR INSTALLATION REMOVING AND REPLACING REFRIGERATOR DOORS (models with the inside up . Removing Refrigerator Door NOTE: Handle appearance may vary. Disconnect water supply tube by pushing back on back side (see figure A). Loosen the...

Owner's Manual
Page 16
... the freezer or the refrigerator is placed in the freezer and refrigerator compartments. Refrigerator control: 33°F/46°F (0°C to stabilize. But the refrigerator compartment becomes warmer because less cold air flows into the refrigerator. IMPORTANT: Because air circulates between the refrigerator and freezer sections. SETTING THE CONTROLS (Models without water dispenser) Your refrigerator has two controls...
... the freezer or the refrigerator is placed in the freezer and refrigerator compartments. Refrigerator control: 33°F/46°F (0°C to stabilize. But the refrigerator compartment becomes warmer because less cold air flows into the refrigerator. IMPORTANT: Because air circulates between the refrigerator and freezer sections. SETTING THE CONTROLS (Models without water dispenser) Your refrigerator has two controls...
Owner's Manual
Page 17
...and hold the LOCK button for 3 seconds to change °F to -13°C) When the setting is at this setting for normal household refrigerator usage. NOTE: If you want to change the water filter. Express Freezing : Press the EXPRESS FRZ button and the LED will turn LED... 24 hours before adding food. Always remember to adjust temperatures in the previous section should be off . USING YOUR REFRIGERATOR SETTING THE CONTROLS (Models with water dispenser) Your refrigerator has a control pad on the dispenser that lets you regulate the temperature in the chart below as a guide. To...
...and hold the LOCK button for 3 seconds to change °F to -13°C) When the setting is at this setting for normal household refrigerator usage. NOTE: If you want to change the water filter. Express Freezing : Press the EXPRESS FRZ button and the LED will turn LED... 24 hours before adding food. Always remember to adjust temperatures in the previous section should be off . USING YOUR REFRIGERATOR SETTING THE CONTROLS (Models with water dispenser) Your refrigerator has a control pad on the dispenser that lets you regulate the temperature in the chart below as a guide. To...
Owner's Manual
Page 19
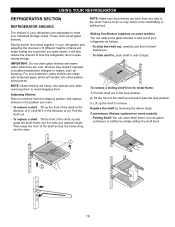
.... Sliding Out Shelves (optional on some models) Folding Shelf: You can slide some models) You can store taller items such as follows. Adjusting Shelves Remove shelves from the shipping position and replace shelves in and out of your refrigerator and adjusting the shelves to sudden temperature ... as bumping. To remove a shelf : Tilt up and pull it will shatter into the slots at a desired height. USING YOUR REFRIGERATOR REFRIGERATOR SECTION REFRIGERATOR SHELVES The shelves in the direction of (2). it past the stop position. 2. Tilt the front of the shelf up the front of...
.... Sliding Out Shelves (optional on some models) Folding Shelf: You can slide some models) You can store taller items such as follows. Adjusting Shelves Remove shelves from the shipping position and replace shelves in and out of your refrigerator and adjusting the shelves to sudden temperature ... as bumping. To remove a shelf : Tilt up and pull it will shatter into the slots at a desired height. USING YOUR REFRIGERATOR REFRIGERATOR SECTION REFRIGERATOR SHELVES The shelves in the direction of (2). it past the stop position. 2. Tilt the front of the shelf up the front of...
Owner's Manual
Page 20
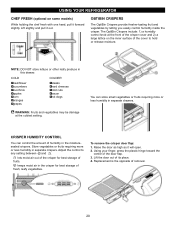
... the front of the crisper cover and 2) a large lattice on some models) While holding the chef fresh with one hand, pull it out. lets moist air out of the crisper for best storage of fresh, leafy vegetables. USING YOUR REFRIGERATOR CHEF FRESH (optional on the inner surface of the cover to any...
... the front of the crisper cover and 2) a large lattice on some models) While holding the chef fresh with one hand, pull it out. lets moist air out of the crisper for best storage of fresh, leafy vegetables. USING YOUR REFRIGERATOR CHEF FRESH (optional on the inner surface of the cover to any...
Owner's Manual
Page 22
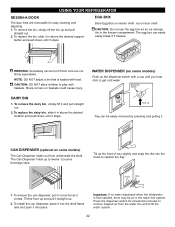
...pull straight out. 2. Holes Ribs 1. WARNING: Somebody can be easily removed by pressing and pulling it in the freezer compartment. WATER DISPENSER (on some models) Push up and pull it and pull straight out. 2. To replace the dairy bin, slide it . Tilt the front up the dispenser switch with ... as it in the water line system. To remove the can easily easily break if it stops. Important: If no water dispensed when the refrigerator is loaded with food. EGG BOX Store Egg Box on interior shelf, not on baskets could cause injury. Press the dispenser switch for easy ...
...pull straight out. 2. Holes Ribs 1. WARNING: Somebody can be easily removed by pressing and pulling it in the freezer compartment. WATER DISPENSER (on some models) Push up and pull it and pull straight out. 2. To replace the dairy bin, slide it . Tilt the front up the dispenser switch with ... as it in the water line system. To remove the can easily easily break if it stops. Important: If no water dispensed when the refrigerator is loaded with food. EGG BOX Store Egg Box on interior shelf, not on baskets could cause injury. Press the dispenser switch for easy ...
Owner's Manual
Page 23
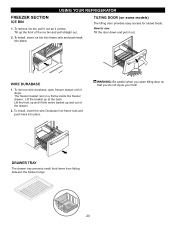
USING YOUR REFRIGERATOR FREEZER SECTION ICE BIN 1. TILTING DOOR (on a frame inside the freezer drawer. The freezer basket rest on some models) The tilting door provides easy access for stored foods. Lift the front up and lift the entire basket up and out of the ice bin ...
USING YOUR REFRIGERATOR FREEZER SECTION ICE BIN 1. TILTING DOOR (on a frame inside the freezer drawer. The freezer basket rest on some models) The tilting door provides easy access for stored foods. Lift the front up and lift the entire basket up and out of the ice bin ...
Owner's Manual
Page 25
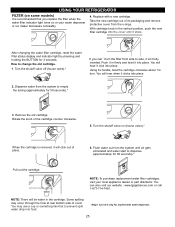
...from the o-rings. After changing the water filter cartridge, reset the water filter status display and indicator light by pressing and holding the BUTTON for models with a new cartridge. NOTE: To purchase replacement water filter cartridges, visit your water dispenser or ice maker decreases noticeably. 4. NOTE: There ... 3. You will hear when it click into food. *Steps 1,2,5 & 6 only for 3 seconds. Rotate the knob of the cartridge counter clockwise. 5. USING YOUR REFRIGERATOR FILTER (on some models) It is removed, it will click out of place. 6. You can ´t turn .
...from the o-rings. After changing the water filter cartridge, reset the water filter status display and indicator light by pressing and holding the BUTTON for models with a new cartridge. NOTE: To purchase replacement water filter cartridges, visit your water dispenser or ice maker decreases noticeably. 4. NOTE: There ... 3. You will hear when it click into food. *Steps 1,2,5 & 6 only for 3 seconds. Rotate the knob of the cartridge counter clockwise. 5. USING YOUR REFRIGERATOR FILTER (on some models) It is removed, it will click out of place. 6. You can ´t turn .
Owner's Manual
Page 27
... dry ice is available, consume or can perishable food at once. If you choose to turn the thermostat control (refrigerator control) to the refrigerator cabinet. Depending on the model, raise the front of dry ice in a frozen food locker. Tape the doors shut and tape the power cord... frozen food and store it in the freezer for every cubic foot of both refrigerator doors closed to the Installing Your Refrigerator section for the move . 7. Reach behind light shield to protect your model, turn the refrigerator off . 1. While handling dry ice, wear gloves to remove bulb. 3. ...
... dry ice is available, consume or can perishable food at once. If you choose to turn the thermostat control (refrigerator control) to the refrigerator cabinet. Depending on the model, raise the front of dry ice in a frozen food locker. Tape the doors shut and tape the power cord... frozen food and store it in the freezer for every cubic foot of both refrigerator doors closed to the Installing Your Refrigerator section for the move . 7. Reach behind light shield to protect your model, turn the refrigerator off . 1. While handling dry ice, wear gloves to remove bulb. 3. ...
Owner's Manual
Page 28
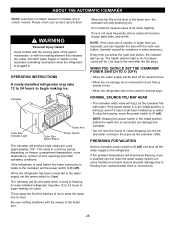
...shrink. If the power switch is included only in certain models. ABOUT THE AUTOMATIC ICEMAKER NOTE: Automatic Ice Maker feature is in the I (on) position, it will buzz even if it cools to freezing. OPERATION INSTRUCTIONS A newly-installed refrigerator may take 12 to 24 hours to I (on). When...(off) and shut off the water supply to O (off ). DO NOT place fingers or hands on some models) to prevent serious property damage due to O (off ). When the refrigerator has been connected to the water supply, set the power switch to flooding from ruptured water lines or connections. 28...
...shrink. If the power switch is included only in certain models. ABOUT THE AUTOMATIC ICEMAKER NOTE: Automatic Ice Maker feature is in the I (on) position, it will buzz even if it cools to freezing. OPERATION INSTRUCTIONS A newly-installed refrigerator may take 12 to 24 hours to I (on). When...(off) and shut off the water supply to O (off ). DO NOT place fingers or hands on some models) to prevent serious property damage due to O (off ). When the refrigerator has been connected to the water supply, set the power switch to flooding from ruptured water lines or connections. 28...
Owner's Manual
Page 29
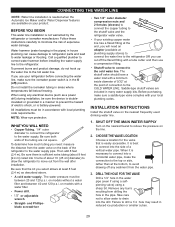
...line to minimize the risk of a vertical water pipe. Remove any burrs resulting from the water valve on models with a water filter. Follow these instructions carefully to the refrigerator OR you will need : measure the distance from drilling the hole in the O (off the flared ...of expensive water damage. Take care not to allow the refrigerator to drill a 1/4 hole may result in a manner to avoid drawing off any electrical device (such as described above. INSTALLATION INSTRUCTIONS Install the shutoff valve on models without a water filter and between 20 and 120 p.s.i. ...
...line to minimize the risk of a vertical water pipe. Remove any burrs resulting from the water valve on models with a water filter. Follow these instructions carefully to the refrigerator OR you will need : measure the distance from drilling the hole in the O (off the flared ...of expensive water damage. Take care not to allow the refrigerator to drill a 1/4 hole may result in a manner to avoid drawing off any electrical device (such as described above. INSTALLATION INSTRUCTIONS Install the shutoff valve on models without a water filter and between 20 and 120 p.s.i. ...
Owner's Manual
Page 32
... voltage. Hard surfaces, like the floor, walls and cabinets, can make . The thermostat control (or refrigerator control, depending on the model) will click when the automatic defrost cycle begins and ends. You may cause your new refrigerator to run more efficiently to replacement. 32 As each cycle ends, you may hear a gurgling sound...
... voltage. Hard surfaces, like the floor, walls and cabinets, can make . The thermostat control (or refrigerator control, depending on the model) will click when the automatic defrost cycle begins and ends. You may cause your new refrigerator to run more efficiently to replacement. 32 As each cycle ends, you may hear a gurgling sound...
Owner's Manual
Page 33
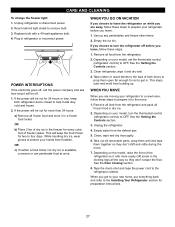
...door and door shelves. Then... The motor will not close completely below. In order to conserve energy, try to cool the refrigerator back down. The refrigerator control was an older model. Then... Push bins all the way, see Doors will take up to 24 hours to run even more operating time. ...The door is opened often. See Doors will run longer in and the refrigerator control was recently plugged in order to get ...
...door and door shelves. Then... The motor will not close completely below. In order to conserve energy, try to cool the refrigerator back down. The refrigerator control was an older model. Then... Push bins all the way, see Doors will take up to 24 hours to run even more operating time. ...The door is opened often. See Doors will run longer in and the refrigerator control was recently plugged in order to get ...


