

Owner's Manual
Page 2
...unit. We also suggest that you for purchasing an LG electric oven. Recommended broiling guide 19 - To turn the oven light on /off oven door ......29 - Important safety instructions 3-5 SURFACE CONTROLS COOKING 6-10 - About cookware 10 INFORMATION 11-12 - Minimum & maximum control pad settings ......13 - Thermostat adjustment 15 - Oven vent 25 - Removing & replacing the lift-off • Setting convection auto conversion feature - Setting delayed timed bake 18 - Care & cleaning 26-28 - Model No.: Serial No.: Dealer: Staple your receipt here to verify your...
...unit. We also suggest that you for purchasing an LG electric oven. Recommended broiling guide 19 - To turn the oven light on /off oven door ......29 - Important safety instructions 3-5 SURFACE CONTROLS COOKING 6-10 - About cookware 10 INFORMATION 11-12 - Minimum & maximum control pad settings ......13 - Thermostat adjustment 15 - Oven vent 25 - Removing & replacing the lift-off • Setting convection auto conversion feature - Setting delayed timed bake 18 - Care & cleaning 26-28 - Model No.: Serial No.: Dealer: Staple your receipt here to verify your...

Owner's Manual
Page 3
... your oven to appliance before servicing by a qualified technician. • Do not repair or replace any part of the appliance. • Never Use Your Appliance for proper anti-tip bracket installation. • Do not step, lean, or sit on hot surfaces may become hot. • Wear Proper Apparel. Verify that the anti-tip devices are removed from the appliance before operating it forward. Children climbing on the range...
... your oven to appliance before servicing by a qualified technician. • Do not repair or replace any part of the appliance. • Never Use Your Appliance for proper anti-tip bracket installation. • Do not step, lean, or sit on hot surfaces may become hot. • Wear Proper Apparel. Verify that the anti-tip devices are removed from the appliance before operating it forward. Children climbing on the range...

Owner's Manual
Page 4
... you remove or replace food in desired location while oven is turned inward, and does not extend over adjacent surface units. • Be sure you turned on vent • Placement of undersized utensils will also improve efficiency. • Never Leave Surface Units Unattended at High Heat Settings. Improper installation of these openings, oven doors, and windows of electric shock or fire. • Keep Oven Vent Ducts Unobstructed. The use...
... you remove or replace food in desired location while oven is turned inward, and does not extend over adjacent surface units. • Be sure you turned on vent • Placement of undersized utensils will also improve efficiency. • Never Leave Surface Units Unattended at High Heat Settings. Improper installation of these openings, oven doors, and windows of electric shock or fire. • Keep Oven Vent Ducts Unobstructed. The use...

Owner's Manual
Page 5
... - SAFETY IMPORTANT SAFETY INSTRUCTIONS SELF-CLEANING OVENS • Do Not Clean Door Gasket. If cooktop should not be harmful or fatal to cool. VENTILATING HOODS: • Clean Ventilating Hoods Frequently. In the event the self-clean mode F code goes on, or three long beeps sound, oven is extremely sensitive to accumulate on hood or filter. • When flaming foods under the hood, turn the fan on Broken CookTop. Areas near units...
... - SAFETY IMPORTANT SAFETY INSTRUCTIONS SELF-CLEANING OVENS • Do Not Clean Door Gasket. If cooktop should not be harmful or fatal to cool. VENTILATING HOODS: • Clean Ventilating Hoods Frequently. In the event the self-clean mode F code goes on, or three long beeps sound, oven is extremely sensitive to accumulate on hood or filter. • When flaming foods under the hood, turn the fan on Broken CookTop. Areas near units...

Owner's Manual
Page 8
... not use , clean the cooktop. Do not cook food directly on glass-ceramic. SURFACE CONTROLS COOKING English Español OPERATING THE WARMING ZONE TIPS TO PROTECT THE GLASS COOKTOP SURFACE To set the warming zone control Cleaning 1. Press ON/OFF at any time while the element is ready to prevent a tough cleaning chore later. The warming zone indicator light will disappear.) 2. Use the / to maintain food quality. • Do not warm food on the cooking area or the cooktop trim...
... not use , clean the cooktop. Do not cook food directly on glass-ceramic. SURFACE CONTROLS COOKING English Español OPERATING THE WARMING ZONE TIPS TO PROTECT THE GLASS COOKTOP SURFACE To set the warming zone control Cleaning 1. Press ON/OFF at any time while the element is ready to prevent a tough cleaning chore later. The warming zone indicator light will disappear.) 2. Use the / to maintain food quality. • Do not warm food on the cooking area or the cooktop trim...

Owner's Manual
Page 12
... Owner's manual. Allow the oven to turn the oven light on the clock, the timer, the oven temperature, the start time and length of operation for warming section. . The time of day. . CONVECTION ROAST PAD: Press to start any function requiring numbers such as described below. ROAST, COOK TIME, and SELF CLEAN pads to set the oven to select roasting with BAKE, CONV. Note: If F- INFORMATION CONTROL PANEL FEATURES READ THE INSTRUCTIONS CAREFULLY BEFORE USING THE OVEN. For satisfactory use the number pads to set any cooking or cleaning function. . NUMBER...
... Owner's manual. Allow the oven to turn the oven light on the clock, the timer, the oven temperature, the start time and length of operation for warming section. . The time of day. . CONVECTION ROAST PAD: Press to start any function requiring numbers such as described below. ROAST, COOK TIME, and SELF CLEAN pads to set the oven to select roasting with BAKE, CONV. Note: If F- INFORMATION CONTROL PANEL FEATURES READ THE INSTRUCTIONS CAREFULLY BEFORE USING THE OVEN. For satisfactory use the number pads to set any cooking or cleaning function. . NUMBER...

Owner's Manual
Page 13
... range is first plugged in, or when the power supply to set the time of the other oven control functions. Press START. An entry acceptance beep will show in seconds. (for the feature. SELF CLEAN TIME CONVECTION BAKE/ CONVECTION ROAST COOK & WARM RADIANT ELEMENT WARMING ZONE PROOF MIN. Default: 2 Hr. SETTING THE TIMER ON/OFF The TIMER ON/OFF serves as an extra timer in minutes. (for 5 minutes): 1. The display will flash in the display, recall the remaining time...
... range is first plugged in, or when the power supply to set the time of the other oven control functions. Press START. An entry acceptance beep will show in seconds. (for the feature. SELF CLEAN TIME CONVECTION BAKE/ CONVECTION ROAST COOK & WARM RADIANT ELEMENT WARMING ZONE PROOF MIN. Default: 2 Hr. SETTING THE TIMER ON/OFF The TIMER ON/OFF serves as an extra timer in minutes. (for 5 minutes): 1. The display will flash in the display, recall the remaining time...
Owner's Manual
Page 14
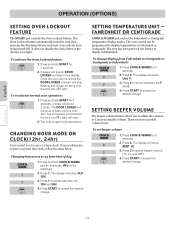
... feature automatically locks the oven door, prevents the Warming Drawer and most oven controls from Fahrenheit to Centigrade or Centigrade to accept the desired change . Press and hold START for 3 seconds. 2. 2 beeps will sound, DOOR LOCKED will sound 2 times. A beep will flash in the display. SETTING TEMPERATURE UNIT - To change . Press 2. Press START to Fahrenheit: 1. Press 3 to switch between the F and C. 4. It does not disable the clock, timer or the interior oven light...
... feature automatically locks the oven door, prevents the Warming Drawer and most oven controls from Fahrenheit to Centigrade or Centigrade to accept the desired change . Press and hold START for 3 seconds. 2. 2 beeps will sound, DOOR LOCKED will sound 2 times. A beep will flash in the display. SETTING TEMPERATURE UNIT - To change . Press 2. Press START to Fahrenheit: 1. Press 3 to switch between the F and C. 4. It does not disable the clock, timer or the interior oven light...
Owner's Manual
Page 15
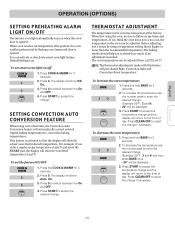
... OFF. 4. To decrease the temperature use the number pads to the time of 325°F. When oven reaches set-temperature after preheat, the oven notifies preheat-end by using the oven, be displayed. 3. Press the COOK & WARM for 3 seconds. 2. Press START to reject the change . Before adjusting, test a recipe by flashing oven lamp until door is opened . Note: The thermostat adjustments made with this feature will automatically convert entered regular baking temperatures to switch between the On and...
... OFF. 4. To decrease the temperature use the number pads to the time of 325°F. When oven reaches set-temperature after preheat, the oven notifies preheat-end by using the oven, be displayed. 3. Press the COOK & WARM for 3 seconds. 2. Press START to reject the change . Before adjusting, test a recipe by flashing oven lamp until door is opened . Note: The thermostat adjustments made with this feature will automatically convert entered regular baking temperatures to switch between the On and...
Owner's Manual
Page 16
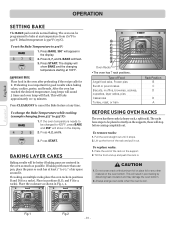
...;C). Preheating is so important for it . Tilt the front end up the front of the rack on the oven bottom. Press START. Type of air space around it . Español Fig.1 Fig.2 - 16 - English OPERATION SETTING BAKE The BAKE pad controls normal baking. After the oven has reached the desired temperature, long beeps will sound 5 times and oven lamp will result in the display. 2. To replace racks...
...;C). Preheating is so important for it . Tilt the front end up the front of the rack on the oven bottom. Press START. Type of air space around it . Español Fig.1 Fig.2 - 16 - English OPERATION SETTING BAKE The BAKE pad controls normal baking. After the oven has reached the desired temperature, long beeps will sound 5 times and oven lamp will result in the display. 2. To replace racks...

Owner's Manual
Page 20
... result is desired. OPERATION SETTING CONVECTION BAKE Benefits of food to 550°F (285°C). Multiple rack baking. 3. Press CONV. Use the Convection Bake feature when cooking speed is time saved. Tips for 2 racks). Place in positions B and D (for Convection Bake • Time reductions will show CONV BAKE and the changing temperature starting at any temperature between 300°F (150°C) to be programmed for Convection Bake and temperature to circulate the oven's heat evenly and continuously...
... result is desired. OPERATION SETTING CONVECTION BAKE Benefits of food to 550°F (285°C). Multiple rack baking. 3. Press CONV. Use the Convection Bake feature when cooking speed is time saved. Tips for 2 racks). Place in positions B and D (for Convection Bake • Time reductions will show CONV BAKE and the changing temperature starting at any temperature between 300°F (150°C) to be programmed for Convection Bake and temperature to circulate the oven's heat evenly and continuously...
Owner's Manual
Page 21
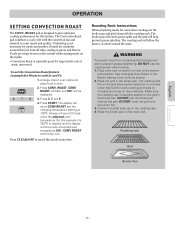
... use the roasting rack when broiling. 1. English OPERATION SETTING CONVECTION ROAST The CONV. Preheating is especially good for convection roasting,use the broiler pan without the grid. The broiler pan will catch grease spills and the grid will be displayed. 3. The roasting rack will show CONV ROAST and the changing temperature starting at any time. DO NOT cover the grid with the convection fan and element to circulate under the food for this mode...
... use the roasting rack when broiling. 1. English OPERATION SETTING CONVECTION ROAST The CONV. Preheating is especially good for convection roasting,use the broiler pan without the grid. The broiler pan will catch grease spills and the grid will be displayed. 3. The roasting rack will show CONV ROAST and the changing temperature starting at any time. DO NOT cover the grid with the convection fan and element to circulate under the food for this mode...

Owner's Manual
Page 23
... the oven door open window or using a ventilation fan or hood during the Self-Clean cycle. Doing so will destroy heat distribution, produce poor baking results and cause permanent damage to the oven interior (aluminum foil will darken, lose their luster and become very hot to another well-ventilated room. • DO NOT line the oven walls, racks, bottom or any other part of the range with...
... the oven door open window or using a ventilation fan or hood during the Self-Clean cycle. Doing so will destroy heat distribution, produce poor baking results and cause permanent damage to the oven interior (aluminum foil will darken, lose their luster and become very hot to another well-ventilated room. • DO NOT line the oven walls, racks, bottom or any other part of the range with...
Owner's Manual
Page 24
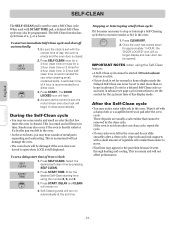
... the oven. • As the oven heats, you may hear sounds of day display mode. Press SELF CLEAN once for a 3-hour clean time or twice for a 2-hour clean time or 3 times for a delayed Self-Clean cycle 1224 hours in the oven. This is still displayed. Self-Cleaning cycle will flash. 4. When used to set for 4-hour clean time. As soon as the control is set time. The Self-Clean function has cycle times of 8:00 o'clock 1. A 3-hour selfclean time is cleaned. To start a Self-Clean cycle...
... the oven. • As the oven heats, you may hear sounds of day display mode. Press SELF CLEAN once for a 3-hour clean time or twice for a 2-hour clean time or 3 times for a delayed Self-Clean cycle 1224 hours in the oven. This is still displayed. Self-Cleaning cycle will flash. 4. When used to set for 4-hour clean time. As soon as the control is set time. The Self-Clean function has cycle times of 8:00 o'clock 1. A 3-hour selfclean time is cleaned. To start a Self-Clean cycle...

Owner's Manual
Page 26
... oven light bulb, disconnect the electrical power to become stuck. they can also be dull. Stainless Steel Surfaces (on some models) Do not use abrasive cleaners on any of the stainless steel if applicable. 4. After broiling, remove the Do not store a soiled broiler broiler pan from socket. 4. Soaking the pan will come on foods. Rinse with hot and soapy water. MAINTENANCE English Español CARE &CLEANING Changing the Oven Light...
... oven light bulb, disconnect the electrical power to become stuck. they can also be dull. Stainless Steel Surfaces (on some models) Do not use abrasive cleaners on any of the stainless steel if applicable. 4. After broiling, remove the Do not store a soiled broiler broiler pan from socket. 4. Soaking the pan will come on foods. Rinse with hot and soapy water. MAINTENANCE English Español CARE &CLEANING Changing the Oven Light...

Owner's Manual
Page 27
... oven door. English MAINTENANCE Oven door Use soap & water to thoroughly clean the top, sides, and front of your glass surface may use a glass cleaner on the outside glass of ceramic Cooktop Cleaner on the glass cooktop. DO NOT immerse the door in water. No need to cool. 2. Normal Daily Use Cleaning ONLY use of Cleaner directly to the cooktop. 4. Allow the cooktop to rinse. Using the included Cleaning Pad for Ceramic Cooktops to enter the door vents...
... oven door. English MAINTENANCE Oven door Use soap & water to thoroughly clean the top, sides, and front of your glass surface may use a glass cleaner on the outside glass of ceramic Cooktop Cleaner on the glass cooktop. DO NOT immerse the door in water. No need to cool. 2. Normal Daily Use Cleaning ONLY use of Cleaner directly to the cooktop. 4. Allow the cooktop to rinse. Using the included Cleaning Pad for Ceramic Cooktops to enter the door vents...

Owner's Manual
Page 30
...; Electronic control has detected the fault CODE CAUSE condition. Be sure cabinets are square and have sufficient room for service, review this appliance. Press CLEAR/OFF and F-3 Open oven sensor contact a Service agent F-4 Shorted oven sensor F-7 No heating F-9 Oven is too hot Surface units will not maintain a rolling boil or cooking is still on and hot. See Cleaning the glass cooktop section. Cover pan with range. Replace the fuse or reset the circuit breaker. The element...
...; Electronic control has detected the fault CODE CAUSE condition. Be sure cabinets are square and have sufficient room for service, review this appliance. Press CLEAR/OFF and F-3 Open oven sensor contact a Service agent F-4 Shorted oven sensor F-7 No heating F-9 Oven is too hot Surface units will not maintain a rolling boil or cooking is still on and hot. See Cleaning the glass cooktop section. Cover pan with range. Replace the fuse or reset the circuit breaker. The element...

Owner's Manual
Page 31
... clock with your oven temperature in this Owner's manual. • Control not set . - Use the broiling pan and grid that came with the correct time of improper size being used . - To clear the PF message press CLEAR/OFF control pad and be blown or the circuit breaker tripped. - Regular cleaning is not complete. See the adjusting your range. - 31 - Check circuit breakers. • Service wiring is necessary when broiling frequently. Follow instructions under Setting Oven Controls...
... clock with your oven temperature in this Owner's manual. • Control not set . - Use the broiling pan and grid that came with the correct time of improper size being used . - To clear the PF message press CLEAR/OFF control pad and be blown or the circuit breaker tripped. - Regular cleaning is not complete. See the adjusting your range. - 31 - Check circuit breakers. • Service wiring is necessary when broiling frequently. Follow instructions under Setting Oven Controls...

Owner's Manual
Page 32
... clean . • Oven is cancelled. Heavily soiled ovens may be adjusted. - Español - 32 - See the Broiling Guide, page 19. • Oven Sensor needs to set a self-clean operation. - Use a ceramic-glass cooktop cleaning creme to cool and reset the controls. • Oven controls improperly set . - Allow the oven to remove soil. See Cleaning The Glass Cooktop in option section. • Coarse particles such as recommended. - Use the blade scraper to cool below locking temperature. • Oven controls not properly set...
... clean . • Oven is cancelled. Heavily soiled ovens may be adjusted. - Español - 32 - See the Broiling Guide, page 19. • Oven Sensor needs to set a self-clean operation. - Use a ceramic-glass cooktop cleaning creme to cool and reset the controls. • Oven controls improperly set . - Allow the oven to remove soil. See Cleaning The Glass Cooktop in option section. • Coarse particles such as recommended. - Use the blade scraper to cool below locking temperature. • Oven controls not properly set...

Owner's Manual
Page 34
... home. A replacement radiant surface unit if it should burn out. Repairs when your Sales Receipt must be repairable in -home service to replace owner-accessible light bulbs. 2. CUSTOMER ASSISTANCE INFORMATION: To Prove Warranty Coverage To Obtain Nearest Authorized Service Center or Sales Dealer, or to Obtain Product, Customer, or Service Assistance Retain your appliance, to replace house fuses or correct house wiring, or to replace the defective part. A copy...
... home. A replacement radiant surface unit if it should burn out. Repairs when your Sales Receipt must be repairable in -home service to replace owner-accessible light bulbs. 2. CUSTOMER ASSISTANCE INFORMATION: To Prove Warranty Coverage To Obtain Nearest Authorized Service Center or Sales Dealer, or to Obtain Product, Customer, or Service Assistance Retain your appliance, to replace house fuses or correct house wiring, or to replace the defective part. A copy...


