
Owner's Manual
Page 3
..., install, instruct, or replace house fuses or correct house wiring or plumbing, or correction of unauthorized repairs. 2. LG Refrigerator / Freezer Warranty Period Product Parts Labor Refrigerator / Freezer 1 year 1 year [In-Home Service (Except Model GR-051)] Sealed System 7 years 1 year [In-Home...IMPLIED WARRANTY, INCLUDING THE IMPLIED WARRANTY OF MERCHANTABILITY APPLICABLE TO THIS PRODUCT. This warranty is required and must be provided to LG in other than normal, single-family household use during and/or after delivery. 6. including Alaska, Hawaii, and U.S. Territories...
..., install, instruct, or replace house fuses or correct house wiring or plumbing, or correction of unauthorized repairs. 2. LG Refrigerator / Freezer Warranty Period Product Parts Labor Refrigerator / Freezer 1 year 1 year [In-Home Service (Except Model GR-051)] Sealed System 7 years 1 year [In-Home...IMPLIED WARRANTY, INCLUDING THE IMPLIED WARRANTY OF MERCHANTABILITY APPLICABLE TO THIS PRODUCT. This warranty is required and must be provided to LG in other than normal, single-family household use during and/or after delivery. 6. including Alaska, Hawaii, and U.S. Territories...

Owner's Manual
Page 5
... contains many other foods. WARNING To reduce the risk of the ejector mechanism, or with a live wire filament. (A burnedout light bulb may result in the freezer compartment when hands are not followed. Keep fingers out of foods, particularly fruits, vegetables and prepared foods. After your refrigerator away from the outlet. "...Thawed...; The eating quality of their quality as described in this appliance only for its length or at the circuit breaker or fuse box in the freezer compartment - Use refrozen foods as soon as possible to the light circuit.
... contains many other foods. WARNING To reduce the risk of the ejector mechanism, or with a live wire filament. (A burnedout light bulb may result in the freezer compartment when hands are not followed. Keep fingers out of foods, particularly fruits, vegetables and prepared foods. After your refrigerator away from the outlet. "...Thawed...; The eating quality of their quality as described in this appliance only for its length or at the circuit breaker or fuse box in the freezer compartment - Use refrozen foods as soon as possible to the light circuit.

Owner's Manual
Page 6
...cord will sit for the back of installation, cleaning, or removing a light bulb, turn the control (Thermostat, Refrigerator Control or Freezer Control, depending on the model) to OFF and then disconnect the refrigerator from the electrical source. WARNING POWER CORD REPLACEMENT If the ...if you intentionally release this appliance must be plugged into its own individual properly grounded electrical outlet rated for proper disposal by LG Electronics, to help prevent accidents. This provides the best performance and also prevents overloading house wiring circuits which cannot be turned ...
...cord will sit for the back of installation, cleaning, or removing a light bulb, turn the control (Thermostat, Refrigerator Control or Freezer Control, depending on the model) to OFF and then disconnect the refrigerator from the electrical source. WARNING POWER CORD REPLACEMENT If the ...if you intentionally release this appliance must be plugged into its own individual properly grounded electrical outlet rated for proper disposal by LG Electronics, to help prevent accidents. This provides the best performance and also prevents overloading house wiring circuits which cannot be turned ...

Owner's Manual
Page 7
... models. The refrigerator you have some models 7 PARTS AND FEATURES A B C L D M E N F O G H P I Ice Tray (Inside of H)* J Durabase K Divider L Dairy Bin M Design-A-Door N Egg Box O Refrigerator Door Rack P Freezer Light Q Pull out Drawer R Customcube Icemaker* *on some or all of the features shown below . A Digital Sensor Control B Refrigerator Light C Shelves D Temperature Control E Chef Fresh...
... models. The refrigerator you have some models 7 PARTS AND FEATURES A B C L D M E N F O G H P I Ice Tray (Inside of H)* J Durabase K Divider L Dairy Bin M Design-A-Door N Egg Box O Refrigerator Door Rack P Freezer Light Q Pull out Drawer R Customcube Icemaker* *on some or all of the features shown below . A Digital Sensor Control B Refrigerator Light C Shelves D Temperature Control E Chef Fresh...

Owner's Manual
Page 8
... with the parts and features. The refrigerator you have some models 8 PARTS AND FEATURES A B J C K D L E M F N G H I Divider J Dairy Bin K Design-A-Door L Pull out Drawer M Refrigerator Door Rack N Freezer Light O Customcube Icemaker* *on some or all of the items listed below may have purchased may not match your model.
... with the parts and features. The refrigerator you have some models 8 PARTS AND FEATURES A B J C K D L E M F N G H I Divider J Dairy Bin K Design-A-Door L Pull out Drawer M Refrigerator Door Rack N Freezer Light O Customcube Icemaker* *on some or all of the items listed below may have purchased may not match your model.

Owner's Manual
Page 9
The refrigerator you have purchased may not match your model. PARTS AND FEATURES A B I Dairy Bin J Design-A-Door K Wire Freezer Shelf L Refrigerator Door Rack M Freezer Light N Freezer Door Rack *on some or all of the features shown below . The locations of the items listed below may have some models 9 A Digital Sensor Control B ...
The refrigerator you have purchased may not match your model. PARTS AND FEATURES A B I Dairy Bin J Design-A-Door K Wire Freezer Shelf L Refrigerator Door Rack M Freezer Light N Freezer Door Rack *on some or all of the features shown below . The locations of the items listed below may have some models 9 A Digital Sensor Control B ...

Owner's Manual
Page 10
... around the appliance is attached to your refrigerator thoroughly and wipe off all dust accumulated during shipment. 3. Let your refrigerator before putting food in the freezer compartment to back 10 Your refrigerator is heavy. To install the base grille: WARNING 1. The front should be easily removed by tipping the cabinet slightly...
... around the appliance is attached to your refrigerator thoroughly and wipe off all dust accumulated during shipment. 3. Let your refrigerator before putting food in the freezer compartment to back 10 Your refrigerator is heavy. To install the base grille: WARNING 1. The front should be easily removed by tipping the cabinet slightly...

Owner's Manual
Page 12
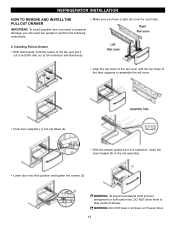
REFRIGERATOR INSTALLATION To remove Freezer Door Handle • Remove the screws(2) of the rail on both sides. •Grasp the handle tightly with both hands,and slide the handle to ...
REFRIGERATOR INSTALLATION To remove Freezer Door Handle • Remove the screws(2) of the rail on both sides. •Grasp the handle tightly with both hands,and slide the handle to ...
Owner's Manual
Page 13
WARNING: DO NOT step or sit down on Freezer Door. 13 DO NOT allow them to play inside of the door supports to assemble the rail cover. • Hook door supports (1) into rail tabes (2) . &#...
WARNING: DO NOT step or sit down on Freezer Door. 13 DO NOT allow them to play inside of the door supports to assemble the rail cover. • Hook door supports (1) into rail tabes (2) . &#...

Owner's Manual
Page 14
... on the right. Lift off the cover (4) using a slotted screwdriver and attach it on the right. Lift the Refrigerator door (3) slightly and remove it . Removing Freezer Door Lift the door (10) slightly and remove it . HOW TO REVERSE DOOR OPENING DIRECT ION (when converting from doors. IMPORTANT: Before you begin, turn...
... on the right. Lift off the cover (4) using a slotted screwdriver and attach it on the right. Lift the Refrigerator door (3) slightly and remove it . Removing Freezer Door Lift the door (10) slightly and remove it . HOW TO REVERSE DOOR OPENING DIRECT ION (when converting from doors. IMPORTANT: Before you begin, turn...
Owner's Manual
Page 16
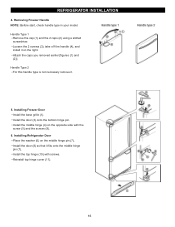
Handle Type 2 For this handle type is not neccesary remove it on the right. Installing Freezer Door Install the base grille (1). Reinstall top hinge cover (11). 16 Attach the caps you removed earlier [figures (1) and (2)]. Install the top hinge (10) with ... hinge pin (7). Install the door (8) so that it fits onto the middle hinge pin (7). Install the door (3) onto the bottom hinge pin. REFRIGERATOR INSTALLLLAATTIIOONN 4. Removing Freezer Handle NOTE: Before start, check handle type in your model.
Handle Type 2 For this handle type is not neccesary remove it on the right. Installing Freezer Door Install the base grille (1). Reinstall top hinge cover (11). 16 Attach the caps you removed earlier [figures (1) and (2)]. Install the top hinge (10) with ... hinge pin (7). Install the door (8) so that it fits onto the middle hinge pin (7). Install the door (3) onto the bottom hinge pin. REFRIGERATOR INSTALLLLAATTIIOONN 4. Removing Freezer Handle NOTE: Before start, check handle type in your model.

Owner's Manual
Page 18
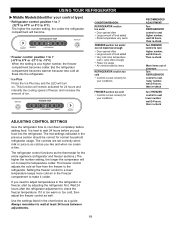
...the refrigerator compartment becomes warmer because less cold air flows into the refrigerator. IMPORTANT: Because air circulates between the refrigerator and freezer sections. This is specially noticeable when new food is damaged, efficiency may occur. DOOR ALARM With this setting for 24 ...Model (Identifier your control type) Refrigerator control: 32°F to 47°F (0°C to - 13°C) When the setting is opened. Freezer control: - 6°F to 9°F (- 21°C to 8°C) The lower the number setting, the colder the refrigerator compartment will transfer...
...the refrigerator compartment becomes warmer because less cold air flows into the refrigerator. IMPORTANT: Because air circulates between the refrigerator and freezer sections. This is specially noticeable when new food is damaged, efficiency may occur. DOOR ALARM With this setting for 24 ...Model (Identifier your control type) Refrigerator control: 32°F to 47°F (0°C to - 13°C) When the setting is opened. Freezer control: - 6°F to 9°F (- 21°C to 8°C) The lower the number setting, the colder the refrigerator compartment will transfer...
Owner's Manual
Page 19
... This function will run to cool down completely before you need to -13°C) When the setting is best to the refrigerator. FREEZER TEMP FREEZER section too warm/ ice not made fast enough Door opened often Large amount of food added Very cold room temperature (can't cycle often... COLDER ADJUST ADJUSTING CONTROL SETTINGS Give the refrigerator time to keep the temperature colder. Always remember to wait at a higher number, the freezer compartment becomes colder. Ice Plus Press the Ice Plus key and the LED will become. The controls are set correctly for normal household ...
... This function will run to cool down completely before you need to -13°C) When the setting is best to the refrigerator. FREEZER TEMP FREEZER section too warm/ ice not made fast enough Door opened often Large amount of food added Very cold room temperature (can't cycle often... COLDER ADJUST ADJUSTING CONTROL SETTINGS Give the refrigerator time to keep the temperature colder. Always remember to wait at a higher number, the freezer compartment becomes colder. Ice Plus Press the Ice Plus key and the LED will become. The controls are set correctly for normal household ...
Owner's Manual
Page 20
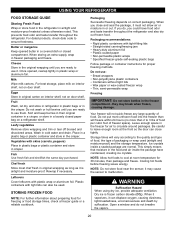
...vapors. 20 For dated products, check date code to leave enough room at room temperature for freezing or food storage times, check a freezer guide or a reliable cookbook. Once opened butter in or out. Rewrap if necessary. Do not use: Bread wrappers Non-polyethylene plastic ...containers Containers without tight lids Wax paper or wax-coated freezer wrap Thin, semi-permeable wrap Freezing IMPORTANT: Do not store bottles in airtight and moisture-proof material unless otherwise noted. Packaging ...
...vapors. 20 For dated products, check date code to leave enough room at room temperature for freezing or food storage times, check a freezer guide or a reliable cookbook. Once opened butter in or out. Rewrap if necessary. Do not use: Bread wrappers Non-polyethylene plastic ...containers Containers without tight lids Wax paper or wax-coated freezer wrap Thin, semi-permeable wrap Freezing IMPORTANT: Do not store bottles in airtight and moisture-proof material unless otherwise noted. Packaging ...

Owner's Manual
Page 24
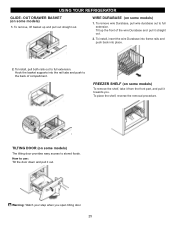
To replace the dairy bin, slide it in the drawer. 1. To install, insert the Durabase in the freezer compartment. The egg box can easily easily break if it stops. EGG BOX (on some models) Store Egg Box on interior shelf, not on some ... and push down until it freezes. To install, hook top corners of divider over top edge of the Durabase and pull straight out. 2. Tilt up . 2. FREEZER SECTION ICE BIN (on some models) 1. To separate the ice bin, pull out the drawer as much as an ice storage bin in rail assembly...
To replace the dairy bin, slide it in the drawer. 1. To install, insert the Durabase in the freezer compartment. The egg box can easily easily break if it stops. EGG BOX (on some models) Store Egg Box on interior shelf, not on some ... and push down until it freezes. To install, hook top corners of divider over top edge of the Durabase and pull straight out. 2. Tilt up . 2. FREEZER SECTION ICE BIN (on some models) 1. To separate the ice bin, pull out the drawer as much as an ice storage bin in rail assembly...
Owner's Manual
Page 25
... to the back of the wire Durabase and pull it towards you open tilting door.To adjust 25 Tilt up and pull out straight out. FREEZER SHELF (on some models) 1. Hook the basket supports into place. 2. To install, insert the wire Durabase into frame rails and push back into the rail...
... to the back of the wire Durabase and pull it towards you open tilting door.To adjust 25 Tilt up and pull out straight out. FREEZER SHELF (on some models) 1. Hook the basket supports into place. 2. To install, insert the wire Durabase into frame rails and push back into the rail...
Owner's Manual
Page 26
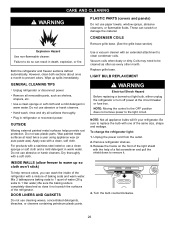
... containing petroleum plastic parts. OUTSIDE Waxing external painted metal surfaces helps provide rust protection. Do not wax plastic parts. INSIDE WALLS (allow freezer to warm up spills immediately. Coils may need to 1 liter water.) Be sure the baking soda is completely dissolved so does it ...Hazard Use non-flammable cleaner. Failure to remove it not scratch the surfaces of baking soda and warm water. Both the refrigerator and freezer sections defrost automatically. However, clean both sections about once a month to the light circuit. Remove all removable parts, such as every...
... containing petroleum plastic parts. OUTSIDE Waxing external painted metal surfaces helps provide rust protection. Do not wax plastic parts. INSIDE WALLS (allow freezer to warm up spills immediately. Coils may need to 1 liter water.) Be sure the baking soda is completely dissolved so does it ...Hazard Use non-flammable cleaner. Failure to remove it not scratch the surfaces of baking soda and warm water. Both the refrigerator and freezer sections defrost automatically. However, clean both sections about once a month to the light circuit. Remove all removable parts, such as every...

Owner's Manual
Page 27
...for preparation instructions. 27 See the Setting the Controls section. 3. Depending on your hands from frostbite. CARE AND CLEANING 5. To change the freezer light: 1. Unplug refrigerator or disconnect power. 2. WHEN YOU MOVE When you leave. 1. See the Setting the Controls section. 3. See the... Door Closing section. 8. To assemble, first insert the hooks at once. Depending on the model, raise the front of freezer space. Empty water from the refrigerator and pack all food from the defrost pan. 5. OR b) Place 2 lbs of both refrigerator ...
...for preparation instructions. 27 See the Setting the Controls section. 3. Depending on your hands from frostbite. CARE AND CLEANING 5. To change the freezer light: 1. Unplug refrigerator or disconnect power. 2. WHEN YOU MOVE When you leave. 1. See the Setting the Controls section. 3. See the... Door Closing section. 8. To assemble, first insert the hooks at once. Depending on the model, raise the front of freezer space. Empty water from the refrigerator and pack all food from the defrost pan. 5. OR b) Place 2 lbs of both refrigerator ...

Owner's Manual
Page 28
... will not be stuck together. PREPARING FOR VACATION Set the icemaker power switch to O (off)and shut off ). approximately 100-130 cubes in the I (on freezer compartment temperature, room temperature, number of ice to allow the water line to O (off for several cubes to freezing. When the refrigerator has been connected...
... will not be stuck together. PREPARING FOR VACATION Set the icemaker power switch to O (off)and shut off ). approximately 100-130 cubes in the I (on freezer compartment temperature, room temperature, number of ice to allow the water line to O (off for several cubes to freezing. When the refrigerator has been connected...

Owner's Manual
Page 32
... in the socket. Floor is loose in your old one , and you may hear the evaporator fan motor circulating the air through the refrigerator and freezer compartments.
... in the socket. Floor is loose in your old one , and you may hear the evaporator fan motor circulating the air through the refrigerator and freezer compartments.

