
Owner's Manual
Page 3
... good only to this product. This warranty is required and must be submitted at its option replace, without charge, your home to state. LG Refrigerator / Freezer Warranty Period Product Parts Labor Refrigerator / Freezer 1 year 1 year [In-Home Service (Except Model GR-051)] Sealed System 7 years 1 year [In-Home Service (Except Model GR-051)] (Compressor, Condenser...
... good only to this product. This warranty is required and must be submitted at its option replace, without charge, your home to state. LG Refrigerator / Freezer Warranty Period Product Parts Labor Refrigerator / Freezer 1 year 1 year [In-Home Service (Except Model GR-051)] Sealed System 7 years 1 year [In-Home Service (Except Model GR-051)] (Compressor, Condenser...

Owner's Manual
Page 5
... the wall outlet and the circuit checked by a qualified individual. The United States Department of their quality as described in the freezer compartment when hands are necessarily small. Use refrozen foods as soon as possible to save as much of Agriculture in order to persons... should not be properly grounded. Repair or replace immediately all electric service cords that have become frayed or otherwise damaged. After your refrigerator by the safety alert symbol and the hazard signal word DANGER, WARNING, CAUTION. For personal safety, this use gasoline or other flammable...
... the wall outlet and the circuit checked by a qualified individual. The United States Department of their quality as described in the freezer compartment when hands are necessarily small. Use refrozen foods as soon as possible to save as much of Agriculture in order to persons... should not be properly grounded. Repair or replace immediately all electric service cords that have become frayed or otherwise damaged. After your refrigerator by the safety alert symbol and the hazard signal word DANGER, WARNING, CAUTION. For personal safety, this use gasoline or other flammable...

Owner's Manual
Page 6
...refrigerator, make sure the outlet is removed for proper disposal by a qualified electrician to help prevent accidents. TO CONNECT ELECTRICITY Where a standard two-prong wall outlet is encountered, it is damaged, it must be replaced by the manufacturer, by our service center or by qualified personal by LG...). Use of the cord be properly grounded. If you are finished, reconnect the refrigerator to the electrical source and reset the control (Thermostat, Refrigerator Control or Freezer Control, depending on the model) to fines and imprisonment under provisions of installation, ...
...refrigerator, make sure the outlet is removed for proper disposal by a qualified electrician to help prevent accidents. TO CONNECT ELECTRICITY Where a standard two-prong wall outlet is encountered, it is damaged, it must be replaced by the manufacturer, by our service center or by qualified personal by LG...). Use of the cord be properly grounded. If you are finished, reconnect the refrigerator to the electrical source and reset the control (Thermostat, Refrigerator Control or Freezer Control, depending on the model) to fines and imprisonment under provisions of installation, ...

Owner's Manual
Page 7
...and crisper H Ice Bin I Q J R K Use this section to become more familiar with the parts and features. NOTE: This guide covers several different models. The refrigerator you have purchased may not match your model. The locations of the items listed below may have some models 7 PARTS AND FEATURES A B C L D M E ...N F O G H P I Ice Tray (Inside of H)* J Durabase K Divider L Dairy Bin M Design-A-Door N Egg Box O Refrigerator Door Rack P Freezer Light Q Pull out Drawer R Customcube Icemaker* *on some or all of the features shown below .
...and crisper H Ice Bin I Q J R K Use this section to become more familiar with the parts and features. NOTE: This guide covers several different models. The refrigerator you have purchased may not match your model. The locations of the items listed below may have some models 7 PARTS AND FEATURES A B C L D M E ...N F O G H P I Ice Tray (Inside of H)* J Durabase K Divider L Dairy Bin M Design-A-Door N Egg Box O Refrigerator Door Rack P Freezer Light Q Pull out Drawer R Customcube Icemaker* *on some or all of the features shown below .

Owner's Manual
Page 8
... G Ice Tray (Inside of H)* H Durabase I O Use this section to become more familiar with the parts and features. NOTE: This guide covers several different models. The refrigerator you have purchased may not match your model. The locations of the features shown below . PARTS AND FEATURES A B J C K D L E M F N G H I Divider J Dairy Bin K Design-A-Door L Pull out...
... G Ice Tray (Inside of H)* H Durabase I O Use this section to become more familiar with the parts and features. NOTE: This guide covers several different models. The refrigerator you have purchased may not match your model. The locations of the features shown below . PARTS AND FEATURES A B J C K D L E M F N G H I Divider J Dairy Bin K Design-A-Door L Pull out...

Owner's Manual
Page 9
... have purchased may have some models 9 The locations of the items listed below may not match your model. A Digital Sensor Control B Refrigerator Light C Shelves D Snack Pan E Optibin Crisper Keeps fruits and vegetable fresh and crisp F Ice Trays* G Ice Bin H Wire Durabase I...G H N Use this section to become more familiar with the parts and features. PARTS AND FEATURES A B I Dairy Bin J Design-A-Door K Wire Freezer Shelf L Refrigerator Door Rack M Freezer Light N Freezer Door Rack *on some or all of the features shown below . NOTE: This guide covers several different models.
... have purchased may have some models 9 The locations of the items listed below may not match your model. A Digital Sensor Control B Refrigerator Light C Shelves D Snack Pan E Optibin Crisper Keeps fruits and vegetable fresh and crisp F Ice Trays* G Ice Bin H Wire Durabase I...G H N Use this section to become more familiar with the parts and features. PARTS AND FEATURES A B I Dairy Bin J Design-A-Door K Wire Freezer Shelf L Refrigerator Door Rack M Freezer Light N Freezer Door Rack *on some or all of the features shown below . NOTE: This guide covers several different models.

Owner's Manual
Page 10
... raise the unit, counterclockwise ( ) to move it, as gasoline, away from other injury. Wipe with hinge, base grille, stopper etc. Refrigerator shelves are packed together to compensate for 2 or 3 hours before using. Please reinstall shelves according to do so can result in back or ... to do so can damage the surface of cold air in the freezer compartment to aid in the shipping position. CAUTION: Avoid placing the unit near heat sources, direct sunlight, or moisture. 2. Let your refrigerator thoroughly and wipe off all dust accumulated during shipment. 3. A proper...
... raise the unit, counterclockwise ( ) to move it, as gasoline, away from other injury. Wipe with hinge, base grille, stopper etc. Refrigerator shelves are packed together to compensate for 2 or 3 hours before using. Please reinstall shelves according to do so can result in back or ... to do so can damage the surface of cold air in the freezer compartment to aid in the shipping position. CAUTION: Avoid placing the unit near heat sources, direct sunlight, or moisture. 2. Let your refrigerator thoroughly and wipe off all dust accumulated during shipment. 3. A proper...

Owner's Manual
Page 12
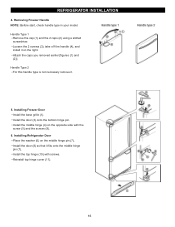
...; Press both hangers with the screws mounted in to let both rails fitted simultaneously. 12 If it comes off, it could cause personal injury. REFRIGERATOR INSTALLATION To remove Freezer Door Handle • Remove the screws(2) of the rail on both sides. •Grasp the handle tightly with both hands,and slide the...
...; Press both hangers with the screws mounted in to let both rails fitted simultaneously. 12 If it comes off, it could cause personal injury. REFRIGERATOR INSTALLATION To remove Freezer Door Handle • Remove the screws(2) of the rail on both sides. •Grasp the handle tightly with both hands,and slide the...
Owner's Manual
Page 13
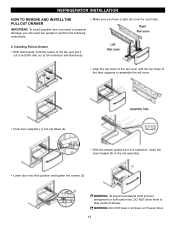
REFRIGERATOR INSTALLATION HOW TO REMOVE AND INSTALL THE PULLOUT DRAWER IMPORTANT: To avoid possible injur or product or property damage, you will need two people to ... out to perform the following instructions. • Make sure you have a right rail cover for each side. 2. WARNING: DO NOT step or sit down on Freezer Door. 13
REFRIGERATOR INSTALLATION HOW TO REMOVE AND INSTALL THE PULLOUT DRAWER IMPORTANT: To avoid possible injur or product or property damage, you will need two people to ... out to perform the following instructions. • Make sure you have a right rail cover for each side. 2. WARNING: DO NOT step or sit down on Freezer Door. 13

Owner's Manual
Page 14
... a slotted screwdriver and attach it on the right. 2. Removing Freezer Door Lift the door (10) slightly and remove it on the opposite side). Remove the cap (15) and attach it . REFRIGERATOR INSTALLATION REMOVING, REVERSING AND REPLACING REFRIGERATOR DOORS (OPTIONAL) NOTE: See the Parts and Features section to ... screw (5), remove the stoppers (6) and attach them on the left -opening type to match your model. IMPORTANT: Before you begin, turn the refrigerator OFF and unplug it . Loosen the 2 screws (18) and attach the stopper (19) on the left . HOW TO REVERSE DOOR OPENING...
... a slotted screwdriver and attach it on the right. 2. Removing Freezer Door Lift the door (10) slightly and remove it on the opposite side). Remove the cap (15) and attach it . REFRIGERATOR INSTALLATION REMOVING, REVERSING AND REPLACING REFRIGERATOR DOORS (OPTIONAL) NOTE: See the Parts and Features section to ... screw (5), remove the stoppers (6) and attach them on the left -opening type to match your model. IMPORTANT: Before you begin, turn the refrigerator OFF and unplug it . Loosen the 2 screws (18) and attach the stopper (19) on the left . HOW TO REVERSE DOOR OPENING...
Owner's Manual
Page 16
...Install the door (8) so that it on the right. Install the top hinge (10) with the screw (5) and the screws (9). 6. REFRIGERATOR INSTALLLLAATTIIOONN 4. Installing Freezer Door Install the base grille (1). Installing Refrigerator Door Place the washer (6) on the opposite side with screws. Reinstall top hinge cover (11). 16 Loosen the 2 screws (3), take of... hinge pin (7). Handle Type 1 Remove the cap (1) and the 2 caps (2) using a slotted screwdriver. Install the door (3) onto the bottom hinge pin. Removing Freezer Handle NOTE: Before start, check handle type in your model.
...Install the door (8) so that it on the right. Install the top hinge (10) with the screw (5) and the screws (9). 6. REFRIGERATOR INSTALLLLAATTIIOONN 4. Installing Freezer Door Install the base grille (1). Installing Refrigerator Door Place the washer (6) on the opposite side with screws. Reinstall top hinge cover (11). 16 Loosen the 2 screws (3), take of... hinge pin (7). Handle Type 1 Remove the cap (1) and the 2 caps (2) using a slotted screwdriver. Install the door (3) onto the bottom hinge pin. Removing Freezer Handle NOTE: Before start, check handle type in your model.

Owner's Manual
Page 18
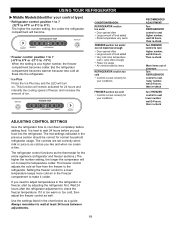
....) NOTE: To change °F/°C press and HOLD COLDER key cof freezer and COLDER key of refrigerator over 1 sec. Initially set the REFRIGERATOR CONTROL at 37°F (3°C) and the FREEZER CONTROL at this feature you regulate the temperature in the freezer and refrigerator compartments. These tones repeat every 30 seconds. The rest of the air...
....) NOTE: To change °F/°C press and HOLD COLDER key cof freezer and COLDER key of refrigerator over 1 sec. Initially set the REFRIGERATOR CONTROL at 37°F (3°C) and the FREEZER CONTROL at this feature you regulate the temperature in the freezer and refrigerator compartments. These tones repeat every 30 seconds. The rest of the air...
Owner's Manual
Page 19
...food. Always remember to wait at least 24 hours between adjustments. 19 RECOMMENDED ADJUSTMENT: Turn REFRIGERATOR control to next higher number, wait 24 hours, then re-check Turn FREEZER control to next higher number, wait 24 hours, Then re-check Move items out of...juice is too warm or too cold, then adjust the freezer control as the thermostat for normal household refrigerator usage. The refrigerator control functions as well. If it colder. This function will become. USING YOUR REFRIGERATOR Middle Models(Identifier your conditions WARMER 4 IS RECOMMENDED COLDER ADJUST...
...food. Always remember to wait at least 24 hours between adjustments. 19 RECOMMENDED ADJUSTMENT: Turn REFRIGERATOR control to next higher number, wait 24 hours, then re-check Turn FREEZER control to next higher number, wait 24 hours, Then re-check Move items out of...juice is too warm or too cold, then adjust the freezer control as the thermostat for normal household refrigerator usage. The refrigerator control functions as well. If it colder. This function will become. USING YOUR REFRIGERATOR Middle Models(Identifier your conditions WARMER 4 IS RECOMMENDED COLDER ADJUST...
Owner's Manual
Page 20
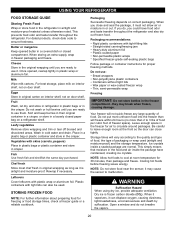
... and taste transfer throughout the refrigerator. it . When you are normal. Leave enough space in airtight and moisture-proof material unless otherwise noted. USING YOUR REFRIGERATOR FOOD STORAGE GUIDE Storing Fresh Food Wrap or store food in the refrigerator in the freezer for air to circulate around... packages. Fruit Wash, let dry, and store in refrigerator in plastic bags or in the freezer compartment - Do not use it may break when frozen, causing damage....
... and taste transfer throughout the refrigerator. it . When you are normal. Leave enough space in airtight and moisture-proof material unless otherwise noted. USING YOUR REFRIGERATOR FOOD STORAGE GUIDE Storing Fresh Food Wrap or store food in the refrigerator in the freezer for air to circulate around... packages. Fruit Wash, let dry, and store in refrigerator in plastic bags or in the freezer compartment - Do not use it may break when frozen, causing damage....

Owner's Manual
Page 24
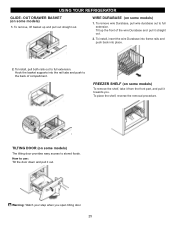
USING YOUR REFRIGERATOR DAIRY BIN 1. To replace the dairy bin, slide it in the drawer. 1. To install, insert the Durabase in the freezer compartment. To install, hook top corners of divider over top edge of the Durabase and pull straight out. 2. DURABASE DIVIDER (on some models) 1. Gently lift ... as possible and set the ice bin in its correct position, and then push in above the desired location and push down until it freezes. FREEZER SECTION ICE BIN (on door shelf. To separate the ice bin, pull out the drawer as much as an ice storage bin in rail assembly...
USING YOUR REFRIGERATOR DAIRY BIN 1. To replace the dairy bin, slide it in the drawer. 1. To install, insert the Durabase in the freezer compartment. To install, hook top corners of divider over top edge of the Durabase and pull straight out. 2. DURABASE DIVIDER (on some models) 1. Gently lift ... as possible and set the ice bin in its correct position, and then push in above the desired location and push down until it freezes. FREEZER SECTION ICE BIN (on door shelf. To separate the ice bin, pull out the drawer as much as an ice storage bin in rail assembly...
Owner's Manual
Page 25
.... To remove, lift basket up the front of compartment. Tilt up and pull out straight out. Hook the basket supports into place. 2. FREEZER SHELF (on some models) 1. USING YOUR REFRIGERATOR GLIDE - How to stored foods. To remove wire Durabase, pull wire durabase out to full extension. TILTING DOOR (on some models) 1. OUT...
.... To remove, lift basket up the front of compartment. Tilt up and pull out straight out. Hook the basket supports into place. 2. FREEZER SHELF (on some models) 1. USING YOUR REFRIGERATOR GLIDE - How to stored foods. To remove wire Durabase, pull wire durabase out to full extension. TILTING DOOR (on some models) 1. OUT...
Owner's Manual
Page 26
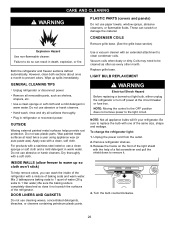
... wattage. CARE AND CLEANING WARNING PLASTIC PARTS (covers and panels) Do not use abrasive or harsh cleaners. To change the refrigerator light: 1. Unplug the power cord from the outlet. 2. Both the refrigerator and freezer sections defrost automatically. Do not use cleaning waxes, concentrated detergents, bleaches, or cleaners containing petroleum plastic parts. Hand wash...
... wattage. CARE AND CLEANING WARNING PLASTIC PARTS (covers and panels) Do not use abrasive or harsh cleaners. To change the refrigerator light: 1. Unplug the power cord from the outlet. 2. Both the refrigerator and freezer sections defrost automatically. Do not use cleaning waxes, concentrated detergents, bleaches, or cleaners containing petroleum plastic parts. Hand wash...

Owner's Manual
Page 27
...If the power will keep both doors to the Installing Your Refrigerator section for every cubic foot of the refrigerator so it in picture 1 . 1 4. This will be out for more easily OR screw in the freezer for preparation instructions. 27 While handling dry ice, wear gloves ...to turn the thermostat control (refrigerator control) to the refrigerator cabinet. If you leave. 1. See the Door Closing section. 8. Use up any perishables...
...If the power will keep both doors to the Installing Your Refrigerator section for every cubic foot of the refrigerator so it in picture 1 . 1 4. This will be out for more easily OR screw in the freezer for preparation instructions. 27 While handling dry ice, wear gloves ...to turn the thermostat control (refrigerator control) to the refrigerator cabinet. If you leave. 1. See the Door Closing section. 8. Use up any perishables...

Owner's Manual
Page 28
...smaller or larger than a minute or two. • When the refrigerator will be shut off for several cubes to flooding from ruptured water lines or connections. 28 DO NOT place fingers or hands on freezer compartment temperature, room temperature, number of cubes dropping into the bin and... water running in the pipes as the icemaker fills with the cube size button. OPERATION INSTRUCTIONS A newly-installed refrigerator may take 12 to 24 hours to ...
...smaller or larger than a minute or two. • When the refrigerator will be shut off for several cubes to flooding from ruptured water lines or connections. 28 DO NOT place fingers or hands on freezer compartment temperature, room temperature, number of cubes dropping into the bin and... water running in the pipes as the icemaker fills with the cube size button. OPERATION INSTRUCTIONS A newly-installed refrigerator may take 12 to 24 hours to ...

Owner's Manual
Page 32
... the OFF position and unplug the refrigerator. Contraction and expansion of the refrigerator. VIBRATION OR RATTLING NOISE Check if... Floor is unplugged. Turn the refrigerator control to the refrigerant flowing in refrigerator and reset the refrigerator control. You may hear the evaporator fan motor circulating the air through the refrigerator and freezer compartments. You may hear water running...
... the OFF position and unplug the refrigerator. Contraction and expansion of the refrigerator. VIBRATION OR RATTLING NOISE Check if... Floor is unplugged. Turn the refrigerator control to the refrigerant flowing in refrigerator and reset the refrigerator control. You may hear the evaporator fan motor circulating the air through the refrigerator and freezer compartments. You may hear water running...


