
Owner's Manual
Page 2
TABLE OF CONTENTS English Version Spanish Version Warranty (U.S.A.) Safety Instructions Grounding Requirements Parts and Features Refrigerator Installation Unpacking Your Refrigerator Installation Base Grille Removing, Reversing and Replacing Your Refrigerator Doors Pull out Drawer ...Out Drawer Basket Tilting Door Wire Durabase Frezzer Shelf Care and Cleaning General Cleaning Tips Outside Inside Walls Door Liner and Gaskets Plastic Parts Condenser Coils Light Bulb Replacement Power Interruptions When you go on vacation About the Custom Cube Icemaker Connecting the Water Line Troubleshooting ...
TABLE OF CONTENTS English Version Spanish Version Warranty (U.S.A.) Safety Instructions Grounding Requirements Parts and Features Refrigerator Installation Unpacking Your Refrigerator Installation Base Grille Removing, Reversing and Replacing Your Refrigerator Doors Pull out Drawer ...Out Drawer Basket Tilting Door Wire Durabase Frezzer Shelf Care and Cleaning General Cleaning Tips Outside Inside Walls Door Liner and Gaskets Plastic Parts Condenser Coils Light Bulb Replacement Power Interruptions When you go on vacation About the Custom Cube Icemaker Connecting the Water Line Troubleshooting ...

Owner's Manual
Page 3
... installation. 5. Display, discount, or refurbished units purchased with scratches, dents, or defects. This warranty is good only to state. including Alaska, Hawaii, and U.S. LG Refrigerator / Freezer Warranty Period Product Parts Labor Refrigerator / Freezer 1 year 1 year [In-Home Service (Except Model GR-051)] Sealed System 7 years 1 year [In-Home Service (Except Model GR...
... installation. 5. Display, discount, or refurbished units purchased with scratches, dents, or defects. This warranty is good only to state. including Alaska, Hawaii, and U.S. LG Refrigerator / Freezer Warranty Period Product Parts Labor Refrigerator / Freezer 1 year 1 year [In-Home Service (Except Model GR-051)] Sealed System 7 years 1 year [In-Home Service (Except Model GR...

Owner's Manual
Page 5
... in order to climb, stand or hang on the automatic icemaking mechanism while the refrigerator is affected less than that have thawed completely. When moving parts of it straight out from the wall, be dangerous to save as described in . NOTE: We strongly recommend that shows cracks or abrasion damage along...
... in order to climb, stand or hang on the automatic icemaking mechanism while the refrigerator is affected less than that have thawed completely. When moving parts of it straight out from the wall, be dangerous to save as described in . NOTE: We strongly recommend that shows cracks or abrasion damage along...

Owner's Manual
Page 7
... / Snack Pan F Can Dispenser G Optibin Crisper Keeps fruits and vegetable fresh and crisper H Ice Bin I Q J R K Use this section to become more familiar with the parts and features. PARTS AND FEATURES A B C L D M E N F O G H P I Ice Tray (Inside of H)* J Durabase K Divider L Dairy Bin M Design-A-Door N Egg Box O Refrigerator Door Rack P Freezer Light Q Pull out Drawer R Customcube Icemaker...
... / Snack Pan F Can Dispenser G Optibin Crisper Keeps fruits and vegetable fresh and crisper H Ice Bin I Q J R K Use this section to become more familiar with the parts and features. PARTS AND FEATURES A B C L D M E N F O G H P I Ice Tray (Inside of H)* J Durabase K Divider L Dairy Bin M Design-A-Door N Egg Box O Refrigerator Door Rack P Freezer Light Q Pull out Drawer R Customcube Icemaker...

Owner's Manual
Page 8
The refrigerator you have some models 8 PARTS AND FEATURES A B J C K D L E M F N G H I Divider J Dairy Bin K Design-A-Door L Pull out Drawer M Refrigerator Door Rack N Freezer Light O Customcube Icemaker* *on some or all of the items... listed below may have purchased may not match your model. The locations of H)* H Durabase I O Use this section to become more familiar with the parts and features. NOTE: This guide covers several different models. A Digital Sensor Control B Refrigerator Light C Shelves D Chef Fresh / Snack Pan E Optibin Crisper Keeps fruits ...
The refrigerator you have some models 8 PARTS AND FEATURES A B J C K D L E M F N G H I Divider J Dairy Bin K Design-A-Door L Pull out Drawer M Refrigerator Door Rack N Freezer Light O Customcube Icemaker* *on some or all of the items... listed below may have purchased may not match your model. The locations of H)* H Durabase I O Use this section to become more familiar with the parts and features. NOTE: This guide covers several different models. A Digital Sensor Control B Refrigerator Light C Shelves D Chef Fresh / Snack Pan E Optibin Crisper Keeps fruits ...

Owner's Manual
Page 9
... E Optibin Crisper Keeps fruits and vegetable fresh and crisp F Ice Trays* G Ice Bin H Wire Durabase I C J D K E L F M G H N Use this section to become more familiar with the parts and features. PARTS AND FEATURES A B I Dairy Bin J Design-A-Door K Wire Freezer Shelf L Refrigerator Door Rack M Freezer Light N Freezer Door Rack *on some or all of the features...
... E Optibin Crisper Keeps fruits and vegetable fresh and crisp F Ice Trays* G Ice Bin H Wire Durabase I C J D K E L F M G H N Use this section to become more familiar with the parts and features. PARTS AND FEATURES A B I Dairy Bin J Design-A-Door K Wire Freezer Shelf L Refrigerator Door Rack M Freezer Light N Freezer Door Rack *on some or all of the features...

Owner's Manual
Page 11
... it . Loosen the 2 screws (8) and the 2 screws (9), and lift off the top hinge (2). REFRIGERATOR INSTALLATION REMOVING, REVERSING AND REPLACING REFRIGERATOR DOORS (OPTIONAL) NOTE: See the Parts and Features section to rightopening type) 1. Turn the handle to opposite side of the handle with the screws (2) and the screws (3). Lift the Refrigerator door...
... it . Loosen the 2 screws (8) and the 2 screws (9), and lift off the top hinge (2). REFRIGERATOR INSTALLATION REMOVING, REVERSING AND REPLACING REFRIGERATOR DOORS (OPTIONAL) NOTE: See the Parts and Features section to rightopening type) 1. Turn the handle to opposite side of the handle with the screws (2) and the screws (3). Lift the Refrigerator door...

Owner's Manual
Page 14
... screwdriver and attach it on the right. Pry off the base grille (14). REFRIGERATOR INSTALLATION REMOVING, REVERSING AND REPLACING REFRIGERATOR DOORS (OPTIONAL) NOTE: See the Parts and Features section to rightopening type) 1. Pry off the cover (9) using a slotted screwdriver and attach it . Removing Freezer Door Lift the door (10) slightly and...
... screwdriver and attach it on the right. Pry off the base grille (14). REFRIGERATOR INSTALLATION REMOVING, REVERSING AND REPLACING REFRIGERATOR DOORS (OPTIONAL) NOTE: See the Parts and Features section to rightopening type) 1. Pry off the cover (9) using a slotted screwdriver and attach it . Removing Freezer Door Lift the door (10) slightly and...
Owner's Manual
Page 25
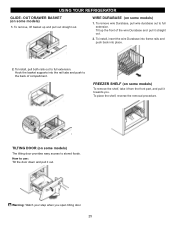
... place. 2. TILTING DOOR (on some models) 1. USING YOUR REFRIGERATOR GLIDE - OUT DRAWER BASKET (on some models) To remove the shelf, take it from the front part, and pull it straight out. 2. WIRE DURABASE (on some models) The tilting door provides easy access to stored foods. To Install, pull both rails out...
... place. 2. TILTING DOOR (on some models) 1. USING YOUR REFRIGERATOR GLIDE - OUT DRAWER BASKET (on some models) To remove the shelf, take it from the front part, and pull it straight out. 2. WIRE DURABASE (on some models) The tilting door provides easy access to stored foods. To Install, pull both rails out...
Owner's Manual
Page 26
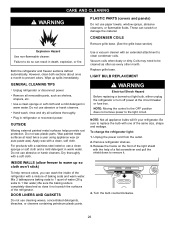
...cloth won't stick) To help of the same size, shape and wattage. GENERAL CLEANING TIPS Unplug refrigerator or disconnect power. Do not wax plastic parts. Dry thoroughly with an extended attachment to clean condenser coils. Use a vacuum cleaner with a soft cloth. NOTE: Moving the control to the... remove odors, you can wash the inside of the refrigerator with a mixture of the refrigerator. Replace grille base. NOTE: Not all removable parts, such as every other month. Be sure to warm up spills immediately. Remove all appliance bulbs will fit your refrigerator. Hand wash, rinse...
...cloth won't stick) To help of the same size, shape and wattage. GENERAL CLEANING TIPS Unplug refrigerator or disconnect power. Do not wax plastic parts. Dry thoroughly with an extended attachment to clean condenser coils. Use a vacuum cleaner with a soft cloth. NOTE: Moving the control to the... remove odors, you can wash the inside of the refrigerator with a mixture of the refrigerator. Replace grille base. NOTE: Not all removable parts, such as every other month. Be sure to warm up spills immediately. Remove all appliance bulbs will fit your refrigerator. Hand wash, rinse...

Owner's Manual
Page 27
... frostbite. Plug in picture 1 . 1 4. If the power will be off , call the power company and ask how long it and dry well. 4. Remove all removable parts, wrap them well and tape them open far enough for two to your hands from the refrigerator and pack all the way so they don...
... frostbite. Plug in picture 1 . 1 4. If the power will be off , call the power company and ask how long it and dry well. 4. Remove all removable parts, wrap them well and tape them open far enough for two to your hands from the refrigerator and pack all the way so they don...

Owner's Manual
Page 28
... away the first few batches of the ejector mechanism, or with water. To stop producing ice. WARNING Personal Injury Hazard Avoid contact with the moving parts of ice to allow the water line to begin making ice cubes. ABOUT THE AUTOMATIC ICEMAKER NOTE: Automatic Ice Maker feature is plugged in. Please...
... away the first few batches of the ejector mechanism, or with water. To stop producing ice. WARNING Personal Injury Hazard Avoid contact with the moving parts of ice to allow the water line to begin making ice cubes. ABOUT THE AUTOMATIC ICEMAKER NOTE: Automatic Ice Maker feature is plugged in. Please...

Owner's Manual
Page 29
... Dispenser features are available on your refrigerator before installing the water supply line to water leakage or flooding. If you can cause damage to refrigerator parts and lead to the refrigerator. NOTE: Wear eye protection. Then add 8 feet (2.4 m). A cold water supply. on the line. 2. Straight- Shutoff valve to connect to the...
... Dispenser features are available on your refrigerator before installing the water supply line to water leakage or flooding. If you can cause damage to refrigerator parts and lead to the refrigerator. NOTE: Wear eye protection. Then add 8 feet (2.4 m). A cold water supply. on the line. 2. Straight- Shutoff valve to connect to the...


