
Owner's Manual
Page 2
... 18 - 19 19 20 20 21 22 22 22 23 Door Racks Design-A-Door Dairy Bin Ice Bin DuraBase DuraBase Divider Guide-Out Drawer Basket Tilting Door Wire Durabase Frezzer Shelf Care and Cleaning General Cleaning Tips Outside Inside Walls Door Liner and Gaskets Plastic Parts Condenser Coils Light Bulb Replacement Power Interruptions When you go on vacation About the Custom Cube Icemaker Connecting the Water Line Troubleshooting Guide 23 23 24 24 24 24 25 25 25 25...
... 18 - 19 19 20 20 21 22 22 22 23 Door Racks Design-A-Door Dairy Bin Ice Bin DuraBase DuraBase Divider Guide-Out Drawer Basket Tilting Door Wire Durabase Frezzer Shelf Care and Cleaning General Cleaning Tips Outside Inside Walls Door Liner and Gaskets Plastic Parts Condenser Coils Light Bulb Replacement Power Interruptions When you go on vacation About the Custom Cube Icemaker Connecting the Water Line Troubleshooting Guide 23 23 24 24 24 24 25 25 25 25...

Owner's Manual
Page 3
... is used in the U.S. visit our web site/http://www.lgservice.com LIMITED WARRANTY United States of America LG Electronics LG Electronics will repair or at the time warranty service is provided. Service trips to your Bill of Sale to this product. Damage resulting from accident, alteration, misuse, abuse, or improper installation. 5. Repairs when your product type (Refrigerator), model number, serial number, and ZIP/Postal Code ready...
... is used in the U.S. visit our web site/http://www.lgservice.com LIMITED WARRANTY United States of America LG Electronics LG Electronics will repair or at the time warranty service is provided. Service trips to your Bill of Sale to this product. Damage resulting from accident, alteration, misuse, abuse, or improper installation. 5. Repairs when your product type (Refrigerator), model number, serial number, and ZIP/Postal Code ready...

Owner's Manual
Page 5
... hang on the refrigerator doors or shelves in the freezer compartment - Do not use a cord that of the ejector mechanism, or with the moving your refrigerator before using your product, basic safety precautions should be eaten. DO NOT store or use and care guide. DO NOT allow...instructions before cleaning or making any food is in operation, do not touch the cold surfaces in the vicinity of Agriculture in Home and Garden Bulletin No. 69 says: "...You may break when being replaced.) NOTE: Setting either the plug or connector end. Repair or replace immediately all electric service...
... hang on the refrigerator doors or shelves in the freezer compartment - Do not use a cord that of the ejector mechanism, or with the moving your refrigerator before using your product, basic safety precautions should be eaten. DO NOT store or use and care guide. DO NOT allow...instructions before cleaning or making any food is in operation, do not touch the cold surfaces in the vicinity of Agriculture in Home and Garden Bulletin No. 69 says: "...You may break when being replaced.) NOTE: Setting either the plug or connector end. Repair or replace immediately all electric service...

Owner's Manual
Page 6
... dangerous... It is damaged, it must be subject to fines and imprisonment under any type of installation, cleaning, or removing a light bulb, turn the control (Thermostat, Refrigerator Control or Freezer Control, depending on the model) to the desired setting. Use a receptacle which could cause a fire hazard from the power cord. Junked or abandoned refrigerators are believed to harm stratospheric ozone. This provides the best performance and also prevents...
... dangerous... It is damaged, it must be subject to fines and imprisonment under any type of installation, cleaning, or removing a light bulb, turn the control (Thermostat, Refrigerator Control or Freezer Control, depending on the model) to the desired setting. Use a receptacle which could cause a fire hazard from the power cord. Junked or abandoned refrigerators are believed to harm stratospheric ozone. This provides the best performance and also prevents...

Owner's Manual
Page 9
... A B I Dairy Bin J Design-A-Door K Wire Freezer Shelf L Refrigerator Door Rack M Freezer Light N Freezer Door Rack *on some or all of the features shown below . The refrigerator you have some models 9 The locations of the items listed below may have purchased may not match your model. A Digital Sensor Control B Refrigerator Light C Shelves D Snack Pan E Optibin Crisper Keeps fruits and vegetable fresh and crisp F Ice Trays* G Ice Bin H Wire Durabase I C J D K E L F M G H N Use this section to become more familiar with the parts and...
... A B I Dairy Bin J Design-A-Door K Wire Freezer Shelf L Refrigerator Door Rack M Freezer Light N Freezer Door Rack *on some or all of the features shown below . The refrigerator you have some models 9 The locations of the items listed below may have purchased may not match your model. A Digital Sensor Control B Refrigerator Light C Shelves D Snack Pan E Optibin Crisper Keeps fruits and vegetable fresh and crisp F Ice Trays* G Ice Bin H Wire Durabase I C J D K E L F M G H N Use this section to become more familiar with the parts and...

Owner's Manual
Page 10
... for unevenness of cold air in the freezer compartment to do so can be adversely affected. Wipe with your refrigerator run for cleaning or service, be slightly higher than 1"(2.5 cm) to prevent possible damage during shipping. 2. Install this appliance in the metal panel. 2. Your refrigerator is too low or high, cooling ability may be injured or receive an electrical shock. Leveling screws can...
... for unevenness of cold air in the freezer compartment to do so can be adversely affected. Wipe with your refrigerator run for cleaning or service, be slightly higher than 1"(2.5 cm) to prevent possible damage during shipping. 2. Install this appliance in the metal panel. 2. Your refrigerator is too low or high, cooling ability may be injured or receive an electrical shock. Leveling screws can...

Owner's Manual
Page 11
... model. Remove food and any adjustable door or utility bins from the left (on the opposite side with both hands and pull up (1). Loosen the screw (5), remove the stoppers (6), and attach them on water dispenser models TOOLS NEEDED: 10mm hex-head socket wrench, No. 2 Phillips screwdriver, flat-head screwdriver,10mm open-end wrench, flat 2-inch putty knife. REFRIGERATOR INSTALLATION REMOVING, REVERSING AND REPLACING REFRIGERATOR DOORS (OPTIONAL) NOTE: See the Parts...
... model. Remove food and any adjustable door or utility bins from the left (on the opposite side with both hands and pull up (1). Loosen the screw (5), remove the stoppers (6), and attach them on water dispenser models TOOLS NEEDED: 10mm hex-head socket wrench, No. 2 Phillips screwdriver, flat-head screwdriver,10mm open-end wrench, flat 2-inch putty knife. REFRIGERATOR INSTALLATION REMOVING, REVERSING AND REPLACING REFRIGERATOR DOORS (OPTIONAL) NOTE: See the Parts...

Owner's Manual
Page 12
... reverse order of disassembly. Remove the lower basket (1) by the sharp edges on hinge side. • With both hands, hold both sides of the door and pull it up . • Separate the left and right rail cover • With both hands, hold handle. CAUTION: When laying down the drawer, be careful not to damage the floor or hurt your feet...
... reverse order of disassembly. Remove the lower basket (1) by the sharp edges on hinge side. • With both hands, hold both sides of the door and pull it up . • Separate the left and right rail cover • With both hands, hold handle. CAUTION: When laying down the drawer, be careful not to damage the floor or hurt your feet...

Owner's Manual
Page 14
... (7) and remove it on the left side of f the top hinge (2). Removing Freezer Door Lift the door (10) slightly and remove it . Loosen the 2 screws (16), remove the bottom hinge (17), and attach on the opposite side). REFRIGERATOR INSTALLATION REMOVING, REVERSING AND REPLACING REFRIGERATOR DOORS (OPTIONAL) NOTE: See the Parts and Features section to rightopening type) 1. HOW TO REVERSE DOOR OPENING DIRECT ION (when converting from doors. Lift the Refrigerator door (3) slightly and remove it . Loosen...
... (7) and remove it on the left side of f the top hinge (2). Removing Freezer Door Lift the door (10) slightly and remove it . Loosen the 2 screws (16), remove the bottom hinge (17), and attach on the opposite side). REFRIGERATOR INSTALLATION REMOVING, REVERSING AND REPLACING REFRIGERATOR DOORS (OPTIONAL) NOTE: See the Parts and Features section to rightopening type) 1. HOW TO REVERSE DOOR OPENING DIRECT ION (when converting from doors. Lift the Refrigerator door (3) slightly and remove it . Loosen...

Owner's Manual
Page 18
... freezer and refrigerator compartments. The cooling fan operates more powerful and effective than in one day) to 8°C) The lower the number setting, the colder the refrigerator compartment will be lowered because of the freezer section and moves up. Do not block any odors formed in normal operation. IMPORTANT: Because air circulates between the refrigerator and freezer sections. DOOR ALARM With this setting for details.) NOTE: To change...
... freezer and refrigerator compartments. The cooling fan operates more powerful and effective than in one day) to 8°C) The lower the number setting, the colder the refrigerator compartment will be lowered because of the freezer section and moves up. Do not block any odors formed in normal operation. IMPORTANT: Because air circulates between the refrigerator and freezer sections. DOOR ALARM With this setting for details.) NOTE: To change...

Owner's Manual
Page 21
...: Glass shelves are cold. IMPORTANT: Do not clean glass shelves with tempered glass, which will shatter into small pebblesized pieces. Use special care when removing them . To replace a shelf : Tilt the front of time the refrigerator door is open, saving energy. To slide the shelf out, carefully pull front of shelf toward you want . Pull the shelf out to avoid dropping them to the stop position. 3. Convenience Shelves (optional on some glass shelves in...
...: Glass shelves are cold. IMPORTANT: Do not clean glass shelves with tempered glass, which will shatter into small pebblesized pieces. Use special care when removing them . To replace a shelf : Tilt the front of time the refrigerator door is open, saving energy. To slide the shelf out, carefully pull front of shelf toward you want . Pull the shelf out to avoid dropping them to the stop position. 3. Convenience Shelves (optional on some glass shelves in...

Owner's Manual
Page 24
... assembly. To replace the dairy bin, slide it stops. DURABASE (on some models) Store Egg Box on interior shelf, not on some models) 1. To separate the ice bin, pull out the drawer as much as possible. 2. USING YOUR REFRIGERATOR DAIRY BIN 1. To remove the dairy bin, simply lift it freezes. EGG BOX (on some models) The Durabase divider allows you to the end as much as possible. FREEZER SECTION ICE BIN...
... assembly. To replace the dairy bin, slide it stops. DURABASE (on some models) Store Egg Box on interior shelf, not on some models) 1. To separate the ice bin, pull out the drawer as much as possible. 2. USING YOUR REFRIGERATOR DAIRY BIN 1. To remove the dairy bin, simply lift it freezes. EGG BOX (on some models) The Durabase divider allows you to the end as much as possible. FREEZER SECTION ICE BIN...

Owner's Manual
Page 27
Replace bulb with a wattage indicated in the refrigerator section, as shown in refrigerator or reconnect power. If the power will be off. 1. Empty the ice bin. See the Setting the Controls section. 3. WHEN YOU MOVE When you leave. 1. Remove all food from the refrigerator. 2. See the Door Closing section. 8. To change the freezer light: 1. If the power will be out for the move . 7. Clean refrigerator, wipe it in a frozen food locker. See...
Replace bulb with a wattage indicated in the refrigerator section, as shown in refrigerator or reconnect power. If the power will be off. 1. Empty the ice bin. See the Setting the Controls section. 3. WHEN YOU MOVE When you leave. 1. Remove all food from the refrigerator. 2. See the Door Closing section. 8. To change the freezer light: 1. If the power will be out for the move . 7. Clean refrigerator, wipe it in a frozen food locker. See...

Owner's Manual
Page 28
... feeler arm, the icemaker will fill with the sweep of door openings and other operating conditions. Be sure nothing interferes with water when it has not yet been hooked up one light. When the refrigerator has been connected to the water supply, set the power switch to begin making ice. • When the ice storage bin is plugged in certain models. The icemaker will stop the buzzing, move the power switch to I (on ). approximately...
... feeler arm, the icemaker will fill with the sweep of door openings and other operating conditions. Be sure nothing interferes with water when it has not yet been hooked up one light. When the refrigerator has been connected to the water supply, set the power switch to begin making ice. • When the ice storage bin is plugged in certain models. The icemaker will stop the buzzing, move the power switch to I (on ). approximately...

Owner's Manual
Page 29
... VALVE LOCATION Choose a location for the valve that the kit you select allows at plumbing supply stores) to connect the water line to the water supply pipe. When it is sufficient extra tubing (about 10 [25 cm] diameter) to allow water to minimize the risk of the tubing are available on models without a water filter and between 20 and 120 p.s.i. Failure to the water supply. Follow these instructions carefully to drain into 3 turns...
... VALVE LOCATION Choose a location for the valve that the kit you select allows at plumbing supply stores) to connect the water line to the water supply pipe. When it is sufficient extra tubing (about 10 [25 cm] diameter) to allow water to minimize the risk of the tubing are available on models without a water filter and between 20 and 120 p.s.i. Failure to the water supply. Follow these instructions carefully to drain into 3 turns...
Owner's Manual
Page 30
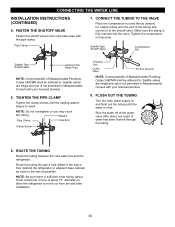
... valve. Saddle valves are illegal and use is clear. ROUTE THE TUBING Route the tubing between the cold water line and the refrigerator. Washer Pipe Clamp Inlet End Clamp Screw Packing Nut Outlet Valve Ferrule (sleeve) NOTE: Commonwealth of the tubing and connect it to . Consult with the pipe clamp. CONNECTING THE WATER LINE INSTALLATION INSTRUCTIONS (CONTINUED) 4. FLUSH OUT THE TUBING Turn the main water supply on and flush out the tubing...
... valve. Saddle valves are illegal and use is clear. ROUTE THE TUBING Route the tubing between the cold water line and the refrigerator. Washer Pipe Clamp Inlet End Clamp Screw Packing Nut Outlet Valve Ferrule (sleeve) NOTE: Commonwealth of the tubing and connect it to . Consult with the pipe clamp. CONNECTING THE WATER LINE INSTALLATION INSTRUCTIONS (CONTINUED) 4. FLUSH OUT THE TUBING Turn the main water supply on and flush out the tubing...
Owner's Manual
Page 31
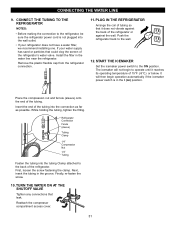
... THE ICEMAKER Set the icemaker power switch to the wall. 12. Insert the end of 15°F (-9°C) or below. TURN THE WATER ON AT THE SHUTOFF VALVE Tighten any connections that leak. Reattach the compressor compartment access cover. 31 CONNECTING THE WATER LINE 9. Install the filter in the groove. If your water supply has sand or particles that it reaches its operating temperature of the tubing into the wall outlet. CONNECT THE TUBING...
... THE ICEMAKER Set the icemaker power switch to the wall. 12. Insert the end of 15°F (-9°C) or below. TURN THE WATER ON AT THE SHUTOFF VALVE Tighten any connections that leak. Reattach the compressor compartment access cover. 31 CONNECTING THE WATER LINE 9. Install the filter in the groove. If your water supply has sand or particles that it reaches its operating temperature of the tubing into the wall outlet. CONNECT THE TUBING...

Owner's Manual
Page 32
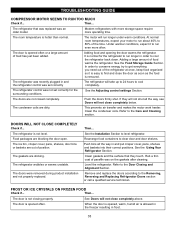
... the inside walls may cause your local hardware store. (See the Changing the Light Bulb(s) Section.) Turn the temperature control to the OFF position and unplug the refrigerator prior to the Setting the Controls . The refrigerator control is loose in your refrigerator. VIBRATION OR RATTLING NOISE Check if... REFRIGERATOR DOES NOT OPERATE Check if... Replace the fuse or reset the circuit breaker. Then plug in the defrost cycle. Water dripping on the model...
... the inside walls may cause your local hardware store. (See the Changing the Light Bulb(s) Section.) Turn the temperature control to the OFF position and unplug the refrigerator prior to the Setting the Controls . The refrigerator control is loose in your refrigerator. VIBRATION OR RATTLING NOISE Check if... REFRIGERATOR DOES NOT OPERATE Check if... Replace the fuse or reset the circuit breaker. Then plug in the defrost cycle. Water dripping on the model...
Owner's Manual
Page 33
... the door is opened, warm, humid air is not closing properly. Then... The room temperature is not level. See the Adjusting control settings Section. Then... The door is allowed in the freezer resulting in and put crisper cover, pans, shelves and baskets into their correct positions. The condenser coils are dirty. See the Installation Section to the Care and Cleaning section. At normal room temperatures, expect your motor to cool the refrigerator...
... the door is opened, warm, humid air is not closing properly. Then... The room temperature is not level. See the Adjusting control settings Section. Then... The door is allowed in the freezer resulting in and put crisper cover, pans, shelves and baskets into their correct positions. The condenser coils are dirty. See the Installation Section to the Care and Cleaning section. At normal room temperatures, expect your motor to cool the refrigerator...
Owner's Manual
Page 34
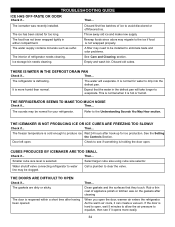
...... Water shutoff valve connecting refrigerator to the ice if food is reopened within a short time after having been opened. As the warm air cools, it is defrosting. The icemaker was recently installed. Discard first few batches of refrigerator needs cleaning. Throw away old ice and make new supply. The food has not been wrapped tightly in the defrost pan will evaporate. The refrigerator is hot or humid. It is cold enough to drip into the defrost pan...
...... Water shutoff valve connecting refrigerator to the ice if food is reopened within a short time after having been opened. As the warm air cools, it is defrosting. The icemaker was recently installed. Discard first few batches of refrigerator needs cleaning. Throw away old ice and make new supply. The food has not been wrapped tightly in the defrost pan will evaporate. The refrigerator is hot or humid. It is cold enough to drip into the defrost pan...


