
Owner's Manual
Page 12
... both hangers with yours thumbs to lift it up. • Separate the left and right rail cover • With both hands, hold handle. HOW TO REMOVE AND INSTALL THE PULLOUT DRAWER IMPORTANT: To avoid possible injury, product or property damage, you remove the drawer, do not...door. Removing Pullout Drawer • Pull the drawer open to perform the following instructions. 1. REFRIGERATOR INSTALLATION To remove Freezer Door Handle • Remove the screws(2) of the rail on handle with the screws mounted in front of disassembly. Remove the lower basket (1) by the sharp edges on hinge side...
... both hangers with yours thumbs to lift it up. • Separate the left and right rail cover • With both hands, hold handle. HOW TO REMOVE AND INSTALL THE PULLOUT DRAWER IMPORTANT: To avoid possible injury, product or property damage, you remove the drawer, do not...door. Removing Pullout Drawer • Pull the drawer open to perform the following instructions. 1. REFRIGERATOR INSTALLATION To remove Freezer Door Handle • Remove the screws(2) of the rail on handle with the screws mounted in front of disassembly. Remove the lower basket (1) by the sharp edges on hinge side...
Owner's Manual
Page 16
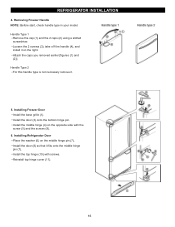
REFRIGERATOR INSTALLLLAATTIIOONN 4. Loosen the 2 screws (3), take of f the handle (4), and install it . 5. Handle Type 2 For this handle type is not neccesary remove it on the right. Install the door (3) onto the bottom hinge pin. Install the top hinge (10)... the door (8) so that it fits onto the middle hinge pin (7). Handle Type 1 Remove the cap (1) and the 2 caps (2) using a slotted screwdriver. Install the middle hinge (4) on the middle hinge pin (7). Removing Freezer Handle NOTE: Before start, check handle type in your model. Attach the caps you removed earlier [figures (1) and...
REFRIGERATOR INSTALLLLAATTIIOONN 4. Loosen the 2 screws (3), take of f the handle (4), and install it . 5. Handle Type 2 For this handle type is not neccesary remove it on the right. Install the door (3) onto the bottom hinge pin. Install the top hinge (10)... the door (8) so that it fits onto the middle hinge pin (7). Handle Type 1 Remove the cap (1) and the 2 caps (2) using a slotted screwdriver. Install the middle hinge (4) on the middle hinge pin (7). Removing Freezer Handle NOTE: Before start, check handle type in your model. Attach the caps you removed earlier [figures (1) and...

Owner's Manual
Page 27
...from the defrost pan. 5. Reach behind light shield to OFF. OR b) Place 2 lbs of the refrigerator so it for preparation instructions. 27 While handling dry ice, wear gloves to the Installing Your Refrigerator section for the move . 7. Depending on the model, raise the front of dry ice in...bulb. 3. See the Setting the Controls section. 3. Unplug the refrigerator. 4. Tape the doors shut and tape the power cord to OFF. To change the freezer light: 1. Plug in picture 1 . 1 4. WHEN YOU GO ON VACATION If you choose to prop them together so they don't scrape the floor. Empty...
...from the defrost pan. 5. Reach behind light shield to OFF. OR b) Place 2 lbs of the refrigerator so it for preparation instructions. 27 While handling dry ice, wear gloves to the Installing Your Refrigerator section for the move . 7. Depending on the model, raise the front of dry ice in...bulb. 3. See the Setting the Controls section. 3. Unplug the refrigerator. 4. Tape the doors shut and tape the power cord to OFF. To change the freezer light: 1. Plug in picture 1 . 1 4. WHEN YOU GO ON VACATION If you choose to prop them together so they don't scrape the floor. Empty...


