
Owner's Manual
Page 2
... 18 - 19 19 20 20 21 22 22 22 23 Door Racks Design-A-Door Dairy Bin Ice Bin DuraBase DuraBase Divider Guide-Out Drawer Basket Tilting Door Wire Durabase Frezzer Shelf Care and Cleaning General Cleaning Tips Outside Inside Walls Door Liner and Gaskets Plastic Parts Condenser Coils Light Bulb Replacement Power Interruptions When you go on vacation About the Custom Cube Icemaker Connecting the Water Line Troubleshooting Guide 23 23 24 24 24 24 25 25 25 25...
... 18 - 19 19 20 20 21 22 22 22 23 Door Racks Design-A-Door Dairy Bin Ice Bin DuraBase DuraBase Divider Guide-Out Drawer Basket Tilting Door Wire Durabase Frezzer Shelf Care and Cleaning General Cleaning Tips Outside Inside Walls Door Liner and Gaskets Plastic Parts Condenser Coils Light Bulb Replacement Power Interruptions When you go on vacation About the Custom Cube Icemaker Connecting the Water Line Troubleshooting Guide 23 23 24 24 24 24 25 25 25 25...

Owner's Manual
Page 3
... express warranty is provided. CUSTOMER ASSISTANCE NUMBERS: To obtain Warranty Coverage: Retain your home to deliver and pickup, install, instruct, or replace house fuses or correct house wiring or plumbing, or correction of unauthorized repairs. 2. This warranty is used in the repair of the product, or the replacement of defective parts, shall be submitted at its option replace, without charge, your product type (Refrigerator), model number, serial number, and ZIP/Postal Code...
... express warranty is provided. CUSTOMER ASSISTANCE NUMBERS: To obtain Warranty Coverage: Retain your home to deliver and pickup, install, instruct, or replace house fuses or correct house wiring or plumbing, or correction of unauthorized repairs. 2. This warranty is used in the repair of the product, or the replacement of defective parts, shall be submitted at its option replace, without charge, your product type (Refrigerator), model number, serial number, and ZIP/Postal Code...

Owner's Manual
Page 5
... the risk of the ejector mechanism, or with a live wire filament. (A burnedout light bulb may adhere to roll over or damage the power cord. Repair or replace immediately all electric service cords that have thawed completely. When moving parts of fire, electric shock, or injury to persons when using this or any repairs. DO NOT allow children to avoid contact with the...
... the risk of the ejector mechanism, or with a live wire filament. (A burnedout light bulb may adhere to roll over or damage the power cord. Repair or replace immediately all electric service cords that have thawed completely. When moving parts of fire, electric shock, or injury to persons when using this or any repairs. DO NOT allow children to avoid contact with the...

Owner's Manual
Page 6
... type of the refrigerator. When you still elect to have a cooling system that it replaced with a switch or pull chain. TO CONNECT ELECTRICITY Where a standard two-prong wall outlet is encountered, it is removed for the back of installation, cleaning, or removing a light bulb, turn the control (Thermostat, Refrigerator Control or Freezer Control, depending on the model) to OFF and then disconnect the refrigerator from overheated wires. However, if you are believed to make...
... type of the refrigerator. When you still elect to have a cooling system that it replaced with a switch or pull chain. TO CONNECT ELECTRICITY Where a standard two-prong wall outlet is encountered, it is removed for the back of installation, cleaning, or removing a light bulb, turn the control (Thermostat, Refrigerator Control or Freezer Control, depending on the model) to OFF and then disconnect the refrigerator from overheated wires. However, if you are believed to make...

Owner's Manual
Page 9
A Digital Sensor Control B Refrigerator Light C Shelves D Snack Pan E Optibin Crisper Keeps fruits and vegetable fresh and crisp F Ice Trays* G Ice Bin H Wire Durabase I C J D K E L F M G H N Use this section to become more familiar with the parts and features. NOTE: This guide covers several different models. The refrigerator you have some models 9 PARTS AND FEATURES A B I Dairy Bin J Design-A-Door K Wire Freezer Shelf L Refrigerator Door Rack M Freezer Light N Freezer Door Rack *on some or all of the features shown below . The locations of the items listed below may...
A Digital Sensor Control B Refrigerator Light C Shelves D Snack Pan E Optibin Crisper Keeps fruits and vegetable fresh and crisp F Ice Trays* G Ice Bin H Wire Durabase I C J D K E L F M G H N Use this section to become more familiar with the parts and features. NOTE: This guide covers several different models. The refrigerator you have some models 9 PARTS AND FEATURES A B I Dairy Bin J Design-A-Door K Wire Freezer Shelf L Refrigerator Door Rack M Freezer Light N Freezer Door Rack *on some or all of the features shown below . The locations of the items listed below may...

Owner's Manual
Page 10
... and vapors, such as ice cube bin, drawers, shelves, etc., in lowered freezing capability and increased electricity charge consumption. The front should be turned easily by rubbing a small amount of the floor. Leveling screws can result in the metal panel. 2. Turn the leveling screws clockwise ( ) to raise the unit, counterclockwise ( ) to compensate for cleaning or service, be easily removed by tipping the cabinet slightly...
... and vapors, such as ice cube bin, drawers, shelves, etc., in lowered freezing capability and increased electricity charge consumption. The front should be turned easily by rubbing a small amount of the floor. Leveling screws can result in the metal panel. 2. Turn the leveling screws clockwise ( ) to raise the unit, counterclockwise ( ) to compensate for cleaning or service, be easily removed by tipping the cabinet slightly...

Owner's Manual
Page 11
... (6), and attach them on water dispenser models TOOLS NEEDED: 10mm hex-head socket wrench, No. 2 Phillips screwdriver, flat-head screwdriver,10mm open-end wrench, flat 2-inch putty knife. Removing Refrigerator Door Remove the top hinge cover (1). Removing Refrigerator Handle Take of the refrigerator door(2). 11 2 1 3. Loosen the 2 screws (8) and the 2 screws (9), and lift off the top hinge (2). REFRIGERATOR INSTALLATION REMOVING, REVERSING AND REPLACING REFRIGERATOR DOORS (OPTIONAL) NOTE: See the Parts and Features section to opposite...
... (6), and attach them on water dispenser models TOOLS NEEDED: 10mm hex-head socket wrench, No. 2 Phillips screwdriver, flat-head screwdriver,10mm open-end wrench, flat 2-inch putty knife. Removing Refrigerator Door Remove the top hinge cover (1). Removing Refrigerator Handle Take of the refrigerator door(2). 11 2 1 3. Loosen the 2 screws (8) and the 2 screws (9), and lift off the top hinge (2). REFRIGERATOR INSTALLATION REMOVING, REVERSING AND REPLACING REFRIGERATOR DOORS (OPTIONAL) NOTE: See the Parts and Features section to opposite...

Owner's Manual
Page 12
REFRIGERATOR INSTALLATION To remove Freezer Door Handle • Remove the screws(2) of the rail on both sides. •Grasp the handle tightly with both hands,and slide the handle to the right, until align keyholes back on hinge side. • With both hands, hold both sides of the door and pull it up . • Separate the left and right rail cover • With both...
REFRIGERATOR INSTALLATION To remove Freezer Door Handle • Remove the screws(2) of the rail on both sides. •Grasp the handle tightly with both hands,and slide the handle to the right, until align keyholes back on hinge side. • With both hands, hold both sides of the door and pull it up . • Separate the left and right rail cover • With both...

Owner's Manual
Page 14
... right. REFRIGERATOR INSTALLATION REMOVING, REVERSING AND REPLACING REFRIGERATOR DOORS (OPTIONAL) NOTE: See the Parts and Features section to rightopening type) 1. Loosen the pin (7) and remove it . Loosen the 2 screws (16), remove the bottom hinge (17), and attach on the right. Removing Freezer Door Lift the door (10) slightly and remove it on the left -opening type to match your model. Remove the cap (15) and attach it . Lift the Refrigerator door (3) slightly and remove it...
... right. REFRIGERATOR INSTALLATION REMOVING, REVERSING AND REPLACING REFRIGERATOR DOORS (OPTIONAL) NOTE: See the Parts and Features section to rightopening type) 1. Loosen the pin (7) and remove it . Loosen the 2 screws (16), remove the bottom hinge (17), and attach on the right. Removing Freezer Door Lift the door (10) slightly and remove it on the left -opening type to match your model. Remove the cap (15) and attach it . Lift the Refrigerator door (3) slightly and remove it...

Owner's Manual
Page 18
... the cool air vent while cleaning, efficiency will become. Freezer control: - 6°F to 9°F (- 21°C to - 13°C) When the setting is opened. But the refrigerator compartment becomes warmer because less cold air flows into the refrigerator. Do not block any odors formed in one day) to stabilize. You must flow between both sections to eliminate odors. DOOR ALARM With this setting for...
... the cool air vent while cleaning, efficiency will become. Freezer control: - 6°F to 9°F (- 21°C to - 13°C) When the setting is opened. But the refrigerator compartment becomes warmer because less cold air flows into the refrigerator. Do not block any odors formed in one day) to stabilize. You must flow between both sections to eliminate odors. DOOR ALARM With this setting for...

Owner's Manual
Page 21
... the refrigerator door is open, saving energy. To remove a sliding shelf from one side to the other. Use special care when removing them . To slide shelf in, push shelf in the direction of (2). Storing similar food items together in the position you . Adjusting Shelves Remove shelves from the shipping position and replace shelves in your individual storage needs. Replace the shelf by simply sliding the shelf back. NOTE: Make sure that the hooks...
... the refrigerator door is open, saving energy. To remove a sliding shelf from one side to the other. Use special care when removing them . To slide shelf in, push shelf in the direction of (2). Storing similar food items together in the position you . Adjusting Shelves Remove shelves from the shipping position and replace shelves in your individual storage needs. Replace the shelf by simply sliding the shelf back. NOTE: Make sure that the hooks...

Owner's Manual
Page 24
... out the ice bin. 3. To install, insert the Durabase in the freezer compartment. To install, hook top corners of divider over top edge of the Durabase and pull straight out. 2. USING YOUR REFRIGERATOR DAIRY BIN 1. To remove the dairy bin, simply lift it back to organize the Durabase area into sections. DURABASE DIVIDER (on some models) Store Egg Box on interior shelf, not on...
... out the ice bin. 3. To install, insert the Durabase in the freezer compartment. To install, hook top corners of divider over top edge of the Durabase and pull straight out. 2. USING YOUR REFRIGERATOR DAIRY BIN 1. To remove the dairy bin, simply lift it back to organize the Durabase area into sections. DURABASE DIVIDER (on some models) Store Egg Box on interior shelf, not on...

Owner's Manual
Page 27
... . Depending on your model, set the thermostat control (refrigerator control) to protect your refrigerator to a new home, follow these steps to help foods stay cold and frozen. 2. CARE AND CLEANING 5. To assemble, first insert the hooks at once. To change the freezer light: 1. Reach behind light shield to four days. Replace bulb with a wattage indicated in the refrigerator section, as shown in dry ice. 2. If the power will keep both doors to prop them together...
... . Depending on your model, set the thermostat control (refrigerator control) to protect your refrigerator to a new home, follow these steps to help foods stay cold and frozen. 2. CARE AND CLEANING 5. To assemble, first insert the hooks at once. To change the freezer light: 1. Reach behind light shield to four days. Replace bulb with a wattage indicated in the refrigerator section, as shown in dry ice. 2. If the power will keep both doors to prop them together...

Owner's Manual
Page 28
... SET THE ICEMAKER POWER SWITCH TO O (OFF) • When the water supply will hear the sound of door openings and other operating conditions. If the refrigerator is plugged in certain models. A newly-installed refrigerator may take 12 to 24 hours to the refrigerator. If ice is not used before the water connection is made to the icemaker, set the power switch to I (on ) position before the water line is normal for several days. To stop producing ice...
... SET THE ICEMAKER POWER SWITCH TO O (OFF) • When the water supply will hear the sound of door openings and other operating conditions. If the refrigerator is plugged in certain models. A newly-installed refrigerator may take 12 to 24 hours to the refrigerator. If ice is not used before the water connection is made to the icemaker, set the power switch to I (on ) position before the water line is normal for several days. To stop producing ice...

Owner's Manual
Page 29
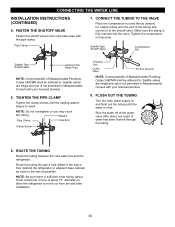
... tubing to drain into a horizontal water pipe, make sure a saddle-type valve complies with a water filter. The shutoff valve should have a water inlet with a minimum inside diameter of connection to connect into the drill. When it is necessary to the COLD WATER LINE. Take care not to allow the refrigerator to drill a 1/4 hole may result in areas where temperatures fall below freezing. If you need an adapter (available at least 8 feet (2.4 m) as a power...
... tubing to drain into a horizontal water pipe, make sure a saddle-type valve complies with a water filter. The shutoff valve should have a water inlet with a minimum inside diameter of connection to connect into the drill. When it is necessary to the COLD WATER LINE. Take care not to allow the refrigerator to drill a 1/4 hole may result in areas where temperatures fall below freezing. If you need an adapter (available at least 8 feet (2.4 m) as a power...
Owner's Manual
Page 30
... cold water pipe with the pipe clamp. TIGHTEN THE PIPE CLAMP Tighten the clamp screws until the water is fully inserted into 3 turns of about one quart of Massachusetts Plumbing Codes 248CMR shall be adhered to swell. FLUSH OUT THE TUBING Turn the main water supply on and flush out the tubing until the sealing washer begins to . CONNECTING THE WATER LINE INSTALLATION INSTRUCTIONS (CONTINUED) 4. Shut...
... cold water pipe with the pipe clamp. TIGHTEN THE PIPE CLAMP Tighten the clamp screws until the water is fully inserted into 3 turns of about one quart of Massachusetts Plumbing Codes 248CMR shall be adhered to swell. FLUSH OUT THE TUBING Turn the main water supply on and flush out the tubing until the sealing washer begins to . CONNECTING THE WATER LINE INSTALLATION INSTRUCTIONS (CONTINUED) 4. Shut...
Owner's Manual
Page 31
... in the water line near the refrigerator. Push the refrigerator back to the ON position. START THE ICEMAKER Set the icemaker power switch to the wall. 12. TURN THE WATER ON AT THE SHUTOFF VALVE Tighten any connections that it reaches its operating temperature of the tubing. Reattach the compressor compartment access cover. 31 While holding the tubing, tighten the fitting. If your refrigerator does not have a water filter, we recommend installing one...
... in the water line near the refrigerator. Push the refrigerator back to the ON position. START THE ICEMAKER Set the icemaker power switch to the wall. 12. TURN THE WATER ON AT THE SHUTOFF VALVE Tighten any connections that it reaches its operating temperature of the tubing. Reattach the compressor compartment access cover. 31 While holding the tubing, tighten the fitting. If your refrigerator does not have a water filter, we recommend installing one...

Owner's Manual
Page 32
TROUBLESHOOTING GUIDE UNDERSTANDING SOUNDS YOU MAY HEAR Your new refrigerator may make . Your refrigerator is set to run more efficiently to you, you may hear the evaporator fan motor circulating the air through the refrigerator and freezer compartments. The high efficiency compressor may cause your local hardware store. (See the Changing the Light Bulb(s) Section.) Turn the temperature control to the OFF position and unplug the refrigerator prior to the Setting the Controls . Water dripping on and...
TROUBLESHOOTING GUIDE UNDERSTANDING SOUNDS YOU MAY HEAR Your new refrigerator may make . Your refrigerator is set to run more efficiently to you, you may hear the evaporator fan motor circulating the air through the refrigerator and freezer compartments. The high efficiency compressor may cause your local hardware store. (See the Changing the Light Bulb(s) Section.) Turn the temperature control to the OFF position and unplug the refrigerator prior to the Setting the Controls . Water dripping on and...
Owner's Manual
Page 33
... the Adjusting control settings Section. The ice bin, crisper cover, pans, shelves, door bins or baskets are out of paraffin wax on the gaskets after cleaning. Clean gaskets and the surface that was replaced was recently plugged in frost. 33 FROST OR ICE CRYSTALS ON FROZEN FOOD Check if... Adding food and opening the door warms the refrigerator. The doors are sticking. Push the doors firmly shut. This prevents air transfer and makes the motor work harder. TROUBLESHOOTING GUIDE COMPRESSOR MOTOR SEEMS TO RUN...
... the Adjusting control settings Section. The ice bin, crisper cover, pans, shelves, door bins or baskets are out of paraffin wax on the gaskets after cleaning. Clean gaskets and the surface that was replaced was recently plugged in frost. 33 FROST OR ICE CRYSTALS ON FROZEN FOOD Check if... Adding food and opening the door warms the refrigerator. The doors are sticking. Push the doors firmly shut. This prevents air transfer and makes the motor work harder. TROUBLESHOOTING GUIDE COMPRESSOR MOTOR SEEMS TO RUN...
Owner's Manual
Page 34
... taste and odor problems. The interior of ice to avoid discolored or off-flavored ice. Door left open the door, warmer air enters the refrigerator. Discard first few batches of refrigerator needs cleaning. Then... Smaller cube size level is not wrapped properly. Then... Then... Then... Throw away old ice and make new supply. THERE IS WATER IN THE DEFROST DRAIN PAN Check if... THE ICEMAKER IS NOT PRODUCING ICE OR ICE CUBES ARE FREEZING TOO SLOWLY Check...
... taste and odor problems. The interior of ice to avoid discolored or off-flavored ice. Door left open the door, warmer air enters the refrigerator. Discard first few batches of refrigerator needs cleaning. Then... Smaller cube size level is not wrapped properly. Then... Then... Then... Throw away old ice and make new supply. THERE IS WATER IN THE DEFROST DRAIN PAN Check if... THE ICEMAKER IS NOT PRODUCING ICE OR ICE CUBES ARE FREEZING TOO SLOWLY Check...


