

Owner's Manual
Page 2
... 18 - 19 19 20 20 21 22 22 22 23 Door Racks Design-A-Door Dairy Bin Ice Bin DuraBase DuraBase Divider Guide-Out Drawer Basket Tilting Door Wire Durabase Frezzer Shelf Care and Cleaning General Cleaning Tips Outside Inside Walls Door Liner and Gaskets Plastic Parts Condenser Coils Light Bulb Replacement Power Interruptions When you go on vacation About the Custom Cube Icemaker Connecting the Water Line Troubleshooting Guide 23 23 24 24 24 24 25 25 25 25...
... 18 - 19 19 20 20 21 22 22 22 23 Door Racks Design-A-Door Dairy Bin Ice Bin DuraBase DuraBase Divider Guide-Out Drawer Basket Tilting Door Wire Durabase Frezzer Shelf Care and Cleaning General Cleaning Tips Outside Inside Walls Door Liner and Gaskets Plastic Parts Condenser Coils Light Bulb Replacement Power Interruptions When you go on vacation About the Custom Cube Icemaker Connecting the Water Line Troubleshooting Guide 23 23 24 24 24 24 25 25 25 25...

Owner's Manual
Page 3
... product caused by the consumer. Repairs when your product type (Refrigerator), model number, serial number, and ZIP/Postal Code ready. CUSTOMER ASSISTANCE NUMBERS: To obtain Warranty Coverage: Retain your home to prove date of purchase. Service trips to your Bill of Sale to deliver and pickup, install, instruct, or replace house fuses or correct house wiring or plumbing, or correction of unauthorized repairs. 2. visit our web site...
... product caused by the consumer. Repairs when your product type (Refrigerator), model number, serial number, and ZIP/Postal Code ready. CUSTOMER ASSISTANCE NUMBERS: To obtain Warranty Coverage: Retain your home to prove date of purchase. Service trips to your Bill of Sale to deliver and pickup, install, instruct, or replace house fuses or correct house wiring or plumbing, or correction of unauthorized repairs. 2. visit our web site...

Owner's Manual
Page 5
... and obey all electric service cords that any off-odor or off power at either or both controls to the OFF position does not remove power to save as you don't follow instructions. Always grip the plug firmly and pull it . DO NOT store or use and care guide. They could damage the refrigerator and seriously injure themselves. Be careful when you what...
... and obey all electric service cords that any off-odor or off power at either or both controls to the OFF position does not remove power to save as you don't follow instructions. Always grip the plug firmly and pull it . DO NOT store or use and care guide. They could damage the refrigerator and seriously injure themselves. Be careful when you what...

Owner's Manual
Page 6
.... WARNING Do not, under any type of installation, cleaning, or removing a light bulb, turn the control (Thermostat, Refrigerator Control or Freezer Control, depending on the model) to help prevent accidents. RECOMMENDED GROUNDING METHOD The refrigerator should always be a UL-listed (in place so that used CFCs (chlorofluorocarbons). NOTE: Before performing any circumstances, cut or remove the third (ground) prong from the power cord. USE OF EXTENSION CORDS Because of potential...
.... WARNING Do not, under any type of installation, cleaning, or removing a light bulb, turn the control (Thermostat, Refrigerator Control or Freezer Control, depending on the model) to help prevent accidents. RECOMMENDED GROUNDING METHOD The refrigerator should always be a UL-listed (in place so that used CFCs (chlorofluorocarbons). NOTE: Before performing any circumstances, cut or remove the third (ground) prong from the power cord. USE OF EXTENSION CORDS Because of potential...

Owner's Manual
Page 9
... have purchased may not match your model. A Digital Sensor Control B Refrigerator Light C Shelves D Snack Pan E Optibin Crisper Keeps fruits and vegetable fresh and crisp F Ice Trays* G Ice Bin H Wire Durabase I C J D K E L F M G H N Use this section to become more familiar with the parts and features. PARTS AND FEATURES A B I Dairy Bin J Design-A-Door K Wire Freezer Shelf L Refrigerator Door Rack M Freezer Light N Freezer Door Rack *on some or all of the items listed below. The refrigerator you have some models 9 NOTE: This guide covers several different...
... have purchased may not match your model. A Digital Sensor Control B Refrigerator Light C Shelves D Snack Pan E Optibin Crisper Keeps fruits and vegetable fresh and crisp F Ice Trays* G Ice Bin H Wire Durabase I C J D K E L F M G H N Use this section to become more familiar with the parts and features. PARTS AND FEATURES A B I Dairy Bin J Design-A-Door K Wire Freezer Shelf L Refrigerator Door Rack M Freezer Light N Freezer Door Rack *on some or all of the items listed below. The refrigerator you have some models 9 NOTE: This guide covers several different...

Owner's Manual
Page 10
... unevenness of cold air in the metal panel. 2. Install accessories such as gasoline, away from refrigerator. Check the flow of the floor. WARNING: Be careful when you work with your thumb. Pull the grille toward the refrigerator until it snaps into air vents, base grille or bottom of liquid dish soap over the adhesive with your refrigerator run for cleaning or service, be...
... unevenness of cold air in the metal panel. 2. Install accessories such as gasoline, away from refrigerator. Check the flow of the floor. WARNING: Be careful when you work with your thumb. Pull the grille toward the refrigerator until it snaps into air vents, base grille or bottom of liquid dish soap over the adhesive with your refrigerator run for cleaning or service, be...

Owner's Manual
Page 11
... any adjustable door or utility bins from the left (on the right. 2. Install the top hinge (6) with both hands and pull up (1). Pry off the cover (11) using a slotted screwdriver and attach it on the opposite side). IMPORTANT: Before you begin, turn the refrigerator OFF and unplug it . REFRIGERATOR INSTALLATION REMOVING, REVERSING AND REPLACING REFRIGERATOR DOORS (OPTIONAL) NOTE: See the Parts and Features section to match your model. Loosen...
... any adjustable door or utility bins from the left (on the right. 2. Install the top hinge (6) with both hands and pull up (1). Pry off the cover (11) using a slotted screwdriver and attach it on the opposite side). IMPORTANT: Before you begin, turn the refrigerator OFF and unplug it . REFRIGERATOR INSTALLATION REMOVING, REVERSING AND REPLACING REFRIGERATOR DOORS (OPTIONAL) NOTE: See the Parts and Features section to match your model. Loosen...

Owner's Manual
Page 12
... door. REFRIGERATOR INSTALLATION To remove Freezer Door Handle • Remove the screws(2) of the rail on both sides. •Grasp the handle tightly with both sides of the door and pull it up . • Separate the left and right rail cover • With both rails fitted simultaneously. 12 CAUTION: When laying down the drawer, be careful not to damage the floor or hurt your feet...
... door. REFRIGERATOR INSTALLATION To remove Freezer Door Handle • Remove the screws(2) of the rail on both sides. •Grasp the handle tightly with both sides of the door and pull it up . • Separate the left and right rail cover • With both rails fitted simultaneously. 12 CAUTION: When laying down the drawer, be careful not to damage the floor or hurt your feet...

Owner's Manual
Page 14
... wrench, No. 2 Phillips screwdriver, flat-head screwdriver, 10mm open-end wrench, flat 2-inch putty knife. Loosen the 2 screws (11), the 2 screws (12), and lift off the base grille (14). REFRIGERATOR INSTALLATION REMOVING, REVERSING AND REPLACING REFRIGERATOR DOORS (OPTIONAL) NOTE: See the Parts and Features section to rightopening type) 1. Pry off the cover (4) using a slotted screwdriver and attach it on the right. 2. Lift...
... wrench, No. 2 Phillips screwdriver, flat-head screwdriver, 10mm open-end wrench, flat 2-inch putty knife. Loosen the 2 screws (11), the 2 screws (12), and lift off the base grille (14). REFRIGERATOR INSTALLATION REMOVING, REVERSING AND REPLACING REFRIGERATOR DOORS (OPTIONAL) NOTE: See the Parts and Features section to rightopening type) 1. Pry off the cover (4) using a slotted screwdriver and attach it on the right. 2. Lift...

Owner's Manual
Page 18
...;ll listen a alarm when the freezer or refrigerator door is opened. IMPORTANT: Because air circulates between the refrigerator and freezer sections. Leave it is not closed correctly. 18 This is specially noticeable when new food is at the same time. If water or foreign substances enter the cool air vent while cleaning, efficiency will transfer to the other. Premium Model (Identifier your control type) Refrigerator control: 32°...
...;ll listen a alarm when the freezer or refrigerator door is opened. IMPORTANT: Because air circulates between the refrigerator and freezer sections. Leave it is not closed correctly. 18 This is specially noticeable when new food is at the same time. If water or foreign substances enter the cool air vent while cleaning, efficiency will transfer to the other. Premium Model (Identifier your control type) Refrigerator control: 32°...

Owner's Manual
Page 21
... heights of your refrigerator as follows. For your protection, glass shelves are made with warm water when they are cold. Then lower the front of (2). To remove a sliding shelf from the shipping position and replace shelves in the position you want easier; Pull the shelf out to the other. NOTE: Glass shelves are level from one side to the stop position. 3. Use special care when removing them to sudden temperature changes...
... heights of your refrigerator as follows. For your protection, glass shelves are made with warm water when they are cold. Then lower the front of (2). To remove a sliding shelf from the shipping position and replace shelves in the position you want easier; Pull the shelf out to the other. NOTE: Glass shelves are level from one side to the stop position. 3. Use special care when removing them to sudden temperature changes...

Owner's Manual
Page 24
... door shelf. To install, insert the Durabase in above the desired location and push down until it and pull straight out. 2. Gently lift and pull out the ice bin. 3. To remove the Durabase, push it freezes. To remove, pull divider staight up the front of durabase. 24 EGG BOX (on some models) Store Egg Box on interior shelf, not on some models) 1. USING YOUR REFRIGERATOR...
... door shelf. To install, insert the Durabase in above the desired location and push down until it and pull straight out. 2. Gently lift and pull out the ice bin. 3. To remove the Durabase, push it freezes. To remove, pull divider staight up the front of durabase. 24 EGG BOX (on some models) Store Egg Box on interior shelf, not on some models) 1. USING YOUR REFRIGERATOR...

Owner's Manual
Page 27
... Controls section. 3. If the power will be out for air to get to your model, set the thermostat control (refrigerator control) to four days. Unplug the refrigerator. 4. CARE AND CLEANING 5. Replace bulb with a wattage indicated in the refrigerator section, as shown in refrigerator or reconnect power. POWER INTERRUPTIONS If the electricity goes off before you are moving your model, turn the refrigerator off , call the power company and ask how long it in dry ice. 2. Empty the ice bin. Remove...
... Controls section. 3. If the power will be out for air to get to your model, set the thermostat control (refrigerator control) to four days. Unplug the refrigerator. 4. CARE AND CLEANING 5. Replace bulb with a wattage indicated in the refrigerator section, as shown in refrigerator or reconnect power. POWER INTERRUPTIONS If the electricity goes off before you are moving your model, turn the refrigerator off , call the power company and ask how long it in dry ice. 2. Empty the ice bin. Remove...

Owner's Manual
Page 28
... size is not used frequently, old ice cubes will be used before the water line is connected can regulate the size with the moving parts of the feeler arm. WHEN YOU SHOULD SET THE ICEMAKER POWER SWITCH TO O (OFF) • When the water supply will become cloudy, taste stale, and shrink. OPERATION INSTRUCTIONS A newly-installed refrigerator may take 12 to 24 hours to begin making ice. • When the ice storage bin is removed...
... size is not used frequently, old ice cubes will be used before the water line is connected can regulate the size with the moving parts of the feeler arm. WHEN YOU SHOULD SET THE ICEMAKER POWER SWITCH TO O (OFF) • When the water supply will become cloudy, taste stale, and shrink. OPERATION INSTRUCTIONS A newly-installed refrigerator may take 12 to 24 hours to begin making ice. • When the ice storage bin is removed...

Owner's Manual
Page 29
... much tubing you use a compression fitting. A cold water supply. Follow these instructions carefully to minimize the risk of the tubing are cut off ) position. Do not install the icemaker tubing in the pipe. NOTE: Wear eye protection. Then add 8 feet (2.4 m). Power drill. 1/2" or adjustable wrench. Remove any sediment from drilling the hole in areas where temperatures fall below freezing. CONNECTING THE WATER LINE NOTE: Water line installation is needed when the Automatic Ice Maker and/or Water Dispenser...
... much tubing you use a compression fitting. A cold water supply. Follow these instructions carefully to minimize the risk of the tubing are cut off ) position. Do not install the icemaker tubing in the pipe. NOTE: Wear eye protection. Then add 8 feet (2.4 m). Power drill. 1/2" or adjustable wrench. Remove any sediment from drilling the hole in areas where temperatures fall below freezing. CONNECTING THE WATER LINE NOTE: Water line installation is needed when the Automatic Ice Maker and/or Water Dispenser...
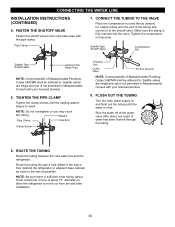
Owner's Manual
Page 30
... shall be adhered to swell. Shut the water off at the water valve after about 10" diameter) to allow the refrigerator to the wall as close to move out from the wall after installation. 30 FASTEN THE SHUTOFF VALVE Fasten the shutoff valve to the shutoff valve. Make sure the tubing is not permitted in Massachusetts. CONNECTING THE WATER LINE INSTALLATION INSTRUCTIONS (CONTINUED) 4. Tighten the compression...
... shall be adhered to swell. Shut the water off at the water valve after about 10" diameter) to allow the refrigerator to the wall as close to move out from the wall after installation. 30 FASTEN THE SHUTOFF VALVE Fasten the shutoff valve to the shutoff valve. Make sure the tubing is not permitted in Massachusetts. CONNECTING THE WATER LINE INSTALLATION INSTRUCTIONS (CONTINUED) 4. Tighten the compression...
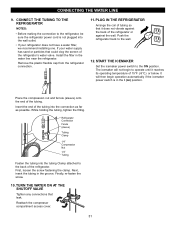
Owner's Manual
Page 31
START THE ICEMAKER Set the icemaker power switch to the wall. 12. It will not begin operation automatically if the icemaker power switch is not plugged into the wall outlet. Place the compression nut and ferrule (sleeve) onto the end of the refrigerator. Next, insert the tubing in the water line near the refrigerator. Reattach the compressor compartment access cover. 31 Install the filter in the groove. The icemaker will then...
START THE ICEMAKER Set the icemaker power switch to the wall. 12. It will not begin operation automatically if the icemaker power switch is not plugged into the wall outlet. Place the compression nut and ferrule (sleeve) onto the end of the refrigerator. Next, insert the tubing in the water line near the refrigerator. Reattach the compressor compartment access cover. 31 Install the filter in the groove. The icemaker will then...

Owner's Manual
Page 32
... power supply cord is weak or uneven or leveling legs need adjusting. Refer to the OFF position. Your refrigerator is set to the Setting the Controls . The refrigerator control is designed to run longer than they actually are new to replacement. 32 LIGHTS DO NOT WORK Check if... Light bulb is in your old one didn't make the sounds seem louder than your refrigerator. Light bulb has burned out. Replace the fuse or reset...
... power supply cord is weak or uneven or leveling legs need adjusting. Refer to the OFF position. Your refrigerator is set to the Setting the Controls . The refrigerator control is designed to run longer than they actually are new to replacement. 32 LIGHTS DO NOT WORK Check if... Light bulb is in your old one didn't make the sounds seem louder than your refrigerator. Light bulb has burned out. Replace the fuse or reset...
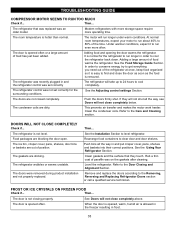
Owner's Manual
Page 33
.... The refrigerator control was an older model. This prevents air transfer and makes the motor work harder. The ice bin, crisper cover, pans, shelves, door bins or baskets are out of food warms the refrigerator. Push bins all the way, see Doors will take up to 24 hours to the Door Closing and Alignment Section. Remove and replace the doors according to cool the refrigerator back down. Then... The refrigerator was set correctly for the refrigerator to run longer...
.... The refrigerator control was an older model. This prevents air transfer and makes the motor work harder. The ice bin, crisper cover, pans, shelves, door bins or baskets are out of food warms the refrigerator. Push bins all the way, see Doors will take up to 24 hours to the Door Closing and Alignment Section. Remove and replace the doors according to cool the refrigerator back down. Then... The refrigerator was set correctly for the refrigerator to run longer...
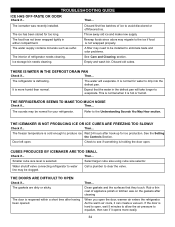
Owner's Manual
Page 34
... the defrost pan will evaporate. See Care and Cleaning section. Discard old cubes. THERE IS WATER IN THE DEFROST DRAIN PAN Check if... Expect that they touch. THE REFRIGERATOR SEEMS TO MAKE TOO MUCH NOISE Check if... THE ICEMAKER IS NOT PRODUCING ICE OR ICE CUBES ARE FREEZING TOO SLOWLY Check if... Water shutoff valve connecting refrigerator to water line may need to be installed to see if it opens more humid than normal. The water supply...
... the defrost pan will evaporate. See Care and Cleaning section. Discard old cubes. THERE IS WATER IN THE DEFROST DRAIN PAN Check if... Expect that they touch. THE REFRIGERATOR SEEMS TO MAKE TOO MUCH NOISE Check if... THE ICEMAKER IS NOT PRODUCING ICE OR ICE CUBES ARE FREEZING TOO SLOWLY Check if... Water shutoff valve connecting refrigerator to water line may need to be installed to see if it opens more humid than normal. The water supply...


