Owners Manual
Page 3
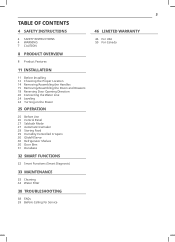
... Installing 12 Choosing the Proper Location 14 Removing/Assembling the Handles 15 Removing/Assembling the Doors and Drawers 18 Reversing Door Opening Direction 20 Connecting the Water Line 24 Leveling 24 Turning on the Power 25 OPERATION 25 Before Use 26 Control Panel 27 Sabbath Mode 27 Automatic Icemaker 28 Storing Food 29 Humidity Controlled Crispers 30 Glide'N'Serve 30 Refrigerator Shelves 30 Door Bins 31 Durabase 32 SMART FUNCTIONS 32 Smart Functions (Smart Diagnosis) 33 MAINTENANCE 33 Cleaning 34 Water Filter 38 TROUBLESHOOTING...
... Installing 12 Choosing the Proper Location 14 Removing/Assembling the Handles 15 Removing/Assembling the Doors and Drawers 18 Reversing Door Opening Direction 20 Connecting the Water Line 24 Leveling 24 Turning on the Power 25 OPERATION 25 Before Use 26 Control Panel 27 Sabbath Mode 27 Automatic Icemaker 28 Storing Food 29 Humidity Controlled Crispers 30 Glide'N'Serve 30 Refrigerator Shelves 30 Door Bins 31 Durabase 32 SMART FUNCTIONS 32 Smart Functions (Smart Diagnosis) 33 MAINTENANCE 33 Cleaning 34 Water Filter 38 TROUBLESHOOTING...
Owners Manual
Page 4
... plug. • Only connect this product, follow instructions. Do not use an extension cord. • The appliance must be positioned for easy access to a dedicated grounded electrical outlet rated for children. There is a risk of long-sleeved gloves and safety glasses. • Never attempt to roll over or damage the power cord. • Contact an authorized service center when installing...
... plug. • Only connect this product, follow instructions. Do not use an extension cord. • The appliance must be positioned for easy access to a dedicated grounded electrical outlet rated for children. There is a risk of long-sleeved gloves and safety glasses. • Never attempt to roll over or damage the power cord. • Contact an authorized service center when installing...

Owners Manual
Page 6
... electric shock. Always grip the plug firmly and pull straight out from the outlet. 6 SAFETY INSTRUCTIONS Maintenance • Do not use by persons (including children) with reduced physical, sensory or mental capabilities, or lack of the appliance by a person responsible for their safety. • Unplug the power plug before cleaning or repairing the refrigerator. • The refrigerator and freezer compartment lights are removed...
... electric shock. Always grip the plug firmly and pull straight out from the outlet. 6 SAFETY INSTRUCTIONS Maintenance • Do not use by persons (including children) with reduced physical, sensory or mental capabilities, or lack of the appliance by a person responsible for their safety. • Unplug the power plug before cleaning or repairing the refrigerator. • The refrigerator and freezer compartment lights are removed...
Owners Manual
Page 12
... tape or glue, rub the area briskly with warm water and dry. • Do not use sharp instruments, rubbing alcohol, flammable fluids, or abrasive cleaners to compensate for the automatic icemaker. Do not remove any warning labels, the model and serial number label • To remove any temporary labels from the refrigerator. Tape or glue residue can also be easily...
... tape or glue, rub the area briskly with warm water and dry. • Do not use sharp instruments, rubbing alcohol, flammable fluids, or abrasive cleaners to compensate for the automatic icemaker. Do not remove any warning labels, the model and serial number label • To remove any temporary labels from the refrigerator. Tape or glue residue can also be easily...

Owners Manual
Page 14
.... Assembling the Freezer Drawer Handle 1 Assemble the mounting fasteners at both ends of the handle with a 3/32 in . The appearance of the door. Allen wrench. Allen wrench • 1/4 in . Allen wrench. 2 Place the handle on the door by fitting the handle footprints over the mounting fasteners and tightening the set screws with a 1/4 in . 14 INSTALLATION Removing/Assembling the Handles When moving the refrigerator through a narrow opening, removing the doors...
.... Assembling the Freezer Drawer Handle 1 Assemble the mounting fasteners at both ends of the handle with a 3/32 in . The appearance of the door. Allen wrench. Allen wrench • 1/4 in . Allen wrench. 2 Place the handle on the door by fitting the handle footprints over the mounting fasteners and tightening the set screws with a 1/4 in . 14 INSTALLATION Removing/Assembling the Handles When moving the refrigerator through a narrow opening, removing the doors...

Owners Manual
Page 15
...; Place the door, inside . with a flathead screwdriver. 2 Rotate the hinge lever clockwise. Removing the Freezer Drawers WARNING • Use two or more people to remove and install the refrigerator doors and freezer drawer. • Disconnect the electrical supply to remove and install the refrigerator doors and freezer drawer. • Be careful of sharp hinges on both sides of the refrigerator. • Be careful when handling the hinge and stopper. • Remove food and bins before detaching the doors and drawers. •...
...; Place the door, inside . with a flathead screwdriver. 2 Rotate the hinge lever clockwise. Removing the Freezer Drawers WARNING • Use two or more people to remove and install the refrigerator doors and freezer drawer. • Disconnect the electrical supply to remove and install the refrigerator doors and freezer drawer. • Be careful of sharp hinges on both sides of the refrigerator. • Be careful when handling the hinge and stopper. • Remove food and bins before detaching the doors and drawers. •...
Owners Manual
Page 21
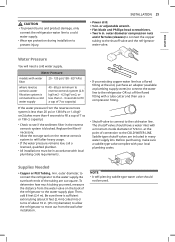
... the sediment filter in the reverse osmosis system is sufficient extra tubing (about 8 feet [2.4 m] coiled into 3 turns of about 10 in . Water Pressure models with a tube cutter and then use a compression fitting. • Shutoff valve to connect to the water supply. Be sure there is blocked. CAUTION • To prevent burns and product damage, only connect the refrigerator water line to a cold water supply. • Wear eye protection during installation to...
... the sediment filter in the reverse osmosis system is sufficient extra tubing (about 8 feet [2.4 m] coiled into 3 turns of about 10 in . Water Pressure models with a tube cutter and then use a compression fitting. • Shutoff valve to connect to the water supply. Be sure there is blocked. CAUTION • To prevent burns and product damage, only connect the refrigerator water line to a cold water supply. • Wear eye protection during installation to...
Owners Manual
Page 26
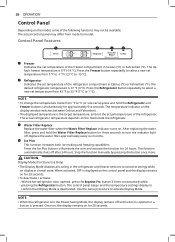
... Refrigerator button. NOTE • To change the temperature mode from model to confirm that Display Mode is 0°F (-18 °C). Water Filter Replace Replace the water filter when the Water Filter Replace indicator turns on the food inside the refrigerator. Press the Ice Plus button to °C (or vice versa) press and hold the Water Filter Replace button for 20 seconds. • To deactivate / activate: - CAUTION Display Mode (For Store Use Only) • The Display Mode disables all cooling in the Power Saving Mode, the display...
... Refrigerator button. NOTE • To change the temperature mode from model to confirm that Display Mode is 0°F (-18 °C). Water Filter Replace Replace the water filter when the Water Filter Replace indicator turns on the food inside the refrigerator. Press the Ice Plus button to °C (or vice versa) press and hold the Water Filter Replace button for 20 seconds. • To deactivate / activate: - CAUTION Display Mode (For Store Use Only) • The Display Mode disables all cooling in the Power Saving Mode, the display...
Owners Manual
Page 27
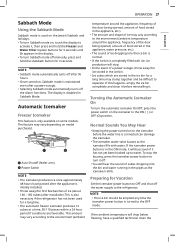
... shut off manually, press and hold the Freezer and Water Filter replace buttons for 3 seconds. If this happens, empty the ice bin completely and clean it before the water line is turned to the icemaker before reinstalling it off. • You will stop the buzzing, press the icemaker power button to turn the automatic icemaker On/Off, press the power switch on , Sabbath mode is maintained even after installation.This is in the ON mode...
... shut off manually, press and hold the Freezer and Water Filter replace buttons for 3 seconds. If this happens, empty the ice bin completely and clean it before the water line is turned to the icemaker before reinstalling it off. • You will stop the buzzing, press the icemaker power button to turn the automatic icemaker On/Off, press the power switch on , Sabbath mode is maintained even after installation.This is in the ON mode...
Owners Manual
Page 34
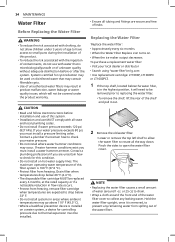
... contain filterable cysts. • Use of the water filter cover to prevent any leaking water. CAUTION • Read and follow Use Instructions before installation and use MUST comply with all the way down. Drain filter when temperatures drop below 40 °F (4.4 °C). • The disposable filter cartridge MUST be replaced every 6 months, at the rated capacity or if a noticeable reduction in flow rate occurs. • Protect from freezing, remove filter cartridge when temperatures are...
... contain filterable cysts. • Use of the water filter cover to prevent any leaking water. CAUTION • Read and follow Use Instructions before installation and use MUST comply with all the way down. Drain filter when temperatures drop below 40 °F (4.4 °C). • The disposable filter cartridge MUST be replaced every 6 months, at the rated capacity or if a noticeable reduction in flow rate occurs. • Protect from freezing, remove filter cartridge when temperatures are...

Owners Manual
Page 35
... new water filter out of its packing and remove the protective cover from the system. Press and release the dispenser pad for cycles of 30 seconds ON and 60 seconds OFF. 7 After changing the filter, press and hold the Water Filter Replace button for approximately 5 minutes) to reset the indicator light. With the water filter tabs in the horizontal position, push the new water filter into the manifold hole and turn...
... new water filter out of its packing and remove the protective cover from the system. Press and release the dispenser pad for cycles of 30 seconds ON and 60 seconds OFF. 7 After changing the filter, press and hold the Water Filter Replace button for approximately 5 minutes) to reset the indicator light. With the water filter tabs in the horizontal position, push the new water filter into the manifold hole and turn...
Owners Manual
Page 37
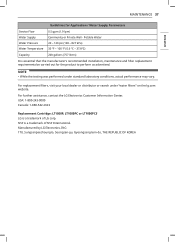
... installation, maintenance and filter replacement requirements be carried out for Application / Water Supply Parameters Service Flow 0.5 gpm (1.9 lpm) Water Supply Community or Private Well - Manufactured by LG Electronics, INC: 170, Sungsanpaechoungro, Seongsan-gu, Gyeongsangnam-do, THE REPUBLIC OF KOREA NOTE • While the testing was performed under "water filters" on the lg.com website. For further assistance, contact the LG Electronics Customer Information Center. Potable Water Water...
... installation, maintenance and filter replacement requirements be carried out for Application / Water Supply Parameters Service Flow 0.5 gpm (1.9 lpm) Water Supply Community or Private Well - Manufactured by LG Electronics, INC: 170, Sungsanpaechoungro, Seongsan-gu, Gyeongsangnam-do, THE REPUBLIC OF KOREA NOTE • While the testing was performed under "water filters" on the lg.com website. For further assistance, contact the LG Electronics Customer Information Center. Potable Water Water...

Owners Manual
Page 38
... pressing the Refrigerator button. A: Continually press the Refrigerator or Freezer button on the inner shelf of the icemaker cycle. The numbers will cycle from my refrigerator periodically? The control panel beeps and the temperature settings display to assist in Display Mode. The icemaker tray may happen if you hear a beep and the settings in a retail store. Ice cream should be cold when stored on the control panel until you do not have a water source...
... pressing the Refrigerator button. A: Continually press the Refrigerator or Freezer button on the inner shelf of the icemaker cycle. The numbers will cycle from my refrigerator periodically? The control panel beeps and the temperature settings display to assist in Display Mode. The icemaker tray may happen if you hear a beep and the settings in a retail store. Ice cream should be cold when stored on the control panel until you do not have a water source...
Owners Manual
Page 39
Refrigerator is set to the Food Storage Guide.) Doors are not cooling. Refrigerator is set to Demo Mode. • Demo Mode allows the lights and control display to work normally while disabling cooling, to disable Demo Mode. The refrigerator should not be operated above 110 °F (43 °C). Refrigerator was recently relocated. • If the refrigerator was recently installed. • It may take up to 24 hours for each compartment may rise slightly. At...
Refrigerator is set to the Food Storage Guide.) Doors are not cooling. Refrigerator is set to Demo Mode. • Demo Mode allows the lights and control display to work normally while disabling cooling, to disable Demo Mode. The refrigerator should not be operated above 110 °F (43 °C). Refrigerator was recently relocated. • If the refrigerator was recently installed. • It may take up to 24 hours for each compartment may rise slightly. At...

Owners Manual
Page 40
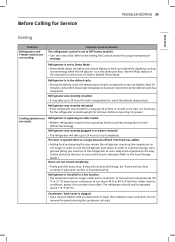
... wall. Door is operated in a cold location. • When the refrigerator is opened frequently or for long periods of time. • When the doors are opened leading to the Control Panel for a long period of time, warm, humid air enters the compartment. This raises the temperature and moisture level within the compartment. To lessen the effect, reduce the frequency and duration of door openings. Defrost cycle recently...
... wall. Door is operated in a cold location. • When the refrigerator is opened frequently or for long periods of time. • When the doors are opened leading to the Control Panel for a long period of time, warm, humid air enters the compartment. This raises the temperature and moisture level within the compartment. To lessen the effect, reduce the frequency and duration of door openings. Defrost cycle recently...
Owners Manual
Page 42
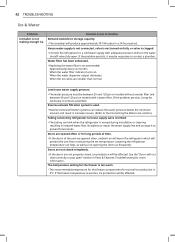
... or repair the water supply line and arrange it may be necessary to prevent future kinks. Doors are opened often, ambient air will warm the refrigerator which will prevent the unit from maintaining the set temperature. If the problem persists, it may be necessary to a cold water supply with a water filter. 42 TROUBLESHOOTING Ice & Water Problem Icemaker is warmer, ice production will be affected. When the water dispenser output decreases. Reverse osmosis filtration system is used. • Reverse...
... or repair the water supply line and arrange it may be necessary to prevent future kinks. Doors are opened often, ambient air will warm the refrigerator which will prevent the unit from maintaining the set temperature. If the problem persists, it may be necessary to a cold water supply with a water filter. 42 TROUBLESHOOTING Ice & Water Problem Icemaker is warmer, ice production will be affected. When the water dispenser output decreases. Reverse osmosis filtration system is used. • Reverse...
Owners Manual
Page 43
... Connecting the Water Line section). The interior of the refrigerator needs to confirm proper operation. Reverse osmosis water filtration system is turned on . • Locate the icemaker ON/OFF and confirm that it . The food has not been stored properly in icemaker issues. (Refer to eliminate taste and odor problems. NOTE: In some cases, a filter may develop a stale taste. Odors may migrate to your cold water supply. • Reverse...
... Connecting the Water Line section). The interior of the refrigerator needs to confirm proper operation. Reverse osmosis water filtration system is turned on . • Locate the icemaker ON/OFF and confirm that it . The food has not been stored properly in icemaker issues. (Refer to eliminate taste and odor problems. NOTE: In some cases, a filter may develop a stale taste. Odors may migrate to your cold water supply. • Reverse...

Owners Manual
Page 44
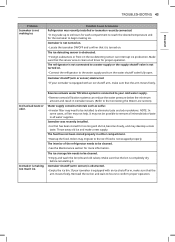
... replaced. The thermostat control (or refrigerator control on the gaskets after cleaning. Refrigerator is LED interior lighting, and service should be set to the MAX setting or replaced. • Set the Air Filter to level refrigerator. Noises Problem Clicking Possible Cause & Solution The defrost control will click when the automatic defrost cycle begins and ends. Doors are blocking the door open . or seems unstable • Refer to the Removing and Replacing Refrigerator Handles and Doors section. Refrigerator has an unusual odor. The Air Filter may need...
... replaced. The thermostat control (or refrigerator control on the gaskets after cleaning. Refrigerator is LED interior lighting, and service should be set to the MAX setting or replaced. • Set the Air Filter to level refrigerator. Noises Problem Clicking Possible Cause & Solution The defrost control will click when the automatic defrost cycle begins and ends. Doors are blocking the door open . or seems unstable • Refer to the Removing and Replacing Refrigerator Handles and Doors section. Refrigerator has an unusual odor. The Air Filter may need...
Owners Manual
Page 47
... ARBITRATION, AND NOT IN A COURT OF GENERAL JURISDICTION. references to the instructions outlined in the Product's owner's manual. • Costs associated with normal operation. • Use of accessories (e.g., water filters, etc.), components, or consumable cleaning products that have been removed, altered, or cannot be borne by LG. The cost of the product or this limited warranty. BINDING ARBITRATION MEANS THAT YOU AND...
... ARBITRATION, AND NOT IN A COURT OF GENERAL JURISDICTION. references to the instructions outlined in the Product's owner's manual. • Costs associated with normal operation. • Use of accessories (e.g., water filters, etc.), components, or consumable cleaning products that have been removed, altered, or cannot be borne by LG. The cost of the product or this limited warranty. BINDING ARBITRATION MEANS THAT YOU AND...
Owners Manual
Page 51
... the instructions outlined in -warranty repair. or iii) correct unauthorized repairs or installations of the Product; • Damage or failure of the Product to perform during power failures and interrupted or inadequate electrical service; • Damage or failure caused by leaky or broken water pipes, frozen water pipes, restricted drain lines, inadequate or interrupted water supply or inadequate supply of the Product. and • Shelves, door bins, drawers, handle and...
... the instructions outlined in -warranty repair. or iii) correct unauthorized repairs or installations of the Product; • Damage or failure of the Product to perform during power failures and interrupted or inadequate electrical service; • Damage or failure caused by leaky or broken water pipes, frozen water pipes, restricted drain lines, inadequate or interrupted water supply or inadequate supply of the Product. and • Shelves, door bins, drawers, handle and...


