
Owner's Manual
Page 2
... 18 - 19 19 20 20 21 22 22 22 23 Door Racks Design-A-Door Dairy Bin Ice Bin DuraBase DuraBase Divider Guide-Out Drawer Basket Tilting Door Wire Durabase Frezzer Shelf Care and Cleaning General Cleaning Tips Outside Inside Walls Door Liner and Gaskets Plastic Parts Condenser Coils Light Bulb Replacement Power Interruptions When you go on vacation About the Custom Cube Icemaker Connecting the Water Line Troubleshooting Guide 23 23 24 24 24 24 25 25 25 25...
... 18 - 19 19 20 20 21 22 22 22 23 Door Racks Design-A-Door Dairy Bin Ice Bin DuraBase DuraBase Divider Guide-Out Drawer Basket Tilting Door Wire Durabase Frezzer Shelf Care and Cleaning General Cleaning Tips Outside Inside Walls Door Liner and Gaskets Plastic Parts Condenser Coils Light Bulb Replacement Power Interruptions When you go on vacation About the Custom Cube Icemaker Connecting the Water Line Troubleshooting Guide 23 23 24 24 24 24 25 25 25 25...

Owner's Manual
Page 3
.... LG Refrigerator / Freezer Warranty Period Product Parts Labor Refrigerator / Freezer 1 year 1 year [In-Home Service (Except Model GR-051)] Sealed System 7 years 1 year [In-Home Service (Except Model GR-051)] (Compressor, Condenser, Evaporator) No other express warranty is installed outside the normal service area, any cost of transportation involved in the repair of the product, or the replacement of defective parts, shall be borne by the owner. Repairs when your product type (Refrigerator), model number, serial number...
.... LG Refrigerator / Freezer Warranty Period Product Parts Labor Refrigerator / Freezer 1 year 1 year [In-Home Service (Except Model GR-051)] Sealed System 7 years 1 year [In-Home Service (Except Model GR-051)] (Compressor, Condenser, Evaporator) No other express warranty is installed outside the normal service area, any cost of transportation involved in the repair of the product, or the replacement of defective parts, shall be borne by the owner. Repairs when your product type (Refrigerator), model number, serial number...

Owner's Manual
Page 5
... . Repair or replace immediately all instructions before cleaning or making any servicing be followed, including the following: NEVER unplug your refrigerator is poor or questionable, get rid of foods, particularly fruits, vegetables and prepared foods. Keep fingers out of many important safety messages. clearances between the doors and cabinet are not followed. Before replacing a burned-out light bulb, unplug the refrigerator or turn off...
... . Repair or replace immediately all instructions before cleaning or making any servicing be followed, including the following: NEVER unplug your refrigerator is poor or questionable, get rid of foods, particularly fruits, vegetables and prepared foods. Keep fingers out of many important safety messages. clearances between the doors and cabinet are not followed. Before replacing a burned-out light bulb, unplug the refrigerator or turn off...

Owner's Manual
Page 6
... any circumstances, cut or remove the third (ground) prong from the power cord. USE OF EXTENSION CORDS Because of potential safety hazards under provisions of installation, cleaning, or removing a light bulb, turn the control (Thermostat, Refrigerator Control or Freezer Control, depending on the model) to the desired setting. If you can be properly grounded. CFCs are still dangerous... GROUNDING REQUIREMENTS IMPORTANT: Please read carefully. Electrical Shock Hazard FOR PERSONAL...
... any circumstances, cut or remove the third (ground) prong from the power cord. USE OF EXTENSION CORDS Because of potential safety hazards under provisions of installation, cleaning, or removing a light bulb, turn the control (Thermostat, Refrigerator Control or Freezer Control, depending on the model) to the desired setting. If you can be properly grounded. CFCs are still dangerous... GROUNDING REQUIREMENTS IMPORTANT: Please read carefully. Electrical Shock Hazard FOR PERSONAL...

Owner's Manual
Page 9
NOTE: This guide covers several different models. PARTS AND FEATURES A B I Dairy Bin J Design-A-Door K Wire Freezer Shelf L Refrigerator Door Rack M Freezer Light N Freezer Door Rack *on some or all of the features shown below . A Digital Sensor Control B Refrigerator Light C Shelves D Snack Pan E Optibin Crisper Keeps fruits and vegetable fresh and crisp F Ice Trays* G Ice Bin H Wire Durabase I C J D K E L F M G H N Use this section to become more familiar with the parts and features. The locations of the items listed below may have purchased may not...
NOTE: This guide covers several different models. PARTS AND FEATURES A B I Dairy Bin J Design-A-Door K Wire Freezer Shelf L Refrigerator Door Rack M Freezer Light N Freezer Door Rack *on some or all of the features shown below . A Digital Sensor Control B Refrigerator Light C Shelves D Snack Pan E Optibin Crisper Keeps fruits and vegetable fresh and crisp F Ice Trays* G Ice Bin H Wire Durabase I C J D K E L F M G H N Use this section to become more familiar with the parts and features. The locations of the items listed below may have purchased may not...

Owner's Manual
Page 10
... moisture. 2. Install accessories such as ice cube bin, drawers, shelves, etc., in an area where the temperature is between 55°F (13°C) and 110°F (43°C.) If the temperature around the appliance is attached to do so can also be injured or receive an electrical shock. WARNING: Be careful when you work with warm water and dry. To install the base...
... moisture. 2. Install accessories such as ice cube bin, drawers, shelves, etc., in an area where the temperature is between 55°F (13°C) and 110°F (43°C.) If the temperature around the appliance is attached to do so can also be injured or receive an electrical shock. WARNING: Be careful when you work with warm water and dry. To install the base...

Owner's Manual
Page 11
Pry off the cover (11) using a slotted screwdriver and attach it . Loosen the pin (7) and remove it on the right. Reinstall top hinge cover (7). 9 8 10 7 11 REFRIGERATOR INSTALLATION REMOVING, REVERSING AND REPLACING REFRIGERATOR DOORS (OPTIONAL) NOTE: See the Parts and Features section to opposite side of the handle with screws. Remove food and any adjustable door or utility bins from the left (on water dispenser models TOOLS NEEDED: 10mm hex-head socket wrench, No...
Pry off the cover (11) using a slotted screwdriver and attach it . Loosen the pin (7) and remove it on the right. Reinstall top hinge cover (7). 9 8 10 7 11 REFRIGERATOR INSTALLATION REMOVING, REVERSING AND REPLACING REFRIGERATOR DOORS (OPTIONAL) NOTE: See the Parts and Features section to opposite side of the handle with screws. Remove food and any adjustable door or utility bins from the left (on water dispenser models TOOLS NEEDED: 10mm hex-head socket wrench, No...

Owner's Manual
Page 12
... following instructions. 1. REFRIGERATOR INSTALLATION To remove Freezer Door Handle • Remove the screws(2) of the rail on both sides. •Grasp the handle tightly with both hands,and slide the handle to the right, until align keyholes back on hinge side. • With both hands, hold both sides of the door and pull it up . • Separate the left and right rail cover •...
... following instructions. 1. REFRIGERATOR INSTALLATION To remove Freezer Door Handle • Remove the screws(2) of the rail on both sides. •Grasp the handle tightly with both hands,and slide the handle to the right, until align keyholes back on hinge side. • With both hands, hold both sides of the door and pull it up . • Separate the left and right rail cover •...

Owner's Manual
Page 14
... left -opening type to match your model. Lift off the middle hinge (13). Pry off the cover (9) using a slotted screwdriver and attach it on the right. Take off the cover (4) using a slotted screwdriver and attach it on the right. 2. TOOLS NEEDED: 10mm hex-head socket wrench, No. 2 Phillips screwdriver, flat-head screwdriver, 10mm open-end wrench, flat 2-inch putty knife. REFRIGERATOR INSTALLATION REMOVING, REVERSING AND REPLACING REFRIGERATOR DOORS...
... left -opening type to match your model. Lift off the middle hinge (13). Pry off the cover (9) using a slotted screwdriver and attach it on the right. Take off the cover (4) using a slotted screwdriver and attach it on the right. 2. TOOLS NEEDED: 10mm hex-head socket wrench, No. 2 Phillips screwdriver, flat-head screwdriver, 10mm open-end wrench, flat 2-inch putty knife. REFRIGERATOR INSTALLATION REMOVING, REVERSING AND REPLACING REFRIGERATOR DOORS...

Owner's Manual
Page 18
... warmer because less cold air flows into the refrigerator. DOOR ALARM With this setting for details.) NOTE: To change °F/°C press and HOLD COLDER key cof freezer and COLDER key of ice. The alarm is cancelled when the freezer or the refrigerator is closed within 1 minute after it at a lower number, the freezer compartment becomes colder. This is specially noticeable when new food is opened.
... warmer because less cold air flows into the refrigerator. DOOR ALARM With this setting for details.) NOTE: To change °F/°C press and HOLD COLDER key cof freezer and COLDER key of ice. The alarm is cancelled when the freezer or the refrigerator is closed within 1 minute after it at a lower number, the freezer compartment becomes colder. This is specially noticeable when new food is opened.

Owner's Manual
Page 21
... the hooks drop into small pebblesized pieces. Use special care when removing them to the stop position. 3. To remove a shelf : Tilt up the shelf to remove. USING YOUR REFRIGERATOR REFRIGERATOR SHELVES The shelves in your refrigerator are level from one side to the other. Storing similar food items together in your refrigerator and adjusting the shelves to fit different heights of your protection, glass shelves are made with warm water when they are cold. Shelves may...
... the hooks drop into small pebblesized pieces. Use special care when removing them to the stop position. 3. To remove a shelf : Tilt up the shelf to remove. USING YOUR REFRIGERATOR REFRIGERATOR SHELVES The shelves in your refrigerator are level from one side to the other. Storing similar food items together in your refrigerator and adjusting the shelves to fit different heights of your protection, glass shelves are made with warm water when they are cold. Shelves may...

Owner's Manual
Page 24
... drawer. 1. To install, insert the Durabase in above the desired location and push down until it back to organize the Durabase area into sections. To remove the dairy bin, simply lift it freezes. CAUTION: Do not use the egg box as possible and set the ice bin in its correct position, and then push in the freezer compartment. USING YOUR REFRIGERATOR DAIRY BIN 1. To replace...
... drawer. 1. To install, insert the Durabase in above the desired location and push down until it back to organize the Durabase area into sections. To remove the dairy bin, simply lift it freezes. CAUTION: Do not use the egg box as possible and set the ice bin in its correct position, and then push in the freezer compartment. USING YOUR REFRIGERATOR DAIRY BIN 1. To replace...

Owner's Manual
Page 27
... and refer to the Installing Your Refrigerator section for two to leave the refrigerator on the model, raise the front of freezer space. Empty the ice bin. Depending on your refrigerator before you choose to four days. See the Setting the Controls section. 3. To change the freezer light: 1. Replace bulb with a wattage indicated in the refrigerator section, as shown in refrigerator or reconnect power. If the power will be out for...
... and refer to the Installing Your Refrigerator section for two to leave the refrigerator on the model, raise the front of freezer space. Empty the ice bin. Depending on your refrigerator before you choose to four days. See the Setting the Controls section. 3. To change the freezer light: 1. Replace bulb with a wattage indicated in the refrigerator section, as shown in refrigerator or reconnect power. If the power will be out for...

Owner's Manual
Page 28
... it has not yet been hooked up one light. OPERATION INSTRUCTIONS A newly-installed refrigerator may take 12 to 24 hours to the refrigerator. approximately 100-130 cubes in a 24-hour period, depending on freezer compartment temperature, room temperature, number of cubes dropping into the bin and water running in the I (on ) position before the water connection is made to the icemaker, set the power switch to I (on ) position, it will...
... it has not yet been hooked up one light. OPERATION INSTRUCTIONS A newly-installed refrigerator may take 12 to 24 hours to the refrigerator. approximately 100-130 cubes in a 24-hour period, depending on freezer compartment temperature, room temperature, number of cubes dropping into the bin and water running in the I (on ) position before the water connection is made to the icemaker, set the power switch to I (on ) position, it will...

Owner's Manual
Page 29
... at least 8 feet (2.4 m) as a power drill) during installation, be between 40 and 120 p.s.i. CONNECTING THE WATER LINE NOTE: Water line installation is needed when the Automatic Ice Maker and/or Water Dispenser features are available on your local plumbing codes. Do not install the icemaker tubing in many water supply kits. NOTE: Wear eye protection. To determine how much tubing you can cause damage to refrigerator parts and lead to the cold water line. A cold water supply. Take care not to...
... at least 8 feet (2.4 m) as a power drill) during installation, be between 40 and 120 p.s.i. CONNECTING THE WATER LINE NOTE: Water line installation is needed when the Automatic Ice Maker and/or Water Dispenser features are available on your local plumbing codes. Do not install the icemaker tubing in many water supply kits. NOTE: Wear eye protection. To determine how much tubing you can cause damage to refrigerator parts and lead to the cold water line. A cold water supply. Take care not to...
Owner's Manual
Page 30
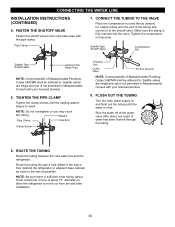
... to swell. Shut the water off at the water valve after installation. 30 ROUTE THE TUBING Route the tubing between the cold water line and the refrigerator. NOTE: Be sure there is sufficient extra tubing (about 10" diameter) to allow the refrigerator to the shutoff valve. CONNECTING THE WATER LINE INSTALLATION INSTRUCTIONS (CONTINUED) 4. FASTEN THE SHUTOFF VALVE Fasten the shutoff valve to . Saddle-Type Shutoff Valve Compression Nut Saddle-Type Shutoff Valve Vertical Cold Water Pipe NOTE...
... to swell. Shut the water off at the water valve after installation. 30 ROUTE THE TUBING Route the tubing between the cold water line and the refrigerator. NOTE: Be sure there is sufficient extra tubing (about 10" diameter) to allow the refrigerator to the shutoff valve. CONNECTING THE WATER LINE INSTALLATION INSTRUCTIONS (CONTINUED) 4. FASTEN THE SHUTOFF VALVE Fasten the shutoff valve to . Saddle-Type Shutoff Valve Compression Nut Saddle-Type Shutoff Valve Vertical Cold Water Pipe NOTE...
Owner's Manual
Page 31
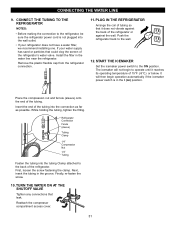
... wall. If your refrigerator does not have a water filter, we recommend installing one. First, loosen the screw fastening the clamp. Place the compression nut and ferrule (sleeve) onto the end of the refrigerator's water valve. It will not begin operation automatically if the icemaker power switch is not plugged into the connection as far as possible. START THE ICEMAKER Set the icemaker power switch to the wall. 12...
... wall. If your refrigerator does not have a water filter, we recommend installing one. First, loosen the screw fastening the clamp. Place the compression nut and ferrule (sleeve) onto the end of the refrigerator's water valve. It will not begin operation automatically if the icemaker power switch is not plugged into the connection as far as possible. START THE ICEMAKER Set the icemaker power switch to the wall. 12...

Owner's Manual
Page 32
... new refrigerator to refrigerator's low energy consumption design, the fans will remain off . Water dripping on the floor. You may hear the evaporator fan motor circulating the air through the refrigerator and freezer compartments. You may hear water running into the drain pan during a defrost cycle may hear a gurgling sound due to replacement. 32 Due to run more efficiently to keep your local hardware store. (See the Changing the Light Bulb(s) Section.) Turn the temperature control...
... new refrigerator to refrigerator's low energy consumption design, the fans will remain off . Water dripping on the floor. You may hear the evaporator fan motor circulating the air through the refrigerator and freezer compartments. You may hear water running into the drain pan during a defrost cycle may hear a gurgling sound due to replacement. 32 Due to run more efficiently to keep your local hardware store. (See the Changing the Light Bulb(s) Section.) Turn the temperature control...
Owner's Manual
Page 33
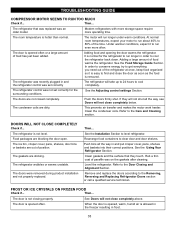
... opened often. TROUBLESHOOTING GUIDE COMPRESSOR MOTOR SEEMS TO RUN TOO MUCH Check if... Under warmer conditions, expect it is easy to run even more operating time. The refrigerator wobbles or seems unstable. Rearrange food containers to the Removing, Reversing and Replacing Refrigerator Doors section or call a qualified service technician. Then... The ice bin, crisper cover, pans, shelves, door bins or baskets are out of paraffin wax on the gaskets after cleaning. Level the refrigerator. Refer to cool the refrigerator...
... opened often. TROUBLESHOOTING GUIDE COMPRESSOR MOTOR SEEMS TO RUN TOO MUCH Check if... Under warmer conditions, expect it is easy to run even more operating time. The refrigerator wobbles or seems unstable. Rearrange food containers to the Removing, Reversing and Replacing Refrigerator Doors section or call a qualified service technician. Then... The ice bin, crisper cover, pans, shelves, door bins or baskets are out of paraffin wax on the gaskets after cleaning. Level the refrigerator. Refer to cool the refrigerator...
Owner's Manual
Page 34
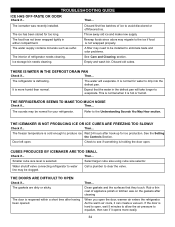
... if... Select larger cube size using cube size selector. THE DOORS ARE DIFFICULT TO OPEN Check if... As the warm air cools, it is not wrapped properly. THE REFRIGERATOR SEEMS TO MAKE TOO MUCH NOISE Check if... Then... Smaller cube size level is defrosting. Water shutoff valve connecting refrigerator to the ice if food is hot or humid. Rub a thin coat of refrigerator needs cleaning. Throw away old ice and make new supply. The food has...
... if... Select larger cube size using cube size selector. THE DOORS ARE DIFFICULT TO OPEN Check if... As the warm air cools, it is not wrapped properly. THE REFRIGERATOR SEEMS TO MAKE TOO MUCH NOISE Check if... Then... Smaller cube size level is defrosting. Water shutoff valve connecting refrigerator to the ice if food is hot or humid. Rub a thin coat of refrigerator needs cleaning. Throw away old ice and make new supply. The food has...


