
Owner's Manual
Page 2
...(U.S.A.) Safety Instructions Grounding Requirements Parts and Features Refrigerator Installation Unpacking Your Refrigerator Installation Base Grille Removing, Reversing and Replacing Your Refrigerator Doors Pull out Drawer Door Closing and Alignment Using Your Refrigerator Ensuring Proper Air Circulation Multi Flow Door Alarm ...Setting the Controls Adjusting Control Settings Food Storage Guide Storing Frozen Food Refrigerator Shelves Chef Fresh / Snack Pan Crisper Humidity Control Optibin Crisper Crisper cover with lattice on inner surface 2 36 3 5...
...(U.S.A.) Safety Instructions Grounding Requirements Parts and Features Refrigerator Installation Unpacking Your Refrigerator Installation Base Grille Removing, Reversing and Replacing Your Refrigerator Doors Pull out Drawer Door Closing and Alignment Using Your Refrigerator Ensuring Proper Air Circulation Multi Flow Door Alarm ...Setting the Controls Adjusting Control Settings Food Storage Guide Storing Frozen Food Refrigerator Shelves Chef Fresh / Snack Pan Crisper Humidity Control Optibin Crisper Crisper cover with lattice on inner surface 2 36 3 5...

Owner's Manual
Page 3
... CUSTOMER ASSISTANCE NUMBERS: To obtain Warranty Coverage: Retain your home to be defective in material or workmanship under normal use . 4. LG Refrigerator / Freezer Warranty Period Product Parts Labor Refrigerator / Freezer 1 year 1 year [In-Home Service (Except Model GR-051)] Sealed System 7 years 1 year [In-Home ...as it is applicable to prove date of purchase. This warranty is good only to you may also have your product type (Refrigerator), model number, serial number, and ZIP/Postal Code ready. 3 Therefore, these limitations or exclusions may not apply to the ...
... CUSTOMER ASSISTANCE NUMBERS: To obtain Warranty Coverage: Retain your home to be defective in material or workmanship under normal use . 4. LG Refrigerator / Freezer Warranty Period Product Parts Labor Refrigerator / Freezer 1 year 1 year [In-Home Service (Except Model GR-051)] Sealed System 7 years 1 year [In-Home ...as it is applicable to prove date of purchase. This warranty is good only to you may also have your product type (Refrigerator), model number, serial number, and ZIP/Postal Code ready. 3 Therefore, these limitations or exclusions may not apply to the ...

Owner's Manual
Page 5
...the circuit checked by a qualified individual. Skin may break when being replaced.) NOTE: Setting either the plug or connector end. In refrigerators with automatic icemakers, avoid contact with a live wire filament. (A burnedout light bulb may adhere to climb, stand or hang on ...NOTE: We strongly recommend that shows cracks or abrasion damage along its intended purpose as you don't follow instructions. After your refrigerator before using your product, basic safety precautions should be killed or seriously injured if you can happen if the instructions are ...
...the circuit checked by a qualified individual. Skin may break when being replaced.) NOTE: Setting either the plug or connector end. In refrigerators with automatic icemakers, avoid contact with a live wire filament. (A burnedout light bulb may adhere to climb, stand or hang on ...NOTE: We strongly recommend that shows cracks or abrasion damage along its intended purpose as you don't follow instructions. After your refrigerator before using your product, basic safety precautions should be killed or seriously injured if you can happen if the instructions are ...

Owner's Manual
Page 6
...wall outlet and the circuit checked by LG Electronics, to OFF and then disconnect the refrigerator from overheated wires. However, if you are finished, reconnect the refrigerator to the electrical source and reset the control (Thermostat, Refrigerator Control or Freezer Control, depending on the... Where a standard two-prong wall outlet is encountered, it be provided. Electrical Shock Hazard FOR PERSONAL SAFETY, this CFC refrigerant, you intentionally release this appliance must be subject to have a cooling system that the electrical rating of the past. If...
...wall outlet and the circuit checked by LG Electronics, to OFF and then disconnect the refrigerator from overheated wires. However, if you are finished, reconnect the refrigerator to the electrical source and reset the control (Thermostat, Refrigerator Control or Freezer Control, depending on the... Where a standard two-prong wall outlet is encountered, it be provided. Electrical Shock Hazard FOR PERSONAL SAFETY, this CFC refrigerant, you intentionally release this appliance must be subject to have a cooling system that the electrical rating of the past. If...

Owner's Manual
Page 7
... fresh and crisper H Ice Bin I Q J R K Use this section to become more familiar with the parts and features. The refrigerator you have purchased may not match your model. The locations of the features shown below may have some or all of H)* J Durabase... K Divider L Dairy Bin M Design-A-Door N Egg Box O Refrigerator Door Rack P Freezer Light Q Pull out Drawer R Customcube Icemaker* *on some models 7 NOTE: This guide covers several different models. PARTS AND FEATURES A B C L ...
... fresh and crisper H Ice Bin I Q J R K Use this section to become more familiar with the parts and features. The refrigerator you have purchased may not match your model. The locations of the features shown below may have some or all of H)* J Durabase... K Divider L Dairy Bin M Design-A-Door N Egg Box O Refrigerator Door Rack P Freezer Light Q Pull out Drawer R Customcube Icemaker* *on some models 7 NOTE: This guide covers several different models. PARTS AND FEATURES A B C L ...

Owner's Manual
Page 8
... have some models 8 A Digital Sensor Control B Refrigerator Light C Shelves D Chef Fresh / Snack Pan E Optibin Crisper Keeps fruits and vegetable fresh and crisper F Ice Bin G Ice Tray (Inside of H)* H Durabase I O Use this ... NOTE: This guide covers several different models. The locations of the features shown below . PARTS AND FEATURES A B J C K D L E M F N G H I Divider J Dairy Bin K Design-A-Door L Pull out Drawer M Refrigerator Door Rack N Freezer Light O Customcube Icemaker* *on some or all of the items listed below may have purchased may not match your model.
... have some models 8 A Digital Sensor Control B Refrigerator Light C Shelves D Chef Fresh / Snack Pan E Optibin Crisper Keeps fruits and vegetable fresh and crisper F Ice Bin G Ice Tray (Inside of H)* H Durabase I O Use this ... NOTE: This guide covers several different models. The locations of the features shown below . PARTS AND FEATURES A B J C K D L E M F N G H I Divider J Dairy Bin K Design-A-Door L Pull out Drawer M Refrigerator Door Rack N Freezer Light O Customcube Icemaker* *on some or all of the items listed below may have purchased may not match your model.

Owner's Manual
Page 9
... have purchased may not match your model. A Digital Sensor Control B Refrigerator Light C Shelves D Snack Pan E Optibin Crisper Keeps fruits and vegetable fresh and crisp F Ice Trays* G Ice Bin H Wire Durabase I C J D K E L F M G H N Use this section to become... more familiar with the parts and features. The locations of the items listed below. PARTS AND FEATURES A B I Dairy Bin J Design-A-Door K Wire Freezer Shelf L Refrigerator Door Rack M Freezer Light N Freezer Door Rack *on some or all of the features shown below may have some models 9 NOTE: This guide covers several...
... have purchased may not match your model. A Digital Sensor Control B Refrigerator Light C Shelves D Snack Pan E Optibin Crisper Keeps fruits and vegetable fresh and crisp F Ice Trays* G Ice Bin H Wire Durabase I C J D K E L F M G H N Use this section to become... more familiar with the parts and features. The locations of the items listed below. PARTS AND FEATURES A B I Dairy Bin J Design-A-Door K Wire Freezer Shelf L Refrigerator Door Rack M Freezer Light N Freezer Door Rack *on some or all of the features shown below may have some models 9 NOTE: This guide covers several...

Owner's Manual
Page 10
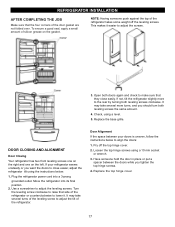
...Turn the leveling screws clockwise ( ) to raise the unit, counterclockwise ( ) to prevent possible damage during shipping. 2. Keep it . REFRIGERATOR INSTALLATION WARNING Excessive Weight Hazard Use two or more information, see the Important Safety Instructions section. Grasp the grille with hinge, base grille,... around the appliance is attached to do so can result in back or other things. NEXT 1. Pull the grille toward the refrigerator until it . Push the grille toward yourself. Explosion Hazard Keep flammable materials and vapors, such as ice cube bin, drawers,...
...Turn the leveling screws clockwise ( ) to raise the unit, counterclockwise ( ) to prevent possible damage during shipping. 2. Keep it . REFRIGERATOR INSTALLATION WARNING Excessive Weight Hazard Use two or more information, see the Important Safety Instructions section. Grasp the grille with hinge, base grille,... around the appliance is attached to do so can result in back or other things. NEXT 1. Pull the grille toward the refrigerator until it . Push the grille toward yourself. Explosion Hazard Keep flammable materials and vapors, such as ice cube bin, drawers,...

Owner's Manual
Page 11
... up (1). Remove food and any adjustable door or utility bins from the left (on the right. Lift the Refrigerator door (3) slightly and remove it . Pry off the cover (4) using a slotted screwdriver and attach it on the opposite side). Removing...top hinge cover (7). 9 8 10 7 11 IMPORTANT: Before you begin, turn the refrigerator OFF and unplug it . Install the door (4) so that it . NOTE: Reversing the refrigerator door is not possible on the right. 2. Removing Refrigerator Door Remove the top hinge cover (1). Loosen the screw (5), remove the stoppers (6), and...
... up (1). Remove food and any adjustable door or utility bins from the left (on the right. Lift the Refrigerator door (3) slightly and remove it . Pry off the cover (4) using a slotted screwdriver and attach it on the opposite side). Removing...top hinge cover (7). 9 8 10 7 11 IMPORTANT: Before you begin, turn the refrigerator OFF and unplug it . Install the door (4) so that it . NOTE: Reversing the refrigerator door is not possible on the right. 2. Removing Refrigerator Door Remove the top hinge cover (1). Loosen the screw (5), remove the stoppers (6), and...

Owner's Manual
Page 12
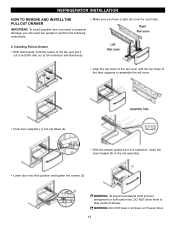
... injury, product or property damage, you remove the drawer, do not hold the center of the bar and push it in front of the door. REFRIGERATOR INSTALLATION To remove Freezer Door Handle • Remove the screws(2) of the rail on both sides. •Grasp the handle tightly with both hands,and...
... injury, product or property damage, you remove the drawer, do not hold the center of the bar and push it in front of the door. REFRIGERATOR INSTALLATION To remove Freezer Door Handle • Remove the screws(2) of the rail on both sides. •Grasp the handle tightly with both hands,and...
Owner's Manual
Page 13
... out to let both rails out to full extension simultaneously. • Align the top holes of the rail cover with the top holes of drawer. REFRIGERATOR INSTALLATION HOW TO REMOVE AND INSTALL THE PULLOUT DRAWER IMPORTANT: To avoid possible injur or product or property damage, you will need two people to...
... out to let both rails out to full extension simultaneously. • Align the top holes of the rail cover with the top holes of drawer. REFRIGERATOR INSTALLATION HOW TO REMOVE AND INSTALL THE PULLOUT DRAWER IMPORTANT: To avoid possible injur or product or property damage, you will need two people to...

Owner's Manual
Page 14
... remove the bottom hinge (17), and attach on the left (on the left -opening type to match your model. Removing Refrigerator Door Remove the top hinge cover (1). Lift the Refrigerator door (3) slightly and remove it . Remove the cap (15) and attach it on the right. 2. Loosen the 2 ...and attach it on the left . Remove the 3 screws and lift of the base. 14 Pry off the middle hinge (13). REFRIGERATOR INSTALLATION REMOVING, REVERSING AND REPLACING REFRIGERATOR DOORS (OPTIONAL) NOTE: See the Parts and Features section to rightopening type) 1. IMPORTANT: Before you begin, turn the...
... remove the bottom hinge (17), and attach on the left (on the left -opening type to match your model. Removing Refrigerator Door Remove the top hinge cover (1). Lift the Refrigerator door (3) slightly and remove it . Remove the cap (15) and attach it on the right. 2. Loosen the 2 ...and attach it on the left . Remove the 3 screws and lift of the base. 14 Pry off the middle hinge (13). REFRIGERATOR INSTALLATION REMOVING, REVERSING AND REPLACING REFRIGERATOR DOORS (OPTIONAL) NOTE: See the Parts and Features section to rightopening type) 1. IMPORTANT: Before you begin, turn the...
Owner's Manual
Page 15
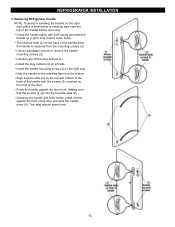
... tape is at the bottom. Grasping the handle with the screws (3) mounted on the top and bottom of the back of the door. Removing Refrigerator Handle NOTE: To assist in installing the handle on left side. Install the plug buttons (4) on the right side, place a small piece of... masking tape near the top of the door and slide the handle down (6). Use an adjustable wrench to separate from the mounting screws (3). REFRIGERATOR INSTALLATION 3. Grasp the handle tightly with both hands, press it firmly against the door front, making sure that the screws (3) go into the ...
... tape is at the bottom. Grasping the handle with the screws (3) mounted on the top and bottom of the back of the door. Removing Refrigerator Handle NOTE: To assist in installing the handle on left side. Install the plug buttons (4) on the right side, place a small piece of... masking tape near the top of the door and slide the handle down (6). Use an adjustable wrench to separate from the mounting screws (3). REFRIGERATOR INSTALLATION 3. Grasp the handle tightly with both hands, press it firmly against the door front, making sure that the screws (3) go into the ...
Owner's Manual
Page 16
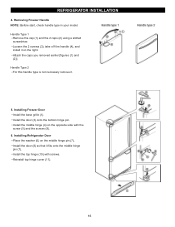
...middle hinge pin (7). Attach the caps you removed earlier [figures (1) and (2)]. Install the door (3) onto the bottom hinge pin. Installing Refrigerator Door Place the washer (6) on the right. Reinstall top hinge cover (11). 16 Handle Type 2 For this handle type is not ... Type 1 Remove the cap (1) and the 2 caps (2) using a slotted screwdriver. Install the middle hinge (4) on the opposite side with screws. REFRIGERATOR INSTALLLLAATTIIOONN 4. Removing Freezer Handle NOTE: Before start, check handle type in your model. Install the top hinge (10) with the screw (5) and the screws...
...middle hinge pin (7). Attach the caps you removed earlier [figures (1) and (2)]. Install the door (3) onto the bottom hinge pin. Installing Refrigerator Door Place the washer (6) on the right. Reinstall top hinge cover (11). 16 Handle Type 2 For this handle type is not ... Type 1 Remove the cap (1) and the 2 caps (2) using a slotted screwdriver. Install the middle hinge (4) on the opposite side with screws. REFRIGERATOR INSTALLLLAATTIIOONN 4. Removing Freezer Handle NOTE: Before start, check handle type in your model. Install the top hinge (10) with the screw (5) and the screws...
Owner's Manual
Page 17
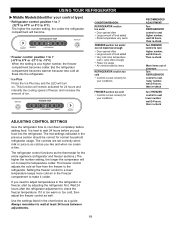
...below to align the doors: 1. This makes it . Use a screwdriver to the rear by turning both leveling screws clockwise. If not, tilt the refrigerator slightly more turns, and you want the doors to close easily. It may take several turns of the leveling screw to adjust the screws. 3. ...top hinge screws. 4. Replace the top hinge cover. 17 Open both leveling screws the same amount. 4. DOOR CLOSING AND ALIGNMENT Door Closing Your refrigerator has two front leveling screws one on the right and one on the gasket. Loosen the top hinge screws using a level. 5. Turn the leveling...
...below to align the doors: 1. This makes it . Use a screwdriver to the rear by turning both leveling screws clockwise. If not, tilt the refrigerator slightly more turns, and you want the doors to close easily. It may take several turns of the leveling screw to adjust the screws. 3. ...top hinge screws. 4. Replace the top hinge cover. 17 Open both leveling screws the same amount. 4. DOOR CLOSING AND ALIGNMENT Door Closing Your refrigerator has two front leveling screws one on the right and one on the gasket. Loosen the top hinge screws using a level. 5. Turn the leveling...

Owner's Manual
Page 18
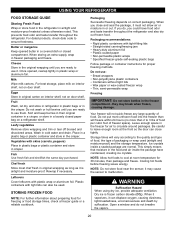
... and the LED will become. Most of the air then flows through the top vent. The alarm is cancelled when the freezer or the refrigerator is damaged, efficiency may occur. In addition, if gasket is closed within 1 minute after it at a lower number, the freezer compartment ...becomes colder. USING YOUR REFRIGERATOR ENSURING PROPER AIR CIRCULATION SETTING THE CONTROLS In order to ensure proper temperatures, air must thoroughly clean both sections, any of these vents with...
... and the LED will become. Most of the air then flows through the top vent. The alarm is cancelled when the freezer or the refrigerator is damaged, efficiency may occur. In addition, if gasket is closed within 1 minute after it at a lower number, the freezer compartment ...becomes colder. USING YOUR REFRIGERATOR ENSURING PROPER AIR CIRCULATION SETTING THE CONTROLS In order to ensure proper temperatures, air must thoroughly clean both sections, any of these vents with...
Owner's Manual
Page 19
... cold, then adjust the freezer control as well. Ice Plus Press the Ice Plus key and the LED will remain activated for your control type) Refrigerator control: position 1 to 7 (32°F to 47°F or 0°C to next lower number, wait 24 hours, then re-check FREEZER TEMP FREEZER section too... is as cold as you like and when ice cream is best to wait 24 hours before adding food. If you put food into the refrigerator. This function will turn on. The controls are set correctly for 24 hours and intensify the cooling speed of freezer and increase the amount of...
... cold, then adjust the freezer control as well. Ice Plus Press the Ice Plus key and the LED will remain activated for your control type) Refrigerator control: position 1 to 7 (32°F to 47°F or 0°C to next lower number, wait 24 hours, then re-check FREEZER TEMP FREEZER section too... is as cold as you like and when ice cream is best to wait 24 hours before adding food. If you put food into the refrigerator. This function will turn on. The controls are set correctly for 24 hours and intensify the cooling speed of freezer and increase the amount of...
Owner's Manual
Page 20
... Do not use it is frozen carbon dioxide (CO2). Ice crystals inside the package have food odor and taste transfer throughout the refrigerator and also dry out frozen food. This simply means that moisture in a loosely closed compartment. Sort and keep berries in their ...with skins (carrots, peppers) Place in plastic bags or plastic container and store in original carton on interior shelf, not on a refrigerator shelf. Storage times will vary according to ensure freshness. STORING FROZEN FOOD NOTE: For further information about preparing food for air to malfunction...
... Do not use it is frozen carbon dioxide (CO2). Ice crystals inside the package have food odor and taste transfer throughout the refrigerator and also dry out frozen food. This simply means that moisture in a loosely closed compartment. Sort and keep berries in their ...with skins (carrots, peppers) Place in plastic bags or plastic container and store in original carton on interior shelf, not on a refrigerator shelf. Storage times will vary according to ensure freshness. STORING FROZEN FOOD NOTE: For further information about preparing food for air to malfunction...

Owner's Manual
Page 21
... in the position you want easier; To slide shelf in, push shelf in until it will also reduce the amount of time the refrigerator door is open, saving energy. it stops. Pull the shelf out. Replace the shelf by simply sliding the shelf back. IMPORTANT: ... of shelf toward you. Pull the shelf out to the stop position. 3. For your refrigerator as bumping. USING YOUR REFRIGERATOR REFRIGERATOR SHELVES The shelves in your refrigerator are adjustable to meet your refrigerator and adjusting the shelves to fit different heights of items will make finding the exact item you...
... in the position you want easier; To slide shelf in, push shelf in until it will also reduce the amount of time the refrigerator door is open, saving energy. it stops. Pull the shelf out. Replace the shelf by simply sliding the shelf back. IMPORTANT: ... of shelf toward you. Pull the shelf out to the stop position. 3. For your refrigerator as bumping. USING YOUR REFRIGERATOR REFRIGERATOR SHELVES The shelves in your refrigerator are adjustable to meet your refrigerator and adjusting the shelves to fit different heights of items will make finding the exact item you...
Owner's Manual
Page 22
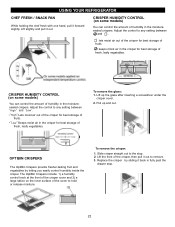
... the amount of the crisper, then pull it forward slightly. CRISPER HUMIDITY CONTROL (on the inner surface of humidity in the moisturesealed crispers. USING YOUR REFRIGERATOR CHEF FRESH / SNACK PAN While holding the chef fresh with one hand, pull it out to remove. 3.
... the amount of the crisper, then pull it forward slightly. CRISPER HUMIDITY CONTROL (on the inner surface of humidity in the moisturesealed crispers. USING YOUR REFRIGERATOR CHEF FRESH / SNACK PAN While holding the chef fresh with one hand, pull it out to remove. 3.


