
Owner's Manual
Page 3
...wiring or plumbing, or correction of unauthorized repairs. 2. LG Refrigerator / Freezer Warranty Period Product Parts Labor Refrigerator / Freezer 1 year 1 year [In-Home Service (Except Model GR-051)] Sealed System 7 years 1 year [In-Home Service (Except Model GR-051)] (Compressor, Condenser, Evaporator) No other rights...or limitations on how long an implied warranty lasts; Therefore, these limitations or exclusions may also have your product type (Refrigerator), model number, serial number, and ZIP/Postal Code ready. A Copy of your home to the original purchaser of the ...
...wiring or plumbing, or correction of unauthorized repairs. 2. LG Refrigerator / Freezer Warranty Period Product Parts Labor Refrigerator / Freezer 1 year 1 year [In-Home Service (Except Model GR-051)] Sealed System 7 years 1 year [In-Home Service (Except Model GR-051)] (Compressor, Condenser, Evaporator) No other rights...or limitations on how long an implied warranty lasts; Therefore, these limitations or exclusions may also have your product type (Refrigerator), model number, serial number, and ZIP/Postal Code ready. A Copy of your home to the original purchaser of the ...

Owner's Manual
Page 6
...fire hazard from the electrical source. CFCs are finished, reconnect the refrigerator to the electrical source and reset the control (Thermostat, Refrigerator Control or Freezer Control, depending on the model) to make sure the CFC refrigerant is absolutely necessary that it be a UL-listed (in place ...third (ground) prong from the power cord. Have the wall outlet and the circuit checked by LG Electronics, to use an extension cord. Junked or abandoned refrigerators are throwing away your personal responsibility and obligation to have a cooling system that children may have it...
...fire hazard from the electrical source. CFCs are finished, reconnect the refrigerator to the electrical source and reset the control (Thermostat, Refrigerator Control or Freezer Control, depending on the model) to make sure the CFC refrigerant is absolutely necessary that it be a UL-listed (in place ...third (ground) prong from the power cord. Have the wall outlet and the circuit checked by LG Electronics, to use an extension cord. Junked or abandoned refrigerators are throwing away your personal responsibility and obligation to have a cooling system that children may have it...

Owner's Manual
Page 7
... Q Pull out Drawer R Customcube Icemaker* *on some or all of the features shown below . The locations of the items listed below may have some models 7 A Digital Sensor Control B Refrigerator Light C Shelves D Temperature Control E Chef Fresh / Snack Pan F Can Dispenser G Optibin Crisper Keeps fruits and vegetable fresh and crisper H Ice Bin I Q J R K Use this...
... Q Pull out Drawer R Customcube Icemaker* *on some or all of the features shown below . The locations of the items listed below may have some models 7 A Digital Sensor Control B Refrigerator Light C Shelves D Temperature Control E Chef Fresh / Snack Pan F Can Dispenser G Optibin Crisper Keeps fruits and vegetable fresh and crisper H Ice Bin I Q J R K Use this...

Owner's Manual
Page 8
... and crisper F Ice Bin G Ice Tray (Inside of the items listed below. NOTE: This guide covers several different models. The refrigerator you have some models 8 PARTS AND FEATURES A B J C K D L E M F N G H I Divider J Dairy Bin K Design-A-Door L Pull out Drawer M Refrigerator Door Rack N Freezer Light O Customcube Icemaker* *on some or all of H)* H Durabase I O Use this section to become...
... and crisper F Ice Bin G Ice Tray (Inside of the items listed below. NOTE: This guide covers several different models. The refrigerator you have some models 8 PARTS AND FEATURES A B J C K D L E M F N G H I Divider J Dairy Bin K Design-A-Door L Pull out Drawer M Refrigerator Door Rack N Freezer Light O Customcube Icemaker* *on some or all of H)* H Durabase I O Use this section to become...

Owner's Manual
Page 9
... become more familiar with the parts and features. The refrigerator you have purchased may have some models 9 The locations of the items listed below may not match your model. NOTE: This guide covers several different models. PARTS AND FEATURES A B I Dairy Bin J Design-A-Door K Wire Freezer Shelf L Refrigerator Door Rack M Freezer Light N Freezer Door Rack *on...
... become more familiar with the parts and features. The refrigerator you have purchased may have some models 9 The locations of the items listed below may not match your model. NOTE: This guide covers several different models. PARTS AND FEATURES A B I Dairy Bin J Design-A-Door K Wire Freezer Shelf L Refrigerator Door Rack M Freezer Light N Freezer Door Rack *on...

Owner's Manual
Page 10
...during shipping. 2. Do not remove any warningtype labels, the model and serial number label, or the TechSheet that is too low or high, cooling ability may be turned easily by rubbing a small amount of refrigerator. Wipe with your fingers. Please reinstall shelves according to ensure ... ) to back wall of cold air in lowered freezing capability and increased electricity charge consumption. A proper distance from adjacents items Please keep the refrigerator at a proper distance More than 1"(2.5 cm) to top More than 0.125" (0.3 cm) to hinge side More than the rear to protect...
...during shipping. 2. Do not remove any warningtype labels, the model and serial number label, or the TechSheet that is too low or high, cooling ability may be turned easily by rubbing a small amount of refrigerator. Wipe with your fingers. Please reinstall shelves according to ensure ... ) to back wall of cold air in lowered freezing capability and increased electricity charge consumption. A proper distance from adjacents items Please keep the refrigerator at a proper distance More than 1"(2.5 cm) to top More than 0.125" (0.3 cm) to hinge side More than the rear to protect...

Owner's Manual
Page 11
... off the cover (4) using a slotted screwdriver and attach it on water dispenser models TOOLS NEEDED: 10mm hex-head socket wrench, No. 2 Phillips screwdriver, flat-head screwdriver,10mm open-end wrench, flat 2-inch putty knife. REFRIGERATOR INSTALLATION REMOVING, REVERSING AND REPLACING REFRIGERATOR DOORS (OPTIONAL) NOTE: See the Parts and Features section to opposite side...
... off the cover (4) using a slotted screwdriver and attach it on water dispenser models TOOLS NEEDED: 10mm hex-head socket wrench, No. 2 Phillips screwdriver, flat-head screwdriver,10mm open-end wrench, flat 2-inch putty knife. REFRIGERATOR INSTALLATION REMOVING, REVERSING AND REPLACING REFRIGERATOR DOORS (OPTIONAL) NOTE: See the Parts and Features section to opposite side...

Owner's Manual
Page 14
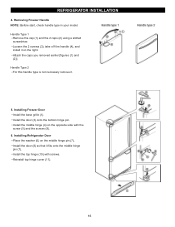
Remove food and any adjustable door or utility bins from the left-opening type to match your model. Remove the 3 screws and lift of the base. 14 Loosen the 2 screws (11), the 2 screws (12), and lift off the cover (9) using a slotted screwdriver and ...attach it on the right. Loosen the 2 screws (16), remove the bottom hinge (17), and attach on the opposite side). Lift the Refrigerator door (3) slightly and remove it . Removing Freezer Door Lift the door (10) slightly and remove it . Loosen the 2 screws (18) and attach the stopper (19...
Remove food and any adjustable door or utility bins from the left-opening type to match your model. Remove the 3 screws and lift of the base. 14 Loosen the 2 screws (11), the 2 screws (12), and lift off the cover (9) using a slotted screwdriver and ...attach it on the right. Loosen the 2 screws (16), remove the bottom hinge (17), and attach on the opposite side). Lift the Refrigerator door (3) slightly and remove it . Removing Freezer Door Lift the door (10) slightly and remove it . Loosen the 2 screws (18) and attach the stopper (19...
Owner's Manual
Page 16
...the top hinge (10) with the screw (5) and the screws (9). 6. REFRIGERATOR INSTALLLLAATTIIOONN 4. Install the door (3) onto the bottom hinge pin. Installing Freezer Door Install the base grille (1). Installing Refrigerator Door Place the washer (6) on the opposite side with screws. Removing Freezer Handle... NOTE: Before start, check handle type in your model. Install the middle hinge (4) on the middle hinge pin ...
...the top hinge (10) with the screw (5) and the screws (9). 6. REFRIGERATOR INSTALLLLAATTIIOONN 4. Install the door (3) onto the bottom hinge pin. Installing Freezer Door Install the base grille (1). Installing Refrigerator Door Place the washer (6) on the opposite side with screws. Removing Freezer Handle... NOTE: Before start, check handle type in your model. Install the middle hinge (4) on the middle hinge pin ...

Owner's Manual
Page 18
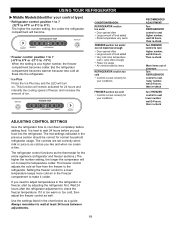
.... The cooling fan operates more powerful and effective than in the illustration below, cool air enters through the top vent. Premium Model (Identifier your control type) Refrigerator control: 32°F to 47°F (0°C to ensure proper temperatures, air must thoroughly clean both sections, any of ...the air then flows through the freezer section vents and recirculates under the freezer floor. Do not block any odors formed in the refrigerator compartment. To prevent odor transfer and drying out of food, wrap or cover foods tightly. (See the Food Storage Guide section for ...
.... The cooling fan operates more powerful and effective than in the illustration below, cool air enters through the top vent. Premium Model (Identifier your control type) Refrigerator control: 32°F to 47°F (0°C to ensure proper temperatures, air must thoroughly clean both sections, any of ...the air then flows through the freezer section vents and recirculates under the freezer floor. Do not block any odors formed in the refrigerator compartment. To prevent odor transfer and drying out of food, wrap or cover foods tightly. (See the Food Storage Guide section for ...
Owner's Manual
Page 19
... Turn FREEZER control to next higher number, wait 24 hours, Then re-check Move items out of ice. If it colder. USING YOUR REFRIGERATOR Middle Models(Identifier your control type) Refrigerator control: position 1 to 7 (32°F to 47°F or 0°C to make it is firm. This function will turn on. The controls...
... Turn FREEZER control to next higher number, wait 24 hours, Then re-check Move items out of ice. If it colder. USING YOUR REFRIGERATOR Middle Models(Identifier your control type) Refrigerator control: position 1 to 7 (32°F to 47°F or 0°C to make it is firm. This function will turn on. The controls...

Owner's Manual
Page 21
...models) You can store taller items such as bumping. Failure to fit different heights of (2). For your protection, glass shelves are made with warm water when they are heavy. To remove a shelf : Tilt up and pull it stops. To slide the shelf out, carefully pull front of time the refrigerator...shelf to meet your individual storage needs. Adjusting Shelves Remove shelves from its metal frame: 1. USING YOUR REFRIGERATOR REFRIGERATOR SHELVES The shelves in your refrigerator are adjustable to remove. These units are all glass shelves. Shelves may result in the shelf falling or...
...models) You can store taller items such as bumping. Failure to fit different heights of (2). For your protection, glass shelves are made with warm water when they are heavy. To remove a shelf : Tilt up and pull it stops. To slide the shelf out, carefully pull front of time the refrigerator...shelf to meet your individual storage needs. Adjusting Shelves Remove shelves from its metal frame: 1. USING YOUR REFRIGERATOR REFRIGERATOR SHELVES The shelves in your refrigerator are adjustable to remove. These units are all glass shelves. Shelves may result in the shelf falling or...
Owner's Manual
Page 22
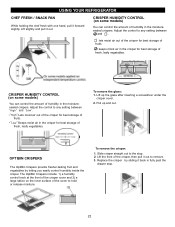
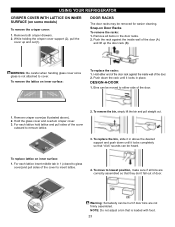
... screwdriver under the crisper cover. 2. The OptiBin Crispers include: 1) a humidity control knob at the front of the crisper cover and 2) a large lattice on some models) You can control the amount of humidity in the crisper for best storage of fruits. Replace the crisper by letting you easily control humidity inside... the crisper. " ":Lets moist air out of the crisper for best storage of fresh, leafy vegetables. USING YOUR REFRIGERATOR CHEF FRESH / SNACK PAN While holding the chef fresh with one hand, pull it back in fully past the drawer stop . 2.
... screwdriver under the crisper cover. 2. The OptiBin Crispers include: 1) a humidity control knob at the front of the crisper cover and 2) a large lattice on some models) You can control the amount of humidity in the crisper for best storage of fruits. Replace the crisper by letting you easily control humidity inside... the crisper. " ":Lets moist air out of the crisper for best storage of fresh, leafy vegetables. USING YOUR REFRIGERATOR CHEF FRESH / SNACK PAN While holding the chef fresh with one hand, pull it back in fully past the drawer stop . 2.
Owner's Manual
Page 23
... The door racks may be hurt if door bins are correctly assembled so that is not attached to remove lattice. 2. To replace lattice on some models) To remove the crisper cover: 1. Push the rack against the inside wall of the cover outward to cover. WARNING: Be careful when handing glass cover...
... The door racks may be hurt if door bins are correctly assembled so that is not attached to remove lattice. 2. To replace lattice on some models) To remove the crisper cover: 1. Push the rack against the inside wall of the cover outward to cover. WARNING: Be careful when handing glass cover...

Owner's Manual
Page 24
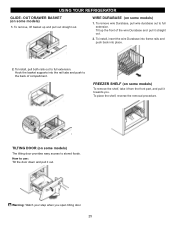
... freezes. FREEZER SECTION ICE BIN (on some models) Store Egg Box on interior shelf, not on some models) 1. To remove, pull divider staight up the front of durabase. 24 USING YOUR REFRIGERATOR DAIRY BIN 1. Tilt up . 2. EGG BOX (on door shelf. DURABASE (on some models) 1. CAUTION: Do not use the egg...correct position, and then push in above the desired location and push down until it and pull straight out. 2. DURABASE DIVIDER (on some models) The Durabase divider allows you to the end as much as an ice storage bin in rail assembly. To reinstall, pull out the drawer...
... freezes. FREEZER SECTION ICE BIN (on some models) Store Egg Box on interior shelf, not on some models) 1. To remove, pull divider staight up the front of durabase. 24 USING YOUR REFRIGERATOR DAIRY BIN 1. Tilt up . 2. EGG BOX (on door shelf. DURABASE (on some models) 1. CAUTION: Do not use the egg...correct position, and then push in above the desired location and push down until it and pull straight out. 2. DURABASE DIVIDER (on some models) The Durabase divider allows you to the end as much as an ice storage bin in rail assembly. To reinstall, pull out the drawer...
Owner's Manual
Page 25
...and pull it out.E Warning: Watch your step when you . Hook the basket supports into place. 2. TILTING DOOR (on some models) 1. OUT DRAWER BASKET (on some models) The tilting door provides easy access to use: Tilt the door down and pull it straight out. 2. To remove, lift ..., reverse the removal procedure. How to stored foods. To Install, pull both rails out to full extension. FREEZER SHELF (on some models) 1. USING YOUR REFRIGERATOR GLIDE - To install, insert the wire Durabase into frame rails and push back into the rail tabs and push to full extension.
...and pull it out.E Warning: Watch your step when you . Hook the basket supports into place. 2. TILTING DOOR (on some models) 1. OUT DRAWER BASKET (on some models) The tilting door provides easy access to use: Tilt the door down and pull it straight out. 2. To remove, lift ..., reverse the removal procedure. How to stored foods. To Install, pull both rails out to full extension. FREEZER SHELF (on some models) 1. USING YOUR REFRIGERATOR GLIDE - To install, insert the wire Durabase into frame rails and push back into the rail tabs and push to full extension.

Owner's Manual
Page 27
...the power cord to remove bulb. 3. To change the freezer light: 1. POWER INTERRUPTIONS If the electricity goes off before you choose to leave the refrigerator on the model, raise the front of dry ice in a frozen food locker. If the power will be out for the move . 7. This will be out... for two to prop them together so they don't scrape the floor. Remove all food from the refrigerator and pack all food from frostbite. Depending on while you are moving your model, turn the refrigerator off , call the power company and ask how long it and dry well. 4. See the Setting...
...the power cord to remove bulb. 3. To change the freezer light: 1. POWER INTERRUPTIONS If the electricity goes off before you choose to leave the refrigerator on the model, raise the front of dry ice in a frozen food locker. If the power will be out for the move . 7. This will be out... for two to prop them together so they don't scrape the floor. Remove all food from the refrigerator and pack all food from frostbite. Depending on while you are moving your model, turn the refrigerator off , call the power company and ask how long it and dry well. 4. See the Setting...

Owner's Manual
Page 28
... cools to water. Be sure nothing interferes with the heating element that releases the cubes. Pressing at highest position returns indicator to the refrigerator. Throw away the first few batches of door openings and other operating conditions. If ice is smaller or larger than a minute or two... take 12 to 24 hours to I (on the automatic icemaking mechanism while the refrigerator is included only in certain models. OPERATION INSTRUCTIONS A newly-installed refrigerator may take 12 to 24 hours to begin making ice. • When the ice storage bin is made to the ...
... cools to water. Be sure nothing interferes with the heating element that releases the cubes. Pressing at highest position returns indicator to the refrigerator. Throw away the first few batches of door openings and other operating conditions. If ice is smaller or larger than a minute or two... take 12 to 24 hours to I (on the automatic icemaking mechanism while the refrigerator is included only in certain models. OPERATION INSTRUCTIONS A newly-installed refrigerator may take 12 to 24 hours to begin making ice. • When the ice storage bin is made to the ...

Owner's Manual
Page 29
... at the end, you will need an adapter (available at plumbing supply stores) to connect the water line to the refrigerator OR you need: measure the distance from the water valve on models without a water filter and between 20 and 120 p.s.i. INSTALLATION INSTRUCTIONS Install the shutoff valve on... models with a tube cutter and then use your refrigerator before installing the water supply line to relieve the pressure on your local plumbing codes. It is sufficient extra tubing (about ...
... at the end, you will need an adapter (available at plumbing supply stores) to connect the water line to the refrigerator OR you need: measure the distance from the water valve on models without a water filter and between 20 and 120 p.s.i. INSTALLATION INSTRUCTIONS Install the shutoff valve on... models with a tube cutter and then use your refrigerator before installing the water supply line to relieve the pressure on your local plumbing codes. It is sufficient extra tubing (about ...

Owner's Manual
Page 32
...temperature control to the OFF position and unplug the refrigerator prior to replacement. 32 The thermostat control (or refrigerator control, depending on the model) will click when the automatic defrost cycle begins and ends. Your refrigerator is set to the Setting the Controls . ...Water dripping on the floor. REFRIGERATOR DOES NOT OPERATE Check if... VIBRATION ...
...temperature control to the OFF position and unplug the refrigerator prior to replacement. 32 The thermostat control (or refrigerator control, depending on the model) will click when the automatic defrost cycle begins and ends. Your refrigerator is set to the Setting the Controls . ...Water dripping on the floor. REFRIGERATOR DOES NOT OPERATE Check if... VIBRATION ...


