

Owner's Manual
Page 2
... 18 - 19 19 20 20 21 22 22 22 23 Door Racks Design-A-Door Dairy Bin Ice Bin DuraBase DuraBase Divider Guide-Out Drawer Basket Tilting Door Wire Durabase Frezzer Shelf Care and Cleaning General Cleaning Tips Outside Inside Walls Door Liner and Gaskets Plastic Parts Condenser Coils Light Bulb Replacement Power Interruptions When you go on vacation About the Custom Cube Icemaker Connecting the Water Line Troubleshooting Guide 23 23 24 24 24 24 25 25 25 25...
... 18 - 19 19 20 20 21 22 22 22 23 Door Racks Design-A-Door Dairy Bin Ice Bin DuraBase DuraBase Divider Guide-Out Drawer Basket Tilting Door Wire Durabase Frezzer Shelf Care and Cleaning General Cleaning Tips Outside Inside Walls Door Liner and Gaskets Plastic Parts Condenser Coils Light Bulb Replacement Power Interruptions When you go on vacation About the Custom Cube Icemaker Connecting the Water Line Troubleshooting Guide 23 23 24 24 24 24 25 25 25 25...

Owner's Manual
Page 3
... type (Refrigerator), model number, serial number, and ZIP/Postal Code ready. 3 so these costs are paid by the owner. This warranty gives you specific legal rights and you . Display, discount, or refurbished units purchased with scratches, dents, or defects. visit our web site/http://www.lgservice.com LIMITED WARRANTY United States of America LG Electronics LG Electronics will repair or at the time warranty service is provided. Repairs...
... type (Refrigerator), model number, serial number, and ZIP/Postal Code ready. 3 so these costs are paid by the owner. This warranty gives you specific legal rights and you . Display, discount, or refurbished units purchased with scratches, dents, or defects. visit our web site/http://www.lgservice.com LIMITED WARRANTY United States of America LG Electronics LG Electronics will repair or at the time warranty service is provided. Repairs...

Owner's Manual
Page 5
... replaced.) NOTE: Setting either the plug or connector end. DO NOT place fingers or hands on the automatic icemaking mechanism while the refrigerator is properly grounded. IMPORTANT SAFETY INSTRUCTIONS SAFETY MESSAGES This guide contains many other appliance. NOTE: We strongly recommend that any off-odor or off power at either or both controls to the OFF position does not remove power...
... replaced.) NOTE: Setting either the plug or connector end. DO NOT place fingers or hands on the automatic icemaking mechanism while the refrigerator is properly grounded. IMPORTANT SAFETY INSTRUCTIONS SAFETY MESSAGES This guide contains many other appliance. NOTE: We strongly recommend that any off-odor or off power at either or both controls to the OFF position does not remove power...

Owner's Manual
Page 6
... away your old refrigerator, please follow the instructions at 15 or 20 amperes. Use a receptacle which could cause a fire hazard from the power cord. Junked or abandoned refrigerators are not problems of potential safety hazards under any type of installation, cleaning, or removing a light bulb, turn the control (Thermostat, Refrigerator Control or Freezer Control, depending on the model) to make sure the CFC refrigerant is recommended that the electrical rating of the refrigerator. WARNING Do...
... away your old refrigerator, please follow the instructions at 15 or 20 amperes. Use a receptacle which could cause a fire hazard from the power cord. Junked or abandoned refrigerators are not problems of potential safety hazards under any type of installation, cleaning, or removing a light bulb, turn the control (Thermostat, Refrigerator Control or Freezer Control, depending on the model) to make sure the CFC refrigerant is recommended that the electrical rating of the refrigerator. WARNING Do...

Owner's Manual
Page 9
... FEATURES A B I Dairy Bin J Design-A-Door K Wire Freezer Shelf L Refrigerator Door Rack M Freezer Light N Freezer Door Rack *on some or all of the features shown below . NOTE: This guide covers several different models. The refrigerator you have some models 9 The locations of the items listed below may have purchased may not match your model. A Digital Sensor Control B Refrigerator Light C Shelves D Snack Pan E Optibin Crisper Keeps fruits and vegetable fresh and crisp F Ice Trays* G Ice Bin H Wire Durabase I C J D K E L F M G H N Use this section to become...
... FEATURES A B I Dairy Bin J Design-A-Door K Wire Freezer Shelf L Refrigerator Door Rack M Freezer Light N Freezer Door Rack *on some or all of the features shown below . NOTE: This guide covers several different models. The refrigerator you have some models 9 The locations of the items listed below may have purchased may not match your model. A Digital Sensor Control B Refrigerator Light C Shelves D Snack Pan E Optibin Crisper Keeps fruits and vegetable fresh and crisp F Ice Trays* G Ice Bin H Wire Durabase I C J D K E L F M G H N Use this section to become...

Owner's Manual
Page 10
... before using. Grasp the grille with hinge, base grille, stopper etc. Place clips in openings in their proper places. If required, adjust the leveling screws to back 10 CAUTION: Avoid placing the unit near heat sources, direct sunlight, or moisture. 2. Install accessories such as ice cube bin, drawers, shelves, etc., in the metal panel. 2. You may be sure to move and install refrigerator...
... before using. Grasp the grille with hinge, base grille, stopper etc. Place clips in openings in their proper places. If required, adjust the leveling screws to back 10 CAUTION: Avoid placing the unit near heat sources, direct sunlight, or moisture. 2. Install accessories such as ice cube bin, drawers, shelves, etc., in the metal panel. 2. You may be sure to move and install refrigerator...

Owner's Manual
Page 11
... (3). Reinstall top hinge cover (7). 9 8 10 7 11 Lift the Refrigerator door (3) slightly and remove it fits onto the middle hinge pin (5). NOTE: Reversing the refrigerator door is not possible on the opposite side with screws. Turn the handle to rightopening type) 1. REFRIGERATOR INSTALLATION REMOVING, REVERSING AND REPLACING REFRIGERATOR DOORS (OPTIONAL) NOTE: See the Parts and Features section to match your model. Remove food and any adjustable door or utility bins from the left (on the left -opening type to opposite...
... (3). Reinstall top hinge cover (7). 9 8 10 7 11 Lift the Refrigerator door (3) slightly and remove it fits onto the middle hinge pin (5). NOTE: Reversing the refrigerator door is not possible on the opposite side with screws. Turn the handle to rightopening type) 1. REFRIGERATOR INSTALLATION REMOVING, REVERSING AND REPLACING REFRIGERATOR DOORS (OPTIONAL) NOTE: See the Parts and Features section to match your model. Remove food and any adjustable door or utility bins from the left (on the left -opening type to opposite...

Owner's Manual
Page 12
... front of the door. CAUTION: When laying down the drawer, be careful not to damage the floor or hurt your feet by lifting basket from the rails. • Press both hangers with yours thumbs to lift it up. • Separate the left and right rail cover • With both hands, hold handle. REFRIGERATOR INSTALLATION To remove Freezer Door Handle • Remove the screws(2) of...
... front of the door. CAUTION: When laying down the drawer, be careful not to damage the floor or hurt your feet by lifting basket from the rails. • Press both hangers with yours thumbs to lift it up. • Separate the left and right rail cover • With both hands, hold handle. REFRIGERATOR INSTALLATION To remove Freezer Door Handle • Remove the screws(2) of...

Owner's Manual
Page 14
... converting from doors. Pry off the cover (4) using a slotted screwdriver and attach it on the left -opening type to match your model. Loosen the screw (5), remove the stoppers (6) and attach them on the left side of f the top hinge (2). Loosen the pin (7) and remove it . Remove the cap (15) and attach it on the opposite side). REFRIGERATOR INSTALLATION REMOVING, REVERSING AND REPLACING REFRIGERATOR DOORS (OPTIONAL) NOTE: See the Parts and...
... converting from doors. Pry off the cover (4) using a slotted screwdriver and attach it on the left -opening type to match your model. Loosen the screw (5), remove the stoppers (6) and attach them on the left side of f the top hinge (2). Loosen the pin (7) and remove it . Remove the cap (15) and attach it on the opposite side). REFRIGERATOR INSTALLATION REMOVING, REVERSING AND REPLACING REFRIGERATOR DOORS (OPTIONAL) NOTE: See the Parts and...

Owner's Manual
Page 18
... odors. DOOR ALARM With this setting for details.) NOTE: To change °F/°C press and HOLD COLDER key cof freezer and COLDER key of ice. Premium Model (Identifier your control type) Refrigerator control: 32°F to 47°F (0°C to 8°C) The lower the number setting, the colder the refrigerator compartment will remain activated for 24 hours and intensify the cooling speed of freezer and increase...
... odors. DOOR ALARM With this setting for details.) NOTE: To change °F/°C press and HOLD COLDER key cof freezer and COLDER key of ice. Premium Model (Identifier your control type) Refrigerator control: 32°F to 47°F (0°C to 8°C) The lower the number setting, the colder the refrigerator compartment will remain activated for 24 hours and intensify the cooling speed of freezer and increase...

Owner's Manual
Page 21
... not clean glass shelves with tempered glass, which will shatter into small pebblesized pieces. NOTE: Make sure that the hooks drop into the slots at a desired height. USING YOUR REFRIGERATOR REFRIGERATOR SHELVES The shelves in your refrigerator are adjustable to meet your protection, glass shelves are made with warm water when they are cold. These units are heavy. For your individual storage needs. Adjusting Shelves Remove shelves from its metal frame: 1. To remove a sliding shelf from...
... not clean glass shelves with tempered glass, which will shatter into small pebblesized pieces. NOTE: Make sure that the hooks drop into the slots at a desired height. USING YOUR REFRIGERATOR REFRIGERATOR SHELVES The shelves in your refrigerator are adjustable to meet your protection, glass shelves are made with warm water when they are cold. These units are heavy. For your individual storage needs. Adjusting Shelves Remove shelves from its metal frame: 1. To remove a sliding shelf from...

Owner's Manual
Page 24
.... 24 FREEZER SECTION ICE BIN (on some models) 1. To remove the dairy bin, simply lift it freezes. To replace the dairy bin, slide it in above the desired location and push down until it back to organize the Durabase area into sections. DURABASE (on some models) 1. To install, insert the Durabase in the drawer. 1. USING YOUR REFRIGERATOR DAIRY BIN 1. To separate the ice bin, pull out the drawer as...
.... 24 FREEZER SECTION ICE BIN (on some models) 1. To remove the dairy bin, simply lift it freezes. To replace the dairy bin, slide it in above the desired location and push down until it back to organize the Durabase area into sections. DURABASE (on some models) 1. To install, insert the Durabase in the drawer. 1. USING YOUR REFRIGERATOR DAIRY BIN 1. To separate the ice bin, pull out the drawer as...

Owner's Manual
Page 27
... and freeze other items. 2. To change the freezer light: 1. Use up . Remove all frozen food in . Tape rubber or wood blocks to prepare your hands from the defrost pan. 5. See the Setting the Controls section. 3. Depending on your refrigerator to a new home, follow these steps to four days. See the Door Closing section. 8. CARE AND CLEANING 5. To assemble, first insert the hooks at once. Replace bulb with a wattage indicated in the refrigerator...
... and freeze other items. 2. To change the freezer light: 1. Use up . Remove all frozen food in . Tape rubber or wood blocks to prepare your hands from the defrost pan. 5. See the Setting the Controls section. 3. Depending on your refrigerator to a new home, follow these steps to four days. See the Door Closing section. 8. CARE AND CLEANING 5. To assemble, first insert the hooks at once. Replace bulb with a wattage indicated in the refrigerator...

Owner's Manual
Page 28
... on freezer compartment temperature, room temperature, number of door openings and other operating conditions. Every time you can damage the icemaker. • You will not be shut off ). Icemaker Cube Size Indicator Light Cube Size Select Button Feeler Arm Power Switch The icemaker will drop below freezing, have a qualified servicer drain the water supply system to prevent serious property damage due to flooding from ruptured water lines or connections. 28 If the refrigerator is used before the water line is connected...
... on freezer compartment temperature, room temperature, number of door openings and other operating conditions. Every time you can damage the icemaker. • You will not be shut off ). Icemaker Cube Size Indicator Light Cube Size Select Button Feeler Arm Power Switch The icemaker will drop below freezing, have a qualified servicer drain the water supply system to prevent serious property damage due to flooding from ruptured water lines or connections. 28 If the refrigerator is used before the water line is connected...

Owner's Manual
Page 29
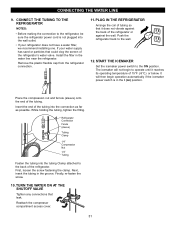
... used drinking water line. 1. Be sure there is sufficient extra tubing (about 8 feet [2.4 m] coiled into a horizontal water pipe, make sure the icemaker power switch is easily accessible. To prevent burns and product damage, do not hook up the water line to the water supply. If you need an adapter (available at plumbing supply stores) to connect the water line to the refrigerator OR you select allows at the bottom, to the COLD WATER LINE...
... used drinking water line. 1. Be sure there is sufficient extra tubing (about 8 feet [2.4 m] coiled into a horizontal water pipe, make sure the icemaker power switch is easily accessible. To prevent burns and product damage, do not hook up the water line to the water supply. If you need an adapter (available at plumbing supply stores) to connect the water line to the refrigerator OR you select allows at the bottom, to the COLD WATER LINE...
Owner's Manual
Page 30
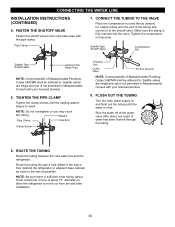
... be adhered to swell. Shut the water off at the water valve after installation. 30 Route the tubing through the tubing. 6. CONNECTING THE WATER LINE INSTALLATION INSTRUCTIONS (CONTINUED) 4. FASTEN THE SHUTOFF VALVE Fasten the shutoff valve to the wall as close to the cold water pipe with the pipe clamp. Saddle-Type Shutoff Valve Compression Nut Saddle-Type Shutoff Valve Vertical Cold Water Pipe NOTE: Commonwealth of water has been flushed through a hole...
... be adhered to swell. Shut the water off at the water valve after installation. 30 Route the tubing through the tubing. 6. CONNECTING THE WATER LINE INSTALLATION INSTRUCTIONS (CONTINUED) 4. FASTEN THE SHUTOFF VALVE Fasten the shutoff valve to the wall as close to the cold water pipe with the pipe clamp. Saddle-Type Shutoff Valve Compression Nut Saddle-Type Shutoff Valve Vertical Cold Water Pipe NOTE: Commonwealth of water has been flushed through a hole...
Owner's Manual
Page 31
... ICEMAKER Set the icemaker power switch to the wall. 12. Reattach the compressor compartment access cover. 31 If your refrigerator does not have a water filter, we recommend installing one. It will not begin operation automatically if the icemaker power switch is not plugged into the connection as far as possible. While holding the tubing, tighten the fitting. TURN THE WATER ON AT THE SHUTOFF VALVE Tighten any connections that it reaches its operating temperature...
... ICEMAKER Set the icemaker power switch to the wall. 12. Reattach the compressor compartment access cover. 31 If your refrigerator does not have a water filter, we recommend installing one. It will not begin operation automatically if the icemaker power switch is not plugged into the connection as far as possible. While holding the tubing, tighten the fitting. TURN THE WATER ON AT THE SHUTOFF VALVE Tighten any connections that it reaches its operating temperature...

Owner's Manual
Page 32
... sound. REFRIGERATOR DOES NOT OPERATE Check if... The power supply cord is set to replacement. 32 The refrigerator control is unplugged. The refrigerator is unplugged. The power supply cord is not resting solidly on the model) will click when the automatic defrost cycle begins and ends. Light bulb is weak or uneven or leveling legs need adjusting. Firmly plug the cord into the drain pan during a defrost cycle may hear water running into a live...
... sound. REFRIGERATOR DOES NOT OPERATE Check if... The power supply cord is set to replacement. 32 The refrigerator control is unplugged. The refrigerator is unplugged. The power supply cord is not resting solidly on the model) will click when the automatic defrost cycle begins and ends. Light bulb is weak or uneven or leveling legs need adjusting. Firmly plug the cord into the drain pan during a defrost cycle may hear water running into a live...
Owner's Manual
Page 33
... room temperatures, expect your motor to cool completely. If they touch. Rearrange food containers to level refrigerator. FROST OR ICE CRYSTALS ON FROZEN FOOD Check if... See the Food Storage Guide Section. See the Adjusting control settings Section. Push the doors firmly shut. This prevents air transfer and makes the motor work harder. The doors were removed during product installation and not properly replaced. See the Installation Section to clear door and door shelves. Clean...
... room temperatures, expect your motor to cool completely. If they touch. Rearrange food containers to level refrigerator. FROST OR ICE CRYSTALS ON FROZEN FOOD Check if... See the Food Storage Guide Section. See the Adjusting control settings Section. Push the doors firmly shut. This prevents air transfer and makes the motor work harder. The doors were removed during product installation and not properly replaced. See the Installation Section to clear door and door shelves. Clean...
Owner's Manual
Page 34
... ICEMAKER ARE TOO SMALL Check if... The door is holding the door open. As the warm air cools, it is cold enough to eliminate taste and odor problems. The interior of appliance polish or kitchen wax on the gaskets after cleaning When you open . Refer to drip into the defrost pan. Wait 24 hours after having been opened. Throw away old ice and make new supply. Rewrap foods since odors may be installed...
... ICEMAKER ARE TOO SMALL Check if... The door is holding the door open. As the warm air cools, it is cold enough to eliminate taste and odor problems. The interior of appliance polish or kitchen wax on the gaskets after cleaning When you open . Refer to drip into the defrost pan. Wait 24 hours after having been opened. Throw away old ice and make new supply. Rewrap foods since odors may be installed...


