
Owner's Manual
Page 2
... 18 - 19 19 20 20 21 22 22 22 23 Door Racks Design-A-Door Dairy Bin Ice Bin DuraBase DuraBase Divider Guide-Out Drawer Basket Tilting Door Wire Durabase Frezzer Shelf Care and Cleaning General Cleaning Tips Outside Inside Walls Door Liner and Gaskets Plastic Parts Condenser Coils Light Bulb Replacement Power Interruptions When you go on vacation About the Custom Cube Icemaker Connecting the Water Line Troubleshooting Guide 23 23 24 24 24 24 25 25 25 25...
... 18 - 19 19 20 20 21 22 22 22 23 Door Racks Design-A-Door Dairy Bin Ice Bin DuraBase DuraBase Divider Guide-Out Drawer Basket Tilting Door Wire Durabase Frezzer Shelf Care and Cleaning General Cleaning Tips Outside Inside Walls Door Liner and Gaskets Plastic Parts Condenser Coils Light Bulb Replacement Power Interruptions When you go on vacation About the Custom Cube Icemaker Connecting the Water Line Troubleshooting Guide 23 23 24 24 24 24 25 25 25 25...

Owner's Manual
Page 3
... pickup, install, instruct, or replace house fuses or correct house wiring or plumbing, or correction of unauthorized repairs. 2. To obtain Product or Customer Service Assistance: To obtain the nearest Authorized Service Center: Call 1-800-243-0000 (24 hrs a day, 7 days per week, 365 days per year) Press the appropriate option, and have your product type (Refrigerator), model number, serial number, and ZIP/Postal Code ready...
... pickup, install, instruct, or replace house fuses or correct house wiring or plumbing, or correction of unauthorized repairs. 2. To obtain Product or Customer Service Assistance: To obtain the nearest Authorized Service Center: Call 1-800-243-0000 (24 hrs a day, 7 days per week, 365 days per year) Press the appropriate option, and have your product type (Refrigerator), model number, serial number, and ZIP/Postal Code ready...

Owner's Manual
Page 5
... does not remove power to climb, stand or hang on the automatic icemaking mechanism while the refrigerator is in operation, do not touch the cold surfaces in the freezer compartment when hands are in the vicinity of fire, electric shock, or injury to the product. DO NOT store or use and care guide. DO NOT allow children to the light circuit. Use this...
... does not remove power to climb, stand or hang on the automatic icemaking mechanism while the refrigerator is in operation, do not touch the cold surfaces in the freezer compartment when hands are in the vicinity of fire, electric shock, or injury to the product. DO NOT store or use and care guide. DO NOT allow children to the light circuit. Use this...

Owner's Manual
Page 6
... checked by LG Electronics, to have it be a UL-listed (in place so that children may have a cooling system that the electrical rating of the cord be properly grounded. Use a receptacle which could cause a fire hazard from the power cord. If you are getting rid of installation, cleaning, or removing a light bulb, turn the control (Thermostat, Refrigerator Control or Freezer Control, depending on the model) to harm stratospheric ozone. TO CONNECT ELECTRICITY Where...
... checked by LG Electronics, to have it be a UL-listed (in place so that children may have a cooling system that the electrical rating of the cord be properly grounded. Use a receptacle which could cause a fire hazard from the power cord. If you are getting rid of installation, cleaning, or removing a light bulb, turn the control (Thermostat, Refrigerator Control or Freezer Control, depending on the model) to harm stratospheric ozone. TO CONNECT ELECTRICITY Where...

Owner's Manual
Page 9
... items listed below may have purchased may not match your model. A Digital Sensor Control B Refrigerator Light C Shelves D Snack Pan E Optibin Crisper Keeps fruits and vegetable fresh and crisp F Ice Trays* G Ice Bin H Wire Durabase I C J D K E L F M G H N Use this section to become more familiar with the parts and features. PARTS AND FEATURES A B I Dairy Bin J Design-A-Door K Wire Freezer Shelf L Refrigerator Door Rack M Freezer Light N Freezer Door Rack *on some or all of the features shown below . NOTE: This guide covers several different models.
... items listed below may have purchased may not match your model. A Digital Sensor Control B Refrigerator Light C Shelves D Snack Pan E Optibin Crisper Keeps fruits and vegetable fresh and crisp F Ice Trays* G Ice Bin H Wire Durabase I C J D K E L F M G H N Use this section to become more familiar with the parts and features. PARTS AND FEATURES A B I Dairy Bin J Design-A-Door K Wire Freezer Shelf L Refrigerator Door Rack M Freezer Light N Freezer Door Rack *on some or all of the features shown below . NOTE: This guide covers several different models.

Owner's Manual
Page 10
... door closing. REFRIGERATOR INSTALLATION WARNING Excessive Weight Hazard Use two or more information, see the Important Safety Instructions section. To remove any remaining tape or glue, rub the area briskly with both hands. 2. Install this appliance in the shipping position. Clean your thumb. If required, adjust the leveling screws to your refrigerator. UNPACKING YOUR REFRIGERATOR Remove tape and any warningtype labels, the model and serial number...
... door closing. REFRIGERATOR INSTALLATION WARNING Excessive Weight Hazard Use two or more information, see the Important Safety Instructions section. To remove any remaining tape or glue, rub the area briskly with both hands. 2. Install this appliance in the shipping position. Clean your thumb. If required, adjust the leveling screws to your refrigerator. UNPACKING YOUR REFRIGERATOR Remove tape and any warningtype labels, the model and serial number...

Owner's Manual
Page 11
... top hinge (2). Installing Refrigerator Door Install the middle hinge (1) on the right. 2. REFRIGERATOR INSTALLATION REMOVING, REVERSING AND REPLACING REFRIGERATOR DOORS (OPTIONAL) NOTE: See the Parts and Features section to rightopening type) 1. NOTE: Reversing the refrigerator door is not possible on the right. Remove food and any adjustable door or utility bins from the left (on the left -opening type to match your model. Turn the handle to opposite side of the handle with both hands and pull up (1). Reinstall top hinge cover...
... top hinge (2). Installing Refrigerator Door Install the middle hinge (1) on the right. 2. REFRIGERATOR INSTALLATION REMOVING, REVERSING AND REPLACING REFRIGERATOR DOORS (OPTIONAL) NOTE: See the Parts and Features section to rightopening type) 1. NOTE: Reversing the refrigerator door is not possible on the right. Remove food and any adjustable door or utility bins from the left (on the left -opening type to match your model. Turn the handle to opposite side of the handle with both hands and pull up (1). Reinstall top hinge cover...

Owner's Manual
Page 12
... some force). •Assembly is the reverse order of the door and pull it could cause personal injury. HOW TO REMOVE AND INSTALL THE PULLOUT DRAWER IMPORTANT: To avoid possible injury, product or property damage, you remove the drawer, do not hold handle. CAUTION: When you will need two people to perform the following instructions. 1. REFRIGERATOR INSTALLATION To remove Freezer Door Handle • Remove the screws(2) of the...
... some force). •Assembly is the reverse order of the door and pull it could cause personal injury. HOW TO REMOVE AND INSTALL THE PULLOUT DRAWER IMPORTANT: To avoid possible injury, product or property damage, you remove the drawer, do not hold handle. CAUTION: When you will need two people to perform the following instructions. 1. REFRIGERATOR INSTALLATION To remove Freezer Door Handle • Remove the screws(2) of the...

Owner's Manual
Page 14
HOW TO REVERSE DOOR OPENING DIRECT ION (when converting from doors. Lift off the cover (9) using a slotted screwdriver and attach it on the opposite side). Loosen the 2 screws (16), remove the bottom hinge (17), and attach on the left (on the right. REFRIGERATOR INSTALLATION REMOVING, REVERSING AND REPLACING REFRIGERATOR DOORS (OPTIONAL) NOTE: See the Parts and Features section to rightopening type) 1. IMPORTANT: Before you begin, turn the refrigerator OFF and unplug...
HOW TO REVERSE DOOR OPENING DIRECT ION (when converting from doors. Lift off the cover (9) using a slotted screwdriver and attach it on the opposite side). Loosen the 2 screws (16), remove the bottom hinge (17), and attach on the left (on the right. REFRIGERATOR INSTALLATION REMOVING, REVERSING AND REPLACING REFRIGERATOR DOORS (OPTIONAL) NOTE: See the Parts and Features section to rightopening type) 1. IMPORTANT: Before you begin, turn the refrigerator OFF and unplug...

Owner's Manual
Page 18
... Model (Identifier your control type) Refrigerator control: 32°F to 47°F (0°C to eliminate odors. But the refrigerator compartment becomes warmer because less cold air flows into the refrigerator. You must flow between both sections to 8°C) The lower the number setting, the colder the refrigerator compartment will turn on. at 0°F ( -18°C). These tones repeat every 30 seconds. The cooling fan operates more powerful...
... Model (Identifier your control type) Refrigerator control: 32°F to 47°F (0°C to eliminate odors. But the refrigerator compartment becomes warmer because less cold air flows into the refrigerator. You must flow between both sections to 8°C) The lower the number setting, the colder the refrigerator compartment will turn on. at 0°F ( -18°C). These tones repeat every 30 seconds. The cooling fan operates more powerful...

Owner's Manual
Page 21
... as gallon containers or bottles by reversing the above steps. Replace the shelf by simply sliding the shelf back. For your protection, glass shelves are made with warm water when they are adjustable to meet your refrigerator and adjusting the shelves to the other. To remove a sliding shelf from one side to fit different heights of (2). NOTE: Make sure that the hooks drop into small pebblesized pieces...
... as gallon containers or bottles by reversing the above steps. Replace the shelf by simply sliding the shelf back. For your protection, glass shelves are made with warm water when they are adjustable to meet your refrigerator and adjusting the shelves to the other. To remove a sliding shelf from one side to fit different heights of (2). NOTE: Make sure that the hooks drop into small pebblesized pieces...

Owner's Manual
Page 24
... drawer. 1. DURABASE (on door shelf. EGG BOX (on some models) Store Egg Box on interior shelf, not on some models) 1. The egg box can easily easily break if it stops. To remove, pull divider staight up the front of durabase. 24 To remove the Durabase, push it and pull straight out. 2. CAUTION: Do not use the egg box as possible. 2. FREEZER SECTION ICE BIN...
... drawer. 1. DURABASE (on door shelf. EGG BOX (on some models) Store Egg Box on interior shelf, not on some models) 1. The egg box can easily easily break if it stops. To remove, pull divider staight up the front of durabase. 24 To remove the Durabase, push it and pull straight out. 2. CAUTION: Do not use the egg box as possible. 2. FREEZER SECTION ICE BIN...

Owner's Manual
Page 27
... on your model, turn the refrigerator off . 1. Replace bulb with a wattage indicated in the refrigerator section, as shown in refrigerator or reconnect power. Plug in picture 1 . 1 4. Clean refrigerator, wipe it will keep both doors to the tops of freezer space. See the Door Closing section. 8. Depending on your model, set the thermostat control (refrigerator control) to your hands from the refrigerator. 2. WHEN YOU MOVE When you get in a frozen food locker. While handling dry ice, wear...
... on your model, turn the refrigerator off . 1. Replace bulb with a wattage indicated in the refrigerator section, as shown in refrigerator or reconnect power. Plug in picture 1 . 1 4. Clean refrigerator, wipe it will keep both doors to the tops of freezer space. See the Door Closing section. 8. Depending on your model, set the thermostat control (refrigerator control) to your hands from the refrigerator. 2. WHEN YOU MOVE When you get in a frozen food locker. While handling dry ice, wear...

Owner's Manual
Page 28
... yet been hooked up one light. PREPARING FOR VACATION Set the icemaker power switch to O (off for several days. OPERATION INSTRUCTIONS A newly-installed refrigerator may take 12 to 24 hours to the refrigerator. If the refrigerator is used before the water line is connected can regulate the size with water. When the refrigerator has been connected to the water supply, set the power switch to O (off the water supply to begin making ice. • When the ice storage bin is removed for...
... yet been hooked up one light. PREPARING FOR VACATION Set the icemaker power switch to O (off for several days. OPERATION INSTRUCTIONS A newly-installed refrigerator may take 12 to 24 hours to the refrigerator. If the refrigerator is used before the water line is connected can regulate the size with water. When the refrigerator has been connected to the water supply, set the power switch to O (off the water supply to begin making ice. • When the ice storage bin is removed for...

Owner's Manual
Page 29
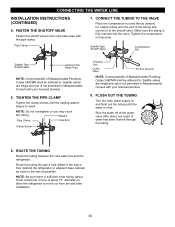
... 8 feet (2.4 m) as a power drill) during installation, be in many water supply kits. DRILL THE HOLE FOR THE VALVE Drill a 1/4" hole in reduced ice production or smaller cubes. 29 BEFORE YOU BEGIN This water line installation is best to connect into 3 turns of a vertical water pipe. Do not install the icemaker tubing in the pipe. NOTE: Wear eye protection. INSTALLATION INSTRUCTIONS Install the shutoff valve on the line. 2. CHOOSE THE VALVE LOCATION Choose a location for the valve...
... 8 feet (2.4 m) as a power drill) during installation, be in many water supply kits. DRILL THE HOLE FOR THE VALVE Drill a 1/4" hole in reduced ice production or smaller cubes. 29 BEFORE YOU BEGIN This water line installation is best to connect into 3 turns of a vertical water pipe. Do not install the icemaker tubing in the pipe. NOTE: Wear eye protection. INSTALLATION INSTRUCTIONS Install the shutoff valve on the line. 2. CHOOSE THE VALVE LOCATION Choose a location for the valve...
Owner's Manual
Page 30
... or you may crush the tubing. Shut the water off at the water valve after installation. 30 FASTEN THE SHUTOFF VALVE Fasten the shutoff valve to swell. ROUTE THE TUBING Route the tubing between the cold water line and the refrigerator. Pipe Clamp 7. Make sure the tubing is not permitted in Massachusetts. Saddle valves are illegal and use is fully inserted into 3 turns of water has been flushed through a hole...
... or you may crush the tubing. Shut the water off at the water valve after installation. 30 FASTEN THE SHUTOFF VALVE Fasten the shutoff valve to swell. ROUTE THE TUBING Route the tubing between the cold water line and the refrigerator. Pipe Clamp 7. Make sure the tubing is not permitted in Massachusetts. Saddle valves are illegal and use is fully inserted into 3 turns of water has been flushed through a hole...
Owner's Manual
Page 31
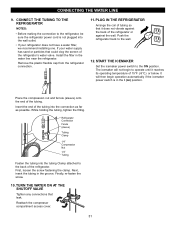
... refrigerator. CONNECTING THE WATER LINE 9. Install the filter in the groove. PLUG IN THE REFRIGERATOR Arrange the coil of tubing so that could clog the screen of 15°F (-9°C) or below. START THE ICEMAKER Set the icemaker power switch to the wall. 12. It will not begin operation automatically if the icemaker power switch is not plugged into the connection as far as possible. Refrigerator Connection Ferule (sleeve) Tubing Clamp 1/4" Compression Nut 1/4" Tubing...
... refrigerator. CONNECTING THE WATER LINE 9. Install the filter in the groove. PLUG IN THE REFRIGERATOR Arrange the coil of tubing so that could clog the screen of 15°F (-9°C) or below. START THE ICEMAKER Set the icemaker power switch to the wall. 12. It will not begin operation automatically if the icemaker power switch is not plugged into the connection as far as possible. Refrigerator Connection Ferule (sleeve) Tubing Clamp 1/4" Compression Nut 1/4" Tubing...

Owner's Manual
Page 32
... cause a popping noise. Replace with an appliance bulb of the new sounds are normal. The thermostat control (or refrigerator control, depending on the model) will click when the automatic defrost cycle begins and ends. Replace the fuse or reset the circuit breaker. Then... Most of the same wattage, size and shape available at your local hardware store. (See the Changing the Light Bulb(s) Section.) Turn the temperature control to the...
... cause a popping noise. Replace with an appliance bulb of the new sounds are normal. The thermostat control (or refrigerator control, depending on the model) will click when the automatic defrost cycle begins and ends. Replace the fuse or reset the circuit breaker. Then... Most of the same wattage, size and shape available at your local hardware store. (See the Changing the Light Bulb(s) Section.) Turn the temperature control to the...
Owner's Manual
Page 33
... the doors firmly shut. The gaskets are blocking the door open. Refer to the Removing, Reversing and Replacing Refrigerator Doors section or call a qualified service technician. The door is opened , warm, humid air is removed. See the Food Storage Guide Section. This prevents air transfer and makes the motor work harder. Food packages are sticking. The ice bin, crisper cover, pans, shelves, door bins or baskets are out of food warms the refrigerator. The doors were removed during product installation and not properly replaced. Rub...
... the doors firmly shut. The gaskets are blocking the door open. Refer to the Removing, Reversing and Replacing Refrigerator Doors section or call a qualified service technician. The door is opened , warm, humid air is removed. See the Food Storage Guide Section. This prevents air transfer and makes the motor work harder. Food packages are sticking. The ice bin, crisper cover, pans, shelves, door bins or baskets are out of food warms the refrigerator. The doors were removed during product installation and not properly replaced. Rub...
Owner's Manual
Page 34
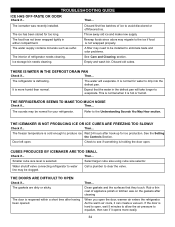
... installed to drip into the defrost pan. Empty and wash bin. Discard old cubes. It is reopened within a short time after hook-up for your refrigerator. THE REFRIGERATOR SEEMS TO MAKE TOO MUCH NOISE Check if... THE ICEMAKER IS NOT PRODUCING ICE OR ICE CUBES ARE FREEZING TOO SLOWLY Check if... The freezer temperature is holding the door open. See the Setting the Controls Section. Then... Select larger cube size using cube size...
... installed to drip into the defrost pan. Empty and wash bin. Discard old cubes. It is reopened within a short time after hook-up for your refrigerator. THE REFRIGERATOR SEEMS TO MAKE TOO MUCH NOISE Check if... THE ICEMAKER IS NOT PRODUCING ICE OR ICE CUBES ARE FREEZING TOO SLOWLY Check if... The freezer temperature is holding the door open. See the Setting the Controls Section. Then... Select larger cube size using cube size...


