Owner's Manual (English)
Page 2
... - 19 19 20 20 21 22 Crisper Humidity Control Optibin Crisper Crisper cover with lattice on inner surface Door Racks Design-A-Door Dairy Bin Ice Bin DuraBase DuraBase Divider Guide-Out Drawer Basket Tilting Door Wire Durabase Frezzer Shelf Care and Cleaning General Cleaning Tips Outside Inside Walls Door Liner and Gaskets Plastic Parts Condenser Coils Light Bulb Replacement Power Interruptions When you go on vacation About the Custom Cube Icemaker Connecting the Water Line Troubleshooting Guide 22 22 23 23 23 24 24...
... - 19 19 20 20 21 22 Crisper Humidity Control Optibin Crisper Crisper cover with lattice on inner surface Door Racks Design-A-Door Dairy Bin Ice Bin DuraBase DuraBase Divider Guide-Out Drawer Basket Tilting Door Wire Durabase Frezzer Shelf Care and Cleaning General Cleaning Tips Outside Inside Walls Door Liner and Gaskets Plastic Parts Condenser Coils Light Bulb Replacement Power Interruptions When you go on vacation About the Custom Cube Icemaker Connecting the Water Line Troubleshooting Guide 22 22 23 23 23 24 24...

Owner's Manual (English)
Page 3
... product type (Refrigerator), model number, serial number, and ZIP/Postal Code ready. LG Refrigerator / Freezer Warranty Period Product Parts Labor Refrigerator / Freezer 1 year 1 year [In-Home Service (Except Model GR-051)] Sealed System 7 years 1 year [In-Home Service (Except Model GR-051)] (Compressor, Condenser, Evaporator) No other express warranty is applicable to deliver and pickup, install, instruct, or replace house fuses or correct house wiring or plumbing, or correction of unauthorized repairs. 2. INCLUDING THE IMPLIED WARRANTY OF...
... product type (Refrigerator), model number, serial number, and ZIP/Postal Code ready. LG Refrigerator / Freezer Warranty Period Product Parts Labor Refrigerator / Freezer 1 year 1 year [In-Home Service (Except Model GR-051)] Sealed System 7 years 1 year [In-Home Service (Except Model GR-051)] (Compressor, Condenser, Evaporator) No other express warranty is applicable to deliver and pickup, install, instruct, or replace house fuses or correct house wiring or plumbing, or correction of unauthorized repairs. 2. INCLUDING THE IMPLIED WARRANTY OF...
Owner's Manual (English)
Page 5
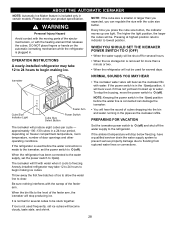
... purpose as possible to persons when using this or any food is properly grounded. Thawed ice cream should be performed by pulling on the power cord. Always read and obey all instructions before cleaning or making any servicing be followed, including the following: NEVER unplug your refrigerator is the safety alert symbol. Be careful when you how to the...
... purpose as possible to persons when using this or any food is properly grounded. Thawed ice cream should be performed by pulling on the power cord. Always read and obey all instructions before cleaning or making any servicing be followed, including the following: NEVER unplug your refrigerator is the safety alert symbol. Be careful when you how to the...

Owner's Manual (English)
Page 6
... electrical outlet rated for 115 Volts, 60 Hz, AC only, and fused at right to fines and imprisonment under any type of installation, cleaning, or removing a light bulb, turn the control (Thermostat, Refrigerator Control or Freezer Control, depending on the model) to OFF and then disconnect the refrigerator from the power cord. Children should always be provided. CFC's are not problems of the past. GROUNDING REQUIREMENTS IMPORTANT: Please read carefully. USE...
... electrical outlet rated for 115 Volts, 60 Hz, AC only, and fused at right to fines and imprisonment under any type of installation, cleaning, or removing a light bulb, turn the control (Thermostat, Refrigerator Control or Freezer Control, depending on the model) to OFF and then disconnect the refrigerator from the power cord. Children should always be provided. CFC's are not problems of the past. GROUNDING REQUIREMENTS IMPORTANT: Please read carefully. USE...
Owner's Manual (English)
Page 10
... the flow of the refrigerator. WARNING: Be careful when you work with warm water and dry. BASE GRILLE To remove the base grille: 1. To install the base grille: WARNING 1. INSTALLATION 1. Avoid placing the unit near heat sources, direct sunlight or moisture. To remove any warningtype labels, the model and serial number label, or the Tech Sheet that is heavy. Refrigerator shelves are packed together to...
... the flow of the refrigerator. WARNING: Be careful when you work with warm water and dry. BASE GRILLE To remove the base grille: 1. To install the base grille: WARNING 1. INSTALLATION 1. Avoid placing the unit near heat sources, direct sunlight or moisture. To remove any warningtype labels, the model and serial number label, or the Tech Sheet that is heavy. Refrigerator shelves are packed together to...
Owner's Manual (English)
Page 11
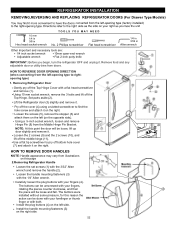
... to rightopening type) 1. Pry off the Top Hinge Cover with your fingers, rotating the pieces counter clockwise, and then 4 the piece will be done with your forefinger or thumb finger or with your fingers (4). The buttons were installed without some pressure, for this reason the action can be loose and fall. REFRIGERATOR INSTALLATION REMOVING,REVERSING AND REPLACING REFRIGERATOR DOORS (For Drawer Type Models) 10 mm...
... to rightopening type) 1. Pry off the Top Hinge Cover with your fingers, rotating the pieces counter clockwise, and then 4 the piece will be done with your forefinger or thumb finger or with your fingers (4). The buttons were installed without some pressure, for this reason the action can be loose and fall. REFRIGERATOR INSTALLATION REMOVING,REVERSING AND REPLACING REFRIGERATOR DOORS (For Drawer Type Models) 10 mm...

Owner's Manual (English)
Page 15
.... Removing Freezer Door Before, remove totally the refrigerator door. Loosen the 2 screws (18) and attach the stopper (19) on the right. REFRIGERATOR INSTALLATION REMOVING,REVERSING AND REPLACING REFRIGERATOR DOORS (For Swing Type Models) 10 mm 1/4 in 3/8 in Hex head socket wrench TOOLS YOU MAY NEED No. 2 Phillips screwdriver Flat head screwdriver 1/4 in 3/32 in installing the handle on the right. Using a ¼-inch socket wrench, loosen and remove Hinge Pin (7) from doors. Set parts...
.... Removing Freezer Door Before, remove totally the refrigerator door. Loosen the 2 screws (18) and attach the stopper (19) on the right. REFRIGERATOR INSTALLATION REMOVING,REVERSING AND REPLACING REFRIGERATOR DOORS (For Swing Type Models) 10 mm 1/4 in 3/8 in Hex head socket wrench TOOLS YOU MAY NEED No. 2 Phillips screwdriver Flat head screwdriver 1/4 in 3/32 in installing the handle on the right. Using a ¼-inch socket wrench, loosen and remove Hinge Pin (7) from doors. Set parts...
Owner's Manual (English)
Page 18
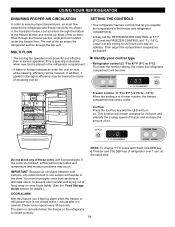
... of food, wrap or cover foods tightly. (See the Food Storage Guide section for details.) DOOR ALARM With this setting for 24 hours and intensify the cooling speed of freezer and increase the amount of the freezer section and moves up. USING YOUR REFRIGERATOR ENSURING PROPER AIR CIRCULATION In order to ensure proper temperatures, air must thoroughly clean both sections, any of refrigerator over 1 sec.
... of food, wrap or cover foods tightly. (See the Food Storage Guide section for details.) DOOR ALARM With this setting for 24 hours and intensify the cooling speed of freezer and increase the amount of the freezer section and moves up. USING YOUR REFRIGERATOR ENSURING PROPER AIR CIRCULATION In order to ensure proper temperatures, air must thoroughly clean both sections, any of refrigerator over 1 sec.
Owner's Manual (English)
Page 24
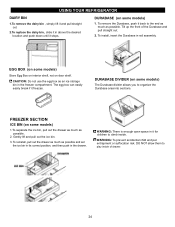
... enough open space in it back to climb inside of the Durabase and pull straight out. 2. EGG BOX (on door shelf. Gently lift and pull out the ice bin. 3. USING YOUR REFRIGERATOR DAIRY BIN 1.To remove the dairy bin , simply lift it and pull straight out. 2.To replace the dairy bin, slide it in above the desired location and push down until it freezes. To...
... enough open space in it back to climb inside of the Durabase and pull straight out. 2. EGG BOX (on door shelf. Gently lift and pull out the ice bin. 3. USING YOUR REFRIGERATOR DAIRY BIN 1.To remove the dairy bin , simply lift it and pull straight out. 2.To replace the dairy bin, slide it in above the desired location and push down until it freezes. To...
Owner's Manual (English)
Page 26
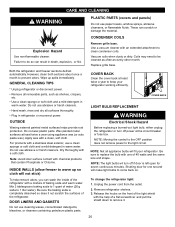
... shelves, crispers, etc. Release the hooks on . Coils may need to replace the bulb with the help remove odors, you can wash the inside of the refrigerator. Both the refrigerator and freezer sections defrost automatically. Plug in warm water. DOOR LINERS AND GASKETS Do not use abrasive or harsh cleaners. NOTE: Moving the control to the OFF position does not remove power to prevent odors. To change the refrigerator light: 1. CARE AND CLEANING WARNING PLASTIC PARTS (covers and panels...
... shelves, crispers, etc. Release the hooks on . Coils may need to replace the bulb with the help remove odors, you can wash the inside of the refrigerator. Both the refrigerator and freezer sections defrost automatically. Plug in warm water. DOOR LINERS AND GASKETS Do not use abrasive or harsh cleaners. NOTE: Moving the control to the OFF position does not remove power to prevent odors. To change the refrigerator light: 1. CARE AND CLEANING WARNING PLASTIC PARTS (covers and panels...
Owner's Manual (English)
Page 27
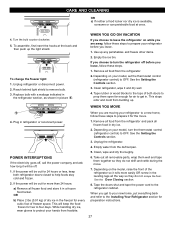
... help foods stay cold and frozen. 2. Clean, wipe and dry thoroughly. 6. If the power will be off before you are away, follow these steps. 1. See the Door Closing section. 8. Plug in picture 1 . While handling dry ice, wear gloves to protect your model, turn the refrigerator off . 1. Tape the doors shut and tape the power cord to remove bulb. 3. To change the freezer light: 1. Replace bulb with a wattage indicated in the refrigerator section, as...
... help foods stay cold and frozen. 2. Clean, wipe and dry thoroughly. 6. If the power will be off before you are away, follow these steps. 1. See the Door Closing section. 8. Plug in picture 1 . While handling dry ice, wear gloves to protect your model, turn the refrigerator off . 1. Tape the doors shut and tape the power cord to remove bulb. 3. To change the freezer light: 1. Replace bulb with a wattage indicated in the refrigerator section, as...
Owner's Manual (English)
Page 28
... sound of ice to allow the water line to water. The higher the light position, the larger the cubes will not be . OPERATION INSTRUCTIONS A newly-installed refrigerator may take 12 to 24 hours to begin making ice. • When the ice storage bin is made to the icemaker, set the power switch to I (on ) position, it has not yet been hooked up one light. If the refrigerator is used for more...
... sound of ice to allow the water line to water. The higher the light position, the larger the cubes will not be . OPERATION INSTRUCTIONS A newly-installed refrigerator may take 12 to 24 hours to begin making ice. • When the ice storage bin is made to the icemaker, set the power switch to I (on ) position, it has not yet been hooked up one light. If the refrigerator is used for more...

Owner's Manual (English)
Page 29
... used drinking water line. WHAT YOU WILL NEED Copper Tubing, 1/4" outer diameter to connect the refrigerator to the hot water line. Power drill. 1/2" or adjustable wrench. Before purchasing, make sure the icemaker power switch is in many water supply kits. Then add 8 feet (2.4 m). Be sure both ends of expensive water damage. Straight- CONNECTING THE WATERLINE NOTE: Water line installation is needed when the Automatic Ice Maker and/or Water Dispenser features are available on your local plumbing codes. Follow these instructions carefully...
... used drinking water line. WHAT YOU WILL NEED Copper Tubing, 1/4" outer diameter to connect the refrigerator to the hot water line. Power drill. 1/2" or adjustable wrench. Before purchasing, make sure the icemaker power switch is in many water supply kits. Then add 8 feet (2.4 m). Be sure both ends of expensive water damage. Straight- CONNECTING THE WATERLINE NOTE: Water line installation is needed when the Automatic Ice Maker and/or Water Dispenser features are available on your local plumbing codes. Follow these instructions carefully...
Owner's Manual (English)
Page 30
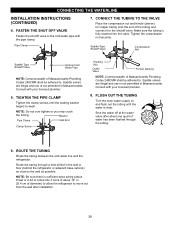
.... 8. NOTE: Do not over tighten or you may crush the tubing. Saddle valves are illegal and use is not permitted in Massachusetts. Tighten the compression nut securely. Consult with the pipe clamp. CONNECTING THE WATERLINE INSTALLATION INSTRUCTIONS (CONTINUED) 4. ROUTE THE TUBING Route the tubing between the cold water line and the refrigerator. TIGHTEN THE PIPE CLAMP Tighten the clamp screws until the...
.... 8. NOTE: Do not over tighten or you may crush the tubing. Saddle valves are illegal and use is not permitted in Massachusetts. Tighten the compression nut securely. Consult with the pipe clamp. CONNECTING THE WATERLINE INSTALLATION INSTRUCTIONS (CONTINUED) 4. ROUTE THE TUBING Route the tubing between the cold water line and the refrigerator. TIGHTEN THE PIPE CLAMP Tighten the clamp screws until the...

Owner's Manual (English)
Page 31
... below. Reattach the compressor compartment access cover. 11.PLUG IN THE REFRIGERATOR Arrange the coil of tubing so that it reaches its operating temperature of the refrigerator's water valve. Place the compression nut and ferrule (sleeve) onto the end of the tubing into the connection as far as possible. While holding the tubing, tighten the fitting. 12.START THE ICEMAKER Set the icemaker power switch to the wall...
... below. Reattach the compressor compartment access cover. 11.PLUG IN THE REFRIGERATOR Arrange the coil of tubing so that it reaches its operating temperature of the refrigerator's water valve. Place the compression nut and ferrule (sleeve) onto the end of the tubing into the connection as far as possible. While holding the tubing, tighten the fitting. 12.START THE ICEMAKER Set the icemaker power switch to the wall...

Owner's Manual (English)
Page 32
... Changing the Light Bulb (s) section). 32 The refrigerator control is loose in the defrost cycle. Light bulb is set to the refrigerant flowing in refrigerator and reset the refrigerator control. Then... Gently remove the bulb and reinsert. Most of the inside walls may hear water running into a live outlet with proper voltage. Refer to the replacement. Turn the refrigerator control to run longer than they actually are normal. TROUBLESHOOTING GUIDE UNDERSTANDING SOUNDS YOU MAY HEAR Your new refrigerator...
... Changing the Light Bulb (s) section). 32 The refrigerator control is loose in the defrost cycle. Light bulb is set to the refrigerant flowing in refrigerator and reset the refrigerator control. Then... Gently remove the bulb and reinsert. Most of the inside walls may hear water running into a live outlet with proper voltage. Refer to the replacement. Turn the refrigerator control to run longer than they actually are normal. TROUBLESHOOTING GUIDE UNDERSTANDING SOUNDS YOU MAY HEAR Your new refrigerator...
Owner's Manual (English)
Page 33
...... The ice bin, crisper cover, pans, shelves, door bins or baskets are blocking the door open. Level the refrigerator. FROST OR ICE CRYSTALS ON FROZEN FOOD Check if... TROUBLESHOOTING GUIDE COMPRESSOR MOTOR SEEMS TO RUN TOO MUCH Check if... Modern refrigerators with more storage space require more often. The refrigerator control was not set correctly The refrigerator will not close completely below. This prevents air transfer and makes the motor work harder. The doors were removed during product installation and...
...... The ice bin, crisper cover, pans, shelves, door bins or baskets are blocking the door open. Level the refrigerator. FROST OR ICE CRYSTALS ON FROZEN FOOD Check if... TROUBLESHOOTING GUIDE COMPRESSOR MOTOR SEEMS TO RUN TOO MUCH Check if... Modern refrigerators with more storage space require more often. The refrigerator control was not set correctly The refrigerator will not close completely below. This prevents air transfer and makes the motor work harder. The doors were removed during product installation and...

Owner's Manual (English)
Page 34
... is cold enough to evaporate. Refer to clear the valve. The freezer temperature is more easily. 34 See the Setting the Controls Section. Check to drip into the defrost pan. CUBES PRODUCED BY ICEMAKER ARE TOO SMALL Check if... Clean gaskets and the surfaces that the water in either compartment. The icemaker was recently installed. THERE IS WATER IN THE DEFROST DRAIN PAN Check if... THE REFRIGERATOR SEEMS TO MAKE TOO MUCH NOISE...
... is cold enough to evaporate. Refer to clear the valve. The freezer temperature is more easily. 34 See the Setting the Controls Section. Check to drip into the defrost pan. CUBES PRODUCED BY ICEMAKER ARE TOO SMALL Check if... Clean gaskets and the surfaces that the water in either compartment. The icemaker was recently installed. THERE IS WATER IN THE DEFROST DRAIN PAN Check if... THE REFRIGERATOR SEEMS TO MAKE TOO MUCH NOISE...
Owner's Manual (Español)
Page 2
..., install, instruct, or replace house fuses or correct house wiring or plumbing, or correction of purchase is used in material or workmanship under normal use . 4. Territories. Display, discount, or refurbished units purchased with scratches, dents, or defects. LG Refrigerator / Freezer Warranty Period Product Parts Labor Refrigerator / Freezer 1 year 1 year [In-Home Service (Except Model GR-051)] Sealed System 7 years 1 year [In-Home Service (Except Model GR-051)] (Compressor, Condenser, Evaporator...
..., install, instruct, or replace house fuses or correct house wiring or plumbing, or correction of purchase is used in material or workmanship under normal use . 4. Territories. Display, discount, or refurbished units purchased with scratches, dents, or defects. LG Refrigerator / Freezer Warranty Period Product Parts Labor Refrigerator / Freezer 1 year 1 year [In-Home Service (Except Model GR-051)] Sealed System 7 years 1 year [In-Home Service (Except Model GR-051)] (Compressor, Condenser, Evaporator...

Specification
Page 2
...Wire Shelf Freezer Door Bin 1 Fixed Express Freezing CustomCube™ Ice Maker Optional Ice Cube Trays Ice Bin Freezer Light 40W M AT E R I A L S / F I N I S H E S / S T Y L E Foam Door Insulation Contour Doors Available Colors White (WW) Handles White Plastic Reversible Doors Toe Grille Surface Coated Metal Back Flush & Metal cover over mechanical parts DIMENSIONS/CLEARANCES/WEIGHT Depth (Including Handles) 33 3/8" Depth (Without Handles) 31 3/4" Depth (Without Door) 28 1/4" Depth (Total w/Door open) 59" Height (To Top of Case) 67 1/4" Height (To Top of LG...
...Wire Shelf Freezer Door Bin 1 Fixed Express Freezing CustomCube™ Ice Maker Optional Ice Cube Trays Ice Bin Freezer Light 40W M AT E R I A L S / F I N I S H E S / S T Y L E Foam Door Insulation Contour Doors Available Colors White (WW) Handles White Plastic Reversible Doors Toe Grille Surface Coated Metal Back Flush & Metal cover over mechanical parts DIMENSIONS/CLEARANCES/WEIGHT Depth (Including Handles) 33 3/8" Depth (Without Handles) 31 3/4" Depth (Without Door) 28 1/4" Depth (Total w/Door open) 59" Height (To Top of Case) 67 1/4" Height (To Top of LG...


