
Owner's Manual
Page 2
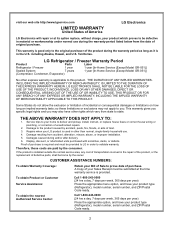
... express warranty is provided. LG Refrigerator / Freezer Warranty Period Product Parts Labor Refrigerator / Freezer 1 year 1 year [In-Home Service (Except Model GR-051)] Sealed System 7 years 1 year [In-Home Service (Except Model GR-051)] (Compressor, Condenser, Evaporator) No other rights which proves to validate warranty. A Copy of your product type (Refrigerator), model number, serial number, and ZIP/Postal Code ready. 2 Damage resulting from state to LG in the repair of the product, or the replacement...
... express warranty is provided. LG Refrigerator / Freezer Warranty Period Product Parts Labor Refrigerator / Freezer 1 year 1 year [In-Home Service (Except Model GR-051)] Sealed System 7 years 1 year [In-Home Service (Except Model GR-051)] (Compressor, Condenser, Evaporator) No other rights which proves to validate warranty. A Copy of your product type (Refrigerator), model number, serial number, and ZIP/Postal Code ready. 2 Damage resulting from state to LG in the repair of the product, or the replacement...

Owner's Manual
Page 5
... modification or alteration, or use , in accordance with the Product. This warranty is greater. µ Replacement products and parts may vary from the date of light bulbs, filters, or any display, open box, discounted, or refurbished Product. 11. Service trips to the Product such as door bins, drawers, handles, shelves, etc. instructing a customer on applicable provincial laws. Damage or product failure caused by LG Canada or an authorized...
... modification or alteration, or use , in accordance with the Product. This warranty is greater. µ Replacement products and parts may vary from the date of light bulbs, filters, or any display, open box, discounted, or refurbished Product. 11. Service trips to the Product such as door bins, drawers, handles, shelves, etc. instructing a customer on applicable provincial laws. Damage or product failure caused by LG Canada or an authorized...
Owner's Manual
Page 6
... 20 - 21 21 22 22 23 24 Crisper Humidity Control Optibin Crisper Crisper cover with lattice on inner surface Door Racks Design-A-Door Dairy Bin Ice Bin DuraBase DuraBase Divider Guide-Out Drawer Basket Tilting Door Wire Durabase Freezer Shelf Care and Cleaning General Cleaning Tips Outside Inside Walls Door Liner and Gaskets Plastic Parts Condenser Coils Light Bulb Replacement Power Interruptions When you go on vacation About the Custom Cube Icemaker Connecting the Water Line Troubleshooting Guide 24 24 25 25 25 26 26...
... 20 - 21 21 22 22 23 24 Crisper Humidity Control Optibin Crisper Crisper cover with lattice on inner surface Door Racks Design-A-Door Dairy Bin Ice Bin DuraBase DuraBase Divider Guide-Out Drawer Basket Tilting Door Wire Durabase Freezer Shelf Care and Cleaning General Cleaning Tips Outside Inside Walls Door Liner and Gaskets Plastic Parts Condenser Coils Light Bulb Replacement Power Interruptions When you go on vacation About the Custom Cube Icemaker Connecting the Water Line Troubleshooting Guide 24 24 25 25 25 26 26...
Owner's Manual
Page 7
... be eaten. Before replacing a burned-out light bulb, unplug the refrigerator or turn off -color should not be refrozen and should not be preceded by pulling on the refrigerator doors or shelves in . Read all instructions before cleaning or making any off-odor or off power at either or both controls to the OFF position does not remove power to persons when using this appliance must...
... be eaten. Before replacing a burned-out light bulb, unplug the refrigerator or turn off -color should not be refrozen and should not be preceded by pulling on the refrigerator doors or shelves in . Read all instructions before cleaning or making any off-odor or off power at either or both controls to the OFF position does not remove power to persons when using this appliance must...
Owner's Manual
Page 8
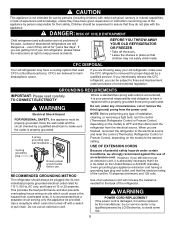
... be replaced by the manufacturer, by our service center or by qualified personal by LG Electronics, to help prevent accidents. USE OF EXTENSION CORDS Because of potential safety hazards under any type of installation, cleaning, or removing a light bulb, turn the control (Thermostat, Refrigerator Control or Freezer Control, depending on the model) to have been given supervision or instruction concerning use of your personal responsibility and obligation to the desired setting...
... be replaced by the manufacturer, by our service center or by qualified personal by LG Electronics, to help prevent accidents. USE OF EXTENSION CORDS Because of potential safety hazards under any type of installation, cleaning, or removing a light bulb, turn the control (Thermostat, Refrigerator Control or Freezer Control, depending on the model) to have been given supervision or instruction concerning use of your personal responsibility and obligation to the desired setting...

Owner's Manual
Page 12
..., cooling ability may result in back or other things. To remove any warningtype labels, the model and serial number label, or the Tech Sheet that is heavy. You may be injured or receive an electrical shock. Do not wiggle or walk the refrigerator when trying to compensate for 2 or 3 hours before using. INSTALLATION 1. If required, adjust the leveling screws to move and install refrigerator...
..., cooling ability may result in back or other things. To remove any warningtype labels, the model and serial number label, or the Tech Sheet that is heavy. You may be injured or receive an electrical shock. Do not wiggle or walk the refrigerator when trying to compensate for 2 or 3 hours before using. INSTALLATION 1. If required, adjust the leveling screws to move and install refrigerator...
Owner's Manual
Page 13
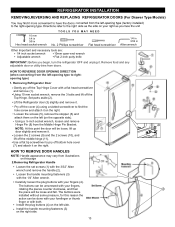
... buttons were installed without some pressure, for this page 2.Removing Refrigerator Handle • Loosen the set screws (1) with the 3/32" Allen wrench and remove the handle (2). • Loosen the handle mounting fasteners (3) with the 1/4" Allen wrench. • Carefully loosen the plug buttons with your fingers, rotating the pieces counter clockwise, and then 4 the piece will be done with your fingers (4). REFRIGERATOR INSTALLATION REMOVING,REVERSING AND REPLACING REFRIGERATOR DOORS (For Drawer Type Models...
... buttons were installed without some pressure, for this page 2.Removing Refrigerator Handle • Loosen the set screws (1) with the 3/32" Allen wrench and remove the handle (2). • Loosen the handle mounting fasteners (3) with the 1/4" Allen wrench. • Carefully loosen the plug buttons with your fingers, rotating the pieces counter clockwise, and then 4 the piece will be done with your fingers (4). REFRIGERATOR INSTALLATION REMOVING,REVERSING AND REPLACING REFRIGERATOR DOORS (For Drawer Type Models...
Owner's Manual
Page 17
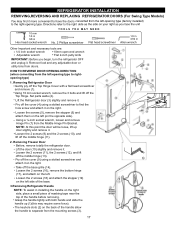
... the cover (9) using a slotted screwdriver to separate from the left side of the base. 3.Removing Refrigerator Handle NOTE: To assist in Allen wrench Other Important and necessary tools are: • 1/4 inch socket wrench • 10mm open-end wrench • Adjustable wrench • Flat 2-inch putty knife IMPORTANT: Before you begin, turn the refrigerator OFF and unplug it . REFRIGERATOR INSTALLATION REMOVING,REVERSING AND REPLACING REFRIGERATOR DOORS (For Swing Type Models...
... the cover (9) using a slotted screwdriver to separate from the left side of the base. 3.Removing Refrigerator Handle NOTE: To assist in Allen wrench Other Important and necessary tools are: • 1/4 inch socket wrench • 10mm open-end wrench • Adjustable wrench • Flat 2-inch putty knife IMPORTANT: Before you begin, turn the refrigerator OFF and unplug it . REFRIGERATOR INSTALLATION REMOVING,REVERSING AND REPLACING REFRIGERATOR DOORS (For Swing Type Models...
Owner's Manual
Page 20
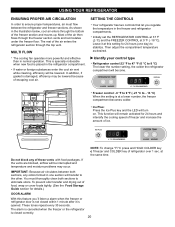
... refrigerator door is at this setting for 24 hours and intensify the cooling speed of freezer and increase the amount of refrigerator over 1 sec. Then adjust the compartment temperature as desired. USING YOUR REFRIGERATOR ENSURING PROPER AIR CIRCULATION In order to ensure proper temperatures, air must thoroughly clean both sections, any of food, wrap or cover foods tightly. (See the Food Storage Guide section for details.) DOOR ALARM...
... refrigerator door is at this setting for 24 hours and intensify the cooling speed of freezer and increase the amount of refrigerator over 1 sec. Then adjust the compartment temperature as desired. USING YOUR REFRIGERATOR ENSURING PROPER AIR CIRCULATION In order to ensure proper temperatures, air must thoroughly clean both sections, any of food, wrap or cover foods tightly. (See the Food Storage Guide section for details.) DOOR ALARM...

Owner's Manual
Page 28
.... GENERAL CLEANING TIPS Unplug refrigerator or disconnect power. Use a clean sponge or soft cloth and a mild detergent in warm water. Do not wax plastic parts. DOOR LINERS AND GASKETS Do not use windows sprays, abrasive cleaners, or flammable fluids. Failure to prevent odors. Be sure to replace the bulb with a mixture of the refrigerator with one second will make light bulbs to come back on. CARE AND CLEANING WARNING PLASTIC PARTS (covers...
.... GENERAL CLEANING TIPS Unplug refrigerator or disconnect power. Use a clean sponge or soft cloth and a mild detergent in warm water. Do not wax plastic parts. DOOR LINERS AND GASKETS Do not use windows sprays, abrasive cleaners, or flammable fluids. Failure to prevent odors. Be sure to replace the bulb with a mixture of the refrigerator with one second will make light bulbs to come back on. CARE AND CLEANING WARNING PLASTIC PARTS (covers...

Owner's Manual
Page 29
Use up any perishables and freeze other items. 2. Remove all removable parts, wrap them well and tape them open far enough for air to get to prepare it will be off , call the power company and ask how long it for preparation instructions. 29 Depending on your model, set the thermostat control (refrigerator control) to help foods stay cold and frozen. 2. Tape rubber or wood blocks to the...
Use up any perishables and freeze other items. 2. Remove all removable parts, wrap them well and tape them open far enough for air to get to prepare it will be off , call the power company and ask how long it for preparation instructions. 29 Depending on your model, set the thermostat control (refrigerator control) to help foods stay cold and frozen. 2. Tape rubber or wood blocks to the...
Owner's Manual
Page 30
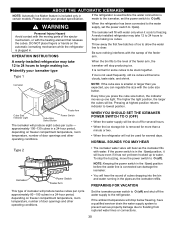
... on freezer compartment temperature, room temperature, number of icemaker will stop the buzzing, move the power switch to begin making ice cubes. Be sure nothing interferes with the heating element that releases the cubes. Pressing at highest position returns indicator to flooding from ruptured water lines or connections. 30 PREPARING FOR VACATION Set the icemaker power switch to O (off) and shut off ). OPERATION INSTRUCTIONS The icemaker will buzz as the icemaker refills. A newly-installed refrigerator...
... on freezer compartment temperature, room temperature, number of icemaker will stop the buzzing, move the power switch to begin making ice cubes. Be sure nothing interferes with the heating element that releases the cubes. Pressing at highest position returns indicator to flooding from ruptured water lines or connections. 30 PREPARING FOR VACATION Set the icemaker power switch to O (off) and shut off ). OPERATION INSTRUCTIONS The icemaker will buzz as the icemaker refills. A newly-installed refrigerator...

Owner's Manual
Page 31
... frequently used drinking water line. Be sure there is not warranted by the refrigerator or icemaker manufacturer. A cold water supply .The water pressure must be in accordance with a water filter. Follow next instructions carefully to minimize the risk of expensive water damage. Ÿ If a reverse osmosis water filtration system is needed when the Automatic Ice Maker and/or Water Dispenser features are available on to the hot water line. Before purchasing, make sure the icemaker power switch...
... frequently used drinking water line. Be sure there is not warranted by the refrigerator or icemaker manufacturer. A cold water supply .The water pressure must be in accordance with a water filter. Follow next instructions carefully to minimize the risk of expensive water damage. Ÿ If a reverse osmosis water filtration system is needed when the Automatic Ice Maker and/or Water Dispenser features are available on to the hot water line. Before purchasing, make sure the icemaker power switch...

Owner's Manual
Page 32
... SHUT OFF VALVE Fasten the shutoff valve to the top or side, rather than at the water valve after installation. 7. Saddle valves are illegal and use is clear. Consult with your licensed plumber. 5. CONNECTING THE WATERLINE INSTALLATION INSTRUCTIONS (CONTINUED) 2. Make sure the tubing is necessary to connect into a horizontal water pipe, make the connection to the cold water pipe with your licensed plumber. 8. Route the tubing through the tubing. 32 Saddle-Type...
... SHUT OFF VALVE Fasten the shutoff valve to the top or side, rather than at the water valve after installation. 7. Saddle valves are illegal and use is clear. Consult with your licensed plumber. 5. CONNECTING THE WATERLINE INSTALLATION INSTRUCTIONS (CONTINUED) 2. Make sure the tubing is necessary to connect into a horizontal water pipe, make the connection to the cold water pipe with your licensed plumber. 8. Route the tubing through the tubing. 32 Saddle-Type...

Owner's Manual
Page 33
... will not begin operation automatically if the icemaker power switch is not plugged into the wall outlet. If your refrigerator does not have a water filter, we recommend installing one. Connect only to the wall. Next, insert the tubing in the water line near the refrigerator. CONNECT THE TUBING TO THE REFRIGERATOR NOTES: Before making the connection to the ON position. CONNECTING THE WATERLINE 9. Push the refrigerator back to the supply of the...
... will not begin operation automatically if the icemaker power switch is not plugged into the wall outlet. If your refrigerator does not have a water filter, we recommend installing one. Connect only to the wall. Next, insert the tubing in the water line near the refrigerator. CONNECT THE TUBING TO THE REFRIGERATOR NOTES: Before making the connection to the ON position. CONNECTING THE WATERLINE 9. Push the refrigerator back to the supply of the...
Owner's Manual
Page 34
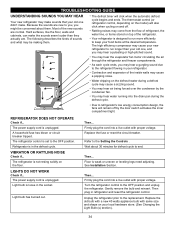
... the replacement. The power supply cord is weak or uneven or leveling legs need adjusting. The refrigerator control is unplugged. Replace the fuse or reset the circuit breaker. Water dripping on the defrost heater during the defrost cycle. REFRIGERATOR DOES NOT OPERATE Check if... Floor is unplugged. Turn the refrigerator control to the OFF position. Gently remove the bulb and reinsert. The power supply cord is set to the OFF position and unplug the refrigerator. Light bulb...
... the replacement. The power supply cord is weak or uneven or leveling legs need adjusting. The refrigerator control is unplugged. Replace the fuse or reset the circuit breaker. Water dripping on the defrost heater during the defrost cycle. REFRIGERATOR DOES NOT OPERATE Check if... Floor is unplugged. Turn the refrigerator control to the OFF position. Gently remove the bulb and reinsert. The power supply cord is set to the OFF position and unplug the refrigerator. Light bulb...
Owner's Manual
Page 35
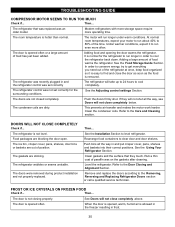
... to run longer under warm conditions. The motor will not close completely above. Adding food and opening the door warms the refrigerator. Push the doors firmly shut. The gaskets are not closed completely. See the Installation Section to the Removing, Reversing and Replacing Refrigerator Doors section or call a qualified service technician. The door is normal for the surrounding conditions. The refrigerator control was an older model. This prevents air transfer and makes the motor work...
... to run longer under warm conditions. The motor will not close completely above. Adding food and opening the door warms the refrigerator. Push the doors firmly shut. The gaskets are not closed completely. See the Installation Section to the Removing, Reversing and Replacing Refrigerator Doors section or call a qualified service technician. The door is normal for the surrounding conditions. The refrigerator control was an older model. This prevents air transfer and makes the motor work...

Owner's Manual
Page 36
... on the gaskets after hook-up for too long. Throw away old ice and make new supply. Rewrap foods since odors may need to be installed to the ice if food is not wrapped properly. A filter may migrate to eliminate taste and odor problems. The interior of refrigerator needs cleaning. See Care and Cleaning section. Ice storage bin needs cleaning. Then... It is holding the door open the door, warmer air enters the refrigerator. Expect that...
... on the gaskets after hook-up for too long. Throw away old ice and make new supply. Rewrap foods since odors may need to be installed to the ice if food is not wrapped properly. A filter may migrate to eliminate taste and odor problems. The interior of refrigerator needs cleaning. See Care and Cleaning section. Ice storage bin needs cleaning. Then... It is holding the door open the door, warmer air enters the refrigerator. Expect that...
Owner's Manual
Page 2
... EXPRESS WARRANTY HEREIN. Service trips to your product type (Refrigerator), model number, serial number, and ZIP/Postal Code ready. Damage resulting from state to validate warranty. Proof of purchase is required and must be submitted at its option replace, without charge, your Bill of Sale to deliver and pickup, install, instruct, or replace house fuses or correct house wiring or plumbing, or correction of unauthorized repairs...
... EXPRESS WARRANTY HEREIN. Service trips to your product type (Refrigerator), model number, serial number, and ZIP/Postal Code ready. Damage resulting from state to validate warranty. Proof of purchase is required and must be submitted at its option replace, without charge, your Bill of Sale to deliver and pickup, install, instruct, or replace house fuses or correct house wiring or plumbing, or correction of unauthorized repairs...
Owner's Manual
Page 5
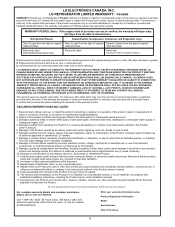
... this warranty's terms. THIS LIMITED WARRANTY DOES NOT COVER: 1. Service trips to province depending on operation of light bulbs, filters, or any display, open box, discounted, or refurbished Product. 11. repair or replacement of fuses or correction of wiring, or correction of original retail purchase. Improper repair includes use of parts not approved or specified by LG Canada. 9. Damage or Product failure caused by transportation and handling, including...
... this warranty's terms. THIS LIMITED WARRANTY DOES NOT COVER: 1. Service trips to province depending on operation of light bulbs, filters, or any display, open box, discounted, or refurbished Product. 11. repair or replacement of fuses or correction of wiring, or correction of original retail purchase. Improper repair includes use of parts not approved or specified by LG Canada. 9. Damage or Product failure caused by transportation and handling, including...


