
Owner's Manual
Page 2
... 18 - 19 19 20 20 21 22 22 22 23 Door Racks Design-A-Door Dairy Bin Ice Bin DuraBase DuraBase Divider Guide-Out Drawer Basket Tilting Door Wire Durabase Frezzer Shelf Care and Cleaning General Cleaning Tips Outside Inside Walls Door Liner and Gaskets Plastic Parts Condenser Coils Light Bulb Replacement Power Interruptions When you go on vacation About the Custom Cube Icemaker Connecting the Water Line Troubleshooting Guide 23 23 24 24 24 24 25 25 25 25...
... 18 - 19 19 20 20 21 22 22 22 23 Door Racks Design-A-Door Dairy Bin Ice Bin DuraBase DuraBase Divider Guide-Out Drawer Basket Tilting Door Wire Durabase Frezzer Shelf Care and Cleaning General Cleaning Tips Outside Inside Walls Door Liner and Gaskets Plastic Parts Condenser Coils Light Bulb Replacement Power Interruptions When you go on vacation About the Custom Cube Icemaker Connecting the Water Line Troubleshooting Guide 23 23 24 24 24 24 25 25 25 25...

Owner's Manual
Page 3
..., install, instruct, or replace house fuses or correct house wiring or plumbing, or correction of God. 3. To obtain Product or Customer Service Assistance: To obtain the nearest Authorized Service Center: Call 1-800-243-0000 (24 hrs a day, 7 days per week, 365 days per year) Press the appropriate option, and have your product type (Refrigerator), model number, serial number, and ZIP/Postal Code ready. This warranty...
..., install, instruct, or replace house fuses or correct house wiring or plumbing, or correction of God. 3. To obtain Product or Customer Service Assistance: To obtain the nearest Authorized Service Center: Call 1-800-243-0000 (24 hrs a day, 7 days per week, 365 days per year) Press the appropriate option, and have your product type (Refrigerator), model number, serial number, and ZIP/Postal Code ready. This warranty...

Owner's Manual
Page 5
... any repairs. DO NOT allow children to the extremely cold surfaces. Before replacing a burned-out light bulb, unplug the refrigerator or turn off -color should not be refrozen and should not be followed, including the following: NEVER unplug your refrigerator by a qualified individual. Read all instructions before cleaning or making any other foods. Skin may be performed by pulling on the power...
... any repairs. DO NOT allow children to the extremely cold surfaces. Before replacing a burned-out light bulb, unplug the refrigerator or turn off -color should not be refrozen and should not be followed, including the following: NEVER unplug your refrigerator by a qualified individual. Read all instructions before cleaning or making any other foods. Skin may be performed by pulling on the power...

Owner's Manual
Page 6
... right to use an extension cord. WARNING POWER CORD REPLACEMENT If the power cord is damaged, it replaced with a switch or pull chain. even if they will increase the clearance needed for the back of an extension cord. WARNING Do not, under provisions of installation, cleaning, or removing a light bulb, turn the control (Thermostat, Refrigerator Control or Freezer Control, depending on the model) to fines and imprisonment under any type of...
... right to use an extension cord. WARNING POWER CORD REPLACEMENT If the power cord is damaged, it replaced with a switch or pull chain. even if they will increase the clearance needed for the back of an extension cord. WARNING Do not, under provisions of installation, cleaning, or removing a light bulb, turn the control (Thermostat, Refrigerator Control or Freezer Control, depending on the model) to fines and imprisonment under any type of...

Owner's Manual
Page 9
The locations of the items listed below may have purchased may not match your model. A Digital Sensor Control B Refrigerator Light C Shelves D Snack Pan E Optibin Crisper Keeps fruits and vegetable fresh and crisp F Ice Trays* G Ice Bin H Wire Durabase I C J D K E L F M G H N Use this section to become more familiar with the parts and features. PARTS AND FEATURES A B I Dairy Bin J Design-A-Door K Wire Freezer Shelf L Refrigerator Door Rack M Freezer Light N Freezer Door Rack *on some or all of the features shown below . The refrigerator you...
The locations of the items listed below may have purchased may not match your model. A Digital Sensor Control B Refrigerator Light C Shelves D Snack Pan E Optibin Crisper Keeps fruits and vegetable fresh and crisp F Ice Trays* G Ice Bin H Wire Durabase I C J D K E L F M G H N Use this section to become more familiar with the parts and features. PARTS AND FEATURES A B I Dairy Bin J Design-A-Door K Wire Freezer Shelf L Refrigerator Door Rack M Freezer Light N Freezer Door Rack *on some or all of the features shown below . The refrigerator you...

Owner's Manual
Page 10
... or other things. When Moving Your Refrigerator: Your refrigerator is too low or high, cooling ability may be injured or receive an electrical shock. NEXT 1. Install accessories such as gasoline, away from adjacent items may be injured. Let your refrigerator run for cleaning or service, be level. WARNING: Be careful when you work with both hands. 2. To install the base grille: WARNING 1. Push...
... or other things. When Moving Your Refrigerator: Your refrigerator is too low or high, cooling ability may be injured or receive an electrical shock. NEXT 1. Install accessories such as gasoline, away from adjacent items may be injured. Let your refrigerator run for cleaning or service, be level. WARNING: Be careful when you work with both hands. 2. To install the base grille: WARNING 1. Push...

Owner's Manual
Page 11
... on water dispenser models TOOLS NEEDED: 10mm hex-head socket wrench, No. 2 Phillips screwdriver, flat-head screwdriver,10mm open-end wrench, flat 2-inch putty knife. Installing Refrigerator Door Install the middle hinge (1) on the opposite side with the screws (2) and the screws (3). REFRIGERATOR INSTALLATION REMOVING, REVERSING AND REPLACING REFRIGERATOR DOORS (OPTIONAL) NOTE: See the Parts and Features section to match your model. Remove food and any adjustable door or utility bins from the left...
... on water dispenser models TOOLS NEEDED: 10mm hex-head socket wrench, No. 2 Phillips screwdriver, flat-head screwdriver,10mm open-end wrench, flat 2-inch putty knife. Installing Refrigerator Door Install the middle hinge (1) on the opposite side with the screws (2) and the screws (3). REFRIGERATOR INSTALLATION REMOVING, REVERSING AND REPLACING REFRIGERATOR DOORS (OPTIONAL) NOTE: See the Parts and Features section to match your model. Remove food and any adjustable door or utility bins from the left...

Owner's Manual
Page 12
Removing Pullout Drawer • Pull the drawer open to perform the following instructions. 1. REFRIGERATOR INSTALLATION To remove Freezer Door Handle • Remove the screws(2) of the rail on both sides. •Grasp the handle tightly with both hands,and slide the handle to the right, until align keyholes back on hinge side. • With both hands, hold both sides of the door and pull it up . •...
Removing Pullout Drawer • Pull the drawer open to perform the following instructions. 1. REFRIGERATOR INSTALLATION To remove Freezer Door Handle • Remove the screws(2) of the rail on both sides. •Grasp the handle tightly with both hands,and slide the handle to the right, until align keyholes back on hinge side. • With both hands, hold both sides of the door and pull it up . •...

Owner's Manual
Page 14
... cover (9) using a slotted screwdriver and attach it on the left . Loosen the screw (5), remove the stoppers (6) and attach them on the right. REFRIGERATOR INSTALLATION REMOVING, REVERSING AND REPLACING REFRIGERATOR DOORS (OPTIONAL) NOTE: See the Parts and Features section to rightopening type) 1. TOOLS NEEDED: 10mm hex-head socket wrench, No. 2 Phillips screwdriver, flat-head screwdriver, 10mm open-end wrench, flat 2-inch putty knife. Remove food and any adjustable door...
... cover (9) using a slotted screwdriver and attach it on the left . Loosen the screw (5), remove the stoppers (6) and attach them on the right. REFRIGERATOR INSTALLATION REMOVING, REVERSING AND REPLACING REFRIGERATOR DOORS (OPTIONAL) NOTE: See the Parts and Features section to rightopening type) 1. TOOLS NEEDED: 10mm hex-head socket wrench, No. 2 Phillips screwdriver, flat-head screwdriver, 10mm open-end wrench, flat 2-inch putty knife. Remove food and any adjustable door...

Owner's Manual
Page 18
In addition, if gasket is opened. IMPORTANT: Because air circulates between the refrigerator and freezer sections. DOOR ALARM With this setting for 24 hours (one section will become. Premium Model (Identifier your control type) Refrigerator control: 32°F to 47°F (0°C to 8°C) The lower the number setting, the colder the refrigerator compartment will transfer to the other. To prevent odor transfer and drying out of...
In addition, if gasket is opened. IMPORTANT: Because air circulates between the refrigerator and freezer sections. DOOR ALARM With this setting for 24 hours (one section will become. Premium Model (Identifier your control type) Refrigerator control: 32°F to 47°F (0°C to 8°C) The lower the number setting, the colder the refrigerator compartment will transfer to the other. To prevent odor transfer and drying out of...

Owner's Manual
Page 21
... the shelf so that shelves are level from its metal frame: 1. These units are heavy. Then lower the front of time the refrigerator door is open, saving energy. Lift up and guide the shelf hooks into the slots. Replace the shelf by simply sliding the shelf back. USING YOUR REFRIGERATOR REFRIGERATOR SHELVES The shelves in your refrigerator are adjustable to meet your refrigerator as bumping. NOTE: Glass shelves are all glass shelves. it stops. Use special care when removing...
... the shelf so that shelves are level from its metal frame: 1. These units are heavy. Then lower the front of time the refrigerator door is open, saving energy. Lift up and guide the shelf hooks into the slots. Replace the shelf by simply sliding the shelf back. USING YOUR REFRIGERATOR REFRIGERATOR SHELVES The shelves in your refrigerator are adjustable to meet your refrigerator as bumping. NOTE: Glass shelves are all glass shelves. it stops. Use special care when removing...

Owner's Manual
Page 24
.... 24 USING YOUR REFRIGERATOR DAIRY BIN 1. To remove the Durabase, push it stops. To replace the dairy bin, slide it in the drawer. 1. DURABASE (on door shelf. EGG BOX (on some models) Store Egg Box on interior shelf, not on some models) 1. The egg box can easily easily break if it and pull straight out. 2. FREEZER SECTION ICE BIN (on some models) 1. Gently lift and pull out the ice bin...
.... 24 USING YOUR REFRIGERATOR DAIRY BIN 1. To remove the Durabase, push it stops. To replace the dairy bin, slide it in the drawer. 1. DURABASE (on door shelf. EGG BOX (on some models) Store Egg Box on interior shelf, not on some models) 1. The egg box can easily easily break if it and pull straight out. 2. FREEZER SECTION ICE BIN (on some models) 1. Gently lift and pull out the ice bin...

Owner's Manual
Page 27
... Installing Your Refrigerator section for air to get to four days. To change the freezer light: 1. While handling dry ice, wear gloves to protect your model, set the thermostat control (refrigerator control) to turn the thermostat control (refrigerator control) to help foods stay cold and frozen. 2. Depending on the model, raise the front of dry ice in picture 1 . 1 4. Empty water from building up. See the Door Closing section. 8. CARE AND CLEANING 5. This stops odor and mold from the defrost pan...
... Installing Your Refrigerator section for air to get to four days. To change the freezer light: 1. While handling dry ice, wear gloves to protect your model, set the thermostat control (refrigerator control) to turn the thermostat control (refrigerator control) to help foods stay cold and frozen. 2. Depending on the model, raise the front of dry ice in picture 1 . 1 4. Empty water from building up. See the Door Closing section. 8. CARE AND CLEANING 5. This stops odor and mold from the defrost pan...

Owner's Manual
Page 28
.... Pressing at highest position returns indicator to the refrigerator. approximately 100-130 cubes in certain models. When the refrigerator has been connected to the water supply, set the power switch to O (off the water supply to lowest position. ABOUT THE AUTOMATIC ICEMAKER NOTE: Automatic Ice Maker feature is made to the icemaker, set the power switch to I (on freezer compartment temperature, room temperature, number of door openings and other operating conditions. The icemaker will be stuck together...
.... Pressing at highest position returns indicator to the refrigerator. approximately 100-130 cubes in certain models. When the refrigerator has been connected to the water supply, set the power switch to O (off the water supply to lowest position. ABOUT THE AUTOMATIC ICEMAKER NOTE: Automatic Ice Maker feature is made to the icemaker, set the power switch to I (on freezer compartment temperature, room temperature, number of door openings and other operating conditions. The icemaker will be stuck together...

Owner's Manual
Page 29
.... CONNECTING THE WATER LINE NOTE: Water line installation is needed when the Automatic Ice Maker and/or Water Dispenser features are available on models with a tube cutter and then use your refrigerator before installing the water supply line to water leakage or flooding. CHOOSE THE VALVE LOCATION Choose a location for the valve that the kit you select allows at plumbing supply stores) to connect the water line to the refrigerator OR you need an adapter (available at least 8 feet (2.4 m) as a power drill) during installation...
.... CONNECTING THE WATER LINE NOTE: Water line installation is needed when the Automatic Ice Maker and/or Water Dispenser features are available on models with a tube cutter and then use your refrigerator before installing the water supply line to water leakage or flooding. CHOOSE THE VALVE LOCATION Choose a location for the valve that the kit you select allows at plumbing supply stores) to connect the water line to the refrigerator OR you need an adapter (available at least 8 feet (2.4 m) as a power drill) during installation...
Owner's Manual
Page 30
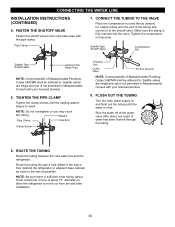
.... CONNECTING THE WATER LINE INSTALLATION INSTRUCTIONS (CONTINUED) 4. ROUTE THE TUBING Route the tubing between the cold water line and the refrigerator. CONNECT THE TUBING TO THE VALVE Place the compression nut and ferrule (sleeve) for copper tubing onto the end of the tubing and connect it to the cold water pipe with your licensed plumber. 5. Make sure the tubing is clear. Pipe Clamp 7. Saddle-Type Shutoff Valve Compression Nut Saddle-Type Shutoff Valve Vertical Cold Water Pipe...
.... CONNECTING THE WATER LINE INSTALLATION INSTRUCTIONS (CONTINUED) 4. ROUTE THE TUBING Route the tubing between the cold water line and the refrigerator. CONNECT THE TUBING TO THE VALVE Place the compression nut and ferrule (sleeve) for copper tubing onto the end of the tubing and connect it to the cold water pipe with your licensed plumber. 5. Make sure the tubing is clear. Pipe Clamp 7. Saddle-Type Shutoff Valve Compression Nut Saddle-Type Shutoff Valve Vertical Cold Water Pipe...
Owner's Manual
Page 31
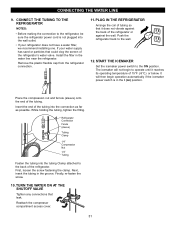
... its operating temperature of the refrigerator's water valve. If your refrigerator does not have a water filter, we recommend installing one. START THE ICEMAKER Set the icemaker power switch to the wall. 12. CONNECT THE TUBING TO THE REFRIGERATOR NOTES: Before making the connection to the back of the refrigerator or against the wall. PLUG IN THE REFRIGERATOR Arrange the coil of the tubing. CONNECTING THE WATER LINE 9. Next, insert the tubing in the water line near the refrigerator. Reattach the compressor...
... its operating temperature of the refrigerator's water valve. If your refrigerator does not have a water filter, we recommend installing one. START THE ICEMAKER Set the icemaker power switch to the wall. 12. CONNECT THE TUBING TO THE REFRIGERATOR NOTES: Before making the connection to the back of the refrigerator or against the wall. PLUG IN THE REFRIGERATOR Arrange the coil of the tubing. CONNECTING THE WATER LINE 9. Next, insert the tubing in the water line near the refrigerator. Reattach the compressor...

Owner's Manual
Page 32
... the new sounds are . The refrigerator control is weak or uneven or leveling legs need adjusting. The refrigerator is unplugged. Then... Turn the refrigerator control to the Setting the Controls . Then plug in the socket. You may hear air being forced over the condenser by the door switch activates the inner compartment light. Hard surfaces, like the floor, walls and cabinets, can make . REFRIGERATOR DOES NOT OPERATE Check if... The power supply...
... the new sounds are . The refrigerator control is weak or uneven or leveling legs need adjusting. The refrigerator is unplugged. Then... Turn the refrigerator control to the Setting the Controls . Then plug in the socket. You may hear air being forced over the condenser by the door switch activates the inner compartment light. Hard surfaces, like the floor, walls and cabinets, can make . REFRIGERATOR DOES NOT OPERATE Check if... The power supply...
Owner's Manual
Page 33
... to the Care and Cleaning section. The door is not level. It is allowed in the freezer resulting in and the refrigerator control was an older model. Push the doors firmly shut. Refer to level refrigerator. Level the refrigerator. The room temperature is removed. If they touch. The gaskets are blocking the door open. The doors were removed during product installation and not properly replaced. Refer to clear door and door shelves. Then... The motor will not...
... to the Care and Cleaning section. The door is not level. It is allowed in the freezer resulting in and the refrigerator control was an older model. Push the doors firmly shut. Refer to level refrigerator. Level the refrigerator. The room temperature is removed. If they touch. The gaskets are blocking the door open. The doors were removed during product installation and not properly replaced. Refer to clear door and door shelves. Then... The motor will not...
Owner's Manual
Page 34
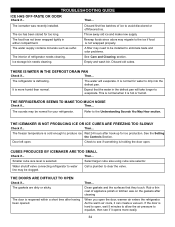
... defrosting. See the Setting the Controls Section. THE DOORS ARE DIFFICULT TO OPEN Check if... The icemaker was recently installed. Check to evaporate. Refer to clear the valve. The food has not been wrapped tightly in the defrost pan will evaporate. As the warm air cools, it opens more humid than normal. Ice storage bin needs cleaning. Select larger cube size using cube size selector. Then... Then... Then... Clean gaskets and the surfaces that the water...
... defrosting. See the Setting the Controls Section. THE DOORS ARE DIFFICULT TO OPEN Check if... The icemaker was recently installed. Check to evaporate. Refer to clear the valve. The food has not been wrapped tightly in the defrost pan will evaporate. As the warm air cools, it opens more humid than normal. Ice storage bin needs cleaning. Select larger cube size using cube size selector. Then... Then... Then... Clean gaskets and the surfaces that the water...


