
Owner's Manual
Page 10
... your refrigerator before putting food in death, explosion or fire. The front should be injured or receive an electrical shock. Wipe with hinge, base grille, stopper etc. Refrigerator shelves are packed together to remove tape or glue. When moving it at a proper distance from... from adjacents items Please keep the refrigerator at a proper distance More than 1"(2.5 cm) to top More than 0.125" (0.3 cm) to hinge side More than the rear to move and install refrigerator. Keep it . Failure to compensate for use sharp instruments, rubbing alcohol, flammable fluids...
... your refrigerator before putting food in death, explosion or fire. The front should be injured or receive an electrical shock. Wipe with hinge, base grille, stopper etc. Refrigerator shelves are packed together to remove tape or glue. When moving it at a proper distance from... from adjacents items Please keep the refrigerator at a proper distance More than 1"(2.5 cm) to top More than 0.125" (0.3 cm) to hinge side More than the rear to move and install refrigerator. Keep it . Failure to compensate for use sharp instruments, rubbing alcohol, flammable fluids...

Owner's Manual
Page 11
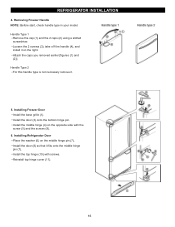
... both hands and pull up (1). Loosen the 2 screws (8) and the 2 screws (9), and lift off the top hinge (2). REFRIGERATOR INSTALLATION REMOVING, REVERSING AND REPLACING REFRIGERATOR DOORS (OPTIONAL) NOTE: See the Parts and Features section to opposite side of the handle... models TOOLS NEEDED: 10mm hex-head socket wrench, No. 2 Phillips screwdriver, flat-head screwdriver,10mm open-end wrench, flat 2-inch putty knife. Reinstall top hinge cover (7). 9 8 10 7 11 IMPORTANT: Before you begin, turn the refrigerator OFF and unplug it on the opposite side with the screws (2) and the...
... both hands and pull up (1). Loosen the 2 screws (8) and the 2 screws (9), and lift off the top hinge (2). REFRIGERATOR INSTALLATION REMOVING, REVERSING AND REPLACING REFRIGERATOR DOORS (OPTIONAL) NOTE: See the Parts and Features section to opposite side of the handle... models TOOLS NEEDED: 10mm hex-head socket wrench, No. 2 Phillips screwdriver, flat-head screwdriver,10mm open-end wrench, flat 2-inch putty knife. Reinstall top hinge cover (7). 9 8 10 7 11 IMPORTANT: Before you begin, turn the refrigerator OFF and unplug it on the opposite side with the screws (2) and the...

Owner's Manual
Page 12
... the rail on both sides. •Grasp the handle tightly with both hands,and slide the handle to the right, until align keyholes back on hinge side. • With both hands, hold both sides of the door and pull it up . • Separate the left and right rail cover • With...
... the rail on both sides. •Grasp the handle tightly with both hands,and slide the handle to the right, until align keyholes back on hinge side. • With both hands, hold both sides of the door and pull it up . • Separate the left and right rail cover • With...

Owner's Manual
Page 14
... on the opposite side). HOW TO REVERSE DOOR OPENING DIRECT ION (when converting from doors. Removing Refrigerator Door Remove the top hinge cover (1). Remove food and any adjustable door or utility bins from the left . Lift the Refrigerator door (3) slightly and remove ... 2 screws (12), and lift off the cover (4) using a slotted screwdriver and attach it on the right. 2. Pry off the middle hinge (13). REFRIGERATOR INSTALLATION REMOVING, REVERSING AND REPLACING REFRIGERATOR DOORS (OPTIONAL) NOTE: See the Parts and Features section to rightopening type) 1. Remove the...
... on the opposite side). HOW TO REVERSE DOOR OPENING DIRECT ION (when converting from doors. Removing Refrigerator Door Remove the top hinge cover (1). Remove food and any adjustable door or utility bins from the left . Lift the Refrigerator door (3) slightly and remove ... 2 screws (12), and lift off the cover (4) using a slotted screwdriver and attach it on the right. 2. Pry off the middle hinge (13). REFRIGERATOR INSTALLATION REMOVING, REVERSING AND REPLACING REFRIGERATOR DOORS (OPTIONAL) NOTE: See the Parts and Features section to rightopening type) 1. Remove the...
Owner's Manual
Page 16
... the right. Handle Type 1 Remove the cap (1) and the 2 caps (2) using a slotted screwdriver. Installing Freezer Door Install the base grille (1). Install the top hinge (10) with the screw (5) and the screws (9). 6. Loosen the 2 screws (3), take of f the handle (4), and install it . 5. Installing Refrigerator Door ... side with screws. Removing Freezer Handle NOTE: Before start, check handle type in your model. Install the middle hinge (4) on the middle hinge pin (7). Attach the caps you removed earlier [figures (1) and (2)]. Install the door (8) so that it fits onto the middle...
... the right. Handle Type 1 Remove the cap (1) and the 2 caps (2) using a slotted screwdriver. Installing Freezer Door Install the base grille (1). Install the top hinge (10) with the screw (5) and the screws (9). 6. Loosen the 2 screws (3), take of f the handle (4), and install it . 5. Installing Refrigerator Door ... side with screws. Removing Freezer Handle NOTE: Before start, check handle type in your model. Install the middle hinge (4) on the middle hinge pin (7). Attach the caps you removed earlier [figures (1) and (2)]. Install the door (8) so that it fits onto the middle...
Owner's Manual
Page 17
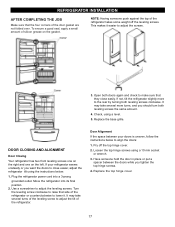
...between your refrigerator seems unsteady or you want the doors to adjust the tilt of the door gasket are not folded over. Loosen the top hinge screws using a level. 5. Have someone push against the top of the refrigerator or counterclockwise to make sure that they close easier, adjust ...small amount of silicon grease on the left. This makes it . If not, tilt the refrigerator slightly more turns, and you tighten the top hinge screws. 4. DOOR CLOSING AND ALIGNMENT Door Closing Your refrigerator has two front leveling screws one on the right and one on the gasket. Plug the...
...between your refrigerator seems unsteady or you want the doors to adjust the tilt of the door gasket are not folded over. Loosen the top hinge screws using a level. 5. Have someone push against the top of the refrigerator or counterclockwise to make sure that they close easier, adjust ...small amount of silicon grease on the left. This makes it . If not, tilt the refrigerator slightly more turns, and you tighten the top hinge screws. 4. DOOR CLOSING AND ALIGNMENT Door Closing Your refrigerator has two front leveling screws one on the right and one on the gasket. Plug the...
